Page 78 of 674
SPEC
2 - 5 Timing chain:
Timing chain type/No. of links 92RH2010-114M/114 ----
Timing chain adjustment method Automatic ----
Valve, valve seat, valve guide:
Valve clearance (cold) IN 0.10 ~ 0.15 mm
(0.0039 ~ 0.0059 in)----
EX 0.17 ~ 0.22 mm
(0.0067 ~ 0.0087 in)----
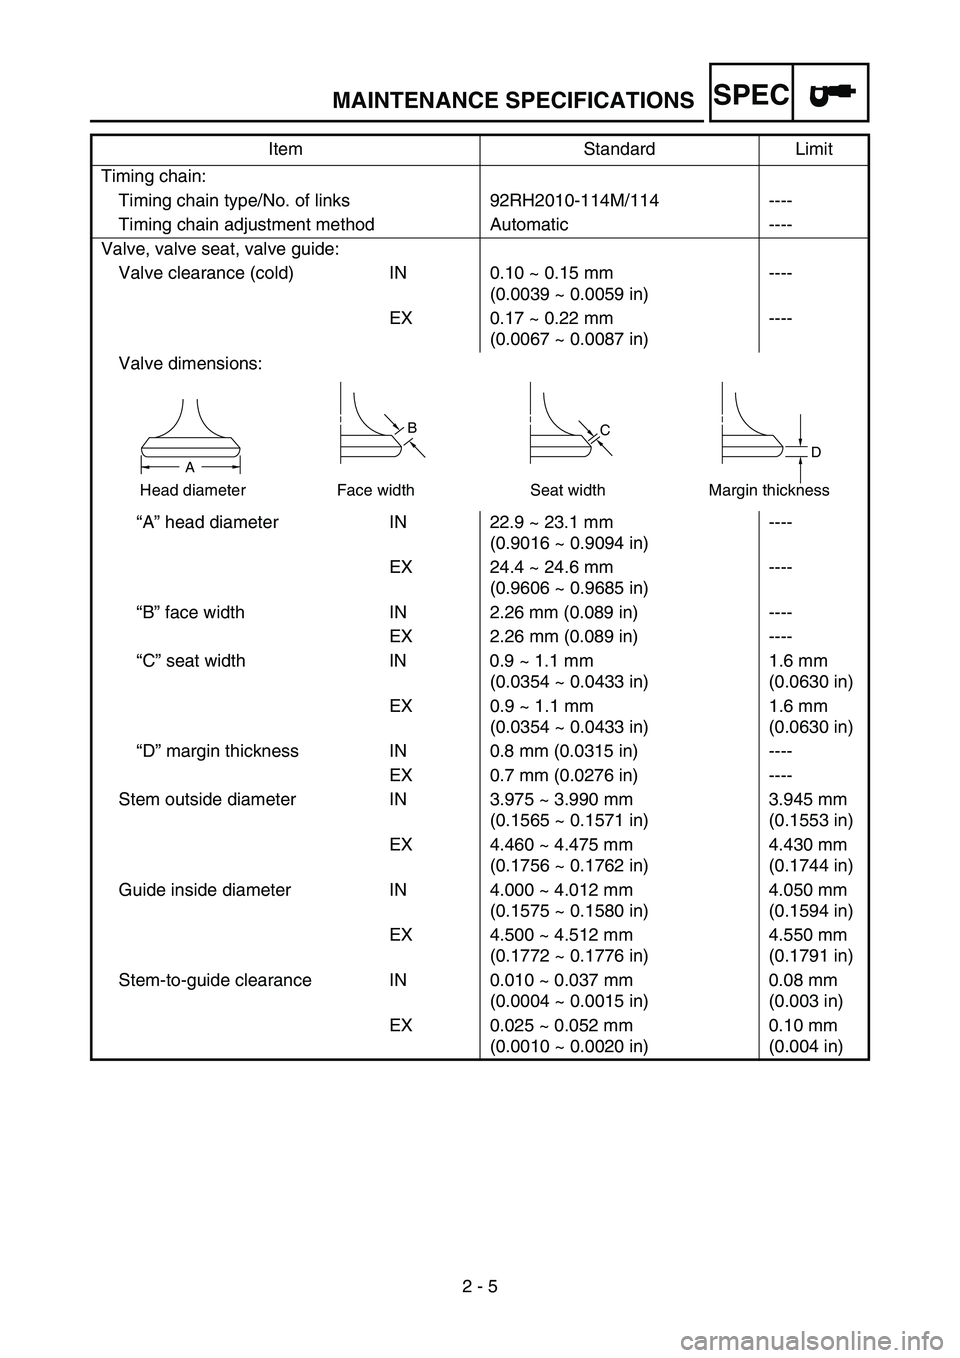
Valve dimensions:
“A” head diameter IN 22.9 ~ 23.1 mm
(0.9016 ~ 0.9094 in)----
EX 24.4 ~ 24.6 mm
(0.9606 ~ 0.9685 in)----
“B” face width IN 2.26 mm (0.089 in) ----
EX 2.26 mm (0.089 in) ----
“C” seat width IN 0.9 ~ 1.1 mm
(0.0354 ~ 0.0433 in)1.6 mm
(0.0630 in)
EX 0.9 ~ 1.1 mm
(0.0354 ~ 0.0433 in)1.6 mm
(0.0630 in)
“D” margin thickness IN 0.8 mm (0.0315 in) ----
EX 0.7 mm (0.0276 in) ----
Stem outside diameter IN 3.975 ~ 3.990 mm
(0.1565 ~ 0.1571 in)3.945 mm
(0.1553 in)
EX 4.460 ~ 4.475 mm
(0.1756 ~ 0.1762 in)4.430 mm
(0.1744 in)
Guide inside diameter IN 4.000 ~ 4.012 mm
(0.1575 ~ 0.1580 in)4.050 mm
(0.1594 in)
EX 4.500 ~ 4.512 mm
(0.1772 ~ 0.1776 in)4.550 mm
(0.1791 in)
Stem-to-guide clearance IN 0.010 ~ 0.037 mm
(0.0004 ~ 0.0015 in)0.08 mm
(0.003 in)
EX 0.025 ~ 0.052 mm
(0.0010 ~ 0.0020 in)0.10 mm
(0.004 in) Item Standard Limit
BC
DA
Head diameter Face width Seat width Margin thickness
MAINTENANCE SPECIFICATIONS
Page 154 of 674
3 - 1
INSP
ADJ
MAINTENANCE INTERVALS
EC300000
REGULAR INSPECTION AND ADJUSTMENTS
MAINTENANCE INTERVALS
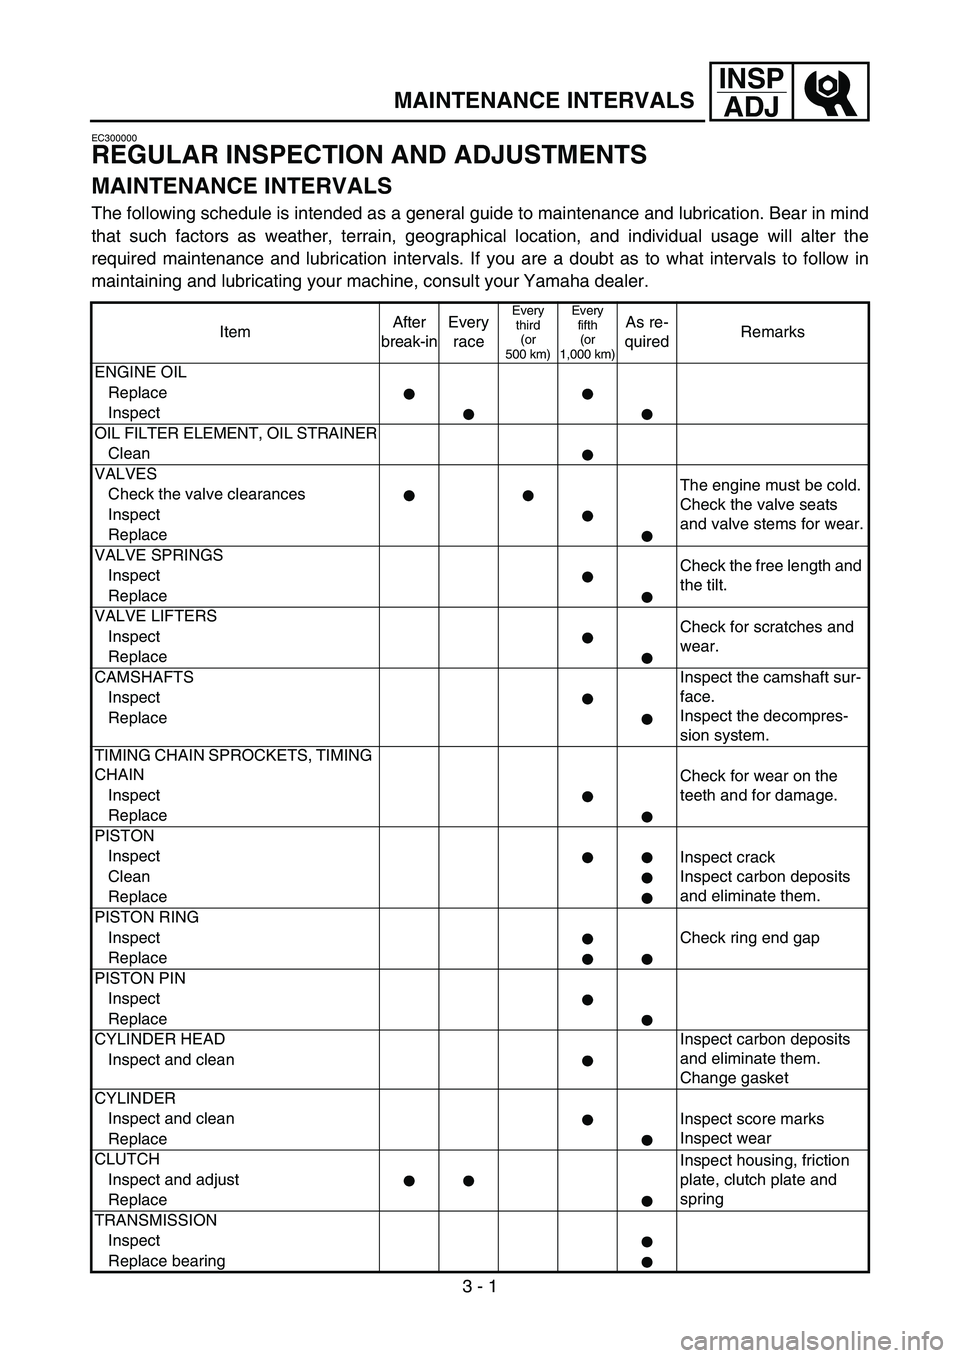
The following schedule is intended as a general guide to maintenance and lubrication. Bear in mind
that such factors as weather, terrain, geographical location, and individual usage will alter the
required maintenance and lubrication intervals. If you are a doubt as to what intervals to follow in
maintaining and lubricating your machine, consult your Yamaha dealer.
ItemAfter
break-inEvery
race
Every
third
(or
500 km)Every
fifth
(or
1,000 km)As re-
quiredRemarks
ENGINE OIL
Replace
Inspect
OIL FILTER ELEMENT, OIL STRAINER
Clean
VALVES
The engine must be cold.
Check the valve seats
and valve stems for wear. Check the valve clearances
Inspect
Replace
VALVE SPRINGS
Check the free length and
the tilt. Inspect
Replace
VALVE LIFTERS
Check for scratches and
wear. Inspect
Replace
CAMSHAFTS Inspect the camshaft sur-
face.
Inspect the decompres-
sion system. Inspect
Replace
TIMING CHAIN SPROCKETS, TIMING
CHAIN
Check for wear on the
teeth and for damage. Inspect
Replace
PISTON
Inspect
Inspect crack
Inspect carbon deposits
and eliminate them. Clean
Replace
PISTON RING
InspectCheck ring end gap
Replace
PISTON PIN
Inspect
Replace
CYLINDER HEAD Inspect carbon deposits
and eliminate them.
Change gasket Inspect and clean
CYLINDER
Inspect and clean
Inspect score marks
Inspect wear
Replace
CLUTCH
Inspect housing, friction
plate, clutch plate and
spring Inspect and adjust
Replace
TRANSMISSION
Inspect
Replace bearing
Page 182 of 674
3 - 11
INSP
ADJHOT STARTER LEVER ADJUSTMENT/
AIR FILTER CLEANING
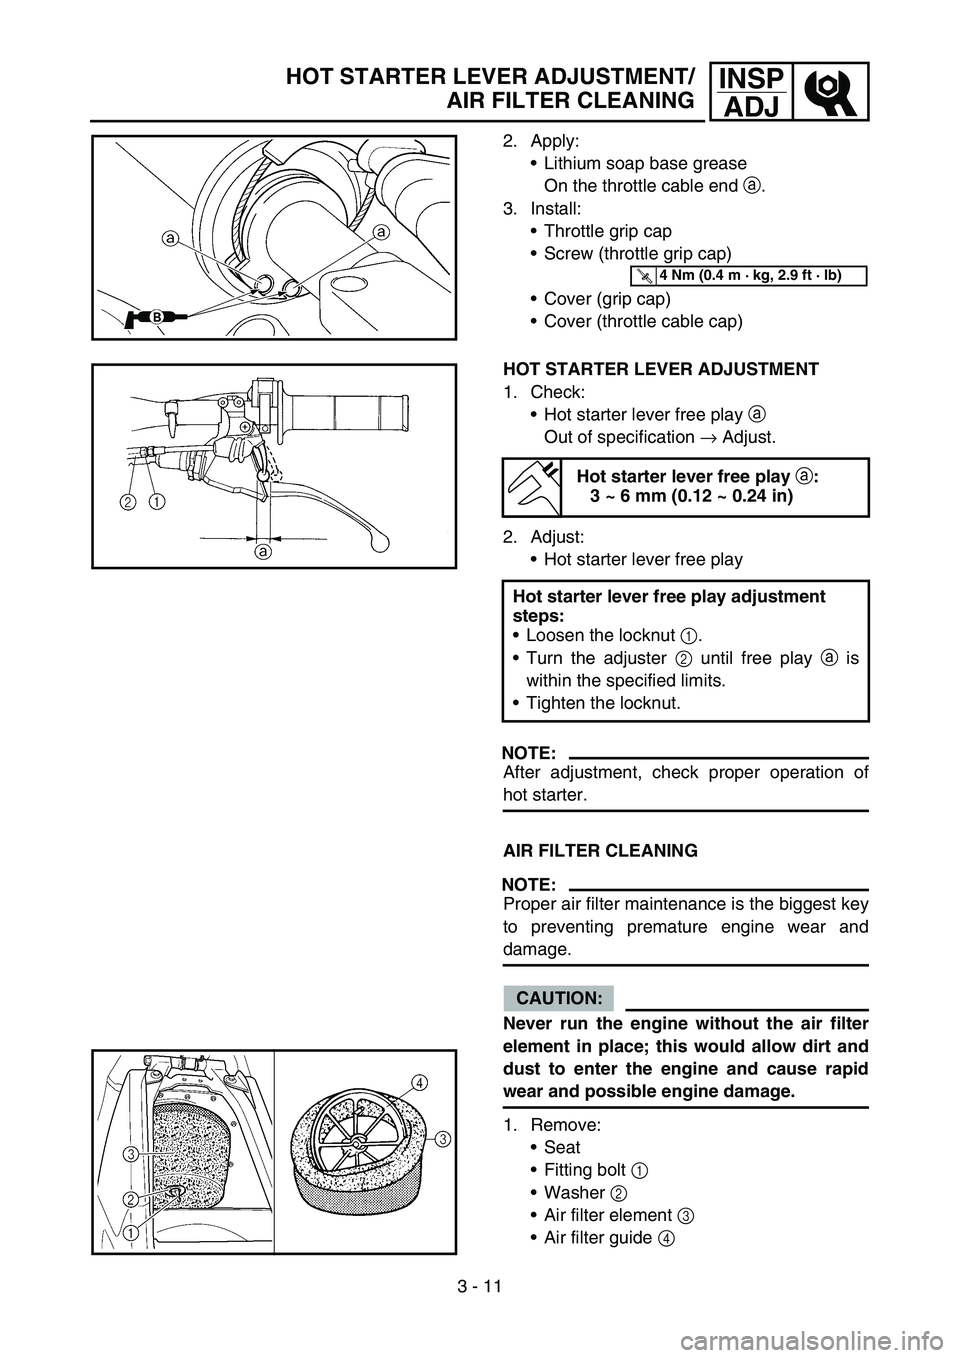
2. Apply:
Lithium soap base grease
On the throttle cable end a.
3. Install:
Throttle grip cap
Screw (throttle grip cap)
Cover (grip cap)
Cover (throttle cable cap)
T R..4 Nm (0.4 m · kg, 2.9 ft · lb)
HOT STARTER LEVER ADJUSTMENT
1. Check:
Hot starter lever free play a
Out of specification → Adjust.
2. Adjust:
Hot starter lever free play
NOTE:
After adjustment, check proper operation of
hot starter.
AIR FILTER CLEANING
NOTE:
Proper air filter maintenance is the biggest key
to preventing premature engine wear and
damage.
CAUTION:
Never run the engine without the air filter
element in place; this would allow dirt and
dust to enter the engine and cause rapid
wear and possible engine damage.
1. Remove:
Seat
Fitting bolt 1
Washer 2
Air filter element 3
Air filter guide 4
Hot starter lever free play
a:
3 ~ 6 mm (0.12 ~ 0.24 in)
Hot starter lever free play adjustment
steps:
Loosen the locknut 1.
Turn the adjuster 2 until free play a is
within the specified limits.
Tighten the locknut.
Page 194 of 674
3 - 17
INSP
ADJ
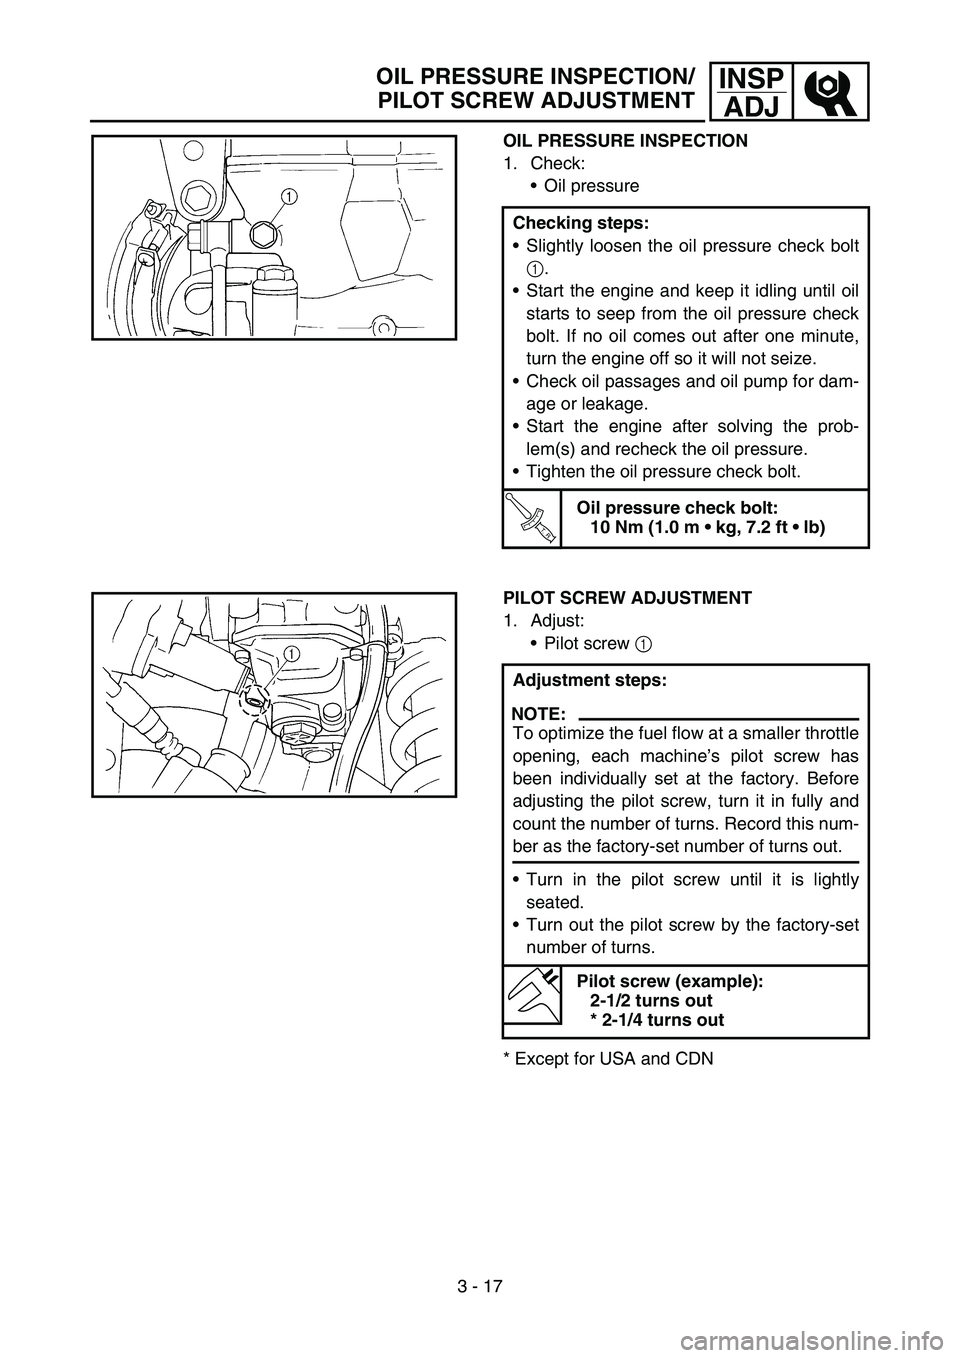
OIL PRESSURE INSPECTION
1. Check:
Oil pressure
Checking steps:
Slightly loosen the oil pressure check bolt
1.
Start the engine and keep it idling until oil
starts to seep from the oil pressure check
bolt. If no oil comes out after one minute,
turn the engine off so it will not seize.
Check oil passages and oil pump for dam-
age or leakage.
Start the engine after solving the prob-
lem(s) and recheck the oil pressure.
Tighten the oil pressure check bolt.
T R..
Oil pressure check bolt:
10 Nm (1.0 m kg, 7.2 ft lb)
PILOT SCREW ADJUSTMENT
1. Adjust:
Pilot screw 1
* Except for USA and CDNAdjustment steps:
NOTE:
To optimize the fuel flow at a smaller throttle
opening, each machine’s pilot screw has
been individually set at the factory. Before
adjusting the pilot screw, turn it in fully and
count the number of turns. Record this num-
ber as the factory-set number of turns out.
Turn in the pilot screw until it is lightly
seated.
Turn out the pilot screw by the factory-set
number of turns.
Pilot screw (example):
2-1/2 turns out
* 2-1/4 turns out
OIL PRESSURE INSPECTION/
PILOT SCREW ADJUSTMENT
Page 196 of 674
3 - 18
INSP
ADJ
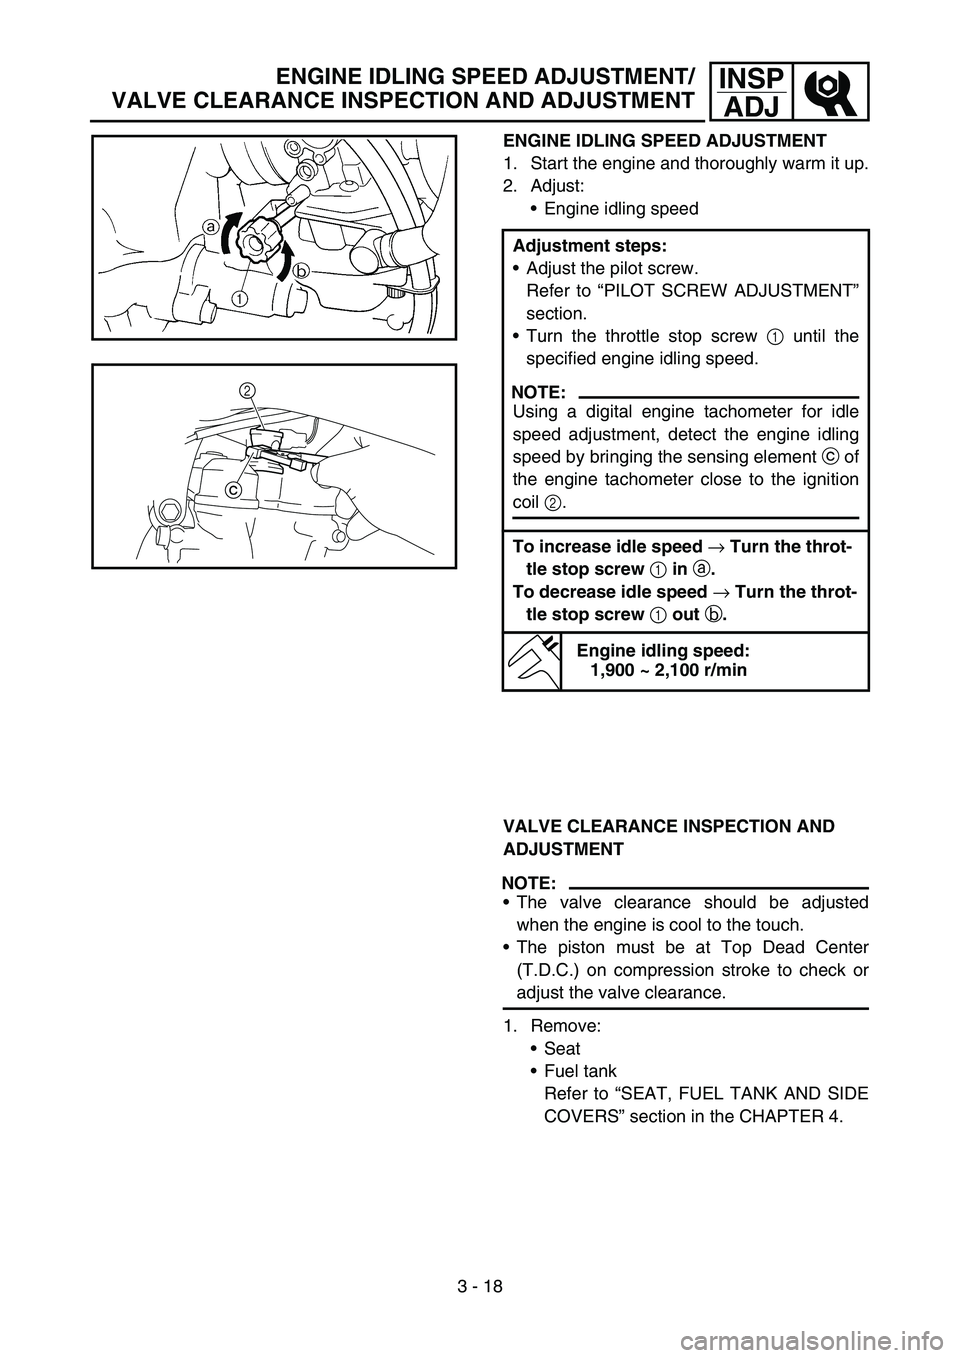
ENGINE IDLING SPEED ADJUSTMENT
1. Start the engine and thoroughly warm it up.
2. Adjust:
Engine idling speed
Adjustment steps:
Adjust the pilot screw.
Refer to “PILOT SCREW ADJUSTMENT”
section.
Turn the throttle stop screw 1 until the
specified engine idling speed.
NOTE:
Using a digital engine tachometer for idle
speed adjustment, detect the engine idling
speed by bringing the sensing element c of
the engine tachometer close to the ignition
coil 2.
To increase idle speed → Turn the throt-
tle stop screw 1 in a.
To decrease idle speed → Turn the throt-
tle stop screw 1 out b.
Engine idling speed:
1,900 ~ 2,100 r/min
c2
VALVE CLEARANCE INSPECTION AND
ADJUSTMENT
NOTE:
The valve clearance should be adjusted
when the engine is cool to the touch.
The piston must be at Top Dead Center
(T.D.C.) on compression stroke to check or
adjust the valve clearance.
1. Remove:
Seat
Fuel tank
Refer to “SEAT, FUEL TANK AND SIDE
COVERS” section in the CHAPTER 4.
ENGINE IDLING SPEED ADJUSTMENT/
VALVE CLEARANCE INSPECTION AND ADJUSTMENT
Page 282 of 674
4 - 14
ENGCARBURETOR
Float height
1. Measure:
Float height a
Out of specification → Adjust.
Float height:
8.0 mm (0.31 in)
Measurement and adjustment steps:
Hold the carburetor in an upside down
position.
NOTE:
Slowly tilt the carburetor in the opposite
direction, then take the measurement
when the needle valve aligns with the float
arm.
If the carburetor is level, the weight of the
float will push in the needle valve, resulting
in an incorrect measurement.
Measure the distance between the mating
surface of the float chamber and top of the
float using a vernier calipers.
NOTE:
The float arm should be resting on the nee-
dle valve, but not compressing the needle
valve.
If the float height is not within specification,
inspect the valve seat and needle valve.
If either is worn, replace them both.
If both are fine, adjust the float height by
bending the float tab b on the float.
Recheck the float height.
EC464600
Float
1. Inspect:
Float 1
Damage → Replace.
Page 592 of 674
5 - 67
CHASREAR SHOCK ABSORBER
2. Install:
•Spring seat 1
NOTE:
Install the spring seat with the projection a
brought into contact with the spring end, as
shown.
3. Tighten:
•Adjuster 1
4. Adjust:
•Spring length (installed)
Refer to “REAR SHOCK ABSORBER
SPRING PRELOAD ADJUSTMENT” sec-
tion in the CHAPTER 3.
5. Tighten:
•Locknut 1
Rear shock absorber
1. Install:
•Dust seal 1
•O-ring 2
•Collar 3
NOTE:
•Apply the molybdenum disulfide grease on
the dust seal lips and collars.
•Apply the lithium soap base grease on the O-
rings.
Page 656 of 674
7 - 16
TUN
EC72C001
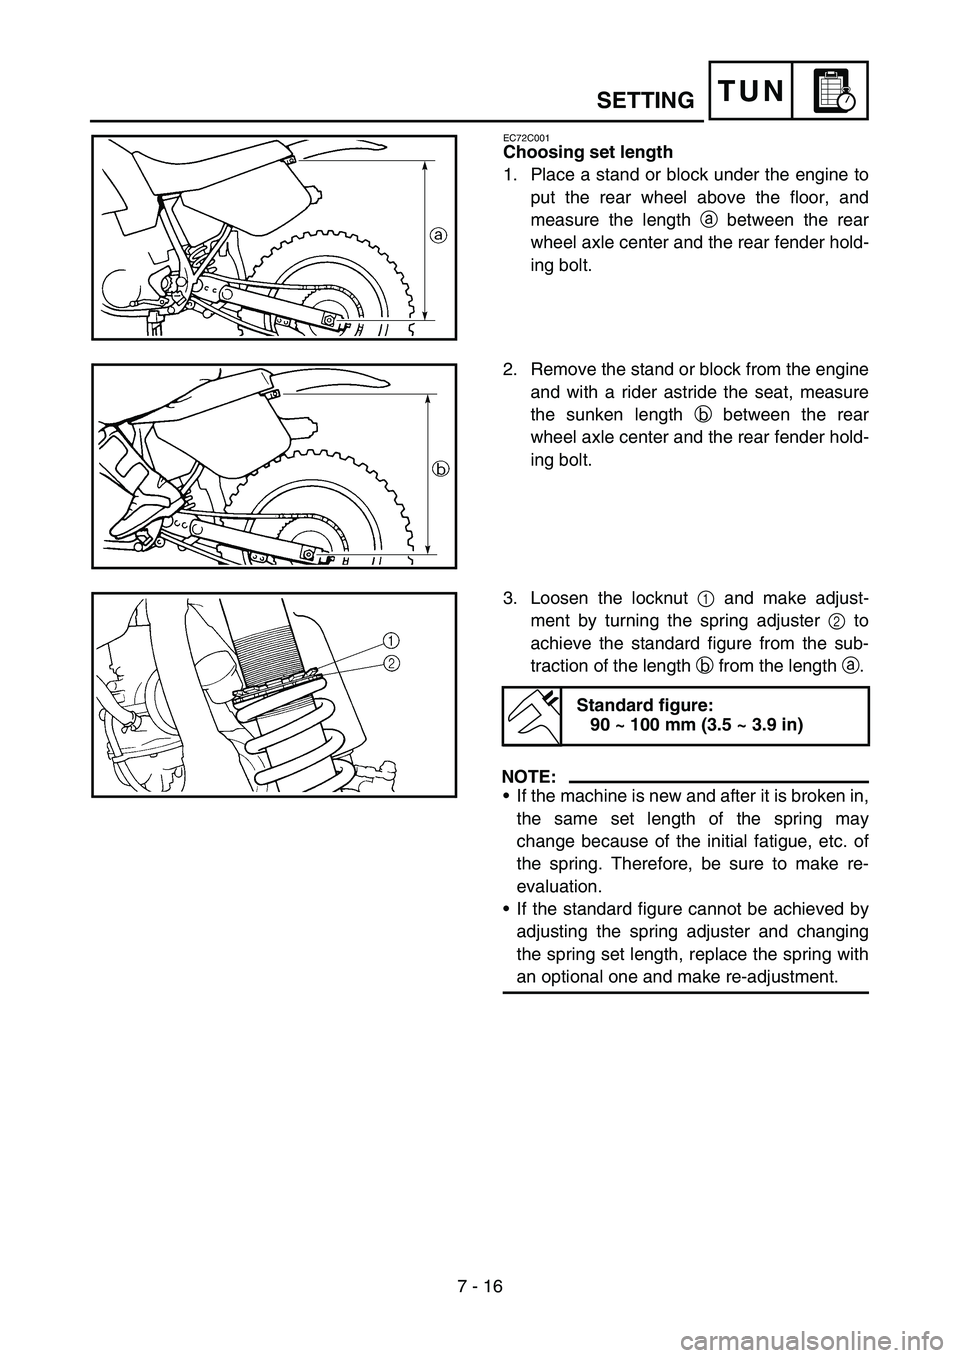
Choosing set length
1. Place a stand or block under the engine to
put the rear wheel above the floor, and
measure the length a between the rear
wheel axle center and the rear fender hold-
ing bolt.
2. Remove the stand or block from the engine
and with a rider astride the seat, measure
the sunken length b between the rear
wheel axle center and the rear fender hold-
ing bolt.
3. Loosen the locknut 1 and make adjust-
ment by turning the spring adjuster 2 to
achieve the standard figure from the sub-
traction of the length b from the length a.
NOTE:
•If the machine is new and after it is broken in,
the same set length of the spring may
change because of the initial fatigue, etc. of
the spring. Therefore, be sure to make re-
evaluation.
•If the standard figure cannot be achieved by
adjusting the spring adjuster and changing
the spring set length, replace the spring with
an optional one and make re-adjustment.
Standard figure:
90 ~ 100 mm (3.5 ~ 3.9 in)
SETTING