Page 55 of 84

PERIODIC MAINTENANCE AND MINOR REPAIR
6-23
6
CAUTION:
ECA10570
Improper drive chain slack will over-
load the engine as well as other vital
parts of the motorcycle and can lead
to chain slippage or breakage. To
prevent this from occurring, keep
the drive chain slack within thespecified limits.
4. Tighten both locknuts, and then
tighten the axle nut and brake
torque rod nut to their specified
torques.
5. Adjust the brake pedal free play.
(See page 6-18.)
WARNING
EWA10660
After adjusting the brake pedal free
play, check the operation of thebrake light.
EAU23022
Cleaning and lubricating the
drive chain The drive chain must be cleaned and
lubricated at the intervals specified in
the periodic maintenance and lubrica-
tion chart, otherwise it will quickly wear
out, especially when riding in dusty or
wet areas. Service the drive chain as
follows.CAUTION:
ECA10581
The drive chain must be lubricated
after washing the motorcycle andriding in the rain.
1. Clean the drive chain with kero-
sene and a small soft brush.CAUTION:
ECA11120
To prevent damaging the O-rings, do
not clean the drive chain with steam
cleaners, high-pressure washers orinappropriate solvents.
2. Wipe the drive chain dry.
3. Thoroughly lubricate the drive
chain with a special O-ring chain
lubricant.
CAUTION:
ECA11110
Do not use engine oil or any other lu-
bricants for the drive chain, as they
may contain substances that coulddamage the O-rings.
Tightening torques:
Axle nut:
91 Nm (9.1 m·kgf, 66 ft·lbf)
Brake torque rod nut:
19 Nm (1.9 m·kgf, 13 ft·lbf)
U3D9E0E0.book Page 23 Saturday, December 25, 2004 11:35 AM
Page 56 of 84

PERIODIC MAINTENANCE AND MINOR REPAIR
6-24
6
EAU23100
Checking and lubricating the
cables The operation of all control cables and
the condition of the cables should be
checked before each ride, and the ca-
bles and cable ends should be lubricat-
ed if necessary. If a cable is damaged
or does not move smoothly, have a
Yamaha dealer check or replace it.
WARNING
EWA10720
Damage to the outer sheath may in-
terfere with proper cable operation
and will cause the inner cable to
rust. Replace a damaged cable as
soon as possible to prevent unsafeconditions.
EAU23111
Checking and lubricating the
throttle grip and cable The operation of the throttle grip should
be checked before each ride. In addi-
tion, the cable should be lubricated at
the intervals specified in the periodic
maintenance chart.
EAU23131
Checking and lubricating the
brake and shift pedals The operation of the brake and shift
pedals should be checked before each
ride, and the pedal pivots should be lu-
bricated if necessary.
Recommended lubricant:
Engine oil
U3D9E0E0.book Page 24 Saturday, December 25, 2004 11:35 AM
Page 57 of 84
PERIODIC MAINTENANCE AND MINOR REPAIR
6-25
6
EAU23140
Checking and lubricating the
brake and clutch levers Brake lever
Clutch lever
The operation of the brake and clutch
levers should be checked before each
ride, and the lever pivots should be lu-
bricated if necessary.
Recommended lubricant:
Lithium-soap-based grease (all-pur-
pose grease)
Recommended lubricant:
Lithium-soap-based grease (all-pur-
pose grease)
U3D9E0E0.book Page 25 Saturday, December 25, 2004 11:35 AM
Page 58 of 84

PERIODIC MAINTENANCE AND MINOR REPAIR
6-26
6
EAU23191
Checking and lubricating the
centerstand The operation of the centerstand
should be checked before each ride,
and the pivots and metal-to-metal con-
tact surfaces should be lubricated if
necessary.
WARNING
EWA11300
If the centerstand does not move up
and down smoothly, have a Yamahadealer check or repair it.
EAUM1650
Lubricating the swingarm
pivots The swingarm pivots must be lubricat-
ed at the intervals specified in the peri-
odic maintenance and lubrication chart.
EAU23271
Checking the front fork The condition and operation of the front
fork must be checked as follows at the
intervals specified in the periodic main-
tenance and lubrication chart.
To check the condition
WARNING
EWA10750
Securely support the vehicle so thatthere is no danger of it falling over.
Check the inner tubes for scratches,
damage and excessive oil leakage.
To check the operation
1. Place the vehicle on a level sur-
face and hold it in an upright posi-
tion.
2. While applying the front brake,
push down hard on the handlebars
several times to check if the front
fork compresses and rebounds
smoothly.
Recommended lubricant:
Lithium-soap-based grease (all-pur-
pose grease)
Recommended lubricant:
Lithium-soap-based grease
U3D9E0E0.book Page 26 Saturday, December 25, 2004 11:35 AM
Page 64 of 84
PERIODIC MAINTENANCE AND MINOR REPAIR
6-32
65. Install the socket (together with the
bulb) by pushing it in.
6. Secure the headlight bulb socket
with the bulb socket holder.
7. Install the headlight unit by install-
ing the screws.
8. Have a Yamaha dealer adjust the
headlight beam if necessary.
EAU37090
Replacing the tail/brake light
bulb 1. Remove the cowling. (See page
6-5.)
2. Remove the tail/brake light lens by
removing the screws.
3. Remove the defective bulb by
pushing it in and turning it counter-
clockwise.4. Insert a new bulb into the socket,
push it in, and then turn it clock-
wise until it stops.
5. Install the lens by installing the
screws.
CAUTION:
ECA10680
Do not overtighten the screws, oth-erwise the lens may break.
6. Install the cowling.
1. Do not touch the glass part of the bulb.
1. Screw
1. Tail/brake light bulb
U3D9E0E0.book Page 32 Saturday, December 25, 2004 11:35 AM
Page 66 of 84
PERIODIC MAINTENANCE AND MINOR REPAIR
6-34
6
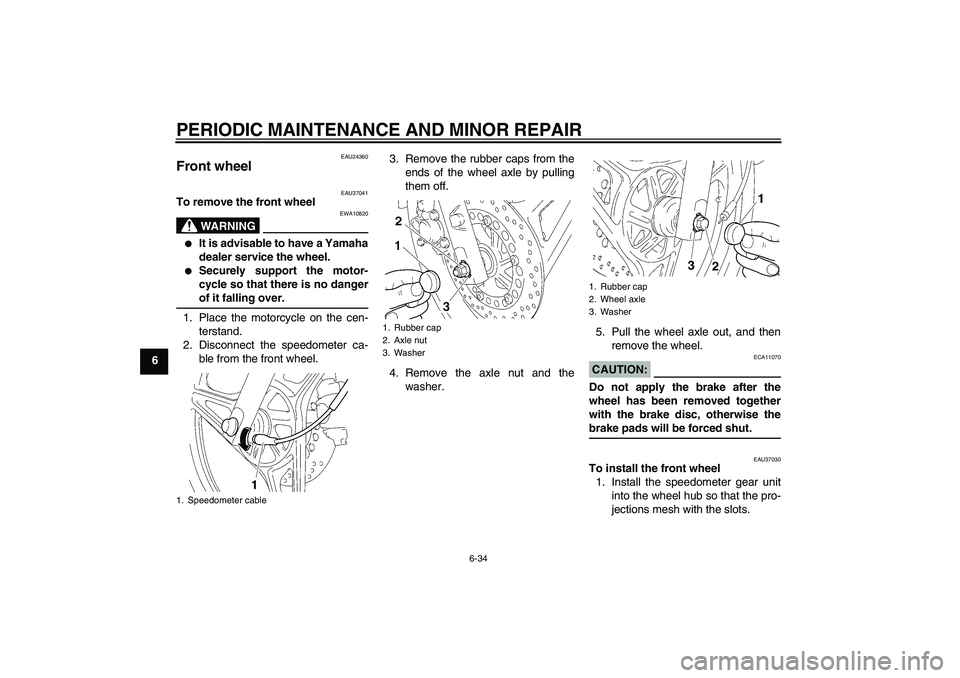
EAU24360
Front wheel
EAU37041
To remove the front wheel
WARNING
EWA10820
�
It is advisable to have a Yamaha
dealer service the wheel.
�
Securely support the motor-
cycle so that there is no dangerof it falling over.
1. Place the motorcycle on the cen-
terstand.
2. Disconnect the speedometer ca-
ble from the front wheel.3. Remove the rubber caps from the
ends of the wheel axle by pulling
them off.
4. Remove the axle nut and the
washer.5. Pull the wheel axle out, and then
remove the wheel.
CAUTION:
ECA11070
Do not apply the brake after the
wheel has been removed together
with the brake disc, otherwise thebrake pads will be forced shut.
EAU37030
To install the front wheel
1. Install the speedometer gear unit
into the wheel hub so that the pro-
jections mesh with the slots.
1. Speedometer cable
1. Rubber cap
2. Axle nut
3. Washer
1. Rubber cap
2. Wheel axle
3. Washer
U3D9E0E0.book Page 34 Saturday, December 25, 2004 11:35 AM
Page 67 of 84
PERIODIC MAINTENANCE AND MINOR REPAIR
6-35
6 2. Lift the wheel up between the fork
legs.
NOTE:
Make sure that there is enough space
between the brake pads before insert-
ing the brake disc and that the slot in
the speedometer gear unit fits over theretainer on the fork leg.3. Insert the wheel axle, making sure
the washer on the left side is in-
stalled with the beveled side facing
outward, and then install the axle
nut.
4. Take the motorcycle off the center-
stand so that the front wheel is on
the ground.
5. Tighten the axle nut to the speci-
fied torque, and then install both
rubber caps so that they fit over the
washers.6. While applying the front brake,
push down hard on the handlebars
several times to check if the front
fork compresses and rebounds
smoothly.
7. Connect the speedometer cable.1. Speedometer gear unit
1. Speedometer gear unit retainer
Tightening torque:
Axle nut:
59 Nm (5.9 m·kgf, 43 ft·lbf)
U3D9E0E0.book Page 35 Saturday, December 25, 2004 11:35 AM
Page 68 of 84

PERIODIC MAINTENANCE AND MINOR REPAIR
6-36
6
EAU25080
Rear wheel
EAU37180
To remove the rear wheel
WARNING
EWA10820
�
It is advisable to have a Yamaha
dealer service the wheel.
�
Securely support the motor-
cycle so that there is no dangerof it falling over.
1. Loosen the axle nut and the brake
torque rod nut at the brake shoe
plate.
2. Disconnect the brake torque rod
from the brake shoe plate by re-
moving the cotter pin, the nut, and
the bolt.3. Place the motorcycle on the cen-
terstand.
4. Remove the brake pedal free play
adjusting nut, and then disconnect
the brake rod from the brake cam-
shaft lever.5. Loosen the chain puller locknut
and the drive chain slack adjusting
bolt on both ends of the swingarm.
1. Axle nut
2. Brake torque rod
3. Brake torque rod cotter pin
4. Brake torque rod nut and bolt
1. Brake pedal free play adjusting nut
2. Brake rod
3. Brake camshaft lever
1. Wheel axle
2. Chain puller locknut
3. Drive chain slack adjusting bolt
U3D9E0E0.book Page 36 Saturday, December 25, 2004 11:35 AM

 by pushing it in.
6. Secure the headlight bulb socket
with the bulb socket holder.
7. Install the headlight u")