Page 97 of 124

8-26
8
EBU24390Checking the front brake lever free play The brake lever free play must be checked at the
intervals specified in the periodic maintenance and
lubrication chart. The brake lever should have a
free play of zero mm (zero in) as shown. If the free
play is incorrect, have a Yamaha dealer check the
brake system.
WARNING
EWB02070Operating with improperly serviced or adjust-
ed brakes could cause loss of braking ability,
which could lead to an accident.
After servicing:
�Make sure the brakes operate smoothly and
that the free play is correct.�Make sure the brakes do not drag.�Make sure the brakes are not spongy. All air
must be bled from the brake system.
Replacement of brake components requires
professional knowledge. These proceduresshould be performed by a Yamaha dealer.EBU24511Adjusting the brake pedal and rear
brake lever free play The brake pedal and brake lever free play must be
checked and, if necessary, adjusted at the inter-
vals specified in the periodic maintenance and lu-
brication chart.NOTE:�Always perform this maintenance completely in
the following order whenever adjusting the rear
brake.�Before adjusting the brake lever and brake pedalfree play, check the rear brake shoes for wear.
1. Brake lever free playU3D560E0.book Page 26 Tuesday, December 27, 2005 12:13 PM
Page 98 of 124
8-27
8Adjusting the brake pedal free play
The brake pedal free play should measure 20.0–
30.0 mm (0.79–1.18 in) as shown. If the free play
is incorrect, adjust it as follows.
1. Fully loosen the brake lever free play adjust-
ing nut on the brake cable at the rear wheel
hub.
2. Turn the brake pedal free play adjusting nut
on the brake cable at the rear wheel hub in di-
rection (a) to increase the free play, and in di-
rection (b) to decrease it.Adjusting the brake lever free play
The brake lever free play should measure 3.0–5.0
mm (0.12–0.20 in) as shown. If the free play is in-
correct, adjust it as follows.
1. Brake pedal free play
1. Brake lever free play adjusting nut
2. Brake pedal free play adjusting nut
U3D560E0.book Page 27 Tuesday, December 27, 2005 12:13 PM
Page 99 of 124
8-28
8 1. Loosen the locknut at the brake lever and fully
turn in the brake lever free play adjusting bolt.
2. Turn the brake lever free play adjusting nut on
the brake cable at the rear wheel hub so that
gap “A” measures 0–1 mm (0–0.04 in).3. Turn the brake lever free play adjusting bolt at
the brake lever in direction (a) to increase the
free play, and in direction (b) to decrease it.
1. Brake lever free play
2. Locknut
3. Brake lever free play adjusting bolt
1. Brake lever free play adjusting nut
2. Gap “A”
U3D560E0.book Page 28 Tuesday, December 27, 2005 12:13 PM
Page 100 of 124

8-29
84. Tighten the locknut at the brake lever.
NOTE:When adjusting the rear brake lever free play:�Be sure not to step on the brake pedal.�Make sure the brake pedal does not move.
WARNING
EWB02080Operating with improperly serviced or adjust-
ed brakes could cause loss of braking ability,
which could lead to an accident.
After servicing:
�Make sure the brakes operate smoothly and
that the free play is correct.�Make sure the brakes do not drag.
Replacement of brake components requires
professional knowledge. These proceduresshould be performed by a Yamaha dealer.EBU24751Brake light switches The operation of the brake light switches must be
checked and, if necessary, adjusted at the inter-
vals specified in the periodic maintenance and lu-
brication chart.
The brake light switch for the brake pedal can be
adjusted as follows, but the other brake light
switches should be adjusted by a Yamaha dealer.
1. Remove panel A. (See page 8-7.)NOTE:The brake light switch is properly adjusted when
the brake light comes on just before braking takeseffect.
2. Turn the adjusting nut while holding the brake
light switch in place. To make the brake light
come on earlier, turn the adjusting nut in direc-
tion (a). To make the brake light come on lat-
er, turn the adjusting nut in direction (b).
1. Locknut
2. Brake lever free play adjusting boltU3D560E0.book Page 29 Tuesday, December 27, 2005 12:13 PM
Page 101 of 124

8-30
8 3. Install the panel.
EBU24900Checking and lubricating the cables The operation and the condition of all control ca-
bles should be checked before each ride, and the
cables and cable ends should be lubricated if nec-
essary. If a cable is damaged or does not move
smoothly, have a Yamaha dealer check or replace
it.
WARNING
EWB02130Inspect cables frequently and replace if dam-
aged. Corrosion can result when the cable
sheaths become damaged, and cables can
also become frayed or kinked, which could re-
strict the operation of controls and lead to anaccident or injury.EBU24911Checking and lubricating the front and
rear brake levers The operation of the front and rear brake levers
should be checked before each ride, and the lever
pivots should be lubricated if necessary.
1. Brake light switch
2. Brake light switch adjusting nutRecommended lubricant:
Engine oil
Recommended lubricant:
Lithium-soap-based grease (all-purpose
grease)
U3D560E0.book Page 30 Tuesday, December 27, 2005 12:13 PM
Page 102 of 124
8-31
8
EBU24950Checking and lubricating the brake
pedal The operation of the brake pedal should be
checked before each ride, and the pedal pivot
should be lubricated if necessary.NOTE:To access the brake pedal pivot, remove panel A.(See page 8-7.)
EBU24961Checking the wheel bearings The front and rear wheel bearings must be
checked at the intervals specified in the periodic
maintenance and lubrication chart. If there is play
in a wheel hub or if a wheel does not turn smoothly,
have a Yamaha dealer check the wheel bearings.EBU24980Lubricating the drive shaft universal
joint The drive shaft universal joint must be lubricated at
the intervals specified in the periodic maintenance
and lubrication chart. Recommended lubricant:
Lithium-soap-based grease (all-purpose
grease)
U3D560E0.book Page 31 Tuesday, December 27, 2005 12:13 PM
Page 103 of 124

8-32
8
EBU25060Lubricating the knuckle pivots The knuckle pivots must be lubricated at the inter-
vals specified in the periodic maintenance and lu-
brication chart.EBU25080Lubricating the knuckle shafts The knuckle shafts must be lubricated at the inter-
vals specified in the periodic maintenance and lu-
brication chart.EBU25100Lubricating the steering shaft The steering shaft must be lubricated at the inter-
vals specified in the periodic maintenance and lu-
brication chart.
EBU25222Battery This model is equipped with a sealed-type (MF)
battery, which does not require any maintenance.
There is no need to check the electrolyte or to add
distilled water. Check and, if necessary, tighten the
battery lead connections.CAUTION:ECB00620Never attempt to remove the battery cell seals,as this would permanently damage the battery.
WARNING
EWB02160Battery electrolyte is poisonous and danger-
ous, as it contains sulfuric acid, which can
cause severe burns. Avoid contact with skin,
eyes or clothing. Always shield your eyes
when working near batteries.
Antidote:
EXTERNAL: Flush with water.
INTERNAL: Drink large quantities of water or
milk. Follow with milk of magnesia, beaten egg
or vegetable oil. Call a physician immediately. Recommended lubricant:
Lithium-soap-based grease
Recommended lubricant:
Lithium-soap-based grease
Recommended lubricant:
Lithium-soap-based greaseRecommended lubricant:
Lithium-soap-based grease
U3D560E0.book Page 32 Tuesday, December 27, 2005 12:13 PM
Page 104 of 124

8-33
8EYES: Flush with water for 15 minutes and get
prompt medical attention.
Batteries produce explosive gases. Keep
sparks, flame, cigarettes or other sources of ig-
nition away. Ventilate when charging or using
in an enclosed space.
KEEP OUT OF REACH OF CHILDREN.
To charge the battery
Have a Yamaha dealer charge the battery as soon
as possible if it seems to have discharged. Keep in
mind that the battery tends to discharge more
quickly if the ATV is equipped with optional electri-
cal accessories.
To store the battery
1. If the ATV will not be used for more than one
month, remove the battery, fully charge it, and
then place it in a cool, dry place.
2. If the battery will be stored for more than two
months, check it at least once a month and ful-
ly charge it if necessary.
To install the batteryNOTE:Be sure the battery is fully charged.1. Place the battery in its compartment.
2. Make sure to properly connect the battery
leads to the battery terminals.
CAUTION:ECB00630�Always keep the battery charged. Storing a
discharged battery can cause permanent
battery damage.�To charge a sealed-type (MF) battery, a spe-
cial constant-voltage battery charger is re-
quired. Using a conventional battery charger
will damage the battery. If you do not have1. Positive battery terminal
2. Negative battery terminal
U3D560E0.book Page 33 Tuesday, December 27, 2005 12:13 PM
 1
1 2
2 3
3 4
4 5
5 6
6 7
7 8
8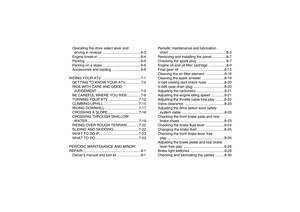 9
9 10
10 11
11 12
12 13
13 14
14 15
15 16
16 17
17 18
18 19
19 20
20 21
21 22
22 23
23 24
24 25
25 26
26 27
27 28
28 29
29 30
30 31
31 32
32 33
33 34
34 35
35 36
36 37
37 38
38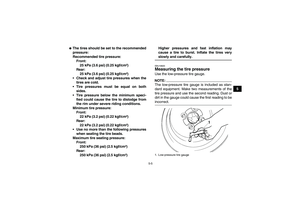 39
39 40
40 41
41 42
42 43
43 44
44 45
45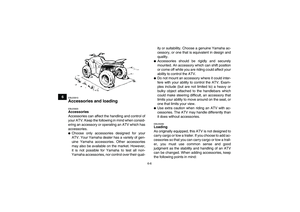 46
46 47
47 48
48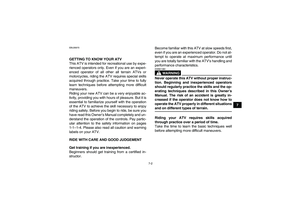 49
49 50
50 51
51 52
52 53
53 54
54 55
55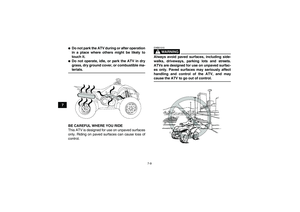 56
56 57
57 58
58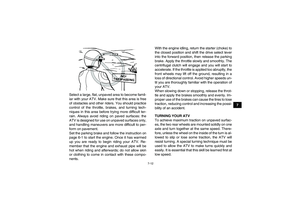 59
59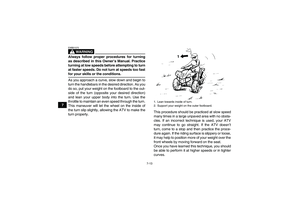 60
60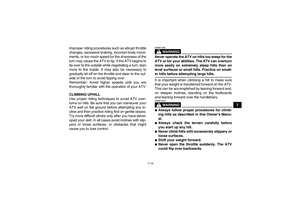 61
61 62
62 63
63 64
64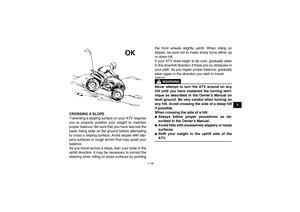 65
65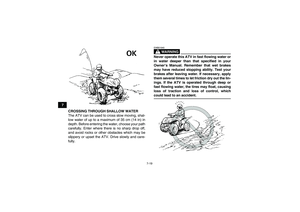 66
66 67
67 68
68 69
69 70
70 71
71 72
72 73
73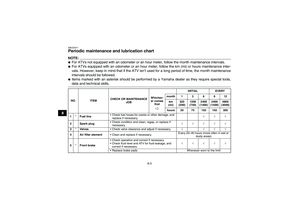 74
74 75
75 76
76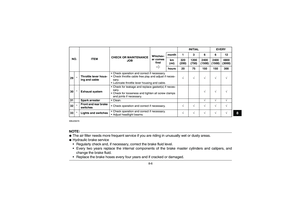 77
77 78
78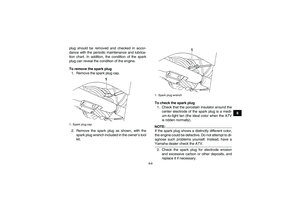 79
79 80
80 81
81 82
82 83
83 84
84 85
85 86
86 87
87 88
88 89
89 90
90 91
91 92
92 93
93 94
94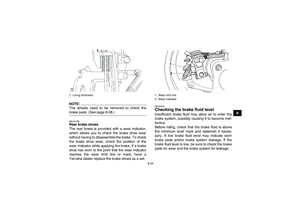 95
95 96
96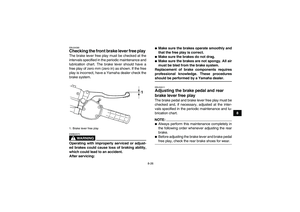 97
97 98
98 99
99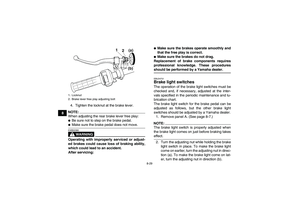 100
100 101
101 102
102 103
103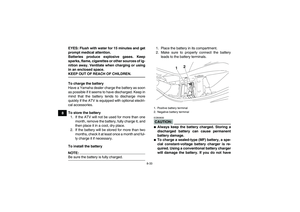 104
104 105
105 106
106 107
107 108
108 109
109 110
110 111
111 112
112 113
113 114
114 115
115 116
116 117
117 118
118 119
119 120
120 121
121 122
122 123
123 as shown. If the free play
is incorrect, adjust it as follows.
1. Fully loosen the b")

