Page 49 of 80

PERIODIC MAINTENANCE AND MINOR REPAIR
6
a
ZAUM0108
a
ZAUM0107
a Front brake lever free play
EAU00697*
Adjusting the front brake
lever free play
The brake lever free play should
measure 10—20 mm as shown.
Periodically check the brake lever free
play and, if necessary, have a Yamaha
dealer adjust it.
EW000100
An incorrect brake lever free play
indicates a hazardous condition in
the brake system. Do not operate the
scooter until the brake system has
been checked or repaired by a
Yamaha dealer.
EAU04469
Adjusting the rear brake
lever free play
The brake lever free play should
measure 10—20 mm as shown.
Periodically check the brake lever free
play and, if necessary, adjust it as
follows.To increase the brake lever free play,
turn the adjusting nut at the brake shoe
plate in direction a . To decrease the
brake lever free play, turn the adjusting
nut in direction b .
EW000101
If proper adjustment cannot be
obtained as described, have a
Yamaha dealer make this
adjustment.
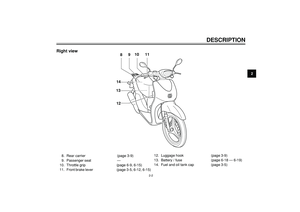
a Rear brake lever free play
1b
aZAUM0374
1. Adjusting nut
6-12
Page 50 of 80
PERIODIC MAINTENANCE AND MINOR REPAIR
6
EAU00720
Checking the front brake
pads and rear brake shoes
The front brake pads and the rear brake
shoes must be checked for wear at the
intervals specified in the periodic main-
tenance and lubrication chart.
EAU01436
Front brake pads
Check each front brake pad for damage
and measure the lining thickness. If a
brake pad is damaged or if the lining
thickness is less than 0.5 mm, have a
Yamaha dealer replace the brake pads
as a set.
EAU04502
Rear brake shoes
The rear brake is provided with a wear
indicator, which allows you to check the
brake shoe wear without having to
disassemble the brake. To check the
brake shoe wear, check the position of
the wear indicator while applying the
brake. If a brake shoe has worn to the
point that the wear indicator reaches
the wear limit line, have a Yamaha dea-
ler replace the brake shoes as a set.
a
ZAUM0375ZAUM0376
1
2
1. Wear indicator
2. Wear limit a Lining thickness
6-13
Page 51 of 80

PERIODIC MAINTENANCE AND MINOR REPAIR
6
EAU00732
Checking the brake fluid
level
Insufficient brake fluid may allow air to
enter the brake system, possibly
causing it to become ineffective.
Before riding, check that the brake fluid
is above the minimum level mark and
replenish if necessary. A low brake fluid
level may indicate worn brake pads
and/or brake system leakage. If the
brake level is low, be sure to check the
brake pads for wear and the brake
system for leakage.Observe these precautions:
•When checking the fluid level,
make sure that the top of the
master cylinder is level by turning
the handlebars.
•Use only the recommended
quality brake fluid, otherwise the
rubber seals may deteriorate,
causing leakage and poor braking
performance.
Recommended brake fluid:
DOT 4
NOTE :
If DOT 4 is not available, DOT 3 can be
used.
•Refill with the same type of brake
fluid. Mixing fluids may result in a
harmful chemical reaction and
lead to poor braking performance.
•Be careful that water does not
enter the master cylinder when
refilling. Water will significantly
lower the boiling point of the fluid
and may result in vapor lock.
•Brake fluid may deteriorate
painted surfaces or plastic parts.
Always clean up spilled fluid
immediately.
•As the brake pads wear, it is nor-
mal for the brake fluid level to
gradually go down. However, if the
brake fluid level goes down
suddenly, have a Yamaha dealer
check the cause.
1
ZAUM0377
1. Brake fluid level
6-14
Page 52 of 80

PERIODIC MAINTENANCE AND MINOR REPAIR
6
EAUM0008
Changing the brake fluid
Have a Yamaha dealer change the
brake fluid at the intervals specified in
the periodic maintenance and
lubrication chart. In addition, have the
brake hose replaced every four years
or whenever it is damaged or leaking.
EAU04034
Checking and lubricating the
throttle grip and cable
The operation of the throttle grip should
be checked before each ride. In addi-
tion, the cable should be lubricated or
replaced at the intervals specified in the
periodic maintenance chart.
6-15
ZAUM0061
EAU00774
Adjusting the Autolube pump
The Autolube pump is a vital and
sophisticated component of the engine,
which must be adjusted by a Yamaha
dealer at the intervals specified in the
periodic maintenance and lubrication
chart.
EAU03118
Lubricating the front and rear
brake levers
The pivoting points of the front and rear
brake levers must be lubricated at the
intervals specified in the periodic main-
tenance and lubrication chart.
Recommended lubricant:
Lithium-soap-based grease
(all-purpose grease)
Page 53 of 80

PERIODIC MAINTENANCE AND MINOR REPAIR
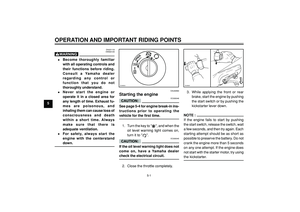
6 To check the operation
1. Place the scooter on a level sur-
face and hold it in an upright po-
sition.
2. While applying the front brake,
push down hard on the
handlebars several times to check
if the front fork compresses and
rebounds smoothly.
EC000098
If any damage is found or the front
fork does not operate smoothly, have
a Yamaha dealer check or repair it.
6-16
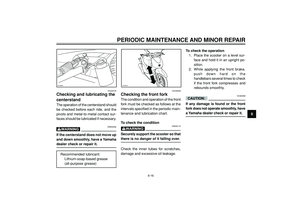
EAU02939
Checking the front fork
The condition and operation of the front
fork must be checked as follows at the
intervals specified in the periodic main-
tenance and lubrication chart.
To check the condition
EW000115
Securely support the scooter so that
there is no danger of it falling over.
Check the inner tubes for scratches,
damage and excessive oil leakage.
ZAUM0378
EAU04123
Checking and lubricating the
centerstand
The operation of the centerstand should
be checked before each ride, and the
pivots and metal-to-metal contact sur-
faces should be lubricated if necessary.
EWA00055
If the centerstand does not move up
and down smoothly, have a Yamaha
dealer check or repair it.
Recommended lubricant:
Lithium-soap-based grease
(all-purpose grease)
ZAUM0062
Page 54 of 80
PERIODIC MAINTENANCE AND MINOR REPAIR
6
EAU01144
Checking the wheel bearings
The front and rear wheel bearings must
be checked at the intervals specified in
the periodic maintenance and
lubrication chart. If there is play in the
wheel hub or if the wheel does not turn
smoothly, have a Yamaha dealer check
the wheel bearings.
6-17
2. Hold the lower ends of the front
fork legs and try to move them
forward and backward. If any free
play can be felt, have a Yamaha
dealer check or repair the
steering.
ZAUM0379
EAU00794
Checking the steering
Worn or loose steering bearings may
cause danger. Therefore, the operation
of the steering must be checked as
follows at the intervals specified in the
periodic maintenance and lubrication
chart.
1. Place a stand under the engine
to raise the front wheel off the
ground.
EW000115
Securely support the scooter so that
there is no danger of it falling over.
Page 55 of 80

PERIODIC MAINTENANCE AND MINOR REPAIR
6
EW000116
•Electrolyte is poisonous and
dangerous since it contains
sulfuric acid, which causes
severe burns. Avoid any con-
tact with skin, eyes or clothing
and always shield your eyes
when working near batteries. In
case of contact, administer the
following FIRST AID.
•EXTERNAL: Flush with
plenty of water.
•INTERNAL: Drink large
quantities of water or milk
and immediately call a
physician.
•EYES: Flush with water for
15 minutes and seek prompt
medical attention.
•Batteries produce explosive
hydrogen gas. Therefore, keep
sparks, flames, cigarettes, etc.,
away from the battery and
provide sufficient ventilation
when charging it in an enclosed
space.
6-18
EAUM0049
Battery
A poorly maintained battery will corrode
and discharge quickly. The electrolyte
level, battery lead connections and
breather hose routing should be
checked before each ride and at the
intervals specified in the periodic main-
tenance and lubrication chart.
To check the electrolyte level
1. Place the scooter on a level sur-
face and hold it in an upright posi-
tion.
NOTE :
Make sure that the scooter is positioned
straight up when checking the
electrolyte level.
2. Remove panel A. (See page 6-5
for panel removal and installation
procedures.)3. Check the electrolyte level in the
battery.
NOTE :
The electrolyte should be between the
minimum and maximum level marks.
4. If the electrolyte is at or below the
minimum level mark, add distilled
water to raise it to the maximum
level mark.
1
2+UPPER
LOWER
ZAUM0106
1. Maximum level mark
2. Minimum level mark
Page 56 of 80

PERIODIC MAINTENANCE AND MINOR REPAIR
6
EAU00809
Replacing the fuse
The fuse holder is located beside the
battery compartment behind panel A.
(See page 6-5 for panel removal and
installation procedures.)
If the fuse is blown, replace it as follows.
1. Turn the key to "
" and turn off
all electrical circuits.
2. Remove the blown fuse, and then
install a new fuse of the specified
amperage.
Specified fuse:
7.5 A
1
ZAUM0380
1. Fuse
6-19
•KEEP THIS AND ALL BATTE-
RIES OUT OF THE REACH OF
CHILDREN.
EC000100
Use only distilled water, as tap water
contains minerals that are harmful
to the battery.
5. Check and, if necessary, tighten
the battery lead connections and
correct the breather hose routing.
To store the battery
1. If the scooter will not be used for
more than one month, remove the
battery, fully charge it, and then
place it in a cool, dry place.
2. If the battery will be stored for
more than two months, check the
specific gravity of the electrolyte
at least once a month and fully
charge the battery whenever
necessary.
3. Fully charge the battery before
installation.
4. After installation, make sure that
the battery leads are properly
connected to the battery terminals
and that the breather hose is
properly routed, in good condition,
and not obstructed.
EC000099
If the breather hose is positioned in
such a way that the frame is exposed
to electrolyte or gas expelled from
the battery, the frame could suffer
structural and external damages.