2006 YAMAHA JOG50R headlight
[x] Cancel search: headlightPage 7 of 56

SAFETY INFORMATION.....................1-1
DESCRIPTION.....................................2-1
Left view ...........................................2-1
Right view .........................................2-2
Controls and instruments .................2-3
INSTRUMENT AND CONTROL
FUNCTIONS........................................3-1
Main switch/steering lock .................3-1
Indicator lights ..................................3-1
Speedometer unit .............................3-2
Fuel gauge ........................................3-3
Clock .................................................3-3
Handlebar switches ..........................3-3
Front brake lever...............................3-4
Rear brake lever................................3-4
Fuel and 2-stroke engine oil tank
caps ...............................................3-4
Fuel ...................................................3-5
2-stroke engine oil ............................3-5
Kickstarter.........................................3-6
Seat...................................................3-6
Storage compartment.......................3-6
PRE-OPERATION CHECKS...............4-1
Pre-operation check list....................4-2
OPERATION AND IMPORTANT RIDING
POINTS................................................5-1
Starting a cold engine ......................5-1Starting off ........................................5-1
Acceleration and deceleration ..........5-2
Braking..............................................5-2
Engine break-in.................................5-2
Parking ..............................................5-2
PERIODIC MAINTENANCE AND
MINOR REPAIR...................................6-1
Periodic maintenance and
lubrication chart ............................6-2
Checking the spark plug ..................6-5
Final transmission oil ........................6-6
Coolant (only for liquid-cooled
models) ..........................................6-6
Cleaning the air filter element ...........6-8
Adjusting the carburetor ...................6-9
Adjusting the throttle cable free
play ................................................6-9
Tires ..................................................6-9
Adjusting the brake lever free
play ..............................................6-11
Adjusting the rear brake lever free
play ..............................................6-11
Checking the front brake pads
and rear brake shoes ..................6-12
Checking the front brake fluid
level .............................................6-13
Changing the brake fluid ................6-13
Checking and lubricating the
cables ..........................................6-13Checking and lubricating the
throttle grip and cable .................6-14
Adjusting the Autolube pump .........6-14
Lubricating the front and rear
brake levers .................................6-14
Checking and lubricating the
centerstand .................................6-14
Checking the front fork ...................6-15
Checking the steering.....................6-15
Checking the wheel bearings .........6-15
Replacing the headlight bulb or a
front turn signal light bulb ...........6-16
Replacing a turn signal light bulb
or the tail/brake light bulb ...........6-16
Replacing the license plate light
bulb .............................................6-17
Battery ............................................6-17
Replacing the fuse ..........................6-18
Troubleshooting ..............................6-19
Troubleshooting chart .....................6-20
SCOOTER CARE AND STORAGE.....7-1
Care ..................................................7-1
Storage .............................................7-3
SPECIFICATIONS...............................8-1
CONSUMER INFORMATION.............9-1
Identification numbers ......................9-1
TABLE OF CONTENTS
5RW-F8199-E3.qxd 08/09/2005 18:07 Página 7
Page 12 of 56

EAU10410
Left view
DESCRIPTION
2-1
2
1. Headlight (page 6-16)
2. Front blinker (page 6-16)
3. Seat (page 3-6)
4. Handle 5. Left rear blinker (page 6-16)
6. kickstarter (page 3-6)
7. Air filter (page 6-8)
8. Center stand (page 6-14)
1
2
3
4
5
6
87
5RW-F8199-E3.qxd 08/09/2005 18:07 Página 12
Page 16 of 56

EAU11030
Turn signal indicator lights “c” and
“d”
The corresponding indicator light flas-
hes when the turn signal switch is
pushed to the left or right.
EAU11080
High beam indicator light “j”
This indicator light comes on when
the high beam of the headlight is swit-
ched on.
EAU11130
2-stroke engine oil level warning
light “z”
This warning light comes on when the
2-stroke engine oil level is low.
The electrical circuit of the warning
light can be checked according to the
following procedure.
1. Turn the key to “ON”.
2. Shift the transmission into the
neutral position.
3. If the warning light does not
come on, have a Yamaha dealer
check the electrical circuit.
ECA11570
CAUTION
Do not operate the motorcycle until
you know that the 2-stroke engine
oil level is sufficient.
NOTE:
Even if the 2-stroke engine oil level is
sufficient, the warning light may flic-
ker when riding on a slope or during
sudden acceleration or deceleration,
but this is not a malfunction.
EAU11430
Coolant temperature warning light
“y”
This warning light comes on when the
engine overheats. When this occurs,
stop the engine immediately and
allow the engine to cool.
ECA10020
CAUTION
Do not operate the engine if it is
overheated.
EAUM1090
Speedometer unit
1. Speedometer unit
2. Fuel gauge
3. Clock
4. Odometer (TOTAL/TRIP)
5. “TRIP” button
The speedometer unit is equipped
with a speedometer, an odometer and
a tripmeter. The speedometer shows
riding speed. The odometer shows
the total distance traveled. The trip-
meter shows the distance traveled
since it was last set to zero.
Pushing the reset button switches the
display between the odometer mode
“TOTAL” and the tripmeter mode
“TRIP”. To reset the tripmeter, enter
the “TRIP” mode, and then hold down
j
d
z
c4050
30
10 2060
70
80
0
y
00000.0
23:08TOTALExF
3
INSTRUMENT AND CONTROL FUNCTIONS
3-2
14
3
2 5
5RW-F8199-E3.qxd 08/09/2005 18:07 Página 16
Page 30 of 56

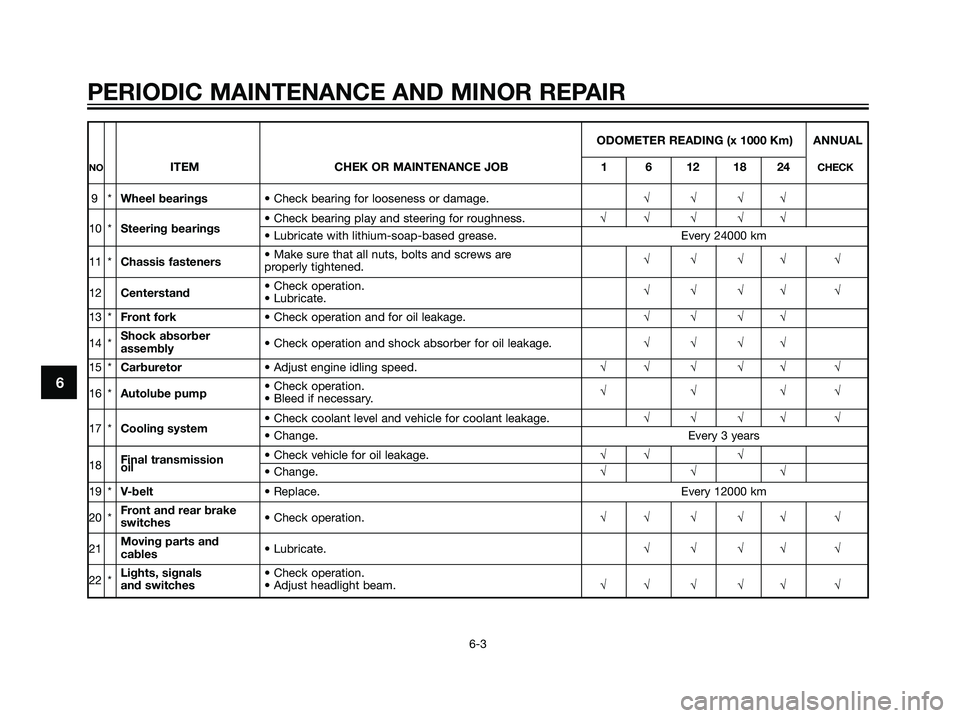
ODOMETER READING (x 1000 Km) ANNUAL
NOITEM CHEK OR MAINTENANCE JOB 1 6 12 18 24CHECK
9*Wheel bearings• Check bearing for looseness or damage.√√√√
10 *Steering bearings• Check bearing play and steering for roughness.√√ √ √√• Lubricate with lithium-soap-based grease. Every 24000 km
11 *Chassis fasteners• Make sure that all nuts, bolts and screws are
properly tightened.√√√√ √
12Centerstand• Check operation.
• Lubricate.√√√√ √
13 *Front fork• Check operation and for oil leakage.√√√√
14 *Shock absorber
• Check operation and shock absorber for oil leakage.√√√√
assembly
15 *Carburetor• Adjust engine idling speed.√√ √ √√ √
16 *Autolube pump• Check operation.
• Bleed if necessary.√√√√
17 *Cooling system• Check coolant level and vehicle for coolant leakage.√√√√ √• Change. Every 3 years
18Final transmission • Check vehicle for oil leakage.√√ √oil
• Change.√√√
19 *V-belt• Replace. Every 12000 km
20 *Front and rear brake
• Check operation.√√ √ √√ √
switches
21Moving parts and
• Lubricate.√√√√ √
cables
22 *Lights, signals • Check operation.
and switches• Adjust headlight beam.√√ √ √√ √
PERIODIC MAINTENANCE AND MINOR REPAIR
6-3
6
5RW-F8199-E3.qxd 08/09/2005 18:07 Página 30
Page 43 of 56

EAUS1110
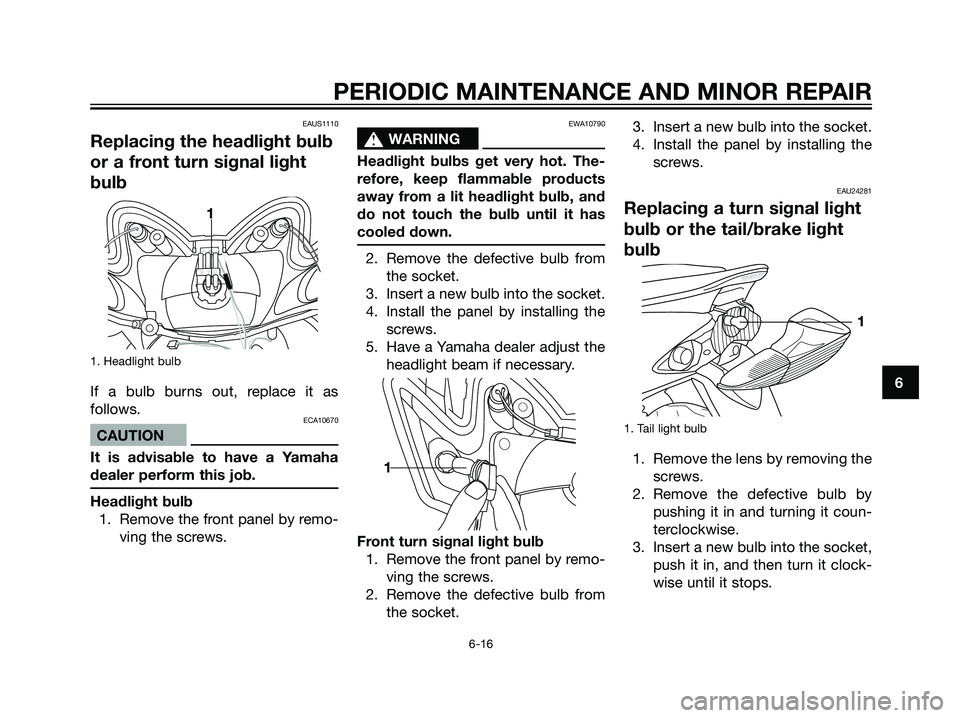
Replacing the headlight bulb
or a front turn signal light
bulb
1. Headlight bulb
If a bulb burns out, replace it as
follows.
ECA10670
CAUTION
It is advisable to have a Yamaha
dealer perform this job.
Headlight bulb
1. Remove the front panel by remo-
ving the screws.
EWA10790
s s
WARNING
Headlight bulbs get very hot. The-
refore, keep flammable products
away from a lit headlight bulb, and
do not touch the bulb until it has
cooled down.
2. Remove the defective bulb from
the socket.
3. Insert a new bulb into the socket.
4. Install the panel by installing the
screws.
5. Have a Yamaha dealer adjust the
headlight beam if necessary.
Front turn signal light bulb
1. Remove the front panel by remo-
ving the screws.
2. Remove the defective bulb from
the socket.3. Insert a new bulb into the socket.
4. Install the panel by installing the
screws.
EAU24281
Replacing a turn signal light
bulb or the tail/brake light
bulb
1. Tail light bulb
1. Remove the lens by removing the
screws.
2. Remove the defective bulb by
pushing it in and turning it coun-
terclockwise.
3. Insert a new bulb into the socket,
push it in, and then turn it clock-
wise until it stops.
BYG
6
PERIODIC MAINTENANCE AND MINOR REPAIR
6-16
1
1
1
5RW-F8199-E3.qxd 08/09/2005 18:07 Página 43
Page 53 of 56

Front wheelRim size
MT 2.75X12
Rear wheelRim size
MT 3.00X12
Front brakeType
Single disc brake
Operation
Right hand operation
Recommended fluid
DOT 4
Rear brakeType
Drum brake
Operation
Left hand operation
Front suspensionType
Telescopic fork
Spring/shock absorber type
Coil spring/oil damper
Wheel travel
70.0 mm
Rear suspensionType
Unit swing
Spring/shock absorber type
Coil spring/oil damper
Wheel travel
60.0 mm
Electrical systemIgnition systemCDI
Charging system
Flywheel magneto
BatteryModel
GT4L-BS
Voltage, capacity
12 V, 4.0 Ah
Bulb voltage, wattage x quantityHeadlight
12 V, 35 W/35.0 W x 1
Tail/brake light
12 V, 21.0 W/5.0 W x 1
Front turn signal light
12 V, 16.0 W x 2
Rear turn signal light
12 V, 10.0 W x 2
Meter lighting
12 V, 1.2 W x 2
Oil level warning light
LED
Fuel level warning light
NONE
FusesMain fuse
7.5 A
8
SPECIFICATIONS
8-2
5RW-F8199-E3.qxd 08/09/2005 18:07 Página 53
Page 55 of 56

22-stroke engine oil .....................................3-5
AAcceleration and deceleration ...................5-2
Adjusting the Autolube pump ..................6-14
Adjusting the brake lever free play ..........6-11
Adjusting the carburetor ............................6-9
Adjusting the rear brake lever free play ...6-11
Adjusting the throttle cable free play .........6-9
BBattery......................................................6-17
Braking .......................................................5-2
CCare............................................................7-1
Changing the brake fluid..........................6-13
Checking and lubricating the cables .......6-13
Checking and lubricating the
centerstand ............................................6-14
Checking and lubricating the throttle
grip and cable ........................................6-14
Checking the front brake fluid level .........6-13
Checking the front brake pads and rear
brake shoes ...........................................6-12
Checking the front fork ............................6-15
Checking the spark plug ............................6-5
Checking the steering ..............................6-15
Checking the wheel bearings ..................6-15
Cleaning the air filter element ....................6-8
Clock ..........................................................3-3
Controls and instruments ..........................2-3
Coolant (only for liquid-cooled models).....6-6
EEngine break-in ..........................................5-2
FFinal transmission oil .................................6-6
Front brake lever ........................................3-4
Fuel ............................................................3-5
Fuel and 2-stroke engine oil tank caps .....3-4
Fuel gauge .................................................3-3
HHandlebar switches ...................................3-3
IIdentification numbers ...............................9-1
Indicator lights ...........................................3-1
KKickstarter ..................................................3-6
LLeft view .....................................................2-1
Lubricating the front and rear brake
levers .....................................................6-14
MMain switch/steering lock ..........................3-1
PParking .......................................................5-2
Periodic maintenance and lubrication
chart .........................................................6-2
Pre-operation check list .............................4-2
RRear brake lever .........................................3-4
Replacing a turn signal light bulb or the
tail/brake light bulb ................................6-16
Replacing the fuse ...................................6-18
Replacing the headlight bulb or a front
turn signal light bulb ..............................6-16
Replacing the license plate light bulb......6-17
Right view ..................................................2-2
SSeat ............................................................3-6
Speedometer unit ......................................3-2
Starting a cold engine ................................5-1
Starting off .................................................5-1
Storage.......................................................7-3
Storage compartment ................................3-6
TTires ...........................................................6-9
Troubleshooting .......................................6-19
Troubleshooting chart ..............................6-20
INDEX
5RW-F8199-E3.qxd 08/09/2005 18:07 Página 55