Page 48 of 122

3-1
E
EJU20060
Fuel and oil
This engine uses Yamaha’s oil injection
system, which provides superior lubrication
by ensuring the proper oil ratio for all operat-
ing conditions. No fuel premixing is neces-
sary except during the engine break-in
period. Simply pour gasoline into the fuel
tank and oil into the oil tank.
The engine utilizes an electronic fuel
injection system to deliver the optimal air-
fuel mixture ratio required by the engine.
With optimal combustion conditions, this
system is able to increase startability and
improve fuel economy.
EJU19122
Gasoline
WARNING@ GASOLINE AND ITS VAPORS ARE
HIGHLY FLAMMABLE AND EXPLOSIVE!
�Do not smoke when refueling, and
keep away from sparks, flames, or
other sources of ignition.
�Stop engine before refueling.
�Refuel in a well-ventilated area with
the watercraft in a horizontal position.
�Do not stand or sit on the watercraft
while refueling in case of fire.
�Take care not to spill gasoline. If gaso-
line spills, wipe it up immediately with
dry rags. Always properly dispose of
gasoline-soaked rags.
UF1G73.book Page 1 Tuesday, July 12, 2005 8:55 AM
Page 53 of 122

3-6
E
EJU13460
Pre-operation checks
EJU13470
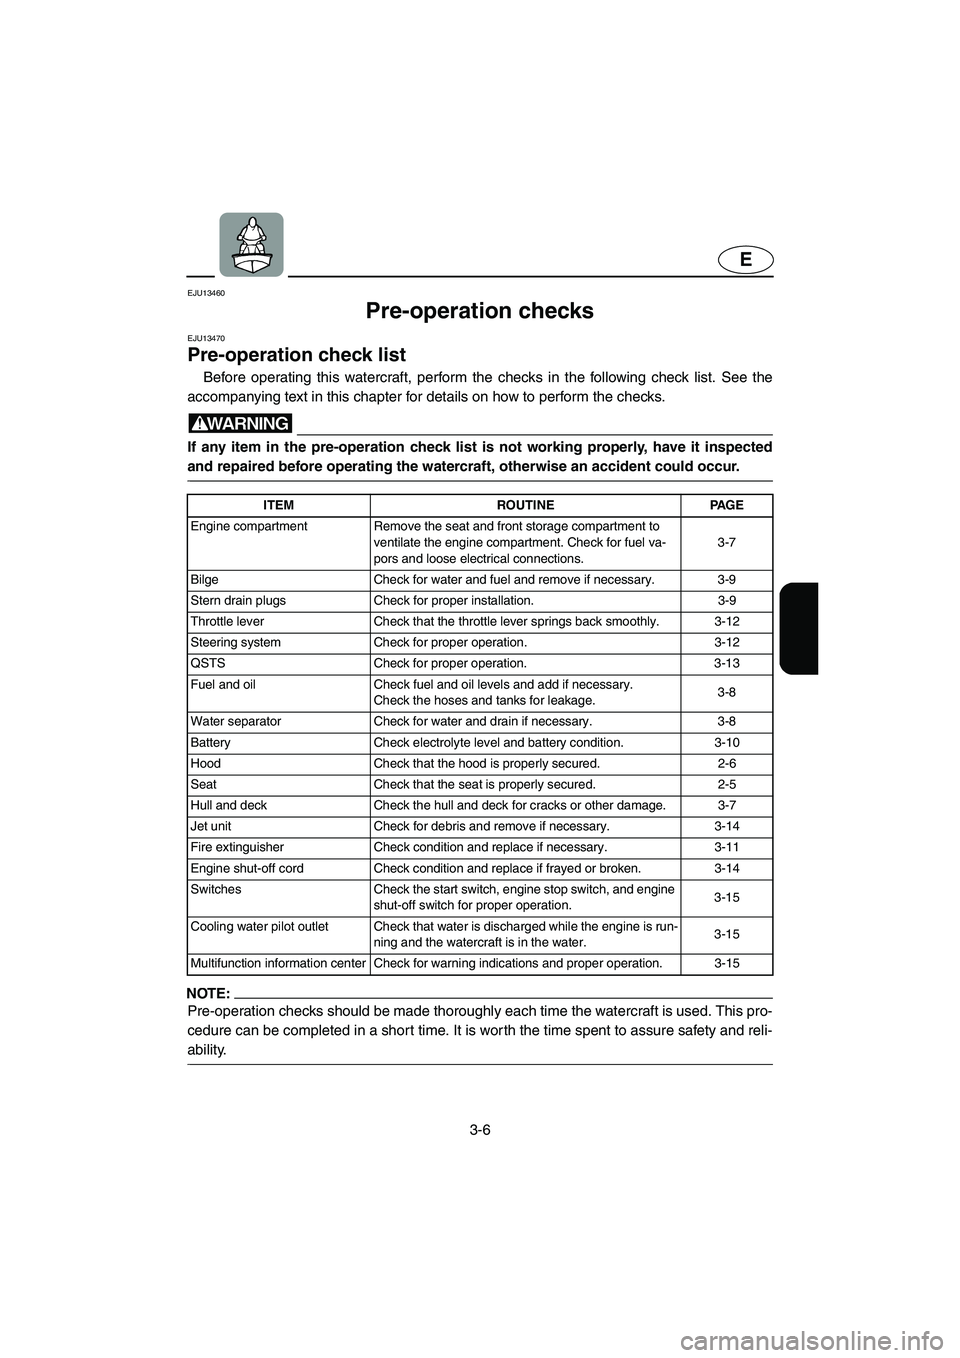
Pre-operation check list
Before operating this watercraft, perform the checks in the following check list. See the
accompanying text in this chapter for details on how to perform the checks.
WARNING@ If any item in the pre-operation check list is not working properly, have it inspected
and repaired before operating the watercraft, otherwise an accident could occur.
@
POC-***
NOTE:@ Pre-operation checks should be made thoroughly each time the watercraft is used. This pro-
cedure can be completed in a short time. It is worth the time spent to assure safety and reli-
ability.
@
ITEM ROUTINE PAGE
Engine compartment Remove the seat and front storage compartment to
ventilate the engine compartment. Check for fuel va-
pors and loose electrical connections.3-7
Bilge Check for water and fuel and remove if necessary. 3-9
Stern drain plugs Check for proper installation. 3-9
Throttle lever Check that the throttle lever springs back smoothly. 3-12
Steering system Check for proper operation. 3-12
QSTS Check for proper operation. 3-13
Fuel and oil Check fuel and oil levels and add if necessary.
Check the hoses and tanks for leakage.3-8
Water separator Check for water and drain if necessary. 3-8
Battery Check electrolyte level and battery condition. 3-10
Hood Check that the hood is properly secured. 2-6
Seat Check that the seat is properly secured. 2-5
Hull and deck Check the hull and deck for cracks or other damage. 3-7
Jet unit Check for debris and remove if necessary. 3-14
Fire extinguisher Check condition and replace if necessary. 3-11
Engine shut-off cord Check condition and replace if frayed or broken. 3-14
Switches Check the start switch, engine stop switch, and engine
shut-off switch for proper operation.3-15
Cooling water pilot outlet Check that water is discharged while the engine is run-
ning and the watercraft is in the water.3-15
Multifunction information center Check for warning indications and proper operation. 3-15
UF1G73.book Page 6 Tuesday, July 12, 2005 8:55 AM
Page 79 of 122

3-32
E
EJU10810
Beaching the watercraft
1. Make sure no obstructions, boats or
swimmers are near the beach. Release
the throttle lever about 125 m (410 ft)
before you reach the intended beaching
area.
2. Approach the beach slowly and stop the
engine before reaching land.
Remember: you need throttle to steer.
3. Get off the watercraft and pull it up on
the beach.
CAUTION:@ Small pebbles, sand, seaweed, and other
debris can be pulled into the jet intake
and impair or damage the impeller.
Always stop the engine and get off
before beaching the watercraft.
@
EJU10820
Docking the watercraft
1. Make sure that no obstructions, boats or
swimmers are close to the watercraft.
Reduce speed about 125 m (410 ft)
away from the dock.
2. Slowly approach the dock and stop the
engine just before coming alongside it.
EJU10830
Rough water operation
The force of landing after jumping can
cause a strong impact on both the watercraft
and the operator and passenger. It is possi-
ble for the operator to hit his or her chest or
jaw on the watercraft body or handlebars
and be injured. Do not operate the water-
craft with your chin right above the handle-
bars or with your feet outside the watercraft.
Operating in rough water or jumping waves
can also crack the watercraft body or dam-
age internal parts. Avoid operating in rough
water or bad weather conditions.
UF1G73.book Page 32 Tuesday, July 12, 2005 8:55 AM
Page 90 of 122

4-7
E
EJU21751
Maintenance and
adjustments
Periodic inspection, adjustment, and lubri-
cation will keep your watercraft in the safest
and most efficient condition possible. Safety
is an obligation of the watercraft owner.
Proper maintenance must be carried out to
keep the exhaust emission and sound levels
within the regulated limits. The most impor-
tant points of watercraft inspection, adjust-
ment, and lubrication are explained on the
following pages.
See your Yamaha dealer for genuine
Yamaha replacement parts and optional
accessories designed for your watercraft.
Remember that failures that are the result
of the installation of parts or accessories
which are not qualitatively equivalent to gen-
uine Yamaha parts are not covered by the
limited warranty.
Maintenance, replacement, or repair of
the emission control devices and system
may be performed by any marine SI
engine repair establishment or individ-
ual. Warranty repair, however, must be
performed at an authorized Yamaha
marine dealership.
UF1G73.book Page 7 Tuesday, July 12, 2005 8:55 AM
Page 97 of 122

4-14
E
EJU11062
Cleaning and adjusting the
spark plugs
The spark plug is an important engine
component and is easy to inspect. The con-
dition of the spark plug can indicate some-
thing about the condition of the engine. For
example, if the center electrode porcelain is
very white, this could indicate an intake air
leak or carburetion problem in that cylinder.
Do not attempt to diagnose any problems
yourself. Have a Yamaha dealer service the
watercraft.
Remove and inspect the spark plugs peri-
odically; heat and deposits will cause the
spark plugs to slowly break down and erode.
If electrode erosion becomes excessive, or if
carbon and other deposits are excessive,
replace the spark plug with the specified
plug.
Measure the spark plug gap a with a
wire thickness gauge. Replace the spark
plugs or adjust the gap to specification if
necessary.
To install the spark plug:
1. Clean the gasket surface.
2. Wipe any dirt from the threads of the
spark plug.
3. Install the spark plug, and then tighten it
to the specified torque.
4. Install the spark plug cap.Standard spark plug: BR8ES-11
Spark plug gap:
1.0–1.1 mm (0.039–0.043 in)
Spark plug tightening torque:
25 N·m (2.5 kgf·m, 18 ft·lb)
UF1G73.book Page 14 Tuesday, July 12, 2005 8:55 AM