2006 VOLKSWAGEN GOLF PLUS clock
[x] Cancel search: clockPage 17 of 541
this section informa tion on the lowing:
Instrument overview ...............•.........
Displays
Compass .................................. .
Service reminder displ
ay
More information:
Warn ing and indi cator page 13
in the ins trument
16
17
19
Display of th e se lec ted gea rs (a utoma tic trans
m iss ion) p age 179
reminder Bookle t Wnrbooklet.
Driver di strn ction con en usc nccidcnts and seriou s personal injury.
Never usc the buttons in the in strument clus te r driving .
first read and no te the imroductory informati on and heed th e on page 16.
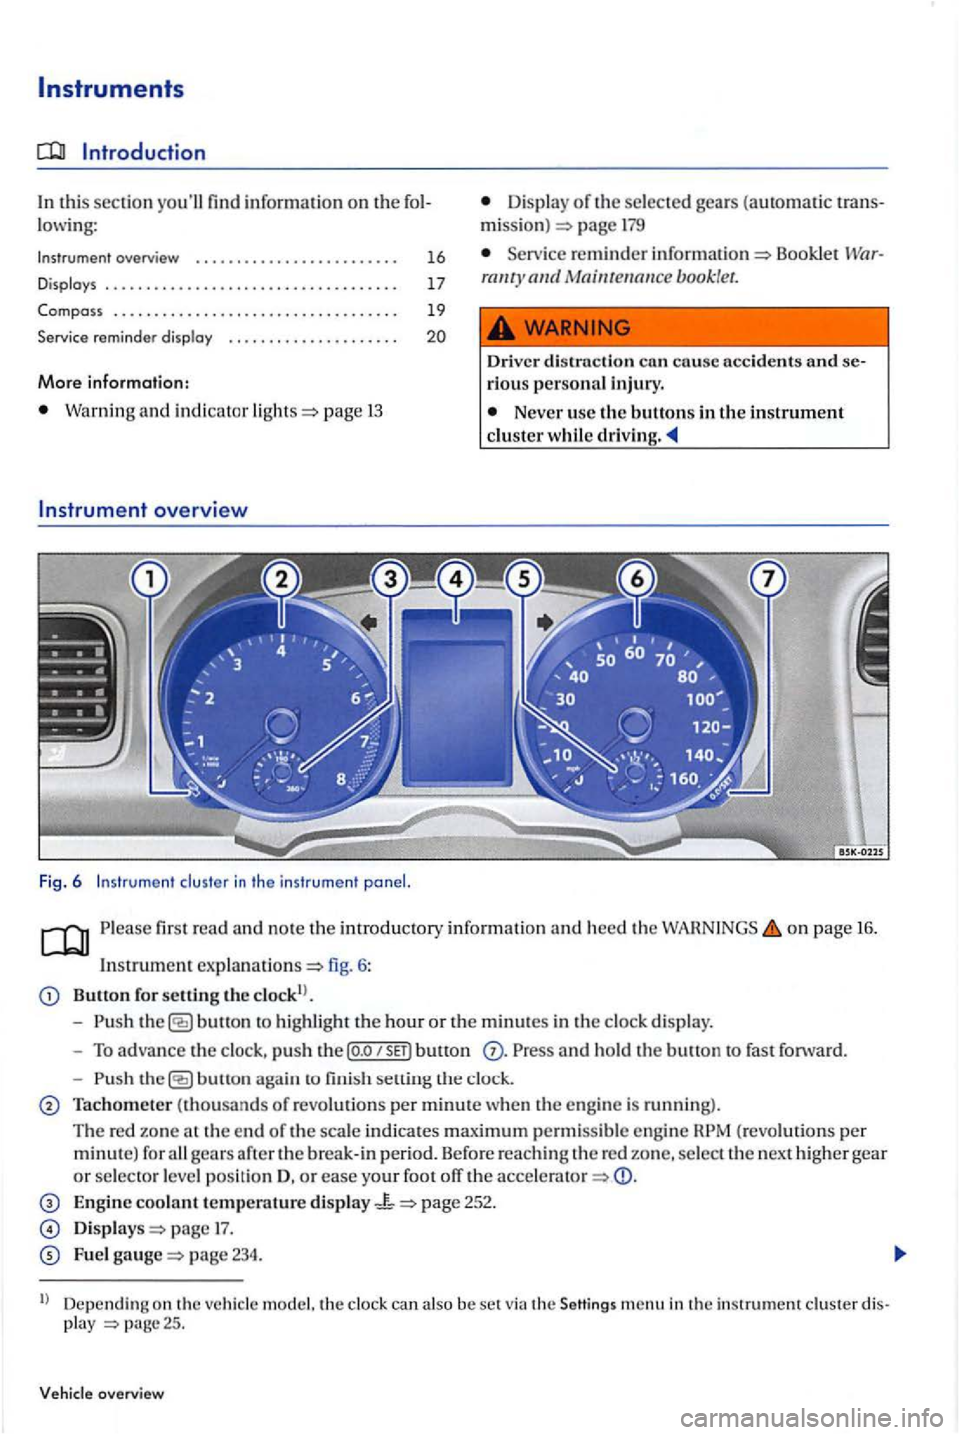
In strum ent
Button for setting the clo ck!).
- Push
button to hi ghli ght the hour or the minut es in the clo ck di splay.
- To advance the clock , pu sh t
he P ress a nd hold th e buu o n to fast fo rward.
-
button aga in to fini sh se llin g th e clock.
Tachometer (thousands of revolut io ns per minute w hen the engine is running).
The re d zo ne at th e e nd of th e scale indica tes maximu m permis s ible eng in e gears
page 17.
Fue l page 234.
ll Depending on th e ve hicle model. th e clock can also be set via the Seltings menu in th e instrument clus ter disp lay
Page 21 of 541
Service reminder
first read and note the introdu ctory information and heed the WARNINGS on page 16.
The service appointment reminder is shown in the clus te r page 16, fig. 6 more information, please see the Warranty and Maintenance booklet.
Information on
maintenance Booklet booklet
Volkswagen distinguishes between serv ic e appointments an engin e oil change, such as an in spection serv ice. The service reminder di splay indicates only ser
vice appointme nt s w hi ch includ e an engine oil change. All o th er serv ice appointments, su ch as the n ex t due inspection serv ice or brake fluid
change, are indi cated on the sticker on the veh icle
door pillar or in th e Warranty and Maintenance booklet.
For vehicles with
time or distance-driven depen
d ent service, fixed service intervals are defined.
Service reminder
If se rv ic e is due in the near future ,
a wrench and a miles (kilomete rs) indicator are shown in the in strument cluster display . The
mil eage shown is the m aximum distance can
b e dri ven until the require d service must be form ed . Th e di spla y changes after a few seconds. A
clock symbol is displayed and the number of days
until the re quired service is show n.
For
i s dis pla yed for severa l seconds. For Service now
i s indi cated on the instrument cluster display.
overview
Querying a service message
The current service message can b e accessed
whe n the ig niti on is switched on, the engine is
switched off, and the vehicl e is stopped:
button in the instrument clu ste r
seve ral times until the wrench appears.
Select th e Settings menu.
In the Service sub-menu, se lec t th e Info menu item.
Overdue service is indicated by a negative sig n in
front of the mil eage or day info rm ation. Fo r cles Service since---mi or--days is indi cated on the instrument cluster displa y.
Resetting the service reminder dis
play
If the service was not performed by an authorize d Volkswagen dealer or an authorized Volk swagen
Serv ice Facilit y, the service reminder can be reset as follows:
Veh icl
es with text message display:
Se lec t th e
menu.
the sub-menu, select the Reset menu ite m.
request with
off the ig nition.
lea se th e button and push button withi n about seconds.
Do
not reset the service r eminde r betwe en serv ice intervals; otherwise, incorrect information will be display ed.
The se rvice reminder disappear s afte r a seconds when the engi ne is running or the bullon has been pushed .
Page 40 of 541
Description of the power system
firs t rea d and no te th e in troduc tory in for mation and heed the on page38.
T he pow er lockin g syst em co ntrols central un
locki ng and lock in g of all doors and the rea r hatc h .
Fro m tl1e outsid e wit h the vehicl e key.
Fro m the in sid e w ith th e remote contro l switch
Speci al fu nct io ns of the power locking syste m can
b e ac tiva ted or dea ctiva te d via the su b-m en u i n the Sett in g s menu or by an au tho-
Fun cti
on
rize d Volkswagen dealer or author ized Volkswage n
Service page 21.
T he doors an d rear h a tc h can b e manually un
l o ck e d and locke d if there is a m alf unc tio n of th e
ve hicl e key or th e power locking sys te m .
L ocki ng the vehicle
after airbag inf la tio n
the airba gs are activated during
the centra l lockin g sys tem
Locking th e ve hicle from th e
outs ide: -Swi tc h th e ig nit ion off and o n again re m ove th e vehicl e key from the ig niti on.
the
with the ve hicl e
k ey buttons
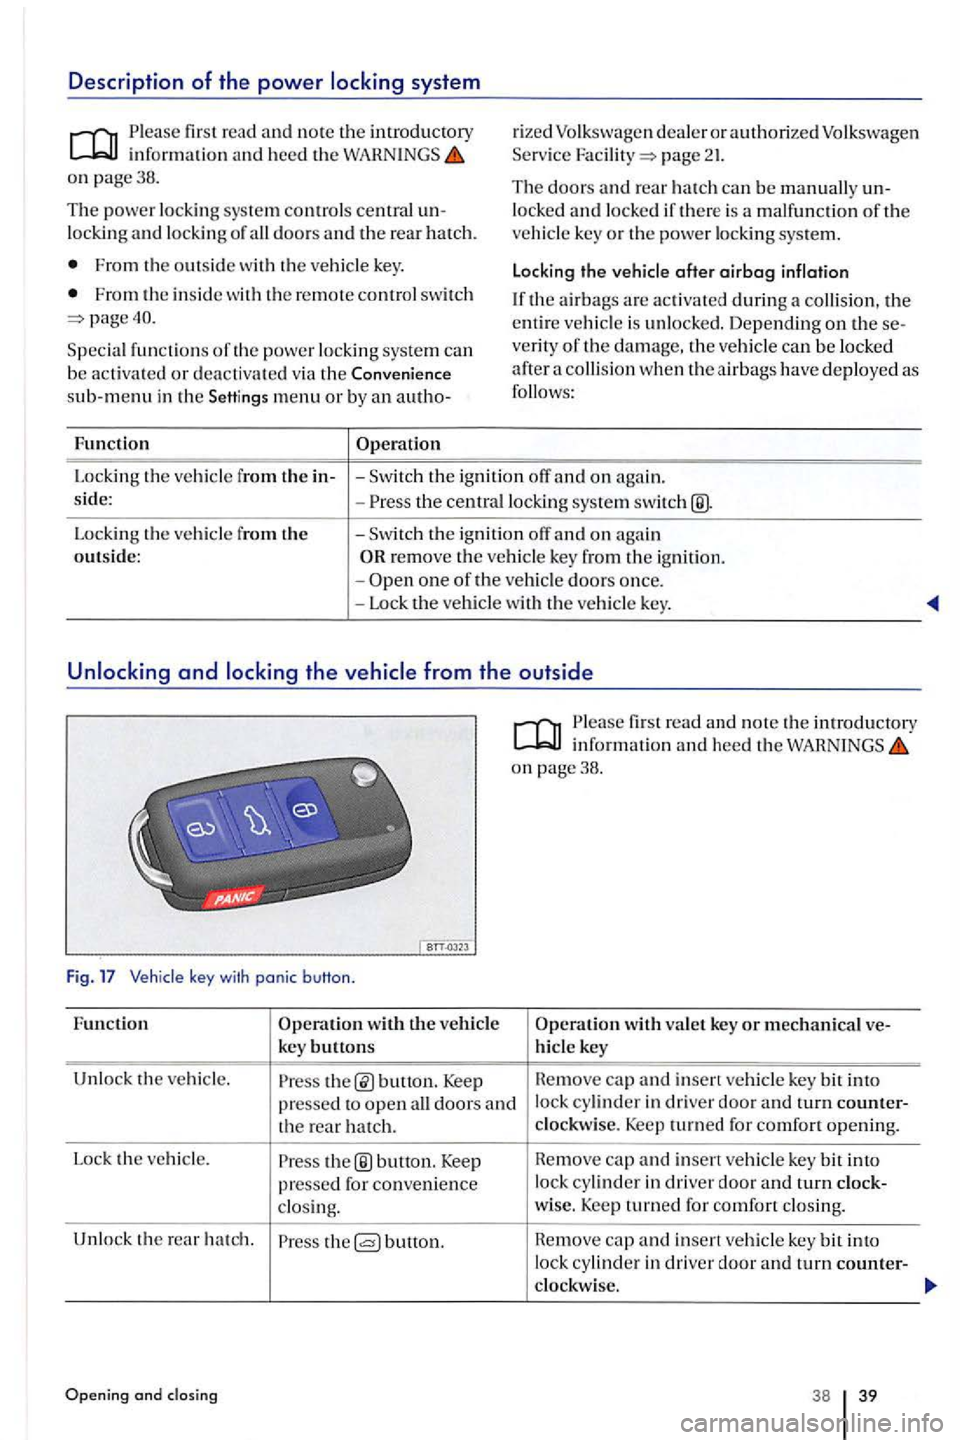
Unlo ck th e ve hicle.
firs t read and note th e introductory infor ma tion and heed th e on page38.
bunon. Keep cap and insert ve hicle key bit into
pres
sed for co nve nien ce lock i
n driver door a nd turn clock-
clo sing. w
ise. Keep turn ed for comfo rt clos ing.
U nlo ck the re a r h atc h .
butto n. cap a nd insert ve hicle key bit int o
lock cy lin der in driver door turn cowller-
clockwise.
Ope ni ng and 38 39
Page 57 of 541
Sitting properly and safely
Adjusting the seating position
Introduction
In thi s sect io n you'll find information on th e lowing:
Examples of improper sealing positions . . . . . . . . . 57
Proper seating position . . . . . . . . . . . . . . . . . . . . . . . 58
Manual controls on the driv er and passenger
. . 62
Ad jus ting the s teeri ng wheel positio n . . . . . . . . . . . 63
Center a rmrest . . . . . . . . . . . . . . . . . . . . . . . . . . . . . 64
Number o f
Th e ve hicl e has total of five seating positio ns: in fron t and three in the re ar. Each sea tin g sition saf ety be ll.
More information:
pag e 65
page 67
Airbag page
sa fe ty and child page
Improper se atin g pos itions increase th e risk of severe or fata l injurie s in a cras h or other dent, especially w hen th e a irbag deploys.
All occupants mus t b e properly seate d and properly restra ined at all tim es.
Never lett h e number of people in the veh icle
excee d the number of availabl e seatin g tions with sa fe ty belt s.
Alw ays secure childr en in the ve hicl e with an approve d and suitable restraint system cord ing to t heir he igh t and weight
All vehi cle occupants shou ld alway s keep
th eir fee t in their r espective footwell s. Neve r
a llow veh icle occ upants to place their feet on the scat, in strume nt panel, out of th e w ind ow, etc. The and eve n in crease the risk of inju ry in a cras h.
B efore driving
Always adjust scat, sa fcry belts and head straints properly befo re drivin g and m ake sure that passe nge rs are prope rl y restrai ne d.
the front passenger sc at as
inch es (25 e m) between th e front passenge r's breastbone and the instrument panel.
Alway s adjus t the driver's scat and th e
s teeri ng wheel so that there arc at least
em).
or an authorized Volkswagen Facilit y to sec w hether adaptive equipment is availabl e.
Alwa ys hold the steerin g wheel on the side of th e steering wheel rim with your hand s at the 9 o'clock and 3 o'clock positi ons to help reduce the risk of p ersonal inju ry if th e dri ver's
a ir bag inflates.
Neve r hold the stee ring whee l at the 12 o'clo ck
po siti on or with your hand s at o th er places insid e
the stee ring wheel rim or o n th e stee rin g w hee l hub. the steering w heel the wrong way
ca n ca use serio us in juries to the hands, arms,
and h ea d if th e driver 's airbag inflates.
t h e s teeri ng whee l toward your face
d ec reases the abiliry of the driver's airbag to
h elp prot ect yo u in a co llisio n.
Never drive with backre sts reclin ed or tilt ed
far back . T he farther th e backr ests arc tilted back, the g reater th e r is k of injury caused by
in correc t positioning of th e safet y belt s and
improper seati ng position.
Never drive with a front seat backres t tilted
forward. If the front airbag deploy s, th e front
backres t ca n b e forced backward and injure
p asse ngers on th e rear scat.
far back as possibl e from the s tee ring
whee l a n d the in strument panel.
Page 59 of 541
Prope r sea ting posit ion
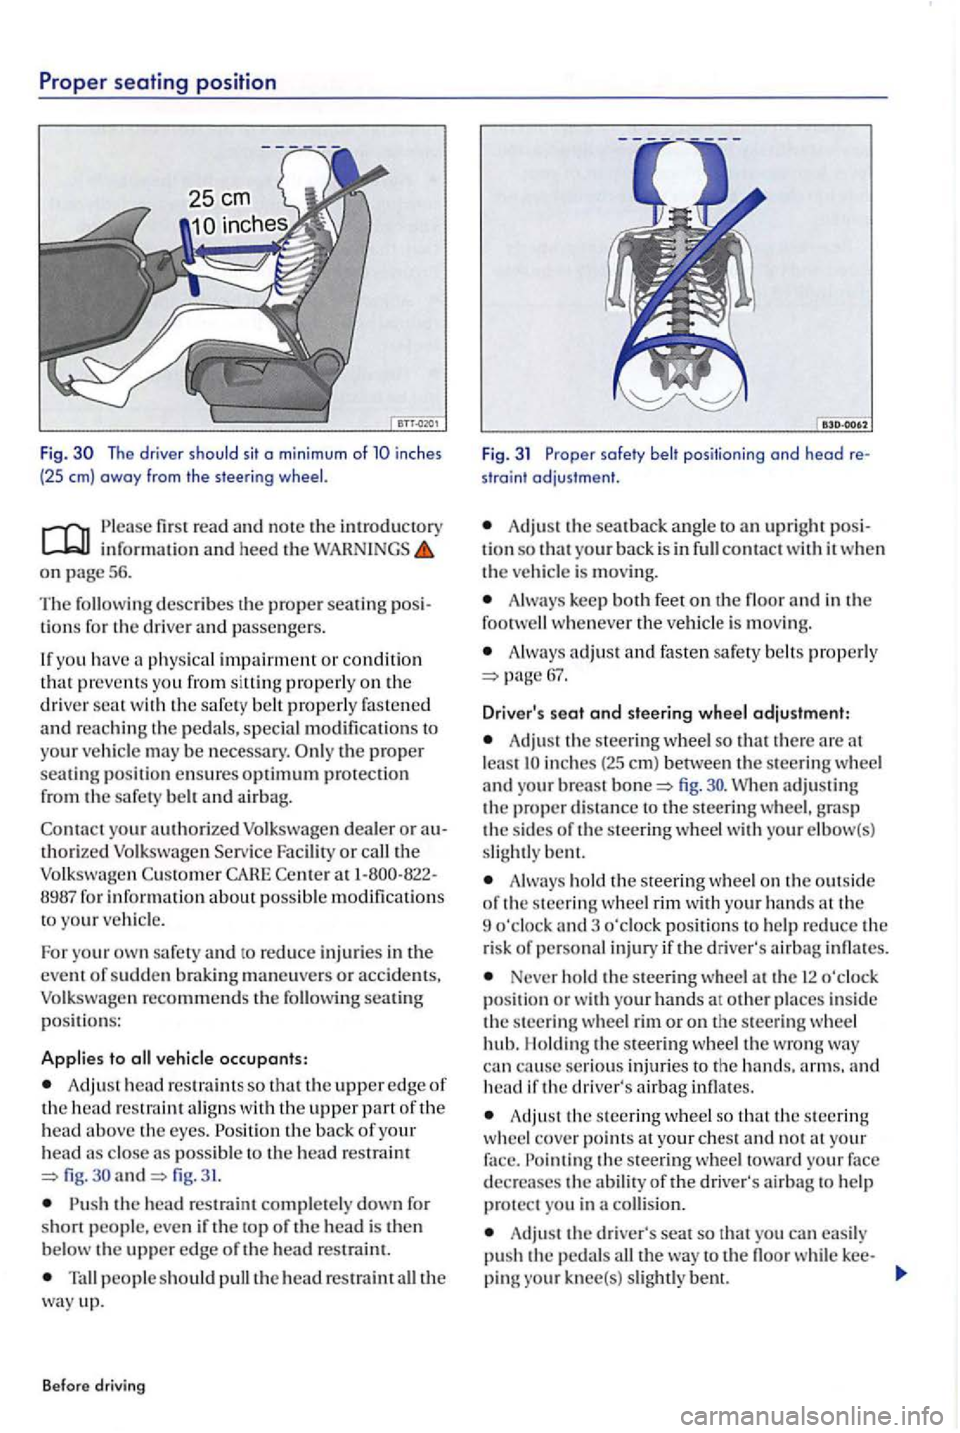
Fig. The driver should sit o min imum of inches
(25 em) away from the steering
first read and note the introductory information an d heed the WARNINGS on page 5 6.
Th e
describes th e proper sea tin g lio ns for the driver and passengers .
If yo u hav e
physical impairment or condition that preve nts you from siltin g properly on the driver wit h the safe ty belt properly fastened and re a ching th e pedals, special modificatio ns to
your ve hicle may be necessary. p roper seating positi on ensures optimum protection from the safety belt and airbag.
Con t
act yo ur authorized Volkswagen dealer o r authorized Volk swage n Serv ice Facility or the Volkswagen Custo m er CAHE Cente r 1-800-822-
8987 fo r informati on about poss ible modification s
t o your ve hicl e.
F o r yo u r
own safety and to reduce inj urie s in the
event of sudde n brakin g maneuve rs or accid ents, Volkswagen recommends the seating p o siti ons:
Applies to vehicle occupants:
Adj ust head re straint s so that the upper edge of the head restraint aligns with the upper part of the head above th e eyes . the ba ck of your head close as poss ible fig. and fig. 31.
the head re straint completely down fo r
short people. eve n if the top of th e head is the n
b elow the uppe r edge o f the head re strai nt.
people s ho uld pull the head restraint the way up.
Before driving
Fig. 31 Proper safety belt positioning ond head re
straint adjustment.
Adjust the sea t back ang le to upri ght posi
tion so that your back is in conta ct w ith it w he n the vehicle is moving.
Alw ays keep both feet on th e floor a nd in the
foot whenever the vehicl e is mov in g.
A lway s adjust a nd fasten safety belt s pro perly
A dju st the steering wheel so that the re are lea st fig .
Always ho ld th e s teering wheel o n the out sid e
o f th e s teerin g wheel rim with your hands the
9 o'cloc k and 3 o'cloc k pos ition s to help re duce the
r is k of personal injury if the driver' s airb ag infl ates.
Never ho ld the steering wheel a t th e 12 o'clock position or w ith your hands at ot her places in side the steerin g wheel rim or o n the steerin g whee l
hub. l lo ldin g the steerin g w hee l the wro ng can cause se rious injurie s to the arms. and head if the driver's airbag infl ates.
Adju st the s teerin g wheel so that the s teerin g
w heel cove r points the ste erin g wh ee l toward your face
d ecrea ses the abilit y of the driver's airba g to help protect you in a collision.
Adju st the driver's seat so that you can easily
pu sh the pedal s the way to th e floo r while kee-
pin g knee(s) slightl y bent.
Page 64 of 541
Note
When removin g or reinstalling the head restrai nt,
take car e t ha t head restraint does not strik e the headliner or the back of the front seat. T he
headlin er or oth er parts of the vehicle could erw ise be
position
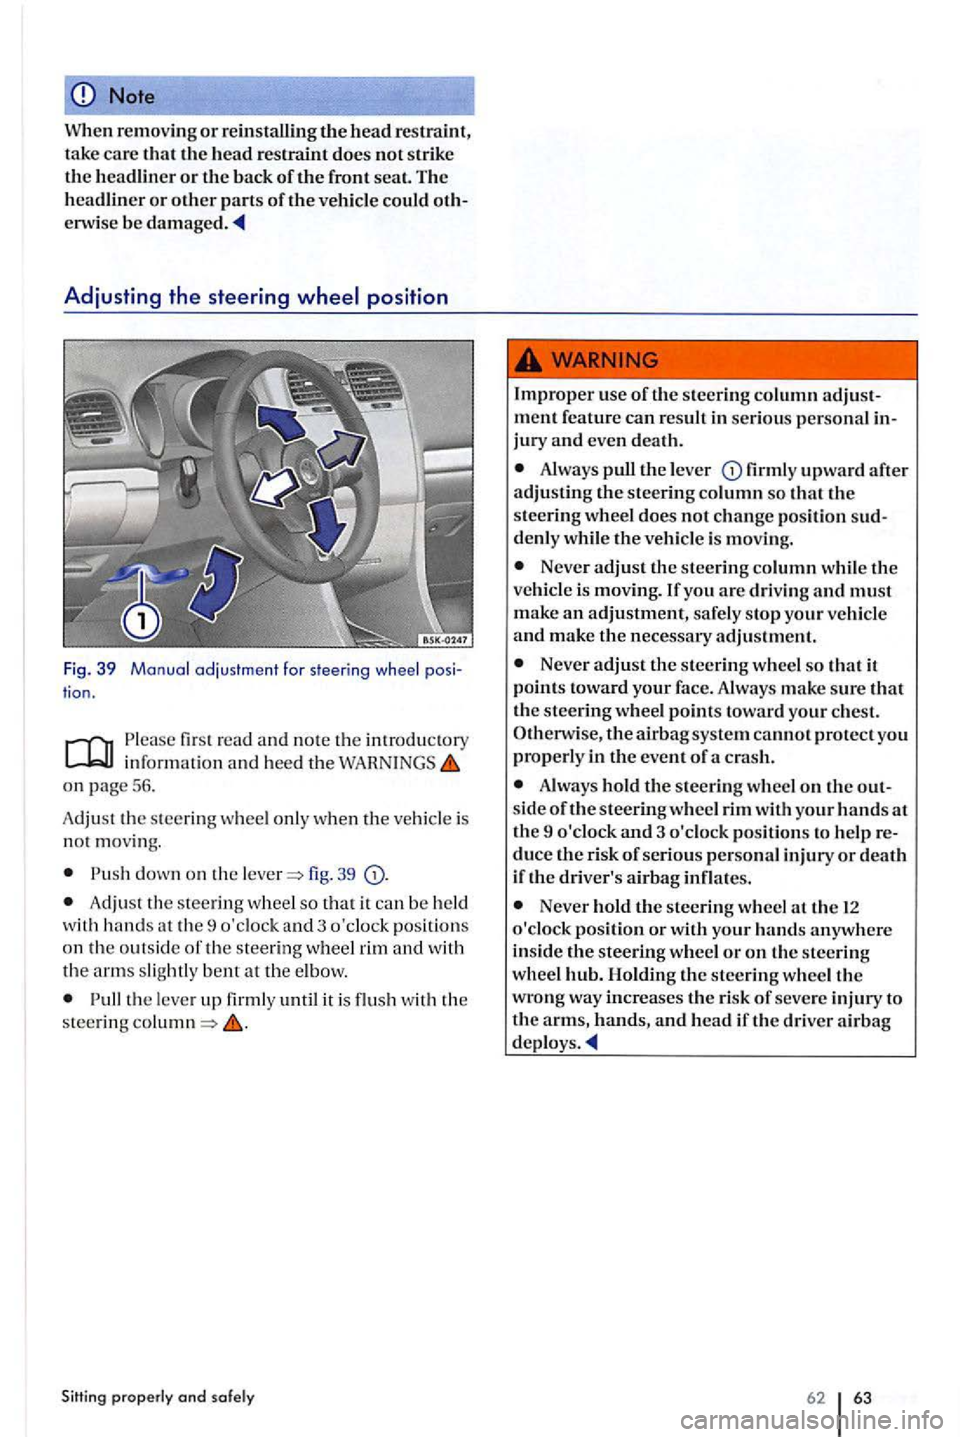
Fig. 39 Manual adjustment far steering whee l pos i
tion.
firs t read and note the introd ucto ry
on page 56.
A dju st th e
steering wheel only when the vehicle is not movin g.
fig. 39
Adju st th e steerin g w hee l so th a t it ca n be held
w ith hands at th e 9 o'clock and 3 o'clock pos itions on the ou ts ide of the stee ring whee l rim and w ith
the arm s slight ly at the e lb ow.
the lever up firmly until it is flu sh with the steering
Always puLl the lever firml y upward after adjustin g th e steering column so that th e
s teering wheel does not ch ange positi on sud
d enl y whil e U1e vehicl e is movin g.
Neve r adjust the stee rin g column w hile the ve hicl e is moving. you are driving and must make an adjustment, safely s top you r vehicle and make the necessary adjustment.
Neve r adjust the steerin g wheel so that it points toward your fac e. Alway s make sure th at
Alwa ys hold U1e steering w hee l o n th e out side of th e steering wheel rim with your hands at
th e 9 o'clo ck and 3 o'clock positions to h elp
Neve r hold the steering w heel at the 12 o'clock position or with your hands anywhere
in side the s teering wheel o r on th e steering
w hee l hub. Holdin g th e stee rin g wheel the wro ng way increases the r isk of seve re injury to the arms, hands, and head if th e driver airb ag
62 63
Page 94 of 541

Always make sure that the statu s signaled
b y the BAG light is correct
for the way that the front passenger seat is bein g
u sed.
The fine dust c reated when airbags deploy can cause breathing problems for people with asthma or other breathing conditions .
To reduce the risk of breathing probl ems , those wit h asthma or tion s should get fres h air right away by getting
o ut of th e ve hicl e or opening windows or doors.
If yo u are in a c ollision in which airbags de
ploy, wash your hands and face with mild soap and wate r b efor e eating.
Be careful not to get the dust int o your eye s, or int o any cut s or sc ratch es.
If the residue should ge t into your eyes, them with water.
Airbags that have deployed in a cras h must
b e replac ed.
Use only original equipment airbag s appro
ved by Volkswagen and installed by a train ed
technician who has the necessary tools and diagnosti c equipment to properl y re plac e any airbag on your veh icle and assure sys te m eff ec
ti ve ness in a cra sh.
Neve r pe rmit salvage d or recy cled airb ags t o
be install ed in your vehicle .
Advanced Airbag System components
first re a d and note th e introductory information and heed the
on pag e
vehicles equipped with the Adva nced Airbag Syste m , th e front passe nge r seat contains a who le
array of important Advanced Airbag compo nents
page 82. Because the front passe nger seat contains important Advanced Airbag System components. you must
take ca re to prevent it from bein g damaged . Damage to th e sea t may pre vent the Adva nced Airbag Syste m for the front passenger sea t from
doing its job in a cras h.
S ittin g properly ond solely
Alwa ys hold the s teering wheel with hands on outsid e of th e steerin g wheel rim at the 9 o 'clock and 3 o'clock positions to help re
duce
Neve r hold the steeri ng wheel at the 12 o'clock position or with your hands anywhere
inside
s ioner s are cla ssified as Material -special handlin g ma y apply.
applicable legal requir ements when
scra pping the vehicle or o f it s restraint sys tem, including airbag modules and safe ty belts
wit h pretensioner s. Auth orized Volkswage n
dealers and authorized Volksw agen Serv ice ties are familiar with the require ments, an d we rec
ommend that you have them p erform this serv ice for
The front Advanced Airbag System also includes:
sensors in the front of th e ve hicl e th at
m eas ure vehicle acce lera tion and dece leration to
p rovide informat io n to th e Advan ced Airb ag
System about the seve rity o f a crash.
An elec troni c co ntrol unit, with int egra ted
cras h sensors for front and sid e im pac ts. The con
trol unit w heth er or n ot to fire just the front air bag s ba sed on the information received
from the crash sen so rs. Th e control unit also whether the safety belt pre te n si oners
s hould be activate d.
A n Adva nced Air b ag. with gas genera tor, ins id e the steering wheel hub for th e driver.
An Adva nced Airbag. with ga s gene rator, in sid e the ins trum ent pan e l for th e front passe nger.
A we ig ht-sen sing mat unde r the upho ls tery paddin g of th e front passenge r seat cushion that
m eas ures the to tal weight on the sear. The infor
m atio n regi stered is sent co nti nuo usly to the elec-
92 93
Page 240 of 541
Never open or close the engine hood if steam or coolant is escaping. Hot steam or coolant can cause serious burns. Always wait until you no longer sec or hear steam or coolant escaping
from the engine.
Hot parts of the engine and the exhaust
system will burn skin on contact.
When the engine has cooled down and you are ready to open the hood:
- Firmly
apply the parking brake and shift the transmission into Park
The engine coolant system is under pressure when the engine is hot. Never unscrew the coolant expansion tank cap when the engine is
hot. Hot coolant can spray out and cause severe burns and other serious injuries.
- Turn
the cap slow ly and very carefully in a
counter-clockwise direction while applying
light downward pressure on the top of the cap.
- A
lways protect your face, hands, and arms from hot escaping coolant or steam by
Never spill fluids on the engine or exhaust
system when Spilling fluids onto hot parts of the engine or exhaust system can cause a fire.
High voltage systems in the
engine com ment can cause electrical shocks or even
Never short-circuit the electrical system. Be especially careful when using jumper cables. The vehicle's battery could explode!
To reduce the risk of electrical shock and sonal injury while the engine is running or being started:
the engine compartment
- Never touch ignition cables. Never touch other components of the high voltage tronic ignition system.
- Never touch
the wiring of the gas
Never reach into t11e area around or touch the
radia tor fan. Contact with the blades can cause serious personal injury. Always remember that the radiator fan is temperature-controlled and can come on suddenly even when the engine has been switched for a while and the key has been removed from the ignition.
lfyou have to perform a check or repair when the engi ne is running, there are more risks from tl1e rotating parts, such as the drive belts, nator, radiator fan, etc ., and from voltage ignition system. Always use extreme care.
- Always make
sure that jewelry, loose clothing and long hair do not get caught in rotating engine parts. Before starting any work remove your je welry, take
parking brake is on.
Never leave any objects in the engine
left behind can cause malfunctions,
Do not smoke.
Never work next to open flames or sparks.
Never pour or spill operating fluids or other flammable liquids on the engine. These fluids can ignite on hot en g in e parts and cause ries .
242 243