Page 12 of 444
Installin g the upper te ther strap on the
anchorage 2.1:
Instrument cluster 3.1: 8
Menu structure 3. 1: 14
Instrument cluster illumination 3.1: 3
Instrument cluster lighting 3.1: 44
Instrument panel 3. 1:
K
Access positive an d negative
t
erminal s 3.2:
Light change 3.2: 93
lights
Lights 3.1: 43 interior 3.1:47
Lights & V is ion
Menu 3.1:17
Lock 3 .2: 26
Locking driver's door in an e m erge ncy 3.2: 88
Locks 3.2: 26
Chi .ld safety 3.1: 33
Low beam 3.1: 43
Lower anchorages 2.1: 71
Luggage compartment 2.1: 3.1: 69
Luggage compartment cover 3.1:71
M
Main menu -Mu lt i-Function
In dicator 3.1:
Malfunct ion Indicator Lamp 3.2:
Vehicle Weights 3.3: 6
Menu compass 3.1: 19
Menu for convenience functions 3.1: 16
Menu for Lights & Vision 3.1: 17
Menus Examp le of use 3.1:
Menu sound system 3.1:
MFI 3.1:20
M IL
m irrors, electrical 3.1:53 Simultaneous adjustment 3.1:53
Mirrors lowered function 3.1: 17
Modifications 3.2: 32
Monitoring th e Advanced Air bag System 2.1:
Key words 9
Page 175 of 444
Booklet 3.1 Controls and Equipment
Warning and lights in the tachom
eter
Symbol Meaning of warning lights
swagen dealer or
on: Electromechanical power steeri ng
a
ssi s t contact yo ur a uthorized
swagen d ealer or
contact your authorized swagen dea ler or workshop
Malfunction
Properly close th e fu el cap
Elec tronic Power (Gaso line engine only)-contact your authorized Volkswage n dealer or qualified workshop
E le ctronic immobilizer
Generator malf unction-contact your au tho-
rized Volkswage n dealer or qualified workshop
Bulb failure
High beams swit ched on
Turn signal left
Turn s ignal right
Warning and indicator light s in the di splay
Symbol Meaning of lights
Engine coolant temperature too high-
and
Engine coolant level too low-coolant
le vel. Fu
rther information
3.2
"Tip s and Advice". chapter steering"
steerin g"
pageBS
-
batteries"
booklet 3.2
page46
Further information
page46
page46
Further inform ation
3.2 "Tip s and Adv ice", chapter
Page 213 of 444

and Equipment
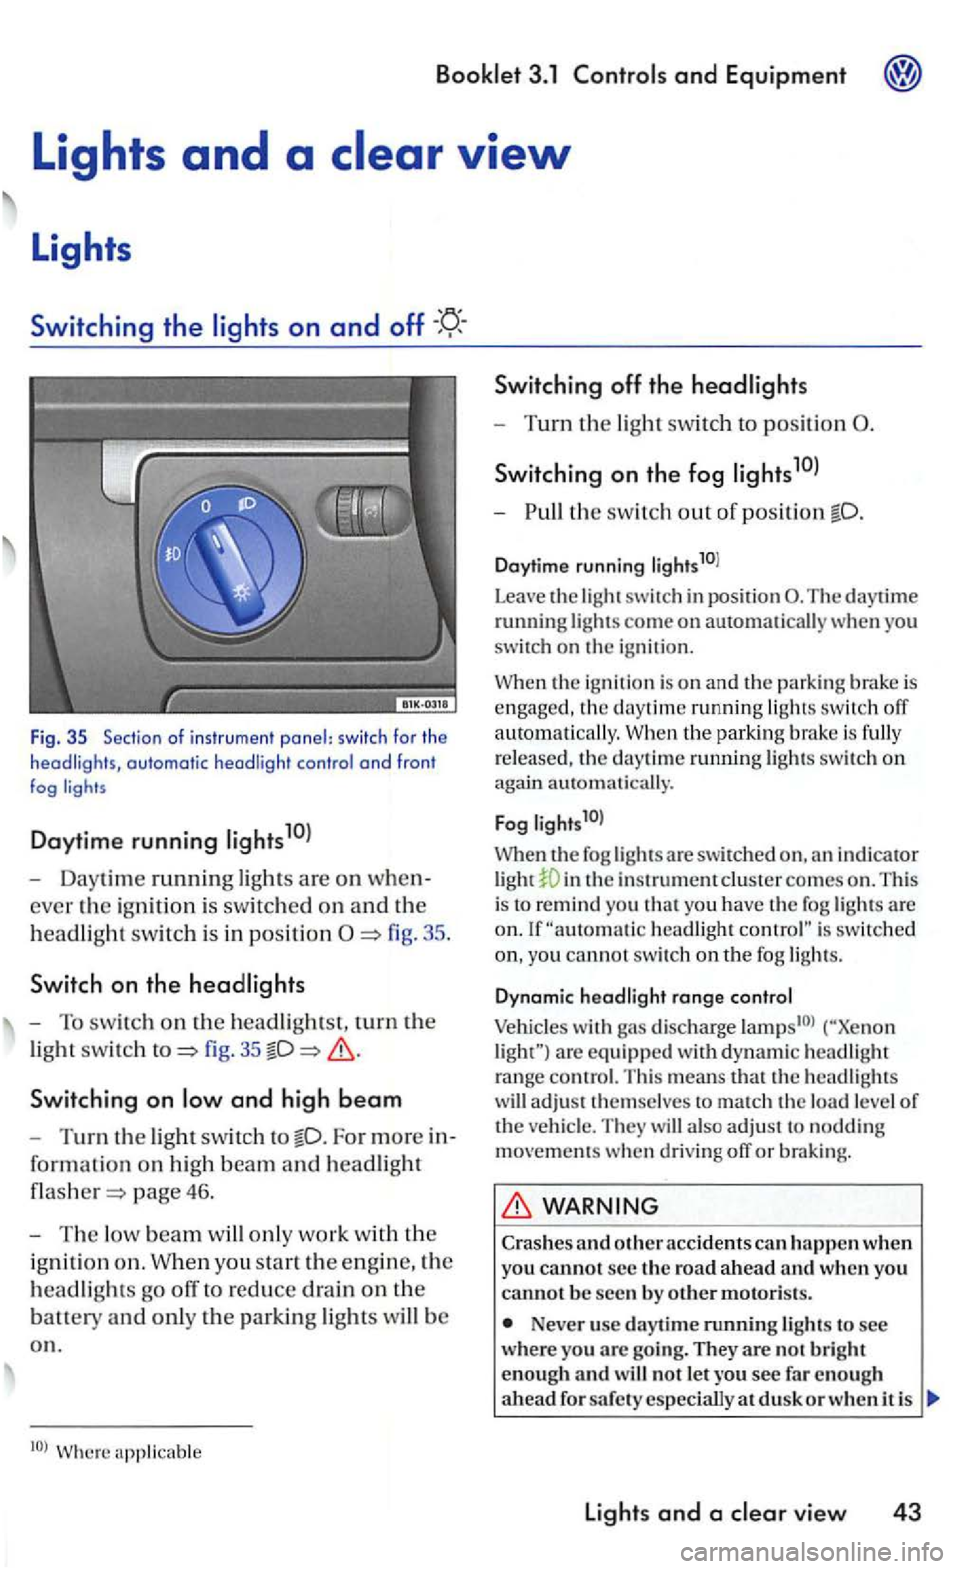
Fig . 35 Sec tio n of i nstr u m ent panel: switc h fo r th e headligh ts, automatic headli ght contro l a nd fron t fog
Daytime running
- Daytime running ligh ts are on when
ever the ig ni tio n i s sw itc hed on an d th e
h
eadlig ht swit c h i s in positi on
fig. 35
Switchin g on
For more in
for ma
tion on hig h beam an d headlight
page 46.
-The low beam w ill only work w it h th e
i g ni
tion o n . W hen you sta rt the e ngin e, the
h
eadlights go off to reduce drain on the
batt ety an d only th e parkin g lights will b e
o n .
Switching off th e headlights
- Turn the light swit ch to position
S wi tch ing on the fog
-th e switch out o f position
Daytime running li g hts10l
Leave
the light switch in posit ion The daytime running lights come on automatically you
switch on the igni tio n.
the ignition is o n and the parking brake is engaged , the daytime running ligh ts switch off
a uto m atically. the park in g bra ke is fully
r e leased , th e daytime ru nning lights swit c h on again automati cally.
F
og l ights1 0l
When th e fog lights a re swit ch ed in th e instrument clus te r comes on . This
i s to remind you t h at yo u have the fog lights are headlight is switc hed
yo u cannot switc h on th e fog ligh ts.
D ynam ic hea d light range co ntrol
Vehicles with gas discharge are eq uip ped w ith d yn am ic headlig h t range contro l. T his means that th e headlig hts
w ill adjust t hemselves to match th e load level of the ve hicl e. They will also ad ju st to noddin g movements when d riving off or braking.
WARNING
Crashes and o ther acc idents can h appen when you cannot s e c the ro a d a head and w hen you canno t b e seen by o th er motoris ts.
Never use day tim e running lights to see wher e you arc goi ng. They are no t b rig h t
enough an d w ill not le t you see fa r en o ug h
a head d usk o r w hen i t is
lights and a vie w 43
Page 216 of 444

and Equipment
and high beam
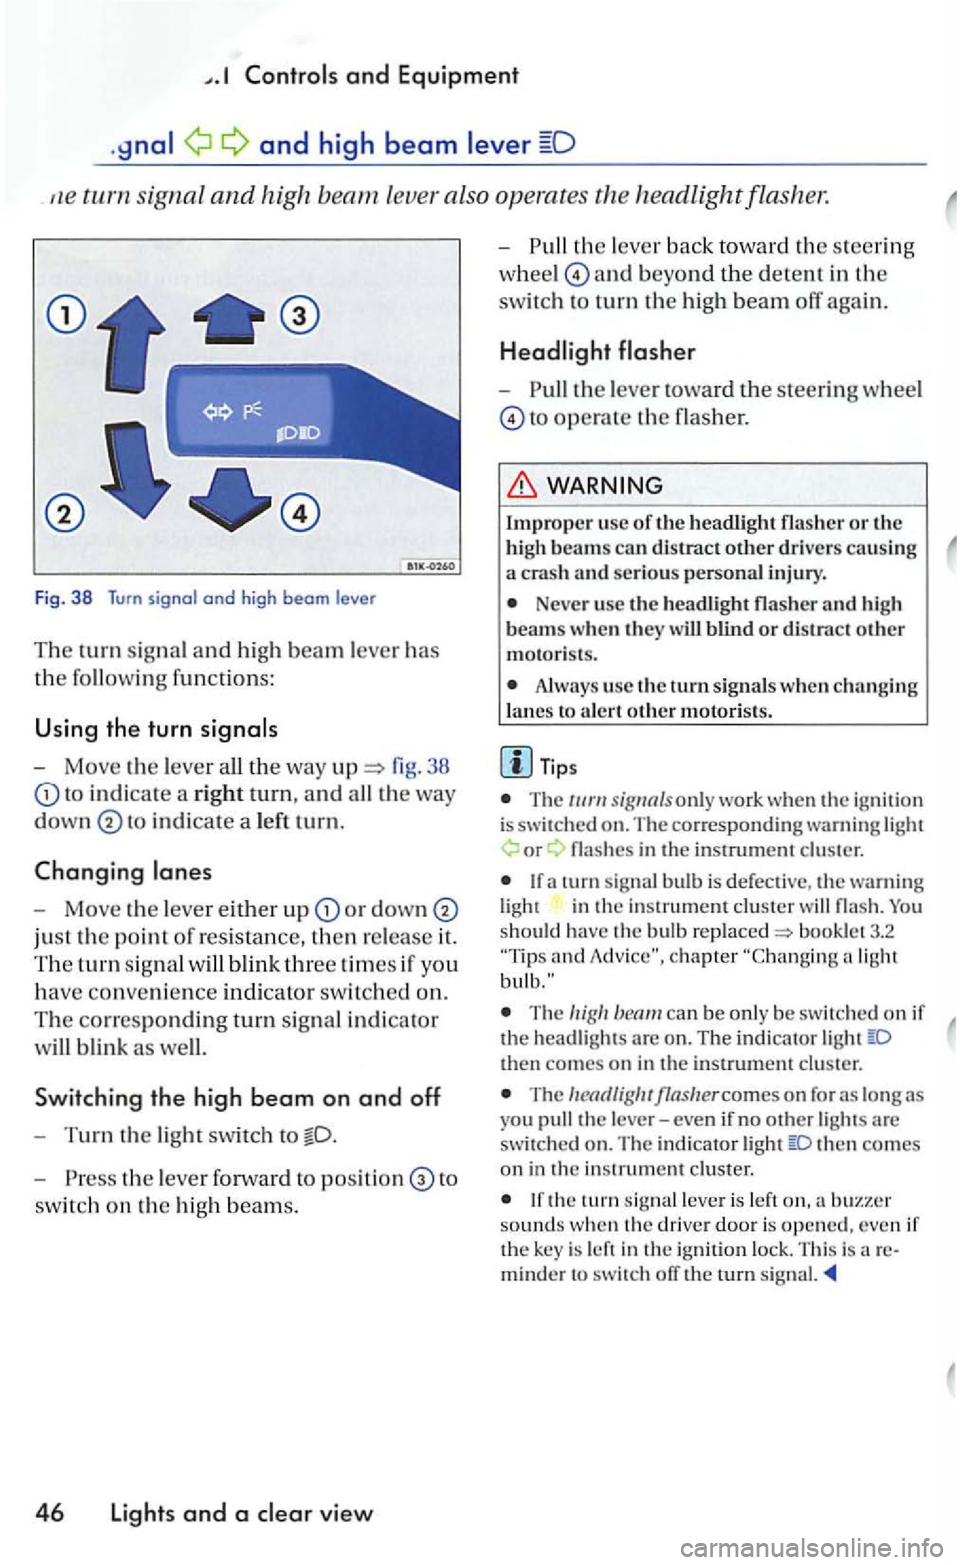
signa l and high leve r also operates
Fig. 38 Turn signal and high beam le ve r
Th e turn signal a n d hi gh beam lever has
the followin g functions:
U sing the turn
- Move the lever 38
to in d icate a rig ht tu rn, and
in dicate a le ft tu rn.
Changing
-Move the leve r either u p or down
just the point of resistance, then re lease it.
The tu rn sig n al
Sw itchin g the high b eam on and off
-Turn the light swit ch to
- P ress the lever forward to to
switc h on the hig h beam s.
4 6 Lights and a view
-th e lever back to wa rd th e s teering
w hee l
and beyond the dete n t in the
switc h to turn th e high beam off again.
-the lever toward the steeri ng wheel
to operate the flasher.
Impro per usc of th e headli ght flasher o r the
h igh beams can distract other drive rs causing a crash an d serious personal injury.
Neve r use the headli gh t flasher and h igh
beam s w hen th ey w ill blind o r distract other motoris ts .
Always use the turn s ig nals w hen ch a nging
l a nes to a le rt oth e r m otori sts .
T ips
T he only work whe n the ig nition is switched on. The co rre sponding warning or
in the in strument cluster
and
The can be only be sw itc hed on if the head ligh ts are o n . The indi cator then comes on in the instrument cluster.
The
then co mes on in the in strument cluster.
the tu rn leve r is left sounds w hen th e driver door is opened, even if the key is left in the ign ition lock. This is areminder to switch ofT the rurn signal.
Page 222 of 444
with headlight washer system
l1eadlig ht
49, 44 is pulled toward s the ste ering
w heel -while low or high beams turned on. llowever, insect
WARNING
A lways read and heed the ..
Note
To avoid make sure that the headlight washers work properly in winter. Keep the n ozzle in the bumper free of snow and remove any ice with de-icer
lr is important for safe driving you good vision ro rear.
Fig. 46 day-night mirror
5 2 Lights and a view
the mirror in the normal position. th e le ve r the bottom edge of th e mirror must point forward. the lever
Page 369 of 444

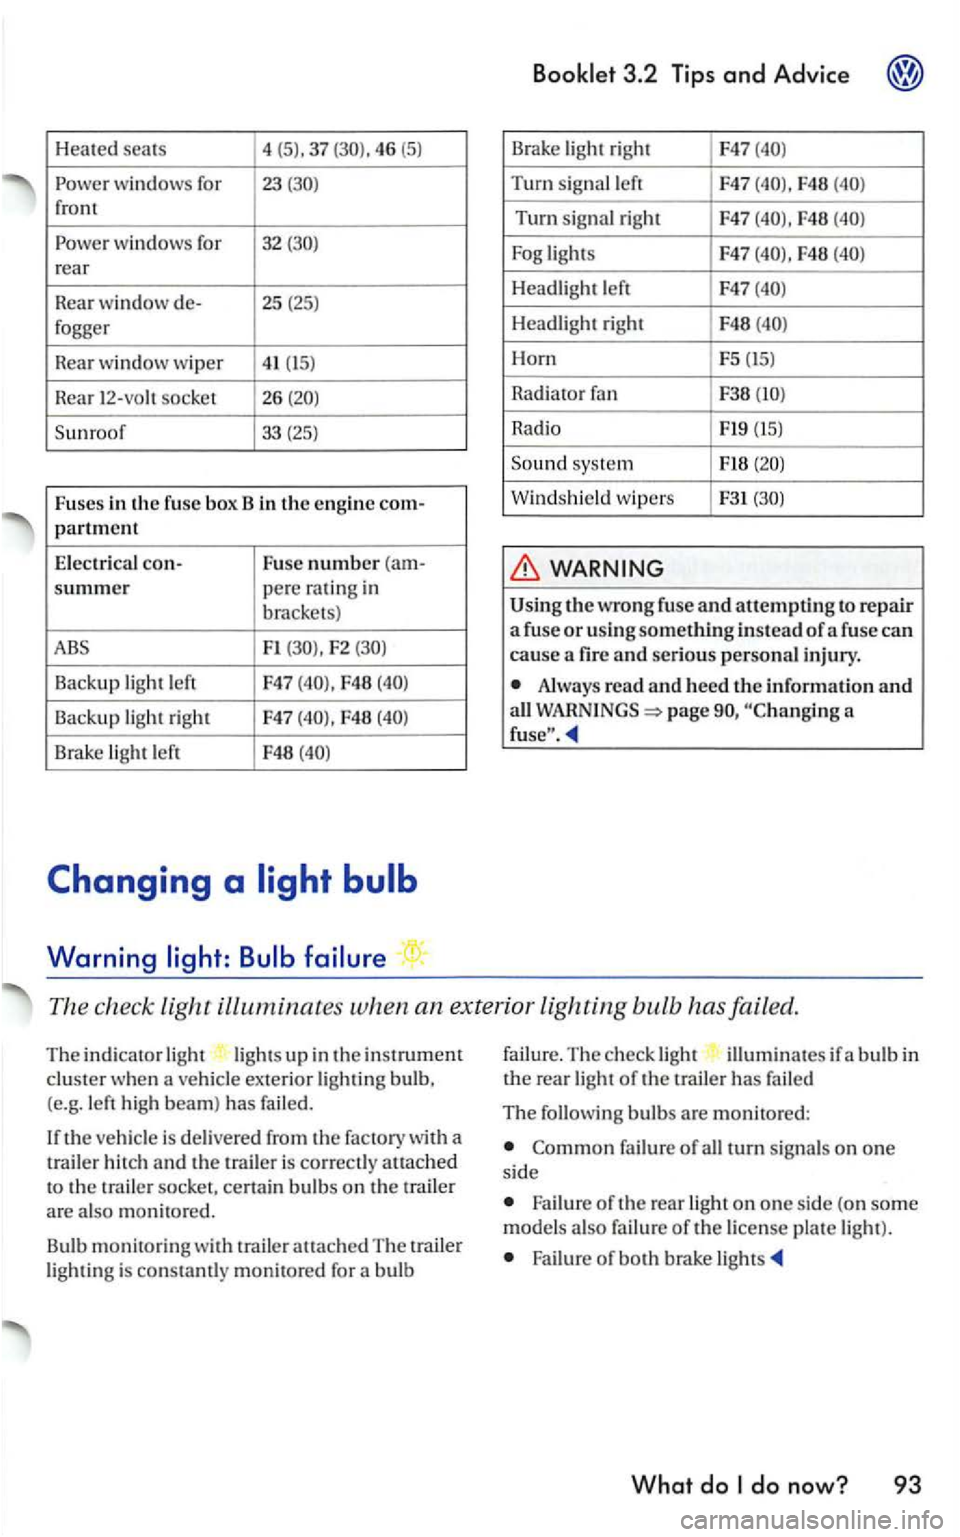
Heated seats 4
(5). 37 46 (5)
windows for 23 front
wind ows for 32 rear
Rea r
window de- 25 (25) fogger
R
ear w indow wiper 41 (15)
R ear 12-vo h socket 26
F1 F2
Backup light left F47 F48
Backup light right F47 F48
Brake light left F48
Warning
Brake light righ t F47
Turn sig na l left F47 F48
Turn signal right F47 F48
F48
Headlight left F47
Headli gh t right F48
Horn F5 (15)
Rad i
ator
Radio Fl9 (15)
Sound syste m
Windshield wipers F31
the wrong fuse and attempti ng to re pair a fuse or usi ng something instead of a fuse can
cause a fir e and serious personal injury.
Alway s read and heed the information and all page a
The check light ill uminates when an ex terior lighting bulb has failed.
The indicato r light lig ht s up in the instrument clus ter when a ve hicle exterior lightin g bulb,
(e.g. le ft high beam) has failed.
th e ve hicle is delivered from the factory with a
t railer h itch and the is correct ly atLached to the trai le r socket, cert ain bulb s on the trail er are also monit ore d .
Bu lb
monitorin g with trailer attach ed The traile r light ing is con stamly monitored for a bulb failu
re.
The ch eck ligh t illumin ates if a b ulb in the rea r light of the trailer has fai led
The following bulbs are mon itored:
failure of all turn signa ls on one si de
Failure o f the rear light on one si de (on som e
model s als o failu re of the license pla te light ).
Failure of both brake li gh ts
What do