Page 275 of 428

265
3. Average fuel consumption
(“AVG MPG” or “AVG L/100 km”)
Average fuel consumption is calculated
and displayed based on total driving
distance and total fue")
’06 HIGHLANDER_U (L/O 0508)
265
3. Average fuel consumption
(“AVG MPG” or “AVG L/100 km”)
Average fuel consumption is calculated
and displayed based on total driving
distance and total fuel consumption
with the engine running.
The displayed value is updated every 10
seconds.
4. Instantaneous fuel consumption (“MPG” or “L/100 km”)
The instantaneous fuel consumption is
calculated and displayed based on dis-
tance and fuel consumption for 1 sec-
onds with the engine running.
The displayed value is updated every 2
seconds.
Note that an accurate figure may not be
shown in the following cases.
�The vehicle is stopped with the engine
running. (The display will indicate the
extremely high fuel consumption.)
�The vehicle is driving down a long
slope applying the engine brake. (The
display will indicate the extremely low
fuel consumption.)
The calculation is reset when the ignition
switch is turned off. 5. Driving time (“E/T”)
The elapsed time after the engine starts
is displayed.
When the engine is started, driving time
is counted from 0:00. Up to 11:59 (11
hours, 59 minutes) can be displayed.
When the driving time exceeds 11:59, the
counter returns to 0:00.
The calculation is reset when the ignition
switch is turned off.
To reset the hour: Push the “H” button.
To reset the minutes: Push the “M” button.
The key must be in the “ACC” or “ON”
position.
If the electrical power source has been
disconnected from the clock, the time dis-
play will automatically be set to 1:00 (one
o’clock).
Clock
Page 279 of 428

269
CALIBRATING THE COMPASS (circling
calibration)
Sometimes the direction display on the
compass may not change after a turn. To
rectify this, stop the vehicle and pu")
’06 HIGHLANDER_U (L/O 0508)
269
CALIBRATING THE COMPASS (circling
calibration)
Sometimes the direction display on the
compass may not change after a turn. To
rectify this, stop the vehicle and push and
hold the “COMP” switch until “C” appears
on the display.
If “C” appears on the display because of
a drastic change in the magnetic field,
perform circling calibration.Drive the vehicle in a circle at 8 km/h (5
mph) or less. If there is not enough space
to drive in a circle, drive around the
block.
After driving 1 to 3 circles in the above
method, calibration is completed when the
direction is shown on the display.
If calibration cannot be performed because
of the magnetized vehicle etc., take your
vehicle to Toyota dealer. Perform circling calibration just after
you have purchased your Toyota. And
then always perform circling calibration
after the battery has been removed, re-
placed or disconnected.
�Do not perform circling calibration of
the compass in a place where the
earth’s magnetic field is subject to in-
terference by artificial magnetic fields
(underground parking, under a steel
tower, between buildings, roof parking,
near a crossing, near a large vehicle,
etc.).
�During calibration, do not operate elec-
tric systems (moon roof, power win-
dows, etc.) as they may interfere with
the calibration.
Page 281 of 428

271
ASHTRAYS
Front ashtray: To use the ashtray, open
the lid.
When finished with your cigarette, thor-
oughly extinguish it in the ashtray to pre-
vent other cigarette b")
’06 HIGHLANDER_U (L/O 0508)
271
ASHTRAYS
Front ashtray: To use the ashtray, open
the lid.
When finished with your cigarette, thor-
oughly extinguish it in the ashtray to pre-
vent other cigarette butts from catching
fire. After using the ashtray, close the lid
completely.
To remove the ashtray, pull the lid and
pull it out.
Rear ashtray: To use the ashtray, pull
it out.
When finished with your cigarette, thor-
oughly extinguish it in the ashtray to pre-
vent other cigarette butts from catching
fire. After using the ashtray, close the lid
completely.
To remove the ashtray, press down on the
lock spring plate and pull out.
CAUTION
To reduce the chance of injury in
case of an accident or sudden stop
while driving, always completely close
the ashtray after use.
Front
Rear
The power outlets (12 VDC) are de-
signed for power supply for car acces-
sories.
The key must be in the “ACC” or “ON”
position for the power outlets to be used.
NOTICE
�To prevent the fuse from being
blown, do not use the electricity
over the total vehicle capacity of 12
VDC/120W (front and rear outlets
together).
� To prevent the battery from being
discharged, do not use the power
outlets longer than necessary when
the engine is not running.
� Close the power outlet lids when
the power outlets are not in use.
Inserting a foreign object other than
the appropriate plug that fits the
outlet, or allowing any liquid into
the outlet may cause electrical fail-
ure or short circuits.
Power outlets (12 VDC)
Page 283 of 428
’06 HIGHLANDER_U (L/O 0508)
273
�
Appliances with high initial peak watt-
age: cathode−
ray tube type televisions,
compressor −driven refrigerators, electric
pumps, electric tools, etc.
�Measuring devices which process pre-
cise data: medical equipment, measur-
ing instruments, etc.
�Other appliances requiring an extremely
stable power supply: microcomputer −
controlled electric blankets, touch sen-
sor lamps, etc.
Certain electrical appliances may cause
radio noise.
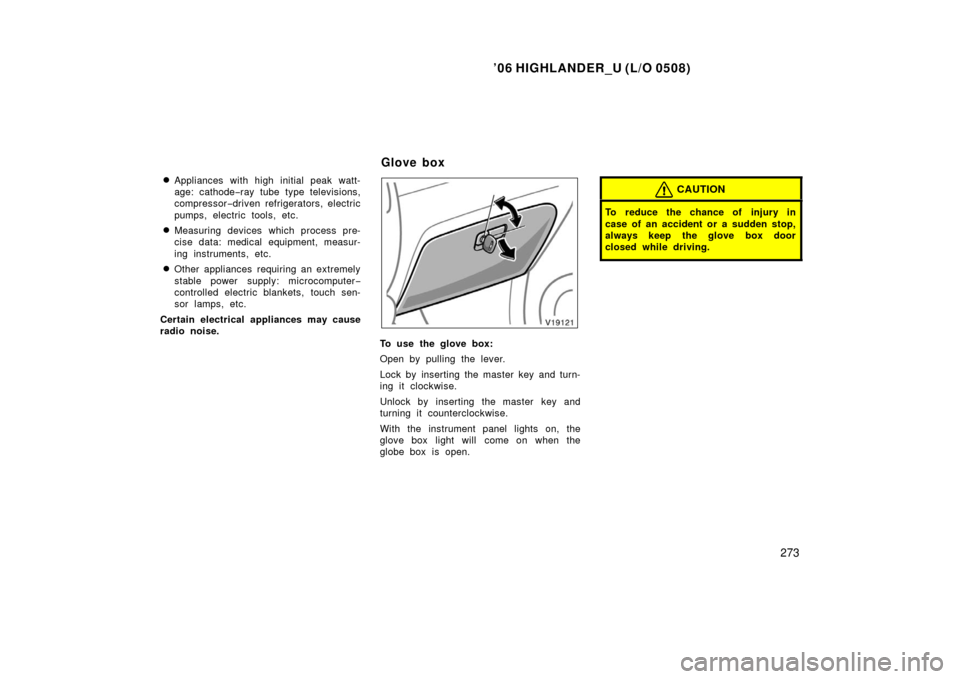
To use the glove box:
Open by pulling the lever.
Lock by inserting the master key and turn-
ing it clockwise.
Unlock by inserting the master key and
turning it counterclockwise.
With the instrument panel lights on, the
glove box light will come on when the
globe box is open.
CAUTION
To reduce the chance of injury in
case of an accident or a sudden stop,
always keep the glove box door
closed while driving.
Glove box
Page 284 of 428

274
Indicator light
Buttons
The garage door opener (\b
Universal Transceiver) is manufactured
under license from HomeLink\b and can
be programmed to operate garage
doors,")
’06 HIGHLANDER_U (L/O 0508)
274
Indicator light
Buttons
The garage door opener (\b
Universal Transceiver) is manufactured
under license from HomeLink\b and can
be programmed to operate garage
doors, gates, entry doors, door locks,
home lighting systems, and security
systems, etc. (a) Programming the HomeLink
\b
The HomeLink\b in your vehicle has 3
buttons and you can store one program
for each button.
To ensure correct programming into the
HomeLink
\b, install a new battery in the
hand− held transmitter prior to program-
ming.
The battery side of the hand −held trans-
mitter must be pointed away from the
HomeLink
\b during the programming pro-
cess.
For Canadian users, follow the procedure
in “Programming an entrance gate/pro-
gramming all devices in the Canadian
market”.
1. Decide which of 3 HomeLink
\b buttons
you want to program.
HomeLink �
Hand −held
garage
transmitter
25 to
75 mm
(1 to 3 in.)
2. Place your hand −held garage transmit-
ter 25 to 75 mm (1 to 3 in.) away from
the surface of the HomeLink
\b.
Keep the indicator light on the HomeLink
\b
in view while programming.
Garage door opener
Page 286 of 428

276
The ceiling mounted garage door opener
motor should now recognize the
HomeLink
\b unit and be able activate the
garage door up/down.
4. Repeat steps 1 through 3 for e")
’06 HIGHLANDER_U (L/O 0508)
276
The ceiling mounted garage door opener
motor should now recognize the
HomeLink
\b unit and be able activate the
garage door up/down.
4. Repeat steps 1 through 3 for each re- maining HomeLink
\b button to program
another rolling code system.
Programming an entrance gate/program-
ming all devices in the Canadian market 1. Decide which of the 3 HomeLink
\b but-
tons you want to program.
2. Place your hand− held gate/device
transmitter 25 to 75 mm (1 to 3 in.)
away from the surface of the
HomeLink
\b.
Keep the indicator light on the HomeLink
\b
in view while programming. 3. Press and hold the selected HomeLink
\b button.
4. Continuously press and release ( cycle)
the hand− held gate/device transmitter
button every two seconds until step 5
is complete.
5. When the indicator light on the HomeLink
\b changes from a slow to a
rapid flash after 20 seconds, you can
release both buttons. 6. Test the operation of the HomeLink
\b by
pressing the newly programmed button.
Check to see if the gate/device oper-
ates correctly.
7. Repeat steps 1 through 6 for each re- maining HomeLink
\b button to program
another device.
Programming other devices
To program other devices such as home
security systems, home door locks or
lighting, contact your authorized Toyota
dealer for assistance.
Reprogramming a button
Individual HomeLink
\b buttons cannot be
erased, however, to reprogram a single
button, follow the procedure “Programming
the HomeLink
\b”.
(b) Operating the HomeLink
\b
To operate the HomeLink\b, press the
appropriate HomeLink\b button to activate
the programmed device. The HomeLink\b
indicator light should come on. The
HomeLink\b continues to send the signal
for up to 20 seconds as long as the
button is pressed.
(c) Erasing the entire HomeLink\b
memory (all three programs)
To erase all previously programmed codes
at one time, press and hold down the 2
outside buttons for 20 seconds until the
indicator light flashes.
If you sell your vehicle, be sure to erase
the programs stored in the HomeLink
\b
memory.
For additional programming assistance
with your HomeLink
\b Universal
Transceiver call the:
�Toyota Customer Experience Center at
1 −800− 331−4331 (U.S.A.)
�Toyota Canada Customer Interaction
Centre at 1 −888− 869−6828 (Canada)
Page 295 of 428
’06 HIGHLANDER_U (L/O 0508)
285
2. Push in the left end of the luggage
cover and place the luggage cover in
the holder as shown.
CAUTION
Make sure the luggage cover is se-
curely stowed.
Cross rails
Roof rails
The roof luggage carrier consists of
roof rails and sliding cross rails.
Upper
knob Side knobs
ADJUSTING THE POSITION OF CROSS
RAILS:
1. Turn the upper and side knobs coun- terclockwise to loosen the cross
rails.
Roof luggage carrier
Page 296 of 428

286
2. Slide the cross rails to the appropri-
ate position for loading the luggages
and turn the side knobs clockwise to
tighten the cross rails securely.
Vehicles with")
’06 HIGHLANDER_U (L/O 0508)
286
2. Slide the cross rails to the appropri-
ate position for loading the luggages
and turn the side knobs clockwise to
tighten the cross rails securely.
Vehicles with the electric moon
roof—There are cross rail stoppers on the
roof rails which help you prevent the
cross rails being touched with the tilted up
moon roof.
NOTICE
Vehicles with the electric moon roof
only—Do not remove the cross rail
stoppers, or the moon roof may be
damaged when it is tilted.
3. In order to fix the cross rails to the appropriate length, turn the upper
knobs clockwise after tightening all
of the side knobs.
CAUTION
Make sure the cross rails are fixed
securely by pushing forward and rear-
ward them. Failure to do so may
cause an unexpected accident or se-
vere injury in the event of emergency
braking or a collision.
Follow the manufacture’s instructions and
precautions when installing the attach-
ments or their equivalent.
CAUTION
When you load cargo on the roof lug-
gage carrier, observe the following:
�Place the cargo so that its weight
is distributed evenly between the
front and rear axles.
�If loading long or wide cargo, never
exceed the vehicle overall length or
width. (See “Dimensions and
weights” on page 404 in Section 8
for information on your vehicle
overall length and width.)
�Before driving, make sure the cargo
is securely fastened on the roof
luggage carrier.
�Loading cargo on the roof luggage
carrier will make the center of the
vehicle gravity higher. Avoid high
speeds, sudden starts, sharp turns,
sudden braking or abrupt maneu-
vers, otherwise it may result in loss
of control or vehicle rollover due to
failure to operate this vehicle cor-
rectly.

285
2. Push in the left end of the luggage
cover and place the luggage cover in
the holder as shown.
CAUTION
Make sure the luggage cover is se-
curely stowed.
Cross rail")