Page 68 of 398
’06 AVALON_U (L/O 0508)
60
This system can memorize the position
of the driver’s seat and outside rear
view mirrors, and recall them at the
touch of a button.
Buttons “1” and “2” can memorize two
separate positions.
SETTING THE DRIVING POSITION
The ignition switch must be set at ON and
the shift lever is in the “P” position.1. Adjust the driver ’s seat and outside rear view mirrors to the desired
position.
2. While pushing the “SET” button, push button “1” or “2” until a beep
is heard.
The system can memorize up to 2 posi-
tions by repeating the above steps. If step
2 is performed when both buttons “1” and
“2” are memorized, the previous position
will be erased and a new position will be
set. To make only slight changes to an already
memorized position, the easiest way is to
first activate the memorized position, then
make the desired changes and perform
step 2 above.
Driving position memory
system—
—Memory call system using
memory buttons
Page 84 of 398

76
To connect the extender to the seat
belt, insert the tab into the seat belt
buckle so that the “PRESS” signs on
the buckle release buttons of the ex-
tender and the s")
’06 AVALON_U (L/O 0508)
76
To connect the extender to the seat
belt, insert the tab into the seat belt
buckle so that the “PRESS” signs on
the buckle release buttons of the ex-
tender and the seat belt are both facing
outward as shown.
You will hear a click when the tab locks
into the buckle.
When releasing the seat belt, press on
the buckle release button on the extender,
not on the seat belt. This helps prevent
damage to the vehicle interior and extend-
er itself.As far as the seat belt extender on the
front passenger side is concerned, do not
fail to disconnect the extender from the
seat belt after the above operation in or-
der to activate the front passenger airbag
correctly when getting into the vehicle
next time.
When not in use, remove the extender
and store in the vehicle for future use.
CAUTION
�After inserting the tab, make sure
the tab and buckle are locked and
that the lap and shoulder portion of
the belt and the seat belt extender
are not twisted.
�Do not insert coins, clips, etc. in
the buckle as this may prevent you
from properly latching the tab and
buckle.
�If the seat belt does not function
normally, immediately contact your
Toyota dealer. Do not use the seat
until the seat belt is fixed, because
it cannot protect an adult occupant
or your child from injury.
The driver and front passenger seat
belt pretensioners are designed to be
activated in response to a severe fron-
tal impact.
When the sensor detects a severe frontal
impact, the front seat belts are quickly
drawn back by the retractors so that the
belts snugly restrain the occupants.
—Seat belt pretensioners
Page 123 of 398
’06 AVALON_U (L/O 0508)
11 5
Canada only
Ty p e ACanada only
Ty p e B
2. Widen the gap between the seat cushion and seatback slightly and
confirm the position of the lower an-
chorages near the buttons on the
seatback.
3. Type A—Latch the hooks of lower straps onto the anchorages and
tighten the lower straps.
Type B—Latch the buckles onto the
anchorages.
For owners in Canada
The symbol on a child restraint system
indicates the presence of a lower connec-
tor system.
If your child restraint system has a top
strap, it should be anchored. (For the
installation of the top strap, see “—Using
a top strap” on page 112 in this Section.)
For installation details, refer to the instruc-
tion manual equipped with each product.
Page 203 of 398
’06 AVALON_U (L/O 0508)
195
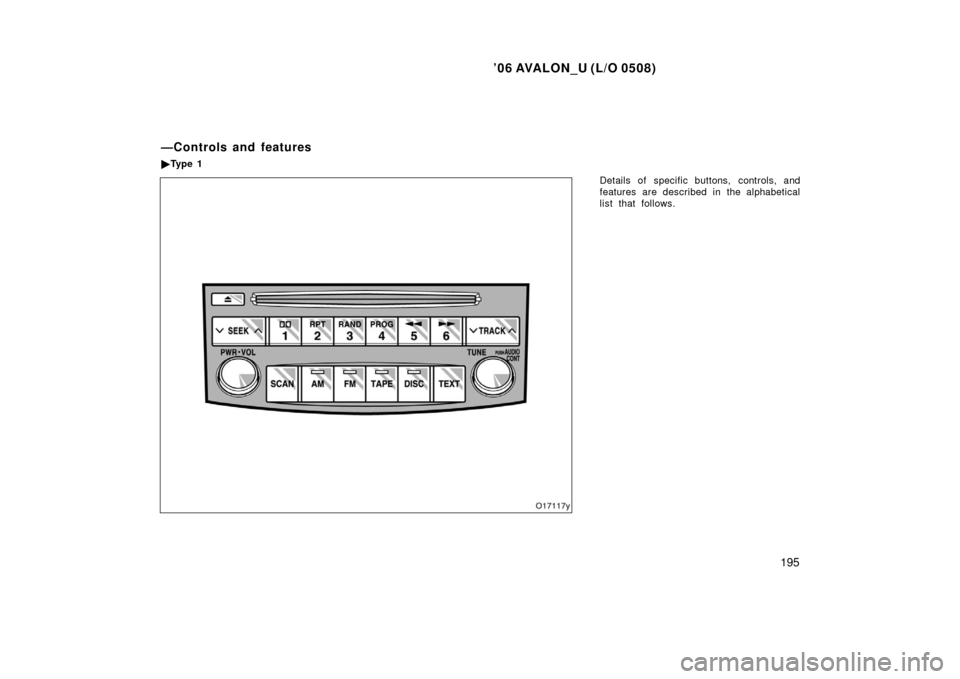
Details of specific buttons, controls, and
features are described in the alphabetical
list that follows.
—Controls and features
�Ty p e 1
Page 204 of 398

196
1 2 3 4 5 6 (Preset buttons)
These buttons are used to preset and
tune in radio stations.
To preset a station to a button: Tune in
the desired station. (See “TUNE” or")
’06 AVALON_U (L/O 0508)
196
1 2 3 4 5 6 (Preset buttons)
These buttons are used to preset and
tune in radio stations.
To preset a station to a button: Tune in
the desired station. (See “TUNE” or
“SEEK”.) Push and hold down the button
until you hear a beep—this will set the
station to the button. The preset button
number will appear on the display.
To recall a preset station: Push the button
for the station you want. The preset but-
ton number and station frequency will ap-
pear on the display.
This radio can store one AM and two FM
for each button. (The display will show
“AM”, “FM1” or “FM2” when you push
“AM” or “FM” button.)
(Eject button)
This button is used to eject a compact
disc.
(Reverse/Fast�forward button)
Cassette player
Push “
” (preset button 6) to fast −for-
ward a cassette tape. “FF” will appear on
the display. Push “
” (preset button 5)
to rewind a tape. “REW” will appear on
the display.
To stop the tape while it is fast −forward-
ing, push “
” or “TAPE” button. To stop
the tape while it is rewinding, push “
”
or “TAPE” button.
If a tape rewinds completely, the cassette
player will stop and then play that same
side. If a tape fast −forwards completely,
the cassette will play the other side of the
tape using the auto −reverse feature.
Compact disc player
Push and hold “
” (preset button 6) or
“
” (preset button 5) to fast −forward or
reverse within a compact disc. When you
release the button, the compact disc play-
er will resume playing.
AM
Push the “AM” button to turn on the radio
and select the AM band. The indicator
light will come on and “AM” will appear on
the display. AUDIO CONT (Tone and sound balance
adjustment function)
Each time you push the “AUDIO CONT”
knob, the mode changes. To adjust the
tone and balance, turn the knob.
BAS: Adjusts low
−pitched tones. The dis-
play ranges from −5 to 5.
TRE: Adjusts high −pitched tones. The dis-
play ranges from −5 to 5.
FAD: Adjusts the sound balance between
the front and rear speakers. The display
ranges from F7 to R7.
BAL: Adjusts the sound balance between
the right and left speakers. The display
ranges from L7 to R7.
DISC (Compact disc)
Push the “DISC” button to play a compact
disc. The indicator light will come on.
When the audio system is set into com-
pact disc operation, the display shows the
track, or track and disc number currently
being played.
Page 208 of 398
’06 AVALON_U (L/O 0508)
200
Details of specific buttons, controls, and
features are described in the alphabetical
list that follows.
�
Ty p e 2
Page 209 of 398

201
1 2 3 4 5 6 (Preset buttons)
These buttons are used to preset and
tune in radio stations.
To preset a station to a button: Tune in
the desired station. (See “TUNE” or")
’06 AVALON_U (L/O 0508)
201
1 2 3 4 5 6 (Preset buttons)
These buttons are used to preset and
tune in radio stations.
To preset a station to a button: Tune in
the desired station. (See “TUNE” or
“SEEK/TRACK”.) Push and hold down the
button until you hear a beep—this will set
the station to the button. The preset but-
ton number will appear on the display.
To recall a preset station: Push the button
for the station you want. The preset but-
ton number and station frequency will ap-
pear on the display.
This radio can store one AM and two FM
for each button. (The display will show
“AM”, “FM1” or “FM2” when you push
“AM” or “FM” button.)
(Eject button)
This button is used to eject one or all
compact discs.
To eject the current compact disc, push
and release the compact disc eject button.
To eject a specific disc, push “ �” or “ �”
side of the “� DISC �” button until the
number of the disc you want to eject is
displayed. Push and release the eject but-
ton. To eject all discs at a time, press and
hold the eject button until you hear a
beep. The last compact disc played before
pushing the button will be ejected first. If
the ejected disc is not removed for a long
time, the eject function will be cancelled.
(Reverse/Fast�forward button)
Cassette player
Push “
” (preset button 6) to fast −for-
ward a cassette tape. “FF” will appear on
the display. Push “
” (preset button 5)
to rewind a tape. “REW” will appear on
the display.
To stop the tape while it is fast −forward-
ing, push “
” or “TAPE” button. To stop
the tape while it is rewinding, push “
”
or “TAPE” button.
If a tape rewinds completely, the cassette
player will stop and then play that same
side. If a tape fast −forwards completely,
the cassette will play the other side of the
tape using the auto −reverse feature. Compact disc player
Push and hold “
” (preset button 6) or
“
” (preset button 5) to fast −forward or
reverse within a compact disc. When you
release the button, the compact disc play-
er will resume playing.
AM
Push the “AM” button to turn on the radio
and select the AM band. The indicator
light will come on and “AM” will appear on
the display.
AUDIO CONT (Tone and sound balance
adjustment function)
Each time you push the “AUDIO CONT”
knob, the mode changes. To adjust the
tone and balance, turn the knob.
BAS: Adjusts low −pitched tones. The dis-
play ranges from −5 to 5.
TRE: Adjusts high −pitched tones. The dis-
play ranges from −5 to 5.
FAD: Adjusts the sound balance between
the front and rear speakers. The display
ranges from F7 to R7.
BAL: Adjusts the sound balance between
the right and left speakers. The display
ranges from L7 to R7.
Page 214 of 398
’06 AVALON_U (L/O 0508)
206
Details of specific buttons, controls and
features are described in the alphabetical
list that follows.
�
Ty p e 3

60
This system can memorize the position
of the driver’s seat and outside rear
view mirrors, and recall them at the
touch of a button.
Buttons “1” and “2” can memor")

11 5
Canada only
Ty p e ACanada only
Ty p e B
2. Widen the gap between the seat cushion and seatback slightly and
confirm the position of the lower an-
chorages near the butt")