Page 277 of 1556
Downloaded from www.Manualslib.com manuals search engine Engine Electrical Devices: 1C-9
Camshaft Position (CMP) Sensor Removal and
Installation
S6RW0D1306012
Removal
1) Disconnect negative cable at battery.
2) Disconnect connector from CMP sensor.
3) Remove camshaft position sensor from timing chain
cover (non-VVT model) or cylinder head (VVT
model).
Installation
1) Install camshaft position sensor to timing chain cover
(non-VVT model) or cylinder head (VVT model).
Tightening torque
CMP sensor bolt (non-VVT model) (a): 10 N·m (
1.0 kgf-m, 7.5 lb-ft)
CMP sensor bolt (VVT model) (b): 11 N·m (1.1
kgf-m, 8.0 lb-ft)
2) Connect connector to CMP sensor securely.
3) Connect negative cable to battery.
Camshaft Position (CMP) Sensor InspectionS6RW0D1306013
Visual check
• Check that O-ring is free from damage.
• Check that end face of sensor and signal rotor tooth
are free from any metal particles and damage.
[A]: Non-VVT model [B]: VVT model
I6RW0D130002-02
I4RS0B130015-01
Page 278 of 1556
Downloaded from www.Manualslib.com manuals search engine 1C-10 Engine Electrical Devices:
Performance check
1) Remove metal particles on end face of CMP sensor,
if any.
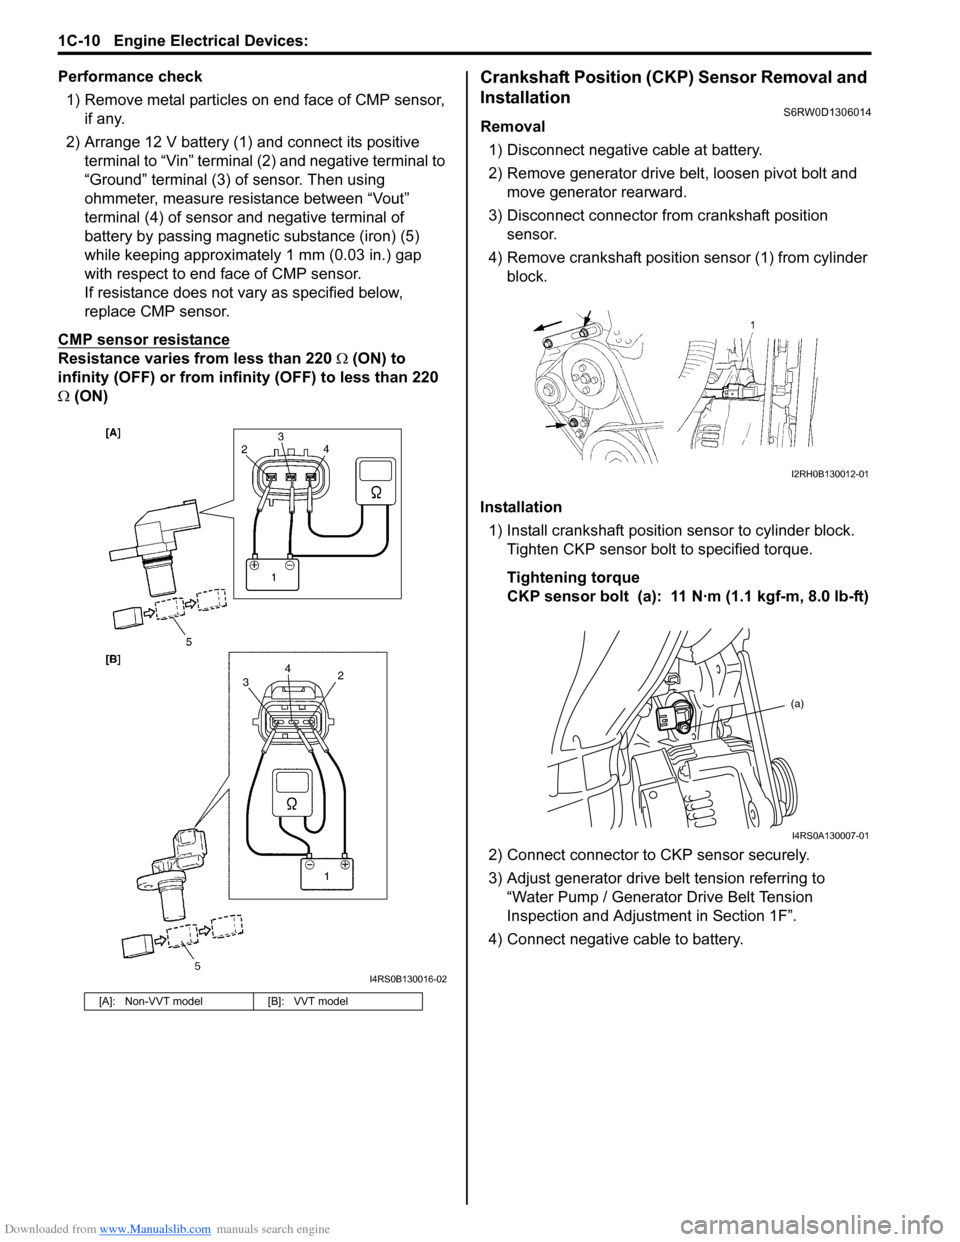
2) Arrange 12 V battery (1) and connect its positive
terminal to “Vin” terminal (2) and negative terminal to
“Ground” terminal (3) of sensor. Then using
ohmmeter, measure resistance between “Vout”
terminal (4) of sensor and negative terminal of
battery by passing magnetic substance (iron) (5)
while keeping approximately 1 mm (0.03 in.) gap
with respect to end face of CMP sensor.
If resistance does not vary as specified below,
replace CMP sensor.
CMP sensor resistance
Resistance varies from less than 220 Ω (ON) to
infinity (OFF) or from infinity (OFF) to less than 220
Ω (ON)
Crankshaft Position (CKP) Sensor Removal and
Installation
S6RW0D1306014
Removal
1) Disconnect negative cable at battery.
2) Remove generator drive belt, loosen pivot bolt and
move generator rearward.
3) Disconnect connector from crankshaft position
sensor.
4) Remove crankshaft position sensor (1) from cylinder
block.
Installation
1) Install crankshaft position sensor to cylinder block.
Tighten CKP sensor bolt to specified torque.
Tightening torque
CKP sensor bolt (a): 11 N·m (1.1 kgf-m, 8.0 lb-ft)
2) Connect connector to CKP sensor securely.
3) Adjust generator drive belt tension referring to
“Water Pump / Generator Drive Belt Tension
Inspection and Adjustment in Section 1F”.
4) Connect negative cable to battery.
[A]: Non-VVT model [B]: VVT model
I4RS0B130016-02
I2RH0B130012-01
(a)
I4RS0A130007-01
Page 279 of 1556
Downloaded from www.Manualslib.com manuals search engine Engine Electrical Devices: 1C-11
Crankshaft Position (CKP) Sensor InspectionS6RW0D1306015
Visual check
• Check that O-ring is free from damage.
• Check that end face of sensor and signal pulley tooth
are free from any metal particles and damage.
Performance check
1) Remove metal particles on end face of CKP sensor,
if any.
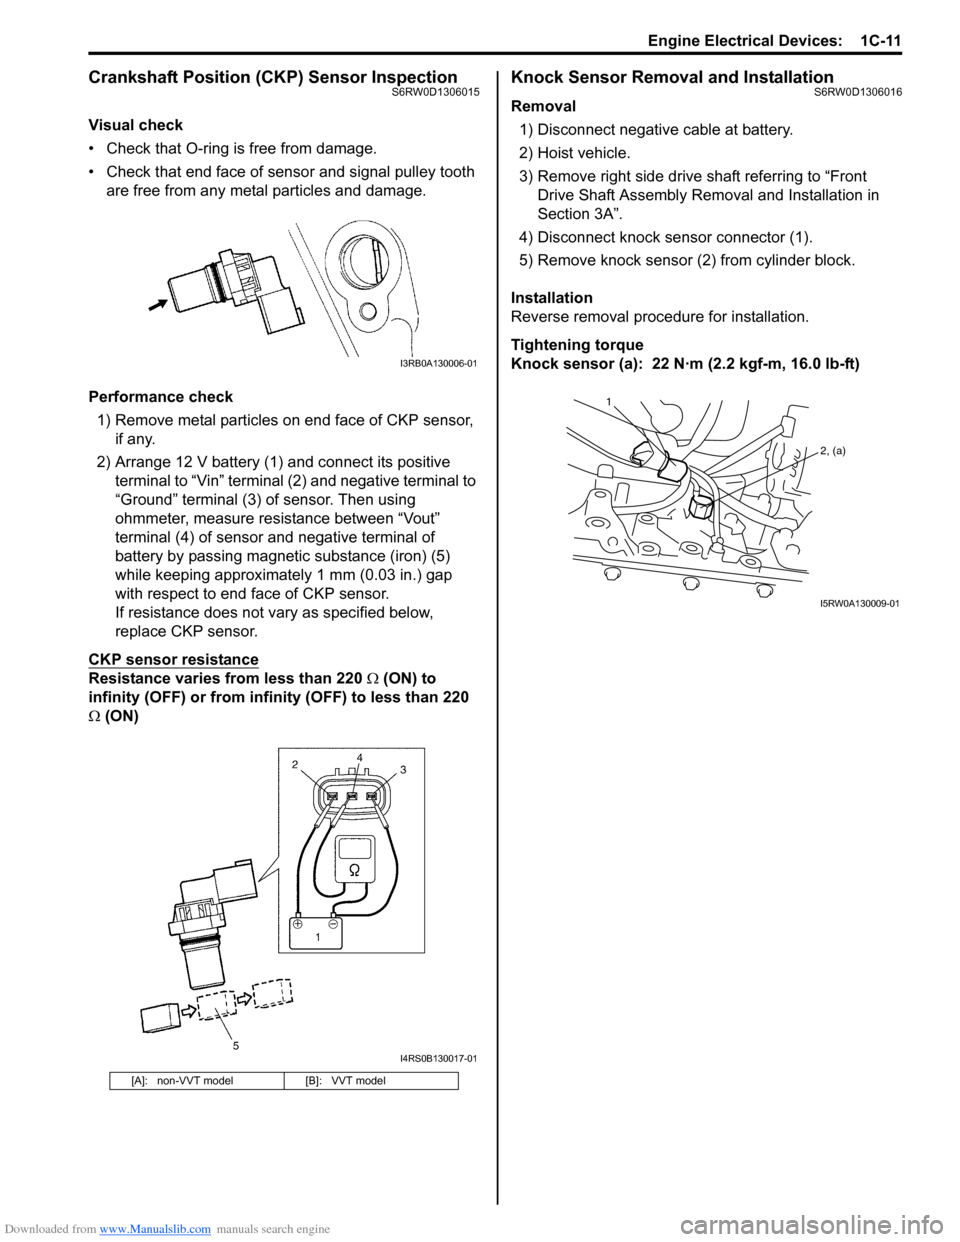
2) Arrange 12 V battery (1) and connect its positive
terminal to “Vin” terminal (2) and negative terminal to
“Ground” terminal (3) of sensor. Then using
ohmmeter, measure resistance between “Vout”
terminal (4) of sensor and negative terminal of
battery by passing magnetic substance (iron) (5)
while keeping approximately 1 mm (0.03 in.) gap
with respect to end face of CKP sensor.
If resistance does not vary as specified below,
replace CKP sensor.
CKP sensor resistance
Resistance varies from less than 220 Ω (ON) to
infinity (OFF) or from infinity (OFF) to less than 220
Ω (ON)
Knock Sensor Removal and InstallationS6RW0D1306016
Removal
1) Disconnect negative cable at battery.
2) Hoist vehicle.
3) Remove right side drive shaft referring to “Front
Drive Shaft Assembly Removal and Installation in
Section 3A”.
4) Disconnect knock sensor connector (1).
5) Remove knock sensor (2) from cylinder block.
Installation
Reverse removal procedure for installation.
Tightening torque
Knock sensor (a): 22 N·m (2.2 kgf-m, 16.0 lb-ft)
[A]: non-VVT model [B]: VVT model
I3RB0A130006-01
I4RS0B130017-01
1
2, (a)
I5RW0A130009-01
Page 280 of 1556
Downloaded from www.Manualslib.com manuals search engine 1C-12 Engine Electrical Devices:
Main Relay, Fuel Pump Relay, Starting Motor
Control Relay, Throttle Actuator Control Relay
and Radiator Cooling Fan Relay Inspection
S6RW0D1306017
1) Disconnect negative cable at battery.
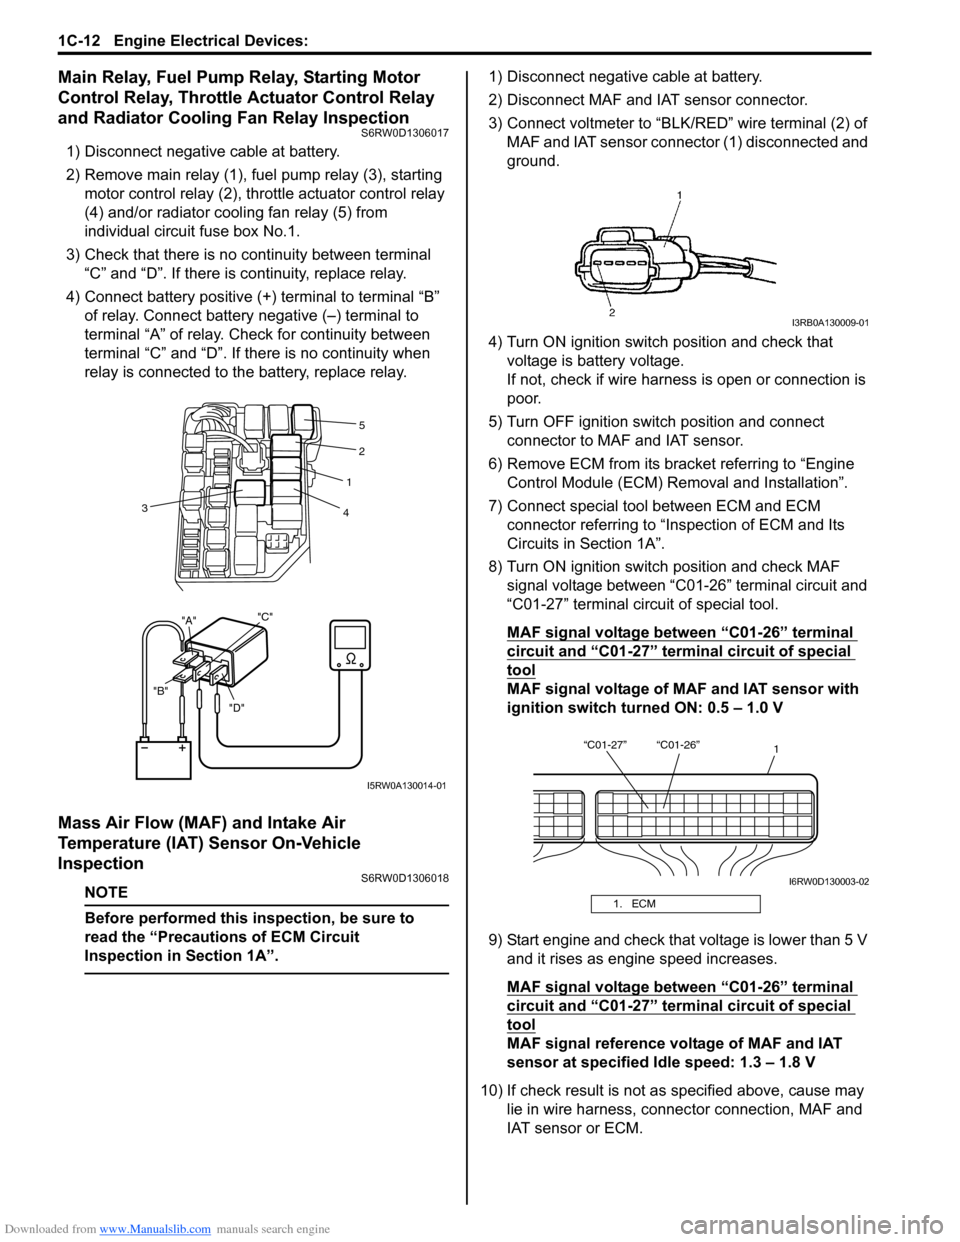
2) Remove main relay (1), fuel pump relay (3), starting
motor control relay (2), throttle actuator control relay
(4) and/or radiator cooling fan relay (5) from
individual circuit fuse box No.1.
3) Check that there is no continuity between terminal
“C” and “D”. If there is continuity, replace relay.
4) Connect battery positive (+) terminal to terminal “B”
of relay. Connect battery negative (–) terminal to
terminal “A” of relay. Check for continuity between
terminal “C” and “D”. If there is no continuity when
relay is connected to the battery, replace relay.
Mass Air Flow (MAF) and Intake Air
Temperature (IAT) Sensor On-Vehicle
Inspection
S6RW0D1306018
NOTE
Before performed this inspection, be sure to
read the “Precautions of ECM Circuit
Inspection in Section 1A”.
1) Disconnect negative cable at battery.
2) Disconnect MAF and IAT sensor connector.
3) Connect voltmeter to “BLK/RED” wire terminal (2) of
MAF and IAT sensor connector (1) disconnected and
ground.
4) Turn ON ignition switch position and check that
voltage is battery voltage.
If not, check if wire harness is open or connection is
poor.
5) Turn OFF ignition switch position and connect
connector to MAF and IAT sensor.
6) Remove ECM from its bracket referring to “Engine
Control Module (ECM) Removal and Installation”.
7) Connect special tool between ECM and ECM
connector referring to “Inspection of ECM and Its
Circuits in Section 1A”.
8) Turn ON ignition switch position and check MAF
signal voltage between “C01-26” terminal circuit and
“C01-27” terminal circuit of special tool.
MAF signal voltage between “C01-26” terminal
circuit and “C01-27” terminal circuit of special
tool
MAF signal voltage of MAF and IAT sensor with
ignition switch turned ON: 0.5 – 1.0 V
9) Start engine and check that voltage is lower than 5 V
and it rises as engine speed increases.
MAF signal voltage between “C01-26” terminal
circuit and “C01-27” terminal circuit of special
tool
MAF signal reference voltage of MAF and IAT
sensor at specified Idle speed: 1.3 – 1.8 V
10) If check result is not as specified above, cause may
lie in wire harness, connector connection, MAF and
IAT sensor or ECM.
"D" "B""A""C"
2
1
4 3
5
I5RW0A130014-01
1. ECM
I3RB0A130009-01
“C01-27” “C01-26”
1
I6RW0D130003-02
Page 281 of 1556
Downloaded from www.Manualslib.com manuals search engine Engine Electrical Devices: 1C-13
Mass Air Flow (MAF) and Intake Air
Temperature (IAT) Sensor Removal and
Installation
S6RW0D1306019
CAUTION!
• Do not disassemble MAF and IAT sensor.
• Do not expose MAF and IAT sensor to any
shock.
• Do not clean MAF and IAT sensor.
• If MAF and IAT sensor has been dropped, it
should be replaced.
• Do not blow compressed air by using air
gun or the like.
• Do not put finger or any other object into
MAF and IAT sensor. Malfunction may
occur.
Removal
1) Disconnect negative cable at battery.
2) Disconnect MAF and IAT sensor connector.
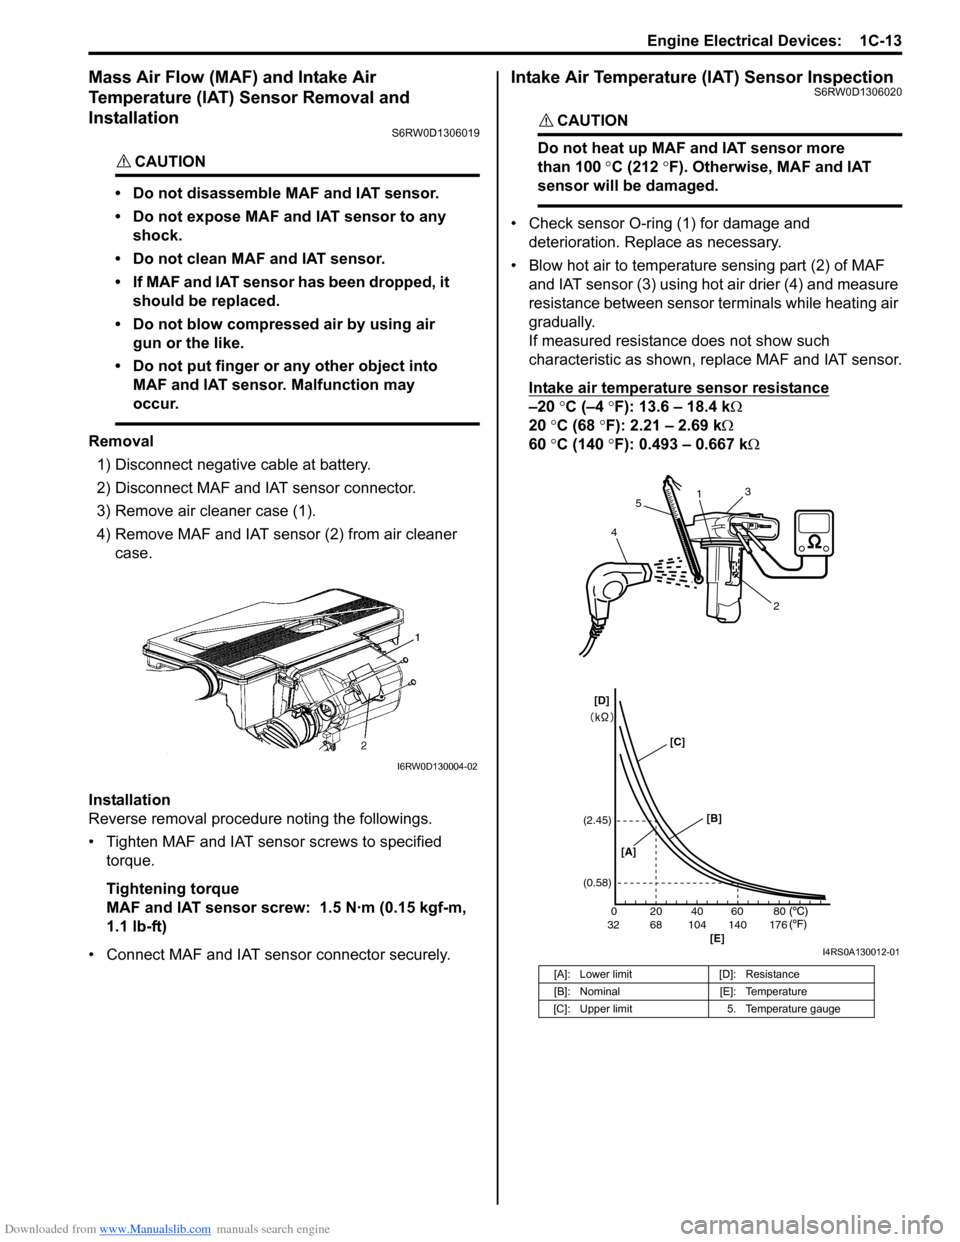
3) Remove air cleaner case (1).
4) Remove MAF and IAT sensor (2) from air cleaner
case.
Installation
Reverse removal procedure noting the followings.
• Tighten MAF and IAT sensor screws to specified
torque.
Tightening torque
MAF and IAT sensor screw: 1.5 N·m (0.15 kgf-m,
1.1 lb-ft)
• Connect MAF and IAT sensor connector securely.
Intake Air Temperature (IAT) Sensor InspectionS6RW0D1306020
CAUTION!
Do not heat up MAF and IAT sensor more
than 100 °C (212 °F). Otherwise, MAF and IAT
sensor will be damaged.
• Check sensor O-ring (1) for damage and
deterioration. Replace as necessary.
• Blow hot air to temperature sensing part (2) of MAF
and IAT sensor (3) using hot air drier (4) and measure
resistance between sensor terminals while heating air
gradually.
If measured resistance does not show such
characteristic as shown, replace MAF and IAT sensor.
Intake air temperature sensor resistance
–20 °C (–4 °F): 13.6 – 18.4 kΩ
20 °C (68 °F): 2.21 – 2.69 kΩ
60 °C (140 °F): 0.493 – 0.667 kΩ
I6RW0D130004-02
[A]: Lower limit [D]: Resistance
[B]: Nominal [E]: Temperature
[C]: Upper limit 5. Temperature gauge
20 0
68 32 104 140 17640 60 80 (2.45)
(0.58)
1
2 3
45
[A][B]
[E] [C] [D]
I4RS0A130012-01
Page 282 of 1556
Downloaded from www.Manualslib.com manuals search engine 1C-14 Engine Electrical Devices:
Specifications
Tightening Torque SpecificationsS6RW0D1307001
Reference:
For the tightening torque of fastener not specified in this section, refer to “Fasteners Information in Section 0A”. Fastening partTightening torque
Note
N⋅mkgf-mlb-ft
ECM mounting bolt 8 0.8 6.0�)
ECT sensor 15 1.5 11.0�)
Heated oxygen sensor 45 4.5 32.5�)
CMP sensor bolt (non-VVT model) 10 1.0 7.5�)
CMP sensor bolt (VVT model) 11 1.1 8.0�)
CKP sensor bolt 11 1.1 8.0�)
Knock sensor 22 2.2 16.0�)
MAF and IAT sensor screw 1.5 0.15 1.1�)
Page 293 of 1556
Downloaded from www.Manualslib.com manuals search engine Engine Mechanical: 1D-11
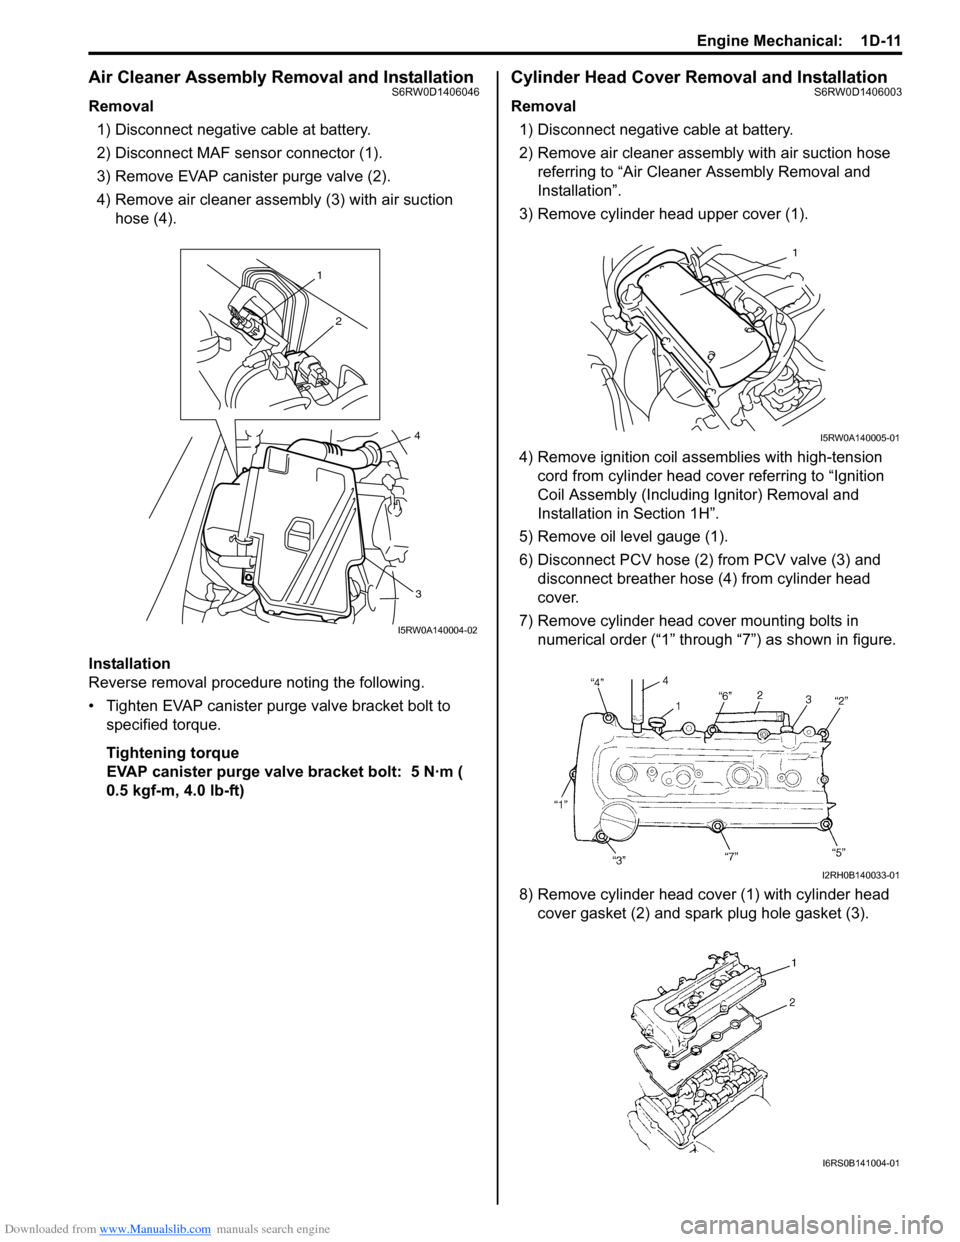
Air Cleaner Assembly Removal and InstallationS6RW0D1406046
Removal
1) Disconnect negative cable at battery.
2) Disconnect MAF sensor connector (1).
3) Remove EVAP canister purge valve (2).
4) Remove air cleaner assembly (3) with air suction
hose (4).
Installation
Reverse removal procedure noting the following.
• Tighten EVAP canister purge valve bracket bolt to
specified torque.
Tightening torque
EVAP canister purge valve bracket bolt: 5 N·m (
0.5 kgf-m, 4.0 lb-ft)
Cylinder Head Cover Removal and InstallationS6RW0D1406003
Removal
1) Disconnect negative cable at battery.
2) Remove air cleaner assembly with air suction hose
referring to “Air Cleaner Assembly Removal and
Installation”.
3) Remove cylinder head upper cover (1).
4) Remove ignition coil assemblies with high-tension
cord from cylinder head cover referring to “Ignition
Coil Assembly (Including Ignitor) Removal and
Installation in Section 1H”.
5) Remove oil level gauge (1).
6) Disconnect PCV hose (2) from PCV valve (3) and
disconnect breather hose (4) from cylinder head
cover.
7) Remove cylinder head cover mounting bolts in
numerical order (“1” through “7”) as shown in figure.
8) Remove cylinder head cover (1) with cylinder head
cover gasket (2) and spark plug hole gasket (3).
1
2
3
4
I5RW0A140004-02
1
I5RW0A140005-01
I2RH0B140033-01
I6RS0B141004-01
Page 295 of 1556
Downloaded from www.Manualslib.com manuals search engine Engine Mechanical: 1D-13
Throttle Body and Intake Manifold ComponentsS6RW0D1406010
I6RW0D140001-01
1. Intake manifold 8. To cylinder head cover 15. Brake booster hose 22. Throttle body outlet water hose
No.2
2. O-ring 9. Gasket (with EGR) 16. To brake booster 23. EGR pipe plate (without EGR)
3. Throttle body: Do not
disassemble10. MAP sensor 17. Throttle body mounting bolt 24. MAP sensor plate (without MAP
sensor)
: Be sure to direct paint mark to
upward.
4. Intake manifold bolt 11. PCV valve hose 18. To EGR valve : Do not reuse.
5. Intake manifold nut 12. Breather pipe 19. Breather hose No.1
6. To PCV valve 13. To EVAP canister purge valve
hose20. Breather hose No.2
7. EGR pipe 14. EVAP canister purge valve hose 21. Throttle body outlet water hose No.1