2006 SUBARU IMPREZA WRX height
[x] Cancel search: heightPage 52 of 365
Seat, seatbelt and SRS airbags 1-25
CONTINUED
Choosing a child restraint
system
Choose a child restraint system that is ap-
propriate for the child s age and size
(weight and height) in order to provide the
child with proper protection. The child re-
straint system should meet all applicable
requirements of Federal Motor Vehicle
Safety Standards for the United States or
of Canada Motor Vehicle Safety Stan-
dards for Canada. It can be identified by
looking for the label on the child restraint
system or the manufacturer s statement of
compliance in the document attached to
the system.
Also it is important for you to make sure
that the child restraint system is compati-
ble with the vehicle in which it will be used.
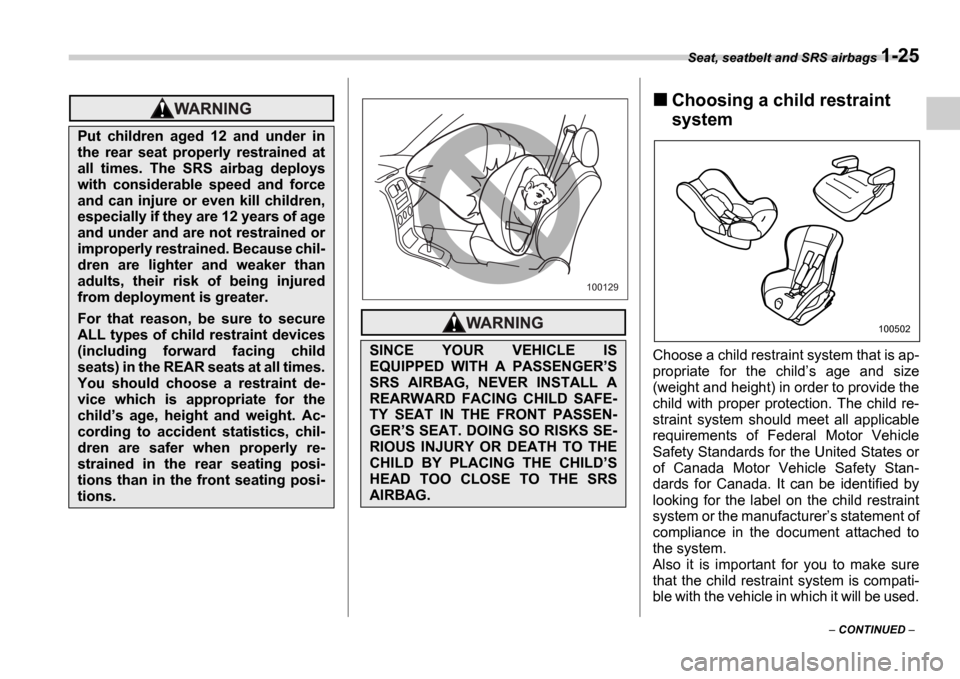
Put children aged 12 and under in
the rear seat properly restrained at
all times. The SRS airbag deploys
with considerable speed and force
and can injure or even kill children,
especially if they are 12 years of age
and under and are not restrained or
improperly restrained. Because chil-
dren are lighter and weaker than
adults, their risk of being injured
from deployment is greater.
For that reason, be sure to secure
ALL types of child restraint devices
(including forward facing child
seats) in the REAR seats at all times.
You should choose a restraint de-
vice which is appropriate for the
child s age, height and weight. Ac-
cording to accident statistics, chil-
dren are safer when properly re-
strained in the rear seating posi-
tions than in the front seating posi-
tions.
SINCE YOUR VEHICLE IS
EQUIPPED WITH A PASSENGER S
SRS AIRBAG, NEVER INSTALL A
REARWARD FACING CHILD SAFE-
TY SEAT IN THE FRONT PASSEN-
GER S SEAT. DOING SO RISKS SE-
RIOUS INJURY OR DEATH TO THE
CHILD BY PLACING THE CHILD S
HEAD TOO CLOSE TO THE SRS
AIRBAG.
100129
100502
Page 64 of 365
Seat, seatbelt and SRS airbags 1-37
CONTINUED
NOTE
When you sell your vehicle, we urge
you to explain to the buyer that it is
equipped with SRS airbags by alerting
him or her to the applicable section in
this owners manual.
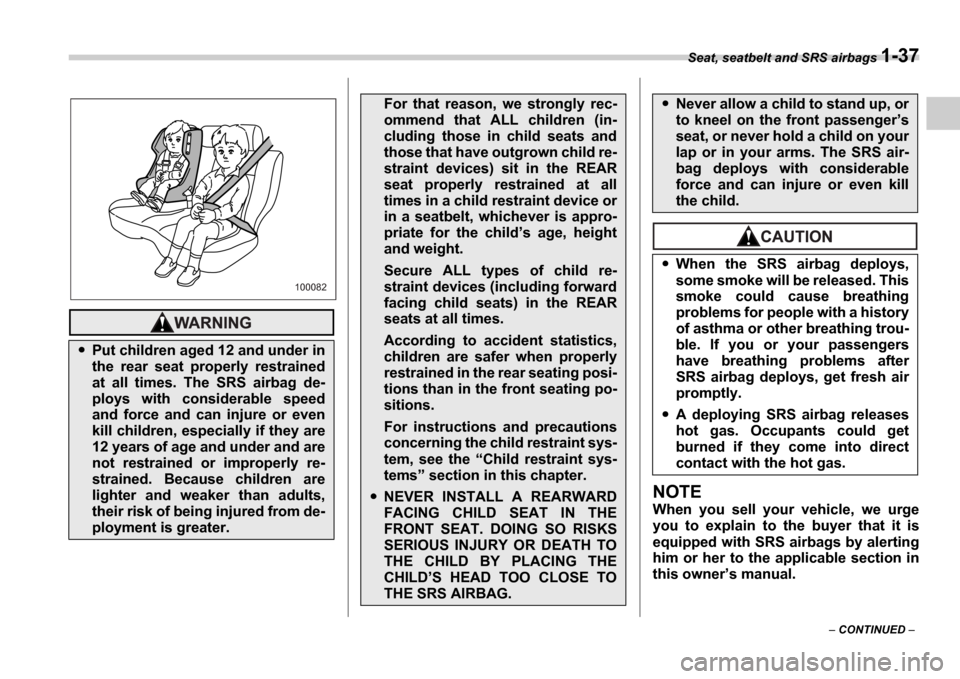
Put children aged 12 and under in
the rear seat properly restrained
at all times. The SRS airbag de-
ploys with considerable speed
and force and can injure or even
kill children, especially if they are
12 years of age and under and are
not restrained or improperly re-
strained. Because children are
lighter and weaker than adults,
their risk of being injured from de-
ployment is greater.
100082
For that reason, we strongly rec-
ommend that ALL children (in-
cluding those in child seats and
those that have outgrown child re-
straint devices) sit in the REAR
seat properly restrained at all
times in a child restraint device or
in a seatbelt, whichever is appro-
priate for the child s age, height
and weight.
Secure ALL types of child re-
straint devices (including forward
facing child seats) in the REAR
seats at all times.
According to accident statistics,
children are safer when properly
restrained in the rear seating posi-
tions than in the front seating po-
sitions.
For instructions and precautions
concerning the child restraint sys-
tem, see the Child restraint sys-
tems section in this chapter.
NEVER INSTALL A REARWARD
FACING CHILD SEAT IN THE
FRONT SEAT. DOING SO RISKS
SERIOUS INJURY OR DEATH TO
THE CHILD BY PLACING THE
CHILD S HEAD TOO CLOSE TO
THE SRS AIRBAG.
Never allow a child to stand up, or
to kneel on the front passenger s
seat, or never hold a child on your
lap or in your arms. The SRS air-
bag deploys with considerable
force and can injure or even kill
the child.
When the SRS airbag deploys,
some smoke will be released. This
smoke could cause breathing
problems for people with a history
of asthma or other breathing trou-
ble. If you or your passengers
have breathing problems after
SRS airbag deploys, get fresh air
promptly.
A deploying SRS airbag releases
hot gas. Occupants could get
burned if they come into direct
contact with the hot gas.
Page 138 of 365
Instruments and controls 3-25
Illumination brightness con-
trol
When the headlight switch is in the
or position, you can ad-
just brightness of the instrument panel illu-
mination for better visibility.
To brighten, turn the control dial upward.
To darken, turn the control dial downward.
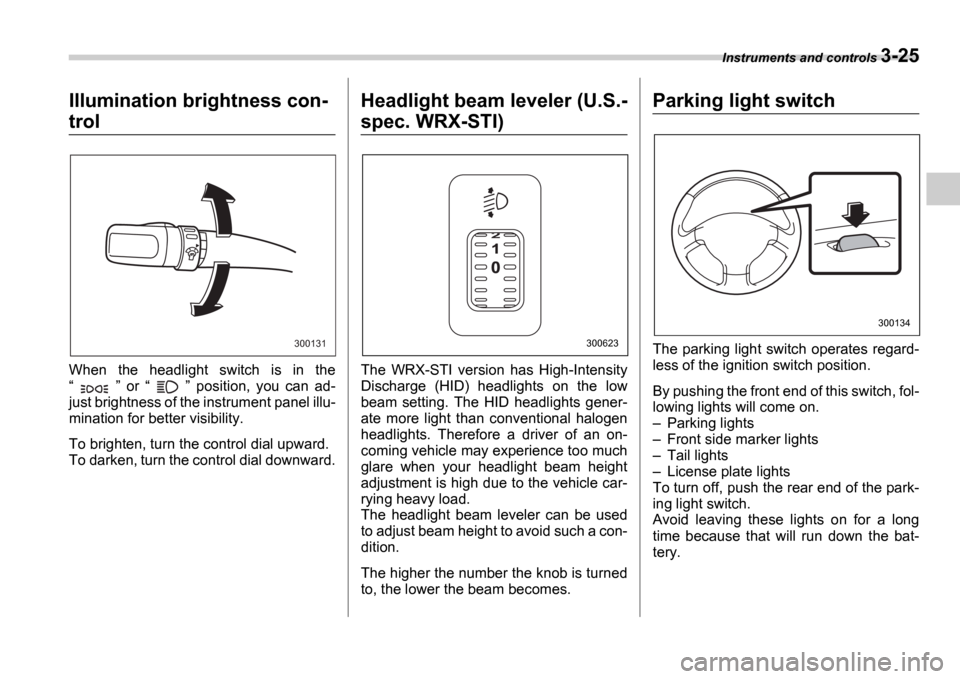
Headlight beam leveler (U.S.-
spec. WRX-STI)
The WRX-STI version has High-Intensity
Discharge (HID) headlights on the low
beam setting. The HID headlights gener-
ate more light than conventional halogen
headlights. Therefore a driver of an on-
coming vehicle may experience too much
glare when your headlight beam height
adjustment is high due to the vehicle car-
rying heavy load.
The headlight beam leveler can be used
to adjust beam height to avoid such a con-
dition.
The higher the number the knob is turned
to, the lower the beam becomes.
Parking light switch
The parking light switch operates regard-
less of the ignition switch position.
By pushing the front end of this switch, fol-
lowing lights will come on. Parking lights
Front side marker lights
Tail lights
License plate lights
To turn off, push the rear end of the park-
ing light switch.
Avoid leaving these lights on for a long
time because that will run down the bat-
tery.300131300623
300134
Page 249 of 365
8-22 Driving tips
Certification label
To check both GVWR and GAWR and to
confirm that the total weight and weight
distribution are within safe driving limits,
you should have your vehicle and trailer
weighed at a commercial weighing sta-
tion.
Be sure that all cargo is firmly secured to
prevent a change in weight distribution
while driving.
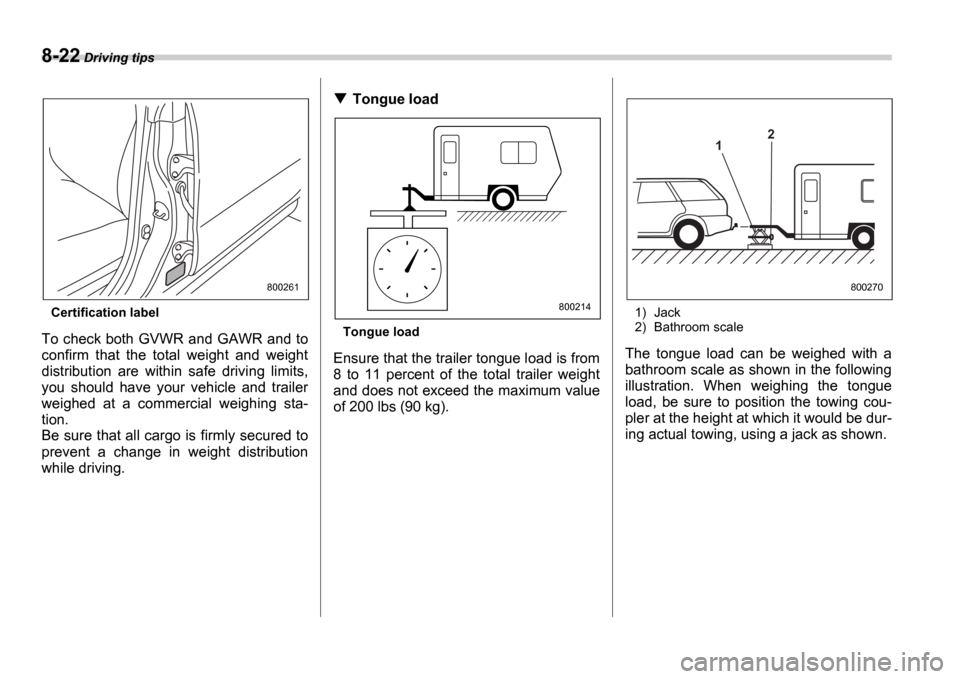
Tongue load
Tongue load
Ensure that the trailer tongue load is from
8 to 11 percent of the total trailer weight
and does not exceed the maximum value
of 200 lbs (90 kg).
1) Jack
2) Bathroom scale
The tongue load can be weighed with a
bathroom scale as shown in the following
illustration. When weighing the tongue
load, be sure to position the towing cou-
pler at the height at which it would be dur-
ing actual towing, using a jack as shown.
800261
800214
1 2
800270
Page 306 of 365
Maintenance and service 11-27
Brake booster
If the brake booster does not operate as
described in the following, have it checked
by your SUBARU dealer.
1. With the engine off, depress the brake
pedal several times, applying the same
pedal force each time. The distance the
pedal travels should not vary.
2. With the brake pedal depressed, start
the engine. The pedal should move slight-
ly down to the floor.
3. With the brake pedal depressed, stop
the engine and keep the pedal depressed
for 30 seconds. The pedal height should
not change.
4. Start the engine again and run for ap-
proximately one minute then turn it off.
Depress the brake pedal several times to
check the brake booster. The brake boost-
er operates properly if the pedal stroke de-
creases with each depression.
Brake pedal
Check the brake pedal free play and re-
serve distance according to the mainte-
nance schedule in the Warranty and
Maintenance Booklet .
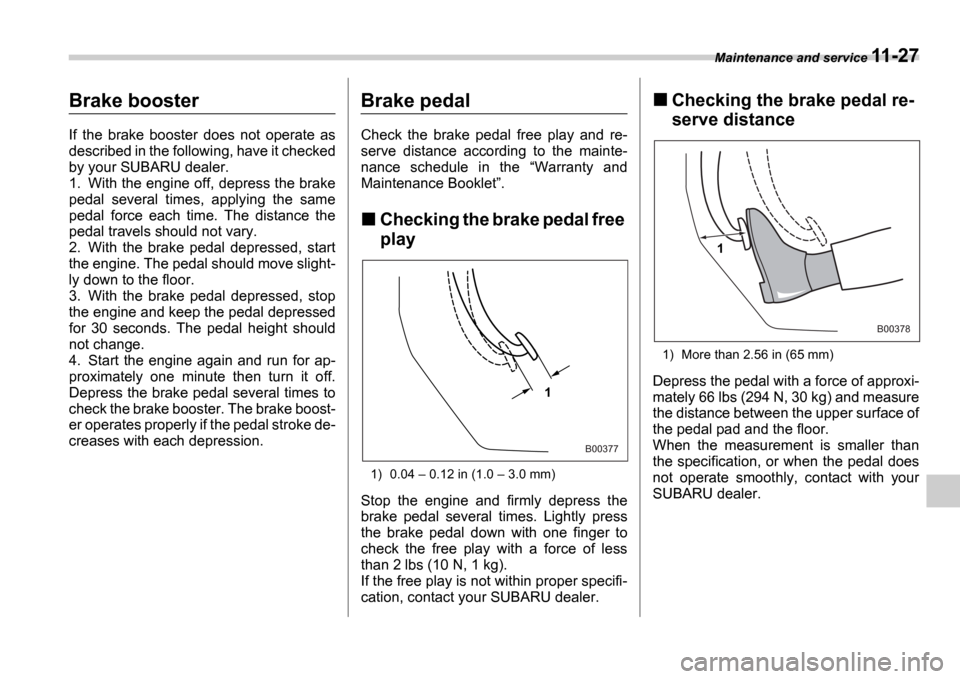
Checking the brake pedal free
play
1) 0.04 0.12 in (1.0 3.0 mm)
Stop the engine and firmly depress the
brake pedal several times. Lightly press
the brake pedal down with one finger to
check the free play with a force of less
than 2 lbs (10 N, 1 kg).
If the free play is not within proper specifi-
cation, contact your SUBARU dealer.
Checking the brake pedal re-
serve distance
1) More than 2.56 in (65 mm)
Depress the pedal with a force of approxi-
mately 66 lbs (294 N, 30 kg) and measure
the distance between the upper surface of
the pedal pad and the floor.
When the measurement is smaller than
the specification, or when the pedal does
not operate smoothly, contact with your
SUBARU dealer.1
B00377
1
B00378
Page 333 of 365
12-2 Specifications
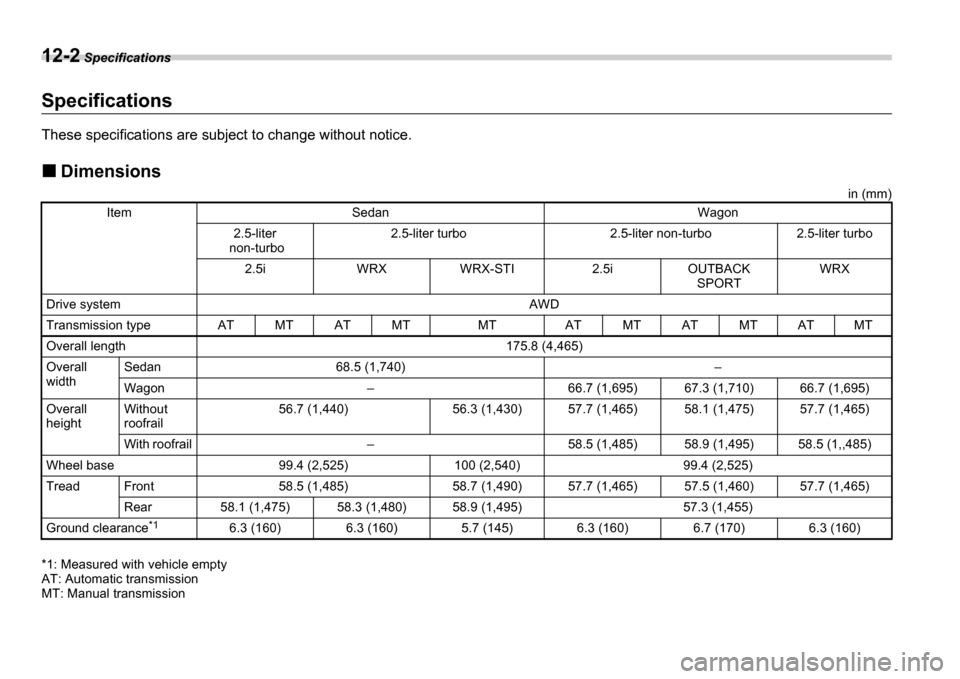
SpecificationsSpecifications
These specifications are subject to change without notice .
Dimensions
in (mm)
*1: Measured with vehicle empty
AT: Automatic transmission
MT: Manual transmission
ItemSedanWagon
2.5-liter
non-turbo2.5-liter turbo2.5-liter non-turbo2.5-liter turbo
2.5iWRXWRX-STI2.5iOUTBACK SPORTWRX
Drive systemAWD
Transmission typeATMTATMTMTATMTATMTATMT
Overall length175.8 (4,465)
Overall
widthSedan68.5 (1,740)
Wagon66.7 (1,695)67.3 (1,710)66.7 (1,695)
Overall
heightWithout
roofrail56.7 (1,440)56.3 (1,430)57.7 (1,465)58.1 (1,475)57.7 (1,465)
With roofrail58.5 (1,485)58.9 (1,495)58.5 (1,,485)
Wheel base99.4 (2,525)100 (2,540)99.4 (2,525)
TreadFront58.5 (1,485)58.7 (1,490)57.7 (1,465)57.5 (1,460)57.7 (1,465)
Rear58.1 (1,475)58.3 (1,480)58.9 (1,495)57.3 (1,455)
Ground clearance *16.3 (160)6.3 (160)5.7 (145)6.3 (160)6.7 (170)6.3 (160)
Page 343 of 365
13-2 Consumer information and Reporting safety defects
Consumer information and Reporting safety defectsFor U.S.A.
The following information has been com-
piled according to Code of Federal Regu-
lations Title 49, Part 575 .Tire information
Tire labeling
Many markings (e.g. Tire size, Tire
Identification Number or TIN) are
placed on the sidewall of a tire by tire
manufacturers. These marking can
provide you with useful information on
the tire.
Tire size
Your vehicle comes equipped with P-
Metric tire size. It is important to un-
derstand the sizing system in select-
ing the proper tire for your vehicles.
Here is a brief review of the tire sizing
system with a breakdown of its indi-
vidual elements.
P Metric
With the P-Metric system, Section
Width is measured in millimeters. To
convert millimeters into inches, divide
by 25.4. The Aspect Ratio (Section
Height divided by Section Width)
helps provide more dimensional infor-
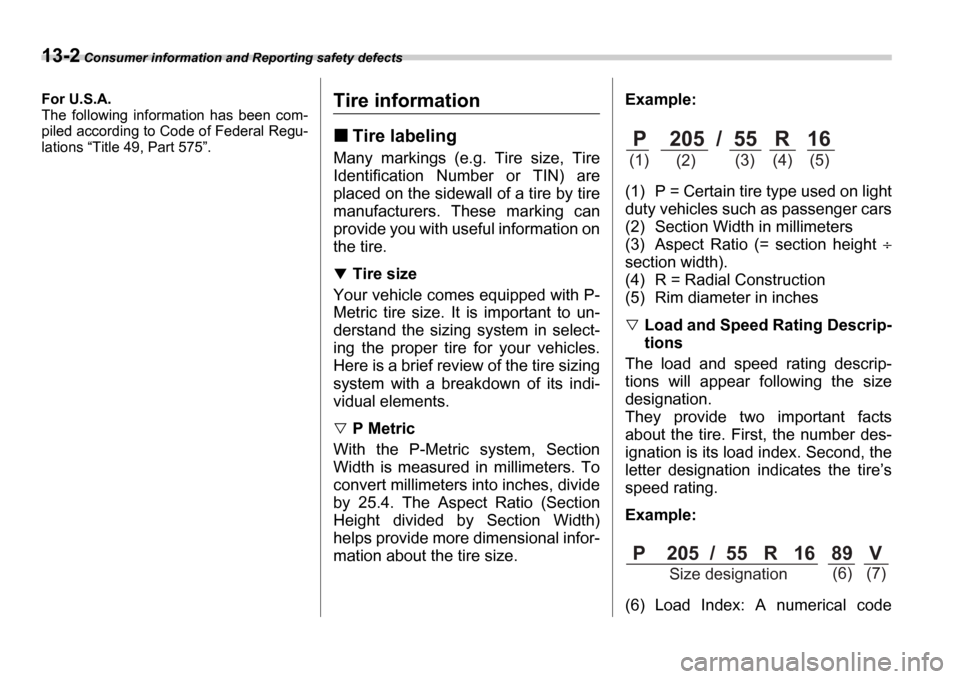
mation about the tire size. Example:
(1) P = Certain tire type used on light
duty vehicles such as passenger cars
(2) Section Width in millimeters
(3) Aspect Ratio (= section height
section width).
(4) R = Radial Construction
(5) Rim diameter in inches
Load and Speed Rating Descrip-
tions
The load and speed rating descrip-
tions will appear following the size
designation.
They provide two important facts
about the tire. First, the number des-
ignation is its load index. Second, the
letter designation indicates the tire s
speed rating.
Example:
(6) Load Index: A numerical code
P 205 / 55 R 16
(1) (2) (3) (4) (5)
P 205 / 55 R 16 89 V
Size designation (6) (7)