2006 SUBARU IMPREZA bulb
[x] Cancel search: bulbPage 13 of 365
10
Illustrated index
Exterior
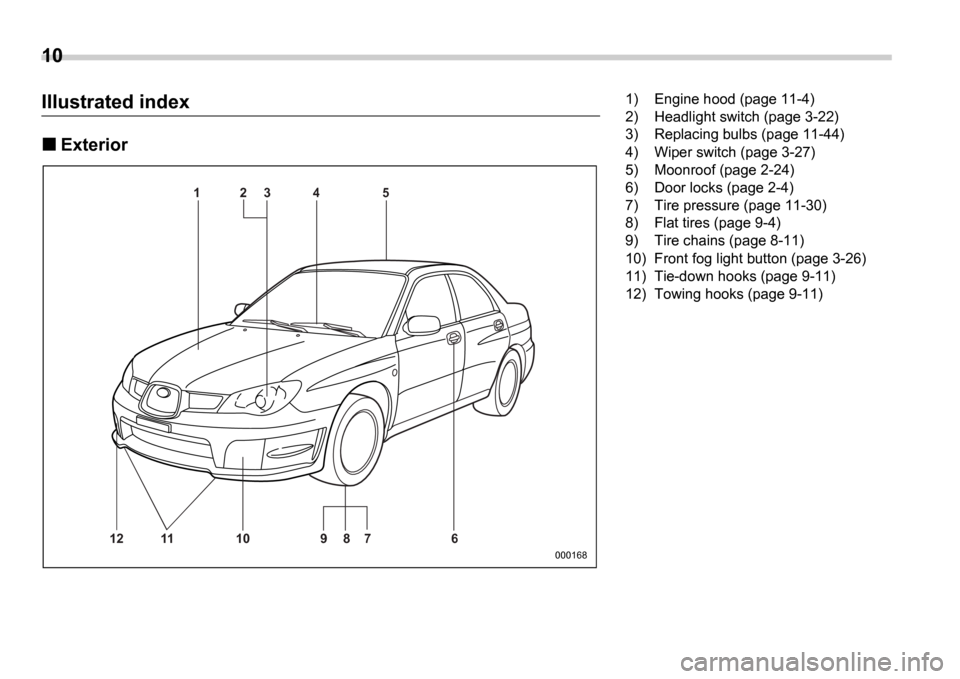
1 2 34 5
12 11 10 9 87 6
000168
1) Engine hood (page 11-4)
2) Headlight switch (page 3-22)
3) Replacing bulbs (page 11-44)
4) Wiper switch (page 3-27)
5) Moonroof (page 2-24)
6) Door locks (page 2-4)
7) Tire pressure (page 11-30)
8) Flat tires (page 9-4)
9) Tire chains (page 8-11)
10) Front fog light button (page 3-26)
11) Tie-down hooks (page 9-11)
12) Towing hooks (page 9-11)
Page 127 of 365
3-14 Instruments and controls
Warning and indicator lights
Several of the warning and indicator lights
come on momentarily and then go out
when the ignition switch is initially turned
to the ON position. This permits check-
ing the operation of the bulbs.
Apply the parking brake and turn the igni-
tion switch to the ON position. The fol-
lowing lights come on:
Seatbelt warning light
SRS airbag system warning light
Front passenger s frontal airbag ON in-
dicator light
Front passenger s frontal airbag OFF
indicator light
CHECK ENGINE warning light/Mal-
function indicator lamp
Charge warning light
Oil pressure warning light
AT OIL temperature warning light (AT
vehicles)
ABS warning light
Brake system warning light
All-Wheel Drive warning light (AT vehi-
cles)
Cruise control indicator light (if
equipped)
Cruise control set indicator light (if
equipped)
If any lights fail to come on, it indicates a burned-out bulb or a malfunction of the
corresponding system.
Consult your authorized SUBARU dealer
for repair.
Seatbelt warning light
and chime
Your vehicle is equipped with a seatbelt
warning device at the driver
s seat, as re-
quired by current safety standards. There
is a seatbelt warning light in the combina-
tion meter.
If the driver has not yet fastened the seat-
belt when the ignition switch is turned to
the ON position, the seatbelt warning
light will flash for 6 seconds, to warn that
the seatbelt is unfastened. If the driver s
seatbelt is not fastened, a chime will also
sound simultaneously.
If the driver s seatbelt is still not fastened
6 seconds later, the warning light will re-
main lit for 15 seconds. If the driver s seat-
belt is still not fastened even 15 seconds
later (21 seconds after turning ON the ig-
nition switch), the warning lights will alter-
nate between flashing and steady illumi-
nation at 15-second intervals, and the
chime will sound while the warning light is
flashing.
Alternate flashing and steady illumination
of the warning lights and sounding of the chime will continue until the driver fastens
the seatbelt.
NOTE
If the driver unfastens the seatbelt af-
ter fastening, the seatbelt warning de-
vice operates as follows according to
the vehicle speed.
At speeds lower than approximate-
ly 9 mph (15 km/h)
The warning light will alternate be-
tween flashing and steady illumina-
tion at 15-second intervals. The
chime will not sound.
At speeds higher than approxi-
mately 9 mph (15 km/h)
The warning light will alternate be-
tween flashing and steady illumina-
tion at 15-second intervals and the
chime will sound while the warning
light is flashing.
It is possible to cancel the warning
operation that follows the 6-second
warning after turning ON the ignition
switch by unfastening and refastening
the driver s seatbelt. When the ignition
switch is turned ON next time, howev-
er, the complete sequence of the warn-
ing operation resumes. For further de-
tails about canceling the warning oper-
ation, please contact your SUBARU
dealer.
Page 133 of 365
3-20 Instruments and controls
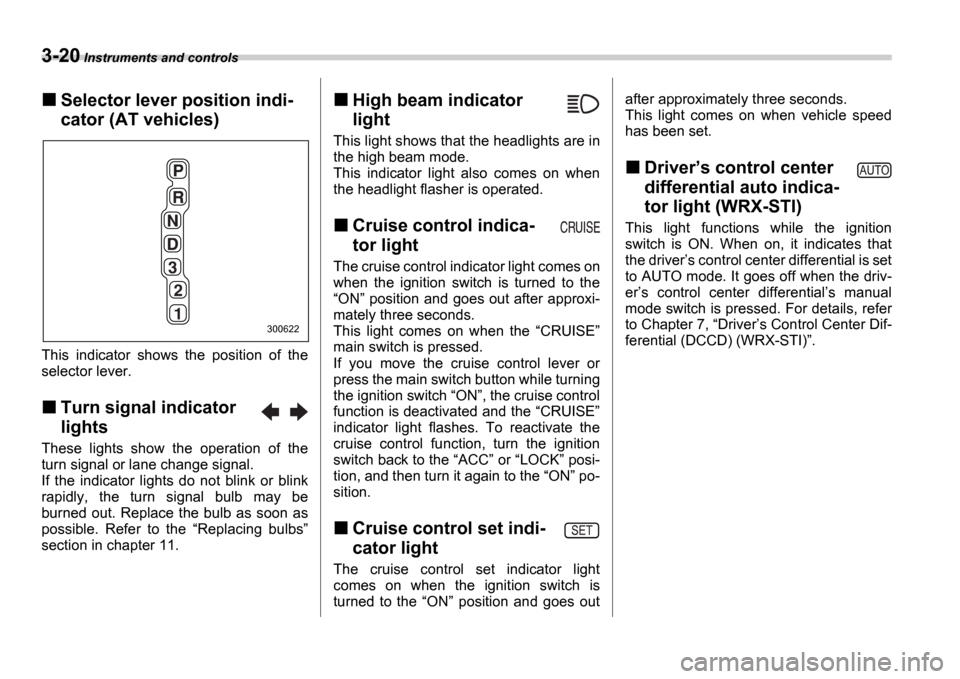
Selector lever position indi-
cator (AT vehicles)
This indicator shows the position of the
selector lever.
Turn signal indicator
lights
These lights show the operation of the
turn signal or lane change signal.
If the indicator lights do not blink or blink
rapidly, the turn signal bulb may be
burned out. Replace the bulb as soon as
possible. Refer to the Replacing bulbs
section in chapter 11.
High beam indicator
light
This light shows that the headlights are in
the high beam mode.
This indicator light also comes on when
the headlight flasher is operated.
Cruise control indica-
tor light
The cruise control indicator light comes on
when the ignition switch is turned to the ON position and goes out after approxi-
mately three seconds.
This light comes on when the CRUISE
main switch is pressed.
If you move the cruise control lever or
press the main switch button while turning
the ignition switch ON , the cruise control
function is deactivated and the CRUISE
indicator light flashes. To reactivate the
cruise control function, turn the ignition
switch back to the ACC or LOCK posi-
tion, and then turn it again to the ON po-
sition.
Cruise control set indi-
cator light
The cruise control set indicator light
comes on when the ignition switch is
turned to the ON position and goes out after approximately three seconds.
This light comes on when vehicle speed
has been set.
Driver
s control center
differential auto indica-
tor light (WRX-STI)
This light functions while the ignition
switch is ON. When on, it indicates that
the driver s control center differential is set
to AUTO mode. It goes off when the driv-
er s control center differential s manual
mode switch is pressed. For details, refer
to Chapter 7, Driver s Control Center Dif-
ferential (DCCD) (WRX-STI) .
300622
Page 281 of 365
Maintenance and service
Tires and wheels ................................................ 11-30
Types of tires .................................... ...................... 11-30
Tire inspection ................................... ..................... 11-30
Tire pressures and wear ........................... ............. 11-30
Wheel balance ..................................... ................... 11-32
Wear indicators ................................... .................... 11-33
Tire rotation ..................................... ........................ 11-33
Tire replacement .................................. ................... 11-33
Wheel replacement ................................. ................ 11-34
Aluminum wheels ................................... ............ 11-35
Intercooler water spray (WRX-STI) ................. .. 11-35
Windshield washer fluid ........................... ......... 11-36
Replacement of wiper blades ....................... ..... 11-37
Windshield wiper blades assembly .................. .... 11-37
Windshield wiper blade rubber ..................... ........ 11-38
Rear window wiper blade assembly .................. ... 11-38
Rear window wiper blade rubber .................... ...... 11-39
Battery ........................................... ...................... 11-40
Fuses ............................................. ...................... 11-41
Main fuse ......................................... .................... 11-43
Installation of accessories ....................... ......... 11-43
Replacing bulbs ................................... ............... 11-44
Headlights (WRX-STI) .............................. ............... 11-45
Headlights (Except WRX-STI) ....................... ......... 11-46
Front turn signal light bulbs ..................... ............. 11-48
Parking light ..................................... ....................... 11-48
Front fog light ................................... ...................... 11-48
Rear combination lights ........................... .............. 11-48
License plate light ............................... ................... 11-50
Dome light, map light and cargo area light ........ .. 11-50Trunk light .......................................
........................ 11-51
High mount stop light ............................. ............... 11-51
Page 323 of 365
11-44 Maintenance and service
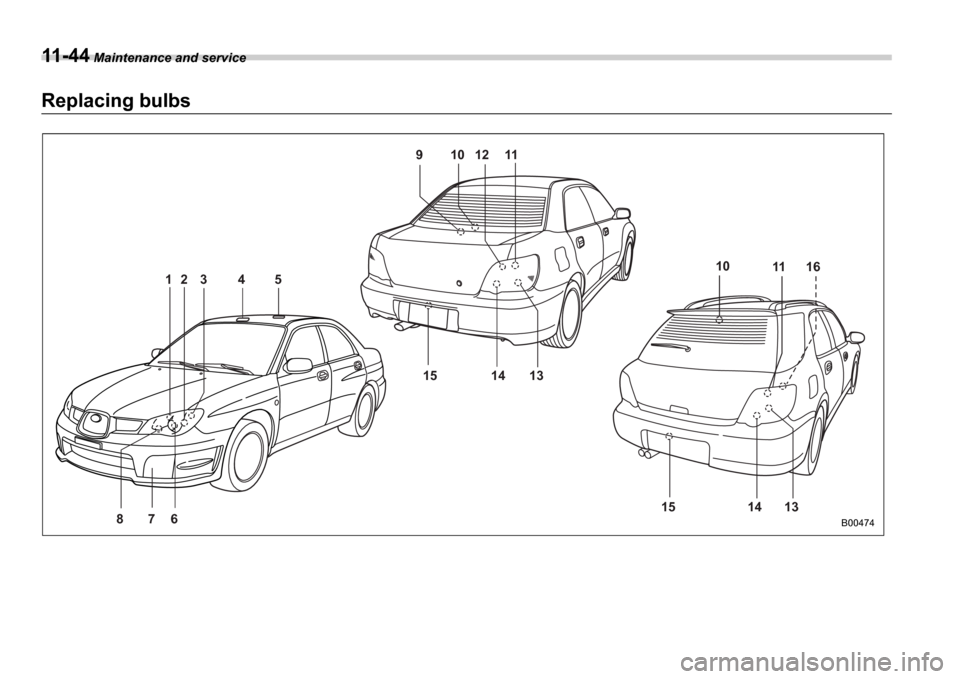
Replacing bulbs
B00474
10
9 12 11
15 14 13 14 13
6 5
4
7
8 1 2 3
1511 16
10
Page 324 of 365
Maintenance and service 11-45
CONTINUED
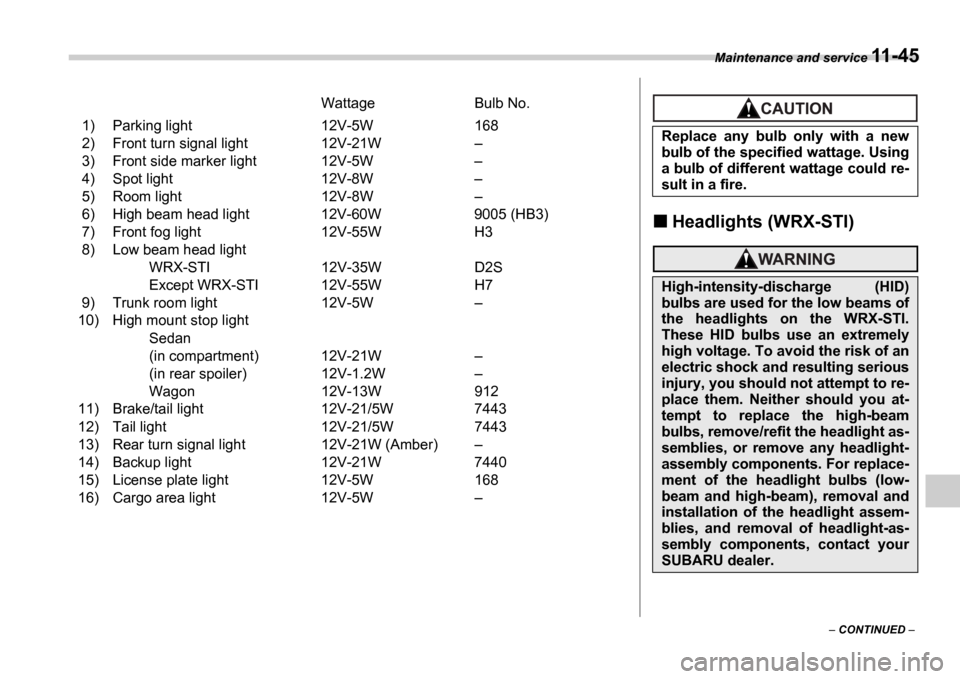
Wattage Bulb No.
1) Parking light 12V-5W 168
2) Front turn signal light 12V-21W
3) Front side marker light 12V-5W
4) Spot light 12V-8W
5) Room light 12V-8W
6) High beam head light 12V-60W 9005 (HB3)
7) Front fog light 12V-55W H3
8) Low beam head light WRX-STI 12V-35W D2S
Except WRX-STI 12V-55W H7
9) Trunk room light 12V-5W
10) High mount stop light
Sedan
(in compartment) 12V-21W
(in rear spoiler) 12V-1.2W
Wagon 12V-13W 912
11) Brake/tail light 12V-21/5W 7443
12) Tail light 12V-21/5W 7443
13) Rear turn signal light 12V-21W (Amber)
14) Backup light 12V-21W 7440
15) License plate light 12V-5W 168
16) Cargo area light 12V-5W
Headlights (WRX-STI)
Replace any bulb only with a new
bulb of the specified wattage. Using
a bulb of different wattage could re-
sult in a fire.
High-intensity-discharge (HID)
bulbs are used for the low beams of
the headlights on the WRX-STI.
These HID bulbs use an extremely
high voltage. To avoid the risk of an
electric shock and resulting serious
injury, you should not attempt to re-
place them. Neither should you at-
tempt to replace the high-beam
bulbs, remove/refit the headlight as-
semblies, or remove any headlight-
assembly components. For replace-
ment of the headlight bulbs (low-
beam and high-beam), removal and
installation of the headlight assem-
blies, and removal of headlight-as-
sembly components, contact your
SUBARU dealer.
Page 325 of 365
11-46 Maintenance and service
Headlights (Except WRX-STI)
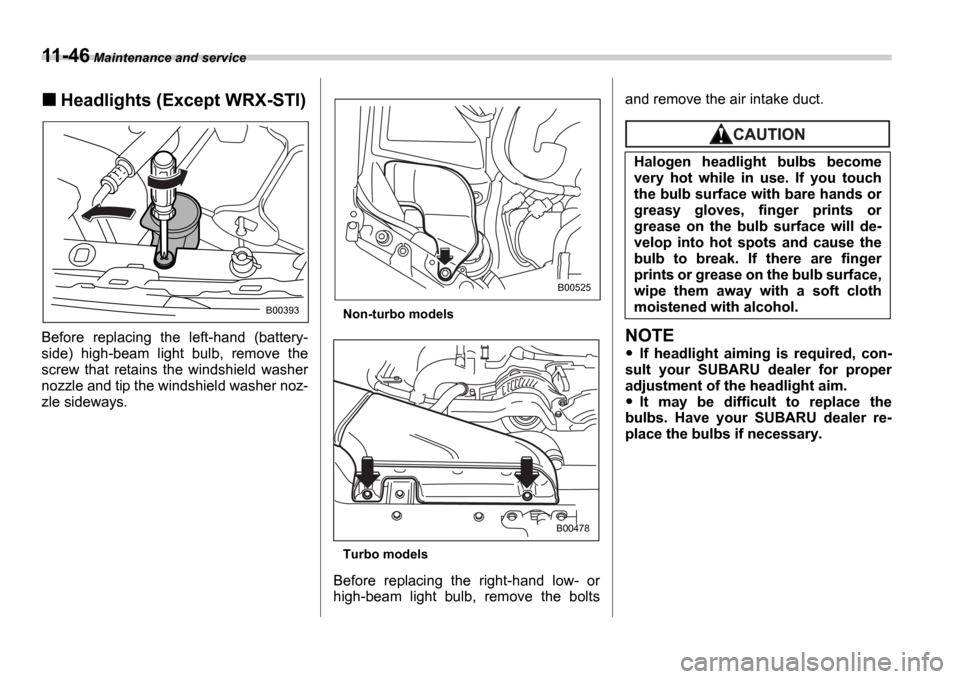
Before replacing the left-hand (battery-
side) high-beam light bulb, remove the
screw that retains the windshield washer
nozzle and tip the windshield washer noz-
zle sideways.
Non-turbo models
Turbo models
Before replacing the right-hand low- or
high-beam light bulb, remove the bolts and remove the air intake duct.
NOTE
If headlight aiming is required, con-
sult your SUBARU dealer for proper
adjustment of the headlight aim.
It may be difficult to replace the
bulbs. Have your SUBARU dealer re-
place the bulbs if necessary.
B00393
B00525
B00478
Halogen headlight bulbs become
very hot while in use. If you touch
the bulb surface with bare hands or
greasy gloves, finger prints or
grease on the bulb surface will de-
velop into hot spots and cause the
bulb to break. If there are finger
prints or grease on the bulb surface,
wipe them away with a soft cloth
moistened with alcohol.
Page 326 of 365
Maintenance and service 11-47
CONTINUED
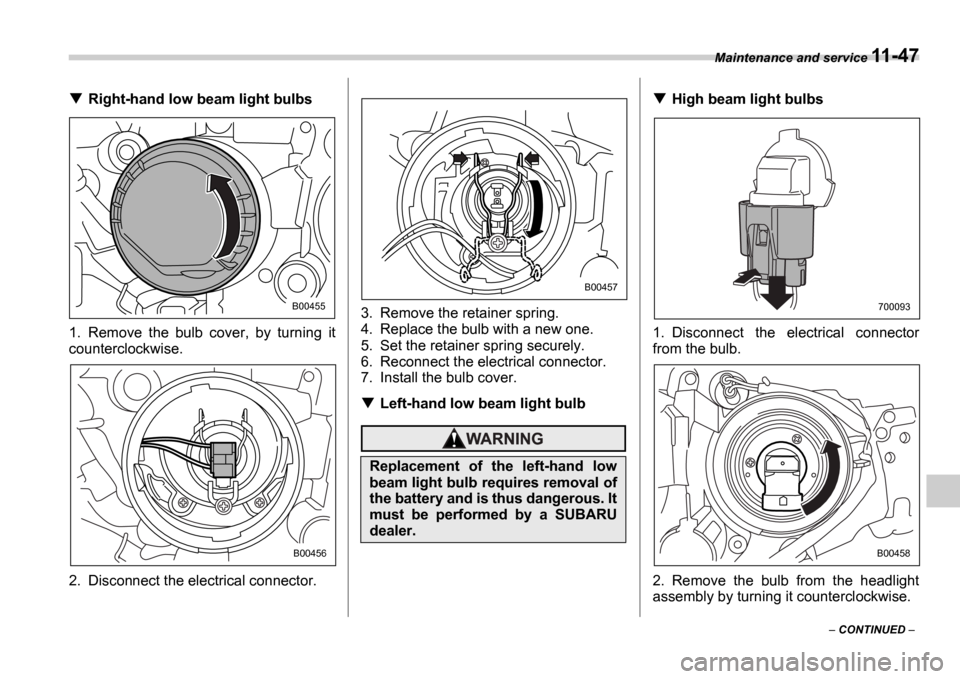
Right-hand low beam light bulbs
1. Remove the bulb cover, by turning it
counterclockwise.
2. Disconnect the electrical connector. 3. Remove the retainer spring.
4. Replace the bulb with a new one.
5. Set the retainer spring securely.
6. Reconnect the electrical connector.
7. Install the bulb cover.
Left-hand low beam light bulb
High beam light bulbs
1. Disconnect the electrical connector
from the bulb.
2. Remove the bulb from the headlight
assembly by turning it counterclockwise.
B00455
B00456
Replacement of the left-hand low
beam light bulb requires removal of
the battery and is thus dangerous. It
must be performed by a SUBARU
dealer.
B00457
700093
B00458