Page 326 of 365
Maintenance and service 11-47
CONTINUED
Right-hand low beam light bulbs
1. Remove the bulb cover, by turning it
counterclockwise.
2. Disconnect the electrical connector. 3. Remove the retainer spring.
4. Replace the bulb with a new one.
5. Set the retainer spring securely.
6. Reconnect the electrical connector.
7. Install the bulb cover.
Left-hand low beam light bulb
High beam light bulbs
1. Disconnect the electrical connector
from the bulb.
2. Remove the bulb from the headlight
assembly by turning it counterclockwise.
B00455
B00456
Replacement of the left-hand low
beam light bulb requires removal of
the battery and is thus dangerous. It
must be performed by a SUBARU
dealer.
B00457
700093
B00458
Page 327 of 365

11-48 Maintenance and service
3. Replace the bulb with new one.
4. Reconnect the electrical connector. At
this time, use care not to touch the bulb
surface.
5. To install the bulb to the headlight as-
sembly, turn it clockwise until it clicks.
Front turn signal light bulbs
It may be difficult to replace the bulbs.
Have your SUBARU dealer replace the
bulbs if necessary.
Parking light
It may be difficult to replace the bulbs.
Have your SUBARU dealer replace the
bulbs if necessary.
Front fog light
It may be difficult to replace the bulbs.
Have your SUBARU dealer replace the
bulbs if necessary.
Rear combination lights
Sedan
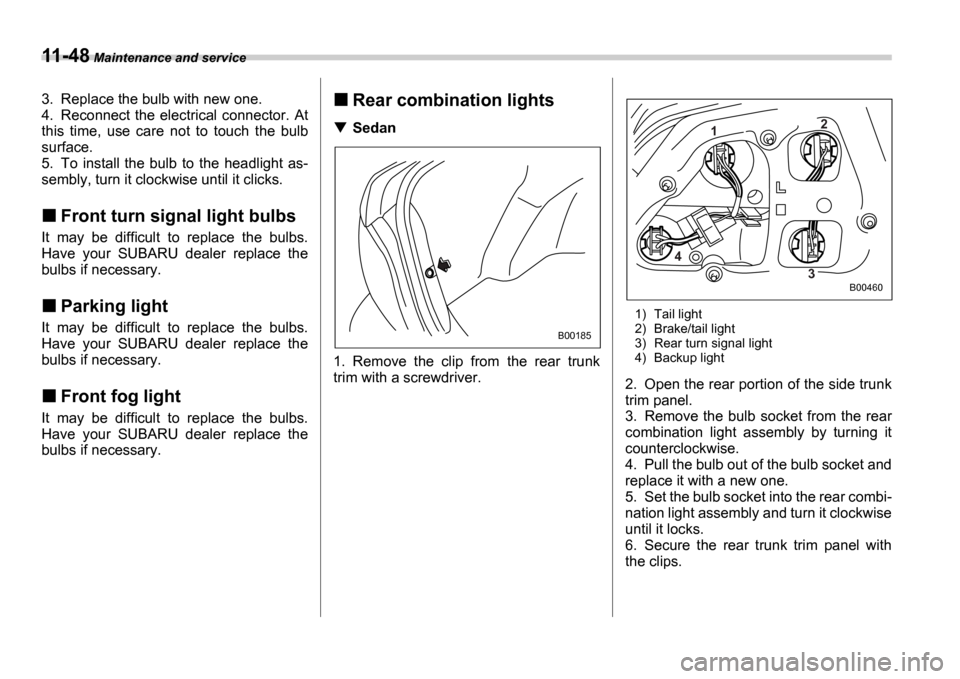
1. Remove the clip from the rear trunk
trim with a screwdriver.
1) Tail light
2) Brake/tail light
3) Rear turn signal light
4) Backup light
2. Open the rear portion of the side trunk
trim panel.
3. Remove the bulb socket from the rear
combination light assembly by turning it
counterclockwise.
4. Pull the bulb out of the bulb socket and
replace it with a new one.
5. Set the bulb socket into the rear combi-
nation light assembly and turn it clockwise
until it locks.
6. Secure the rear trunk trim panel with
the clips.
B00185
1 2
3
4
B00460
Page 328 of 365
Maintenance and service 11-49
CONTINUED
Wagon
1. Using a Phillips screwdriver, remove
the upper and lower clips that secure the
side cover of the rear combination light as-
sembly. 2. Remove the side cover.
3. Remove the upper and lower bolts.
Then, slide the rear combination lamp as-
sembly to the rear and remove it from the
vehicle.
1) Brake/tail light
2) Rear turn signal light
3) Backup light
4. Remove the bulb socket from the rear
combination light assembly by turning it
counterclockwise.
5. Pull the bulb out of the bulb socket and
replace it with a new one.
6. Set the bulb socket into the rear combi-
nation light assembly and turn it clockwise
until it locks.
B00187
B00529
B00188
1
3 2
B00524
Page 329 of 365
11-50 Maintenance and service
7. Put the rear combination light assem-
bly into place while aligning the clip with
the guide on the vehicle and fasten the
bolts.
8. Install the side cover and secure it with
the clips.
License plate light
1. Remove the mounting screws using a
Phillips screwdriver.
2. Remove the lens.
3. Pull the bulb out of the socket. Install a
new bulb.
4. Reinstall the lens.
5. Tighten the mounting screws.
Dome light, map light and
cargo area light
B00530
B00190
700104
700106
Page 330 of 365
Maintenance and service 11-51
CONTINUED
1. Remove the lens by prying the edge of
the lens with a flat-head screwdriver.
2. Pull the bulb out of the socket. Install a
new bulb.
3. Reinstall the lens.
Trunk light0
1. Remove the cover by squeezing its
sides and pulling it.
2. Pull the bulb out of the socket. Install a
new bulb.
3. Reinstall the cover.
High mount stop light
Sedan
1. Remove the high mount stop light cov-
er by prying the edge with a screwdriver.
2. Remove the bulb socket from the high
mount stop light assembly by turning it
counterclockwise.
3. Pull the bulb out of the socket. Install a
new bulb.
4. Reinstall the cover.
B00461
B00191
B00523
Page 331 of 365
11-52 Maintenance and service
Wagon
1. Remove the mounting screws using a
Phillips screwdriver and then remove the
high mount stop light cover.
2. Remove the bulbs from the socket by
pushing it and turning counterclockwise.
Install a new bulb.
3. Reinstall the cover.
4. Tighten the mounting screws.
NOTE
Other bulbs may be difficult to replace.
Have your SUBARU dealer replace
these bulbs if necessary.
B00531
Page 353 of 365

13-12 Consumer information and Reporting safety defects
Uniform tire quality grading
standards
This information indicates the relative
performance of passenger car tires in
the area of treadwear, traction, and
temperature resistance. This is to aid
the consumer in making an informed
choice in the purchase of tires.
Quality grades can be found where
applicable on the tire sidewall be-
tween tread shoulder and maximum
section width. For example:
Treadwear 200 Traction AA Tem-
perature A
The quality grades apply to new pneu-
matic tires for use on passenger cars.
However, they do not apply to deep
tread, winter type snow tires, space-
saver or temporary use spare tires,
tires with nominal rim diameters of 12
inches or less, or to some limited pro-
duction tires.
All passenger car tires must confirm
to Federal Safety Requirements in
addition to these grades.
Treadwear
The treadwear grade is a comparative
rating based on the wear rate of the
tire when tested under controlled con-
ditions on a specified government test
course.
For example, a tire graded 150 would
wear one and one-half (1-1/2) times
as well on the government course as
a tire graded 100. The relative perfor-
mance of tires depends upon the ac-
tual conditions of their use, however,
and may depart significantly from the
norm due to variations in driving hab-
its, service practices and differences
in road characteristics and climate.
Traction AA, A, B, C
The traction grades, from highest to
lowest, are AA, A, B and C. Those
grades represent the tire s ability to
stop on wet pavement as measured
under controlled conditions on speci-
fied government test surfaces of as-
phalt and concrete. A tire marked C
may have poor traction performance.
Temperature A, B, C
The temperature grades are A (the
highest), B, and C, representing the
tire s resistance to the generation of
heat and its ability to dissipate heat
when tested under controlled condi-
tions on a specified indoor laboratory
test wheel. Sustained high tempera-
ture can cause the material of the tire
to degenerate and reduce tire life, and
excessive temperature can lead to
sudden tire failure. The grade C corre-
sponds to a level of performance
which all passenger car tires must
meet under the Federal Motor Vehicle
Safety Standards No. 109. Grades B
and A represent higher levels of per-
formance on the laboratory test wheel
than the minimum required by law.
The traction grade assigned to
this tire is based on straight-
ahead braking traction tests,
and does not include accelera-
tion, cornering, hydroplaning, or
peak traction characteristics.