2006 SUBARU BAJA ECU
[x] Cancel search: ECUPage 323 of 487
8-30
Driving tips
F: Front
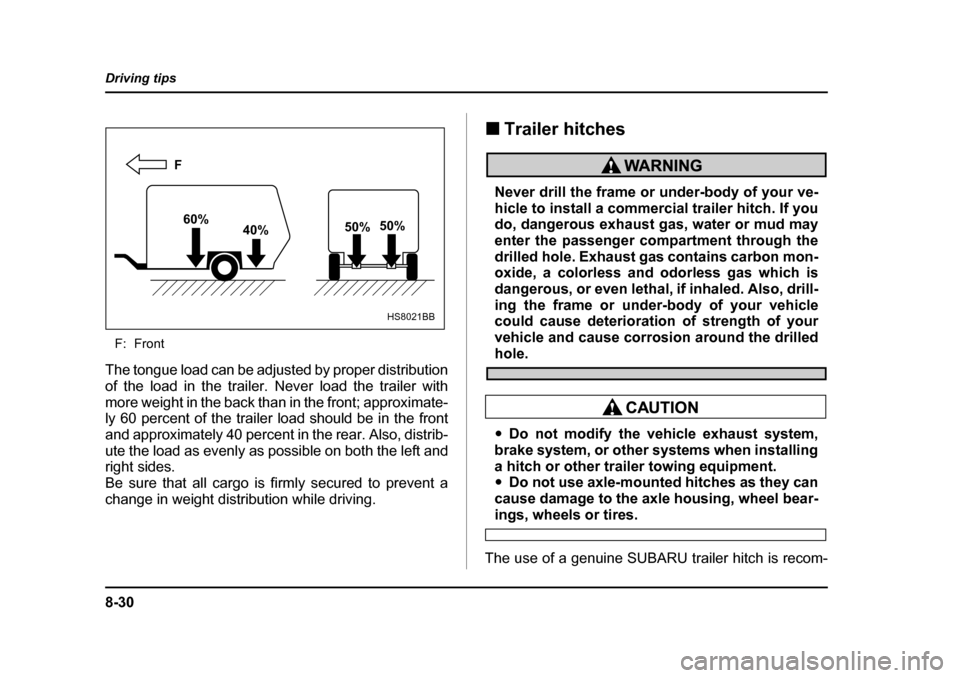
The tongue load can be adjusted by proper distribution
of the load in the trailer. Never load the trailer with
more weight in the back than in the front; approximate-
ly 60 percent of the trailer load should be in the front
and approximately 40 percent in the rear. Also, distrib-
ute the load as evenly as possible on both the left and
right sides.
Be sure that all cargo is firmly secured to prevent a
change in weight distribution while driving. �„
Trailer hitches
Never drill the frame or under-body of your ve-
hicle to install a commercial trailer hitch. If you
do, dangerous exhaust gas, water or mud may
enter the passenger compartment through the
drilled hole. Exhaust gas contains carbon mon-
oxide, a colorless and odorless gas which is
dangerous, or even lethal, if inhaled. Also, drill-
ing the frame or under-body of your vehicle
could cause deterioration of strength of your
vehicle and cause corrosion around the drilled
hole.
�yDo not modify the vehicle exhaust system,
brake system, or other systems when installing
a hitch or other trailer towing equipment. �y Do not use axle-mounted hitches as they can
cause damage to the axle housing, wheel bear-
ings, wheels or tires.
The use of a genuine SUBARU trailer hitch is recom-
F
60% 40% 50%
50%
HS8021BB
Page 326 of 487
8-33
Driving tips
– CONTINUED –
tire is used. The temporary spare tire is not de-
signed to sustain the towing load. Use of the
temporary spare tire when towing can result in
failure of the spare tire and/or less stability of
the vehicle.
Make sure that all the tire s on your vehicle are properly
inflated.
The recommended cold tire pressure is shown on the
vehicle placard attached to the driver’s side door jamb.
Trailer tire condition, size, load rating and proper infla-
tion pressure should be in accordance with the trailer
manufacturer’s specifications.
In the event your vehicle gets a flat tire when towing a
trailer, ask a commercial road service to repair the flat tire.
If you carry a regular size spare tire in your vehicle or
trailer as a precaution against getting a flat tire, be
sure that the spare ti re is firmly secured. �„
Trailer towing tips�yNever exceed 45 mph (72 km/h) when towing
a trailer in hilly country on hot days. �y When towing a trailer, steering, stability,
stopping distance and braking performance
will be different from normal operation. For
safety’s sake, you should employ extra caution
when towing a trailer and you should never
speed. You should also keep the following tips
in mind:
�T Before starting out on a trip
�y Check that the vehicle and vehicle-to-hitch mount-
ing are in good condition. If any problems are appar-
ent, do not tow the trailer. �y Check that the vehicle sits horizontally with the trail-
er attached. If t he vehicle is tipped sharply up at the
front and down at the rear, check the total trailer
weight, GVW, GAWs and t ongue load again, then con-
firm that the load and its distribution are acceptable. �y Check that the tire pressures are correct.
�y Check that the vehicle and trailer are connected
properly. Confirm that.
Page 327 of 487
8-34
Driving tips
– the trailer tongue is connected properly to the
hitch ball.
– the trailer lights connector is connected properly
and trailer’s brake lights illuminate when the vehi-
cle’s brake pedal is pressed, and that the trailer’s
turn signal lights flash when the vehicle’s turn signal
lever is operated.
– the safety chains are connected properly.
– all cargo in the trailer is secured safety in position.
– the side mirrors provide a good rearward field of
view without a significant blind spot.
�y Sufficient time should be taken to learn the “feel” of
the vehicle/trailer combination before starting out on a
trip. In an area free of traffic, practice turning, stopping
and backing up. �T Driving with a trailer
�y You should allow for considerably more stopping
distance when towing a trailer. Avoid sudden braking
because it may result in skidding or jackknifing and
loss of control. �y Avoid abrupt starts and sudden accelerations. If
your vehicle has a manual transmission, always start
out in first gear and release the clutch at moderate en-
gine revolution.�y Avoid uneven steering, sharp turns and rapid lane
changes.�y Slow down before turning. Make a longer than nor- mal turning radius because the trailer wheels will be
closer than the vehicle wheels to the inside of the turn.
In a tight turn, the trailer could hit your vehicle. �y
Crosswinds will adversely affect the handling of
your vehicle and trailer, causing sway. Crosswinds
can be due to weather conditions or the passing of large trucks or buses. If sway ing occurs, firmly grip the
steering wheel and slow down immediately but gradu-
ally. �y When passing other vehicles, considerable dis-
tance is required because of the added weight and
length caused by attaching the trailer to your vehicle.
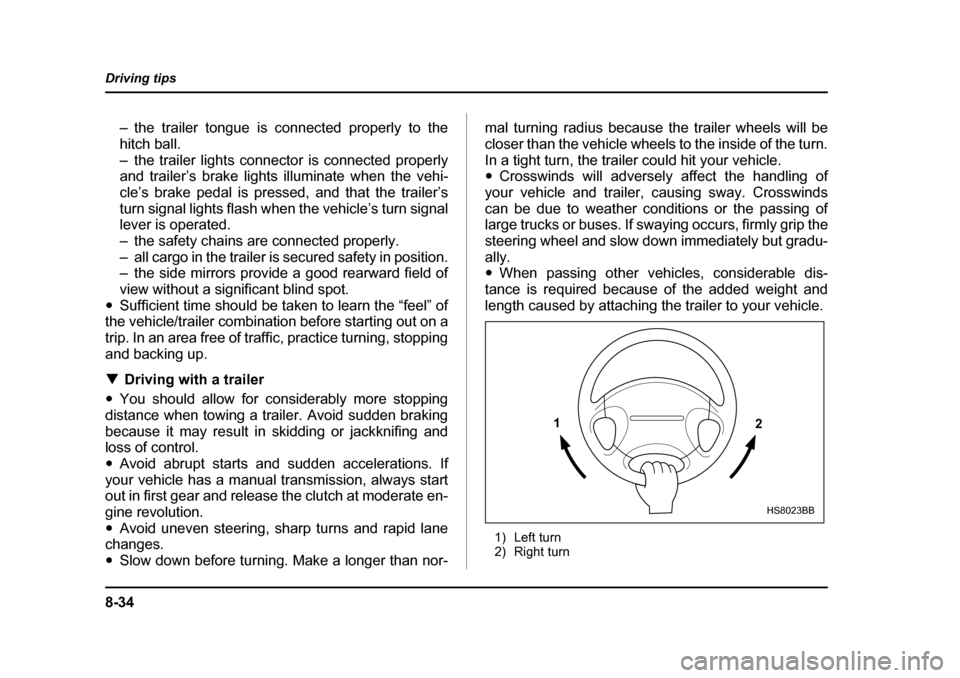
1) Left turn
2) Right turn
1 2
HS8023BB
Page 335 of 487
9-6
In case of emergency
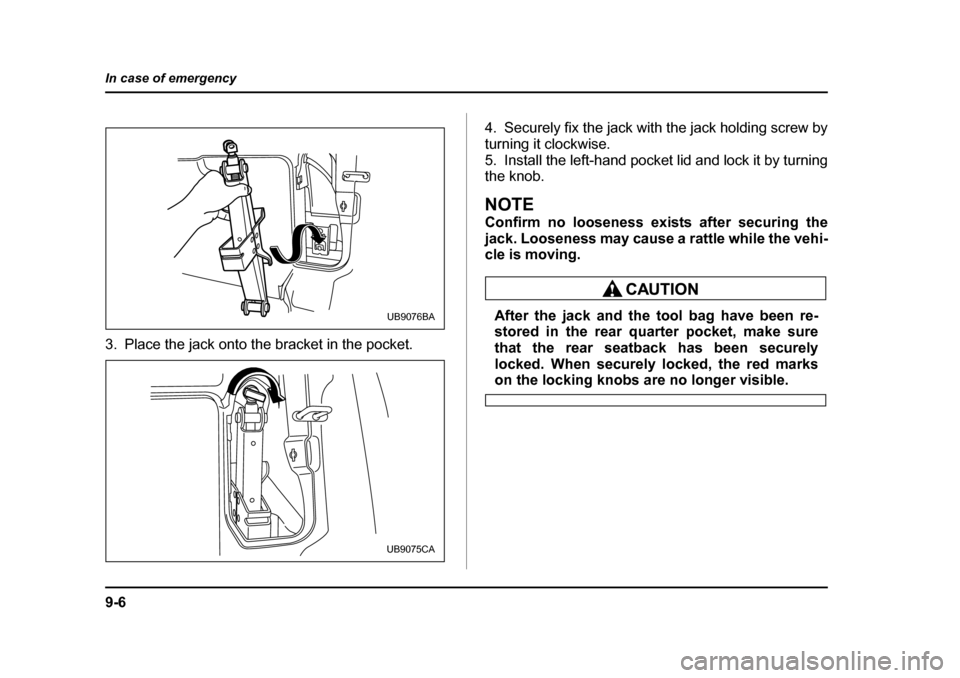
3. Place the jack onto the bracket in the pocket.
4. Securely fix the jack with the jack holding screw by
turning it clockwise.
5. Install the left-hand pocket lid and lock it by turning
the knob.
NOTE
Confirm no looseness exists after securing the
jack. Looseness may cause a rattle while the vehi-
cle is moving.
After the jack and the tool bag have been re-
stored in the rear quarter pocket, make sure
that the rear seatback has been securely
locked. When securely locked, the red marks
on the locking knobs are no longer visible.
UB9076BA
UB9075CA
Page 338 of 487
9-9
In case of emergency
– CONTINUED –
underside of the vehicle. Driving with the cable
not retracted fully could r esult in damage to the
adjacent under floor parts and lead to a serious
accident. �y The spare tire holder is designed to carry
only the smaller temporary spare tire. Never store a full size tire (fl at or otherwise) in the
spare tire holder. Doing so can result in dam-
age to adjacent under floor parts and can lead
to a serious accident.
When using the spare tire hoist:
Do not use air tools or power tools to turn the
spare tire hoist shaft end. If you do, it could re-
sult in severe mechanical damage to the spare
tire hoist.
�„ Re-storage of spare tire
1. Turn the spare tire hoist shaft end counterclock-
wise with the wheel nut wrench to loosen the cable
sufficiently enough to allow the cable end retainer go
through center hole of the temporary spare tire.
2. Insert the retainer through the center hole of the temporary tire (with the outside of the tire facing up).
3. Turn the hoist shaft en
d clockwise with the wheel
nut wrench to wind the cable up completely until you
hear a few clicking sounds. Confirm that the temporary
spare tire holding cable has been wound up complete-
ly by shaking the temporary tire.
If the temporary spare tire is not stored secure-
ly, it could damage adjacent areas of the vehi-
cle and make an abnormal noise.
4. Put the rubber cap on the hoist shaft end hole.
5. Place the wheel nut wrench back into the tool bag
and store the jack and tool bag in their storage loca-
tions.
Page 341 of 487

9-12
In case of emergency
Flat tires
If you get a flat tire while driving, never brake sudden-
ly; keep driving straight ahead while gradually reduc-
ing speed. Then slowly pull off the road to a safe place. �„
Changing a flat tire
�yDo not jack up the vehicle on an incline or a
loose road surface. The jack can come out of
the jacking point or sink into the ground and
this can result in a serious accident. �y Use only the jack provided with your vehicle.
The jack supplied with the vehicle is designed
only for changing a tire. Never get under the ve-
hicle while supporting the vehicle with thisjack. �y Always turn off the engi ne before raising the
flat tire off the grou nd using the jack. Never
swing or push the vehicle supported with the
jack. The jack can come out of the jacking point
due to a jolt and this can result in a serious ac-
cident. �y Never place a tire or tire changing tools in the
passenger compartment after changing wheels. In a sudden stop or collision, loose
equipment could strike occupants and cause
injury. Store the tire and all tools in the proper
place.
1. Park on a hard, level surface, whenever possible,
then stop the engine.
2. Set the parking brake securely and shift a manual
transmission vehicle into reverse or an automatic
transmission vehicle into the “P” (Park) position.
3. Turn on the hazard warning flasher and have ev-
eryone get out of the vehicle.
4. Put wheel blocks at the fron t and rear of the tire di-
HS9003BA
Page 345 of 487
9-16
In case of emergency
9. Use the wheel nut wrench to securely tighten the
wheel nuts to the specified torque, following the tight-
ening order in the illustration. The torque for tightening
the nuts is 74 to 89 lbf·ft (100 to 120 N·m, 10 to 12
kgf·m). This torque is equivalent to applying approxi-
mately 88 to 110 lbs (40 to 50 kg) at the top of the
wheel nut wrench provided with your vehicle. Never
use your foot on the wheel nut wrench or a pipe exten-
sion on the wrench because you may exceed the
specified torque. Have the wheel nut torque checked
at the nearest automot
ive service facility.
�T Storage of the flat tire
�ySecure the flat tire in the cargo bed (with the
outer side of the wheel facing up) by using the
designated tire holding rod and retainer. If the
flat tire is not properly secured, it may fall out
and create a dangerous road hazard that could
lead to a serious accident. �y Do not store the flat ti re under the floor. Do-
ing so could damage the underside of the vehi-
cle.
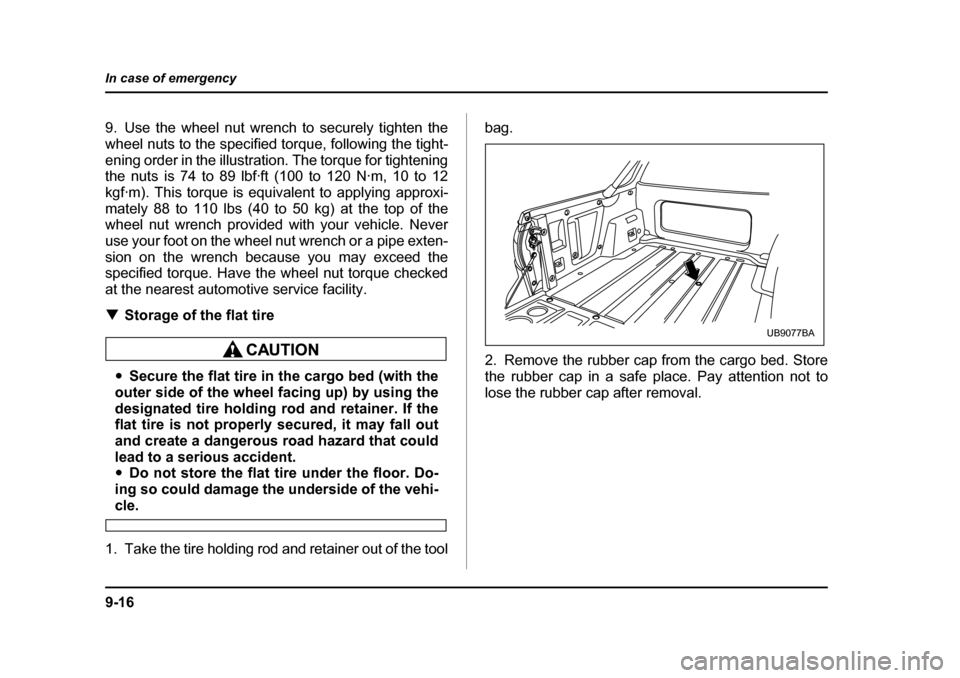
1. Take the tire holding rod and retainer out of the tool bag.
2. Remove the rubber cap from the cargo bed. Store
the rubber cap in a safe place. Pay attention not to
lose the rubber ca
p after removal.
UB9077BA
Page 346 of 487
9-17
In case of emergency
– CONTINUED –
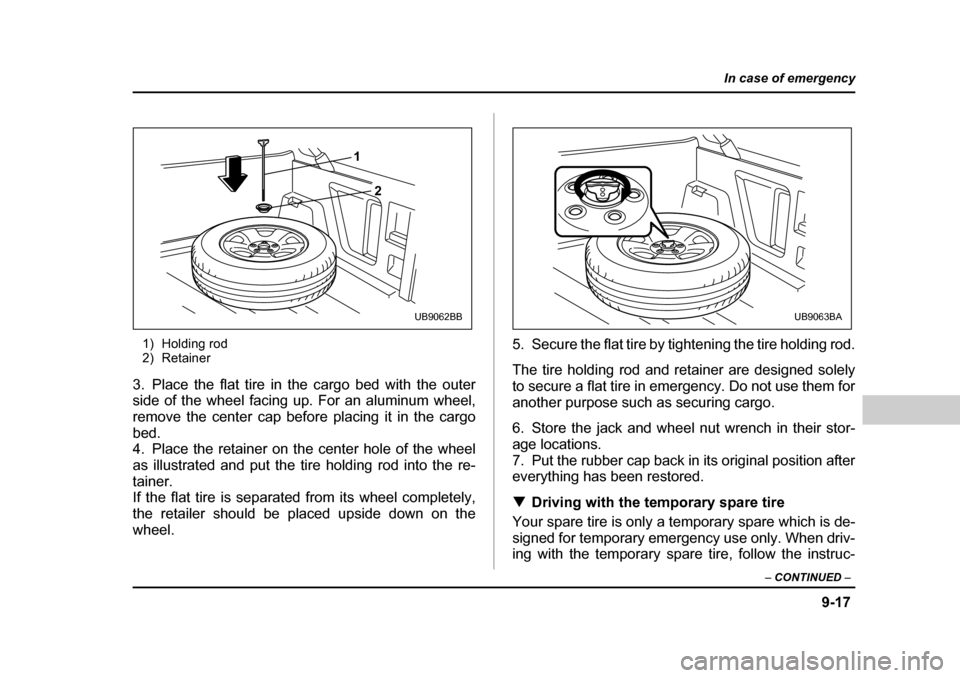
1) Holding rod
2) Retainer
3. Place the flat tire in the cargo bed with the outer
side of the wheel facing up. For an aluminum wheel,
remove the center cap before placing it in the cargo
bed.
4. Place the retainer on the center hole of the wheel
as illustrated and put the tire holding rod into the re-
tainer.
If the flat tire is separated from its wheel completely,
the retailer should be placed upside down on the
wheel. 5. Secure the flat tire by tightening the tire holding rod.
The tire holding rod and retainer are designed solely
to secure a flat tire in emergency. Do not use them for
another purpose such as securing cargo.
6. Store the jack and wheel nut wrench in their stor-
age locations.
7. Put the rubber cap back in its original position after
everything has been restored. �T
Driving with the temporary spare tire
Your spare tire is only a temporary spare which is de-
signed for temporary emergency use only. When driv-
ing with the temporary spare tire, follow the instruc-
1
2
UB9062BBUB9063BA