2006 SKODA ROOMSTER weight
[x] Cancel search: weightPage 78 of 274

Seats and Stowage77
Using the systemSafetyDriving TipsGeneral MaintenanceBreakdown assistanceTechnical Data
•There must be no objects on the floor which could roll under the
pedals. You would then no longer be able to apply the brakes,
operate the clutch or accelerator - risk of accident!
Luggage compartment
Loading the lugg age compartment
Please observe the following in the interest of having good
handling characteristics of your vehicle:
– Distribute the items of luggage as evenly as possible.
– Place heavy objects as far forward as possible.
– Attach the items of luggage to the lashing eyes or the safety
net* ⇒page 78.
In the event of an accident, there is such a high kinetic energy which is
produced by small and light objects that they can cause severe injuries.
The magnitude of the kinetic energy depends on the speed at which the
vehicle is travelling and on the weight of the object. The speed at which
the vehicle is travelling is in this case the more significant factor.
Example: In the event of a frontal collision at a speed of 50 km/h, an unse-
cured object with a weight of 4.5 kg produces an energy, which corre-
sponds to 20 times its own weight. This means that it results in a weight
of approx. 90 kg. You can imagine the injuries that can occur, if this “bullet”
is flying through the interior compartment and hits an occupant.
WARNING
•Store the objects in the luggage compartment and attach them
to the lashing eyes.
•Loose objects in the passenger compartment can be thrown
forward during a sudden manoeuvre or in case of an accident and
can injure the occupants or other onc oming traffic. This risk is still
increased, if the objects which are flying around are hit by a
deployed airbag. In this case, the objects which are thrown back
can injure the occupants - hazard.
•Please note that the handling properties of your vehicle may be
affected when transporting heavy objects as a result of the
displacement of the centre of gravity. The speed and style of
driving must be ad justed accordingly.
•The items carried in the luggage compartment should be stored
in such a way that no objects are able to slip forward if there are any
sudden driving or braking manoeuvres undertaken - risk of injury!
•When transporting fastened objects which are sharp and
dangerous in the luggage compartment enlarged by folding the
rear seats forward or removing the rear seats, ensure the safety of
the passengers transported on the other rear seats ⇒page 145,
“Correct seated position for the occupants on the rear seats”.
•If the rear seats next to the folded forward seat are occupied,
ensure maximum safety, e.g. by placing the goods to be trans-
ported in such a way that a folding back of the seat is prevented in
case of a rear collision.
•Never drive with the tailgate fully opened or slightly ajar other-
wise exhaust gases may get into the interior of the vehicle - risk of
poisoning!
•On no account exceed the permissible axle loads and the
permissible gross weight of the vehicle - risk of accident!
•Never transport occupants in the luggage compartment.
WARNING (continued)
NKO 20 A05.book Page 77 Wednesday, June 21, 2006 1:42 PM
Page 80 of 274

Seats and Stowage79
Using the systemSafetyDriving TipsGeneral MaintenanceBreakdown assistanceTechnical Data
Folding hooks for attaching small items of luggage, such as bags etc., are
provided on both sides of the luggage compartment
⇒page 78, fig. 61 .
An item of luggage weighing up to 10 kg can be attached to the hook.
Fixing nets - Net programme*
Fixing examples of the fixing nets as horizontal pocket, floor fixing net
⇒ fig. 62 and double vertical pockets ⇒fig. 63 .
The fixing nets* and the installation instruction are located in the luggage
compartment.
WARNING
•The whole strength of the net makes it possible to load the
pocket with objects of up to 1.5 kg in weight. Heavy objects are not
secured sufficiently - risk of injury and net damage!
•The load to be transported must be fixed in place in such a way
that it cannot move during the journey and when braking.
Caution
Do not place any objects with sharp edges in the nets - risk of net
damage.
Fig. 62 Fixing net:
double horizontal
pocket, floor fixing net
Fig. 63 Fixing net:
double vertical pockets
NKO 20 A05.book Page 79 Wednesday, June 21, 2006 1:42 PM
Page 81 of 274

Seats and Stowage
80
Fixing floor covering of the luggage compartment
You can fix the raised floor cover between the backrests and the luggage
compartment cover, as if one needs to reach the spare wheel.
The luggage compartment cover
You can use the luggage compartment cover behind the
head restraints for storing light and soft items.
The luggage compartment cover can be removed as required if
one must transport bulky goods.
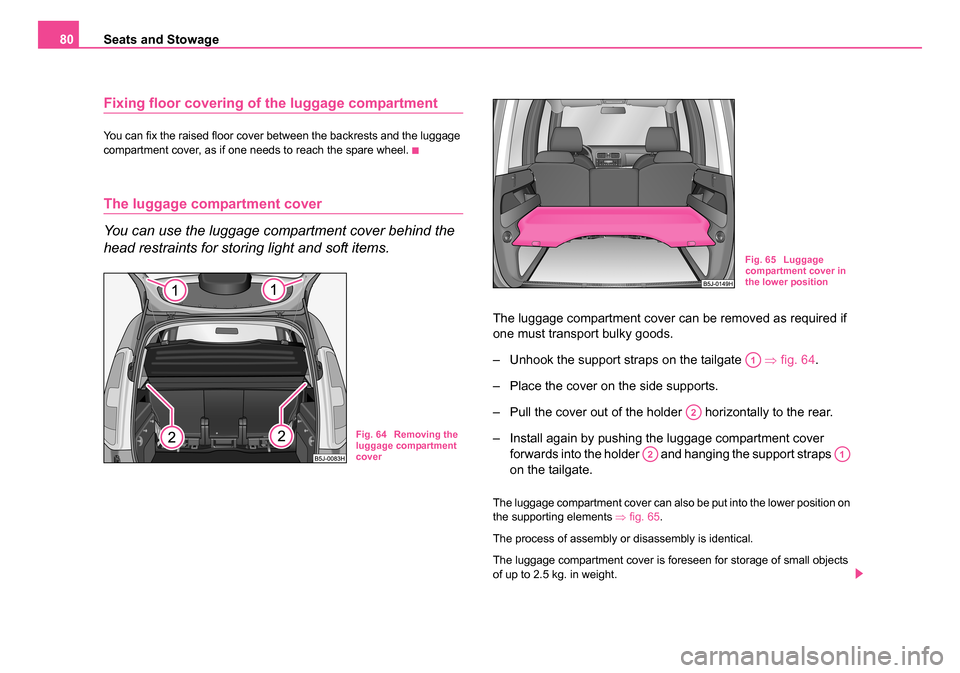
– Unhook the support straps on the tailgate ⇒fig. 64 .
– Place the cover on the side supports.
– Pull the cover out of the holder horizontally to the rear.
– Install again by pushing the luggage compartment cover forwards into the holder and hanging the support straps
on the tailgate.
The luggage compartment cover can also be put into the lower position on
the supporting elements ⇒fig. 65 .
The process of assembly or disassembly is identical.
The luggage compartment cover is foreseen for storage of small objects
of up to 2.5 kg. in weight.
Fig. 64 Removing the
luggage compartment
cover
Fig. 65 Luggage
compartment cover in
the lower position
A1
A2
A2A1
NKO 20 A05.book Page 80 Wednesday, June 21, 2006 1:42 PM
Page 86 of 274

Seats and Stowage85
Using the systemSafetyDriving TipsGeneral MaintenanceBreakdown assistanceTechnical Data
The roof luggage rack system*
Roof rail*
Pay attention to the following points if you wish to transport luggage or
other items on the roof of your vehicle:
•A special roof luggage rack system was developed for the vehicle, that
is why you should only use a roof luggage rack which has been released
for use by Škoda Auto a.s.
•The roof rail is the basis for a complete roof luggage rack system.
Separate additional holders are required for safety reasons for trans-
porting luggage, bikes, surfboards, skis and boats.
•The basic version of the roof luggage rack system and further compo-
nents are obtainable as accessories from Škoda Service Partners.
Caution
•Ensure that the opened tailgate does not collide with the roof load.
For the sake of the environment
The increased aerodynamic drag results in a higher fuel consumption.
Note
A roof rail is obtainable from a Skoda Service Partner if hasn't been fitted
onto a vehicle at the works.
Roof load
Distribute weight evenly over the roof luggage rack system. The maximum
permissible roof load (including roof rack system) of 75 kg and the
maximum permissible total weight of the vehicle should not be exceeded.
You cannot make full use of the permissible roof load if you use a roof
luggage rack system with a lower load carrying capacity. The load trans-
ported on the roof luggage rack system must not exceed the weight limit
which is stated in the fitting instructions.
WARNING
•The items which you transport on the roof bar system must be
reliably attached - risk of accident!
•You must on no account exceed the permissible roof load, the
permissible axle loads and the permissible gross weight of your
vehicle - risk of accident!
•Please note that the handling properties of your vehicle change
when you transport heavy or bulky items on the roof bar system as
a result of the displacement of the centre of gravity and the
increased wind attack area - risk of accident! You must absolutely
adapt your style of driving and the speed of the vehicle to the
specific circumstances.
Fig. 72 Roof rail
NKO 20 A05.book Page 85 Wednesday, June 21, 2006 1:42 PM
Page 94 of 274

Seats and Stowage93
Using the systemSafetyDriving TipsGeneral MaintenanceBreakdown assistanceTechnical Data
Storage compartment in the front seat*
The storage compartment is foreseen for storing small objects of
up to 1 kg in weight.
– Tilt the lock to open the flap and pull out the flap ⇒fig. 85 .
– Tilt the lock to close the flap and press flap close.
Front seat armrest with storage compartment*
Fig. 85 Front seat:
Storage compartmentFig. 86 Armrest:
Storage compartment
Fig. 87 Opening
stowage compartment
NKO 20 A05.book Page 93 Wednesday, June 21, 2006 1:42 PM
Page 95 of 274

Seats and Stowage
94
Fold the armrest
– Press the lower button on the end face of the armrest ⇒page 93, fig. 86 in order to fold the armrest. Fold the
armrest forwards and release the button.
Opening stowage compartment
– The armrest includes a stowage compartment. The storage compartment is unlocked by pressing the upper button and
then can be opened to the top.
Note
The moving space of the arms can be restricted if the armrest is folded
down. In city traffic the armrest should not be folded down.
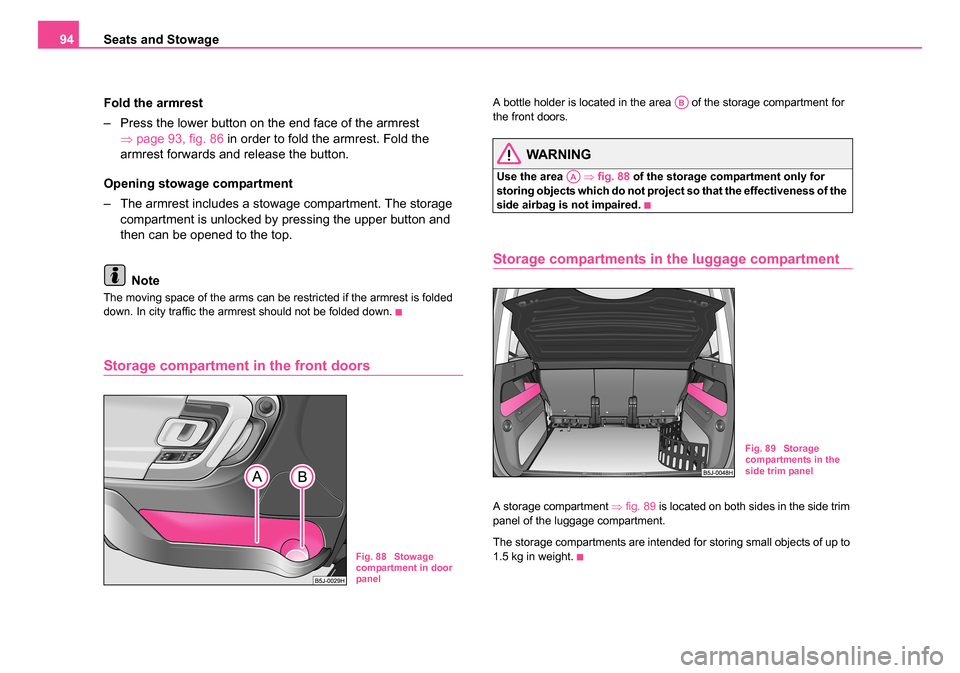
Storage compartment in the front doors
A bottle holder is located in the area of the storage compartment for
the front doors.
WARNING
Use the area ⇒fig. 88 of the storage compartment only for
storing objects which do not project so that the effectiveness of the
side airbag is not impaired.
Storage compartments in the luggage compartment
A storage compartment ⇒fig. 89 is located on both sides in the side trim
panel of the luggage compartment.
The storage compartments are intended for storing small objects of up to
1.5 kg in weight.
Fig. 88 Stowage
compartment in door
panel
AB
AA
Fig. 89 Storage
compartments in the
side trim panel
NKO 20 A05.book Page 94 Wednesday, June 21, 2006 1:42 PM
Page 96 of 274

Seats and Stowage95
Using the systemSafetyDriving TipsGeneral MaintenanceBreakdown assistanceTechnical Data
Flexible storage compartment
A flexible storage compartment is located on the right side of the
luggage compartment. The flexible storage compartment is fore-
seen for storing small objects of up to 8 kg. in weight.
Removing
– Grasp the flexible storage compartment with both hands,
unlock it by pushing upwards and pull it towards you, in order
to remove the storage compartment.
Installing
– Insert both ends of the flexible storage compartment into the openings of the right side trim panel of the luggage compart-
ment and push it downwards until it locks.
Clothes hooks*
A clothes hook is located above the rear doors ⇒fig. 91 .
WARNING
•Ensure that any clothes hanging from the hooks do not impair
your vision to the rear.
•Use the hooks for hanging only light items of clothing and
ensure that there are no heavy or sharp-edged objects in the
pockets.
Fig. 90 Flexible
storage compartmentFig. 91 Area above
rear doors: Clothes
hooks
NKO 20 A05.book Page 95 Wednesday, June 21, 2006 1:42 PM
Page 117 of 274

Starting-off and Driving
116
Cruise control system (CCS)*
Introduction
The cruise control system (CCS) maintains a constant speed, more than
30 km/h, once it has been set, without you having to depress the acceler-
ator pedal. This is only possible within the range which is permitted by the
power output and braking power of the engine. The cruise control system
makes it possible - particularly on long journeys - for you to rest your
“accelerator foot”.
WARNING
•The cruise control system must not, for safety reasons, be used
in dense traffic or on unfavourable road surfaces (such as icy
roads, slippery roads or loose chippings) - risk of accident!
•In order to prevent unintentional use of the cruise control
system, always switch off the system after use.
Note
•Models fitted with a manual gearbox: Always depress the clutch pedal
if you switch on the cruise control system when the gearbox is in Neutral.
Otherwise the engine can rev up unintentionally.
•The cruise control system is not able to maintain a constant speed
when driving on steep downhill sections. The weight of the vehicle
increases the speed at which it travels. One should shift down in good time
to a lower gear or slow the vehicle down by applying the foot brake.
•It is not possible on vehicles fitted with an automatic gearbox to switch
on the cruise control system if the selector lever is in the position P, N or
R .
Storing a speed
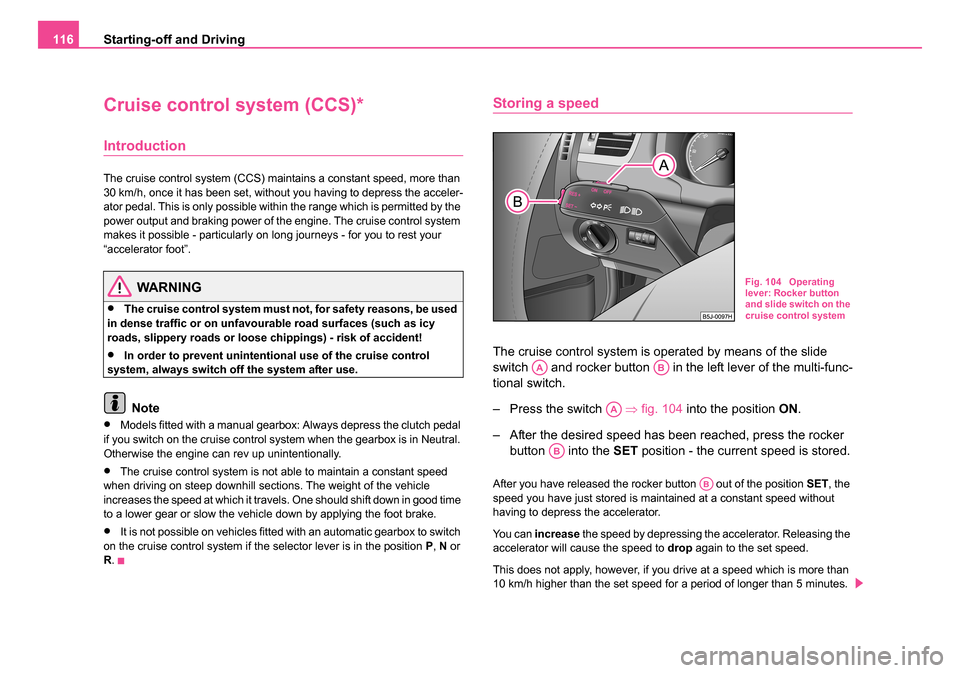
The cruise control system is operated by means of the slide
switch and rocker button in the left lever of the multi-func-
tional switch.
– Press the switch ⇒fig. 104 into the position ON.
– After the desired speed has been reached, press the rocker button into the SET position - the current speed is stored.
After you have released the rocker button out of the position SET, the
speed you have just stored is maintained at a constant speed without
having to depress the accelerator.
Yo u c a n increase the speed by depressing the accelerator. Releasing the
accelerator will cause the speed to drop again to the set speed.
This does not apply, however, if you drive at a speed which is more than
10 km/h higher than the set speed for a period of longer than 5 minutes.
Fig. 104 Operating
lever: Rocker button
and slide switch on the
cruise control system
AAAB
AA
AB
AB
NKO 20 A05.book Page 116 Wednesday, June 21, 2006 1:42 PM