2006 SKODA ROOMSTER ECU
[x] Cancel search: ECUPage 85 of 274

Seats and Stowage
84
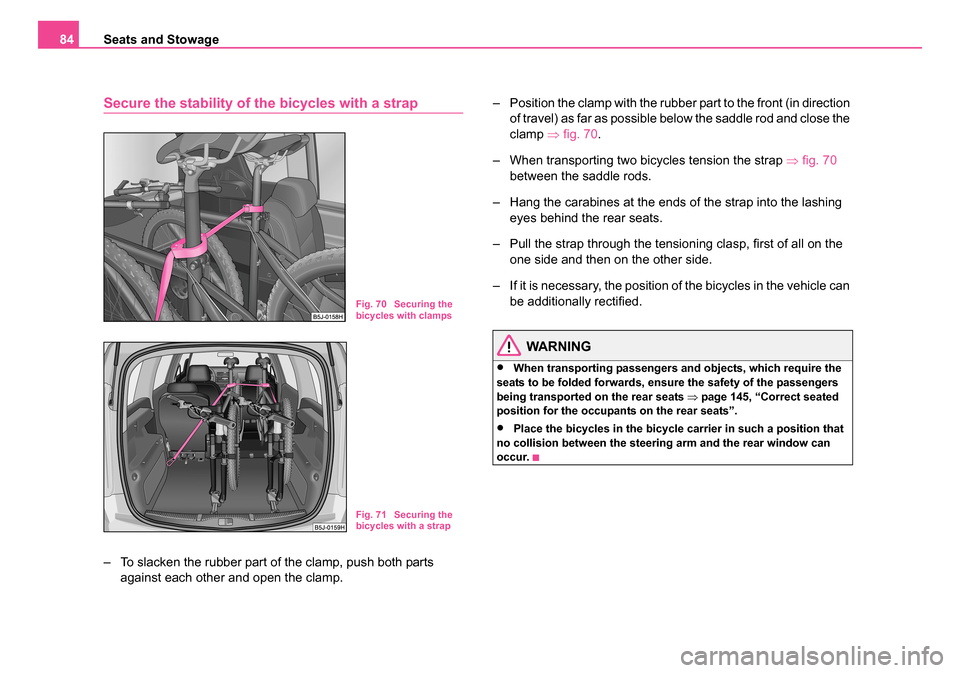
Secure the stability of the bicycles with a strap
– To slacken the rubber part of the clamp, push both parts
against each other and open the clamp. – Position the clamp with the rubber part to the front (in direction
of travel) as far as possible below the saddle rod and close the
clamp ⇒fig. 70 .
– When transporting two bicycles tension the strap ⇒fig. 70
between the saddle rods.
– Hang the carabines at the ends of the strap into the lashing eyes behind the rear seats.
– Pull the strap through the tensioning clasp, first of all on the one side and then on the other side.
– If it is necessary, the position of the bicycles in the vehicle can be additionally rectified.
WARNING
•When transporting passengers and objects, which require the
seats to be folded forwards, ensure the safety of the passengers
being transported on the rear seats ⇒page 145, “Correct seated
position for the occupants on the rear seats”.
•Place the bicycles in the bicycle carrier in such a position that
no collision between the steering arm and the rear window can
occur.
Fig. 70 Securing the
bicycles with clamps
Fig. 71 Securing the
bicycles with a strap
NKO 20 A05.book Page 84 Wednesday, June 21, 2006 1:42 PM
Page 130 of 274

Communication129
Using the systemSafetyDriving TipsGeneral MaintenanceBreakdown assistanceTechnical Data
•It is recommended to speak louder at higher speeds, so that the tone
of your voice is louder than the increased surrounding noise.
•During the dialogue avoid additional noise in the vehicle, e.g. simulta-
neously talking occupants.
•Do not speak, if the system makes an announcement.
•The microphone for voice control is directed to the driver and front
passenger. Therefore the driver and the front passenger can operate the
equipment.
WARNING
Pay attention primarily to the traffic situation! As the driver you are
fully responsible for the traffic safety. Use the telephone system
only to such an extent, so that you are in full control of your vehicle
at any time.
Caution
Taking the mobile phone out of the adapter during the call can lead to
interruption of the connection. When taking out the mobile phone, the
connection to the factory-fitted antenna is interrupted, this reduces the
quality of the transmitting and receiving signal. This might result addition-
ally in harmful radiation from the mobile phone in the interior of the vehicle
and the charging of the telephone battery is interrupted.
Note
•Please also refer to the additional instructions ⇒page 138, “Mobile
phones and two-way radio systems”.
•Please contact your Škoda Service Partner if there are any points
which are not clear.
•The voice control of the telephone is only possible for adapters with
PTT button. Suitable adapters are available at a Škoda Service Partner.
Inserting the mobile phone and adapter
A telephone mount is factory-fitted. The mount is attached to the
centre console. The adapter “Cullmann” is offered as Škoda Orig-
inal Accessory.
Inserting the mobile phone and adapter
– First of all push the adapter in the direction of arrow ⇒fig. 113
up to the stop into the mount. Press the adapter slightly down-
wards, until it locks securely into position.
– Insert the mobile phone into the adapter (as specified in manufacturer's instructions).
Removing the mobile phone and adapter
– Press simultaneouly the side locks of the mount and remove the mobile phone and adapter ⇒fig. 113 .
Fig. 113 Universal
preparation for the
mobile phone
NKO 20 A05.book Page 129 Wednesday, June 21, 2006 1:42 PM
Page 133 of 274

Communication
132
Other possible commands
Enter PIN code
A PIN code must be entered before operating the system.
– Press the PTT button.
– Give the command ENTER PIN/PIN CODE after the signal
tone.
After this command the PIN code can be entered.
The entry of the PIN code is only possible if:
•The ignition and
•the mobile phone are switched on.
The digits zero to nine are permitted. The system detects no continuous
digit combinations such as twenty-three, but only individually spoken
digits (two, three). After each order of digits (separation through brief voice
pause) the detected digits are repeated.
Notes for entering the PIN code
•When entering a PIN code with more than 8 digits, the system indi-
cates “ The PIN is too long ”.
•When entering an incorrect PIN code, the system indicates “ The PIN
is incorrect ”.
•If the incorrect PIN code has been entered three times consecutively,
the card is blocked. With the aid of the personal unblocking code PUK
(Personal Unblock Key), the SIM card can be unblocked. The unblocking
code can only be entered via the phone keypad and not through the
voice control.
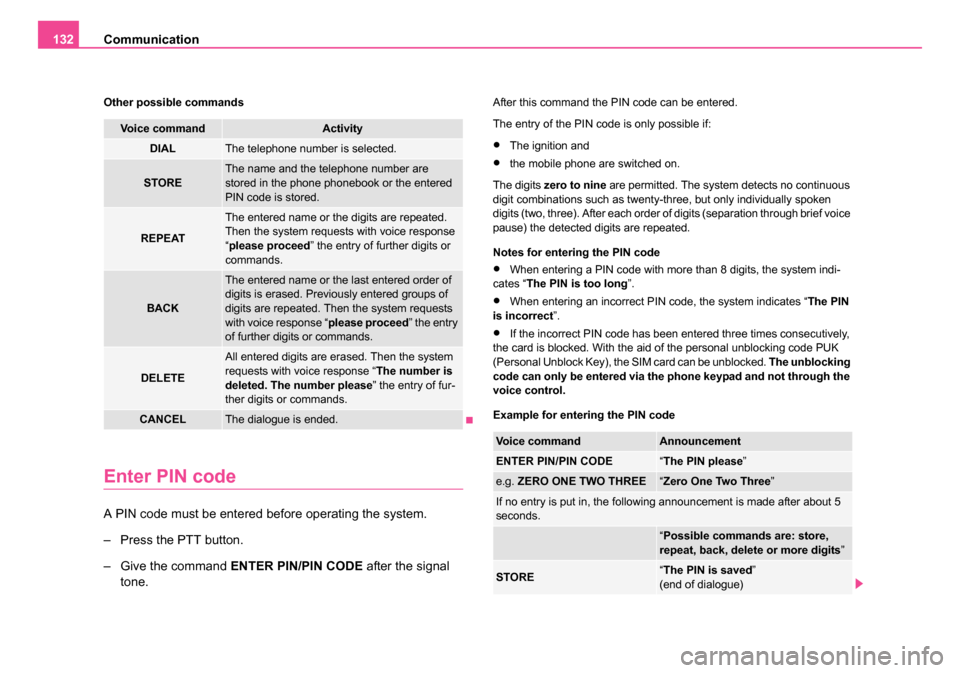
Example for entering the PIN code
Voice commandActivity
DIALThe telephone number is selected.
STOREThe name and the telephone number are
stored in the phone phonebook or the entered
PIN code is stored.
REPEAT
The entered name or the digits are repeated.
Then the system requests with voice response
“ please proceed ” the entry of further digits or
commands.
BACK
The entered name or the last entered order of
digits is erased. Previously entered groups of
digits are repeated. Then the system requests
with voice response “ please proceed” the entry
of further digits or commands.
DELETE
All entered digits are erased. Then the system
requests with voice response “ The number is
deleted. The number please ” the entry of fur-
ther digits or commands.
CANCELThe dialogue is ended.
Voice commandAnnouncement
ENTER PIN/PIN CODE“ The PIN please ”
e.g. ZERO ONE TWO THREE“Zero One Two Three ”
If no entry is put in, the following announcement is made after about 5
seconds.
“Possible commands are: store,
repeat, back, delete or more digits ”
STORE“The PIN is saved ”
(end of dialogue)
NKO 20 A05.book Page 132 Wednesday, June 21, 2006 1:42 PM
Page 140 of 274

Communication139
Using the systemSafetyDriving TipsGeneral MaintenanceBreakdown assistanceTechnical Data
Note
If an external audio source is connected via AUX-IN*, which has a sepa-
rate power supply, this can lead to an interference of the audio signals. It
depends on the properties of the adapter.
CD changer*
Operating the CD changer*
Loading a CD
– Touch the button and guide the CD (compact disc) into the
CD-case . The CD is automatically loaded onto the next
free position in the CD-changer. The LED in the corresponding
button stops flashing. Loading all CDs
– Hold the button pressed and guide all CDs one after the
other into the CD-case . The LEDs in the buttons are no
longer flashing.
Loading a CD to one definite position
– Touch button . The LEDs in the buttons light up at the memory spaces, which are already assigned and flash in the
case of free memory spaces.
– Touch the desired button and guide the CD into the CD- case .
Ejecting a CD
– Touch the button , in order to eject a CD. For assigned memory spaces, now the LEDs light up in the buttons .
– Touch the corresponding button . The CD is ejected.
Ejecting all CDs
– Hold the button pressed for more than 2 seconds, in order to eject the CDs. All CDs in the CD-changer are ejected
consecutively.
Note•Always guide the CD into the CD-case with the printed side
pointing upwards.
•Never push the CD with force into the CD-case as the insertion is
performed automatically.
Fig. 115 The CD
changer
AC
AB
AD
AC
ABAD
ACAD
AD
AB
AA
AD
AD
AA
AB
NKO 20 A05.book Page 139 Wednesday, June 21, 2006 1:42 PM
Page 153 of 274

Seat belts
152
– Press the red button in the belt lock ⇒fig. 124 . The spring
force causes the tongue of the lock to jump out.
– Guide the belt back with your hand to enable the inertia reel to wind up the belt webbing more easily.
A plastic knob in the belt webbing holds the belt tongue in a position which
is easy to get hold of.
Three-point seat belt fo r the rear middle seat
The three-point seat belt for the rear middle seat is
anchored in the area of the luggage compartment on the
left side of the headliner.
Your car is equipped as standard with the three-point seat belt
Fastening the seat belt
– Pull the belt with both lock tongues out of the headliner mount.
– Insert the lock tongue at the end of the belt into the seat belt buckle on the left side until it is heard to lock in place.
– Pull the second lock tongue, which is moveable on the seat belt, over the chest and insert it into the belt buckle on the right
side until it is heard to lock in place.
– Pull on the belt to check that both lock tongues are reliably engaged in the locks. – The belt tongues for the rear middle seat are shaped differ-
ently so that they only fit into the respective belt buckle. If you
attempt to insert a lock tongue into the wrong belt lock it will
not lock.
Taking seat belt off
– Take off the seat belt in the reverse order to fastening.
WARNING
•The three-point safety belt for the rear middle seat can only fulfil
its function reliably when the backrests are correctly locked into
position ⇒page 72.
•After releasing the seat belt hold it tight and let it slowly reel up
until both lock tongues lock into the headliner mount and are
secured with a magnet - risk of injury.
•Never release simultaneously both tongues of the lock.
Belt tensioner
Safety for the driver and front passenger wearing their seat belts is
enhanced by the belt tensioners fitted to the inertia reels of the front three-
point seat belts.
The fastened three-point seat belts are automatically tensioned in the
event of a frontal collision of a certain severity. The belts tensioners are
also deployed if the seat belts are not fastened.
Belt tensioners are not activated in the event of minor frontal collisions,
side and rear-end collisions, in the case of a rollover and also not in acci-
dents in which no major forces are produced from the front.
NKO 20 A05.book Page 152 Wednesday, June 21, 2006 1:42 PM
Page 167 of 274

Transporting children safely
166
Transporting children safely
What you should know about
transporting children!
An introduction to the subject
Accident statistics have revealed that children are gener-
ally more safely transported on the rear seats than on the
front passenger seat.
Children younger than 12 years of age should normally travel on the rear
seat of the vehicle (take note of any national legal provisions which differ
from this). They should be secured there by means of a child restraint
system or by using the existing seat belts depending on their age, body
size and weight. The child seat should be mounted behind the front
passenger seat for safety reasons.
The physical principle of an accident does, of course, also apply to chil-
dren ⇒page 148, “The physical principle of a frontal collision”. They differ
from adults in that their muscles and bone structure of children are not yet
fully developed. Thus children are exposed to increased risk of injury.
Children should be transported by using special child safety seats in order
to reduce this risk of injury.
Only use child safety seats which are officially approved, suitable for chil-
dren and which comply with the ECE-R 44 standard, which classifies child
safety seats into 5 groups ⇒page 170, “Classification of child seats into
groups”. Child restraint systems which have been tested for conformity
with ECE-R 44 have a non-detachable test seal (a large E within a circle
and below this the test number) attached to the seat. We recommend that you use child safety seats from the Škoda genuine
accessories. These child seats were developed and also tested for use in
Škoda vehicles. They fulfil the standard ECE-R 44.
WARNING
Always comply with national le
gal provisions and instructions
from the relevant child safety seat manufacturer when installing
and using a child seat ⇒ in “Important safety information
regarding the use of child safety seats”.
Note
Any national legal provisions which vary from the information contained in
this Owner's Manual take precedence over the information contained
herein.
Important safety informatio n regarding the use of
child safety seats
Correct use of child safety seats considerably reduces the
risk of injury!
WARNING
•All the occupants of the car - in particular children - must wear
a seat belt when the car is moving!
•Children less than 1.50 m in height or younger than 12 years
must not use a normal seat belt without a child restraint system
NKO 20 A05.book Page 166 Wednesday, June 21, 2006 1:42 PM
Page 195 of 274

Towing a trailer
194
be found in your vehicle registration documents or in the brochure -
Technical Data .
Distribution of the load
Distribute the load in the trailer in such a way that any heavy items are
located as close as possible to the axle. Secure the items to prevent them
slipping.
Tyre pressure
Correct the tyre inflation pressure on your vehicle for that of “fully laden”,
⇒ page 226. The inflation pressure of the tyres fitted to the trailer adjust
in accordance with the manufacturer's recommendation.
Exterior mirrors
You have to have additional exterior mirrors fitted if you are not able to see
the traffic behind the trailer with the standard rear-view mirrors. Both exte-
rior mirrors should be attached to folding arms. Adjust the mirrors so that
they provide you with an adequate field of view to the rear.
Headlights
Before starting off with a hitched trailer, also check the setting of the head-
lights. Alter the setting as necessary with the aid of the headlight beam
adjuster ⇒page 58.
Detachable ball head
The ball rod is detachable on vehicles with towing device and suppliable
from Škoda original accessories. It is stowed together with separate fitting
instructions in the spare wheel well in the luggage compartment of the
vehicle.
Note
•We recommend that you also have your vehicle inspected between
service intervals if you tow a trailer frequently.
•The handbrake on the towing vehicle must be put on when coupling
and decoupling the trailer.
Driving Tips
Particular caution is required when towing a trailer.
– Do not, as far as possible, drive with your vehicle unladen and the trailer laden.
– Do not make full use of the legal maximum speeds. This applies in particular to downhill sections.
– Apply the brakes in good time.
– Keep a check on the coolant temperature gauge if the outside temperature is high.
Distribution of weight
The distribution of the weight is very poor if your vehicle is unladen and
the trailer is laden. Maintain a particularly low speed if you cannot avoid
driving with this combination.
Driving speed
Do not drive faster than 80 km/hour for safety reasons. This also applies
for countries in which higher speeds are allowed.
The fact that the driving stability of the vehicle + trailer combination
reduces with increasing speed means that the legally allowed speed
should not be used when there are unfavourable road, weather or wind
conditions, particularly near accident black spots.
NKO 20 A05.book Page 194 Wednesday, June 21, 2006 1:42 PM
Page 208 of 274

Fuel207
Using the systemSafetyDriving TipsGeneral MaintenanceBreakdown assistanceTechnical Data
Operation in winter
Winter-grade diesel fuel
A different grade of diesel fuel is available at filling stations in winter than
during the summer. Using “summer-grade diesel fuel” at temperatures
below 0°C can result in operational problems because the diesel becomes
viscous as a result of paraffin separation.
It is therefore the case that DIN EN 590 prescribes diesel fuel class for
certain periods of the year which can also be purchased at the corre-
sponding time during the year. “Winter-grade diesel fuel” will still operate
properly even at a temperature of -20°C.
It is often the case in countries with different climatic conditions that diesel
fuels available have a different temperature characteristic. Škoda Service
Partners and filling stations in the country concerned will be able to
provide you with information regarding the diesel fuels available.
Prewarming fuel
The vehicle is fitted with a fuel filter prewarming system. This secures
operation of a vehicle using diesel fuel down to an environmental temper-
ature of -25°C.
Biofuel
We recommend refuelling with diesel fuel at temperatures below -10°C.
Caution
It is not permitted to add the various fuel additives on the market, including
petrol, to diesel fuel in order to improve its flow properties.
Refuelling
Opening the fuel filler cap
– Open the fuel filler flap with the hand.
Fig. 151 Right rear
side of the vehicle: Fuel
filler flap
Fig. 152 Filler flap with
cap unscrewed
NKO 20 A05.book Page 207 Wednesday, June 21, 2006 1:42 PM