2006 Seat Toledo towing
[x] Cancel search: towingPage 215 of 298
Checking and refilling levels213
Safety First
Operating instructions
Tips and Maintenance
Te c h n i c a l D a t a
Note
Before a long trip, we recommend finding an engine oil that conforms to the
corresponding VW specifications and keeping it in the vehicle. This way, the
correct engine oil will always be available for a top-up if needed.Checking the engine oil level
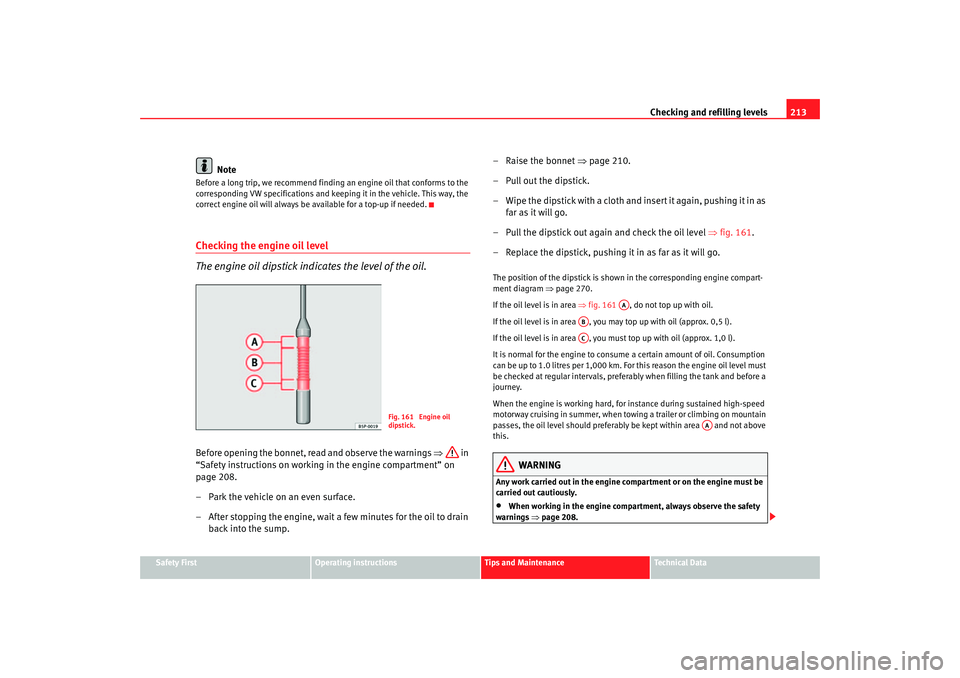
The engine oil dipstick indicates the level of the oil.Before opening the bonnet, read and observe the warnings ⇒ in
“Safety instructions on working in the engine compartment” on
page 208.
– Park the vehicle on an even surface.
– After stopping the engine, wait a few minutes for the oil to drain back into the sump. – Raise the bonnet
⇒page 210.
– Pull out the dipstick.
– Wipe the dipstick with a cloth and insert it again, pushing it in as far as it will go.
– Pull the dipstick out again and check the oil level ⇒fig. 161.
– Replace the dipstick, pushing it in as far as it will go.
The position of the dipstick is shown in the corresponding engine compart-
ment diagram ⇒page 270.
If the oil level is in area ⇒fig. 161 , do not top up with oil.
If the oil level is in area , you may top up with oil (approx. 0,5 l).
If the oil level is in area , you must top up with oil (approx. 1,0 l).
It is normal for the engine to consum e a certain amount of oil. Consumption
can be up to 1.0 litres per 1,000 km. For this reason the engine oil level must
be checked at regular intervals, preferably when filling the tank and before a
journey.
When the engine is working hard, for instance during sustained high-speed
motorway cruising in summer, when towing a trailer or climbing on mountain
passes, the oil level should preferably be kept within area and not above
this.
WARNING
Any work carried out in the engine compartment or on the engine must be
carried out cautiously.•
When working in the engine compartm ent, always observe the safety
warnings ⇒page 208.
Fig. 161 Engine oil
dipstick.
AA
ABAC
AA
toledo_angles_0706 Seite 213 Dienstag, 5. September 2006 10:32 10
Page 236 of 298

If and when
234
Note•
Seek professional assistance if the repair of a tyre puncture is not
possible with the sealing compound.
Wheel changePreparation work
What you must do before changing a wheel.– If you have a flat tyre or puncture, park the vehicle as far away from the flow of traffic as possible. Choose a location that is as
level as possible.
– All passengers should leave the ve hicle. They should wait in a
safe area (for instance behind the roadside crash barrier).
– Switch off the engine. Switch on the hazard warning lights.
–Apply the handbrake firmly.
– Engage the first gear, or put the selector lever to position P for
those vehicles with an automatic gearbox.
– If you are towing a trailer, unhitch it from your vehicle.
– Take the vehicle tools and the spare wheel out of the luggage
compartment.
WARNING
Put the hazard warning lights on and place the warning triangle in position.
This is for your own safety and also warns other road users.
Caution
If you have to change the tyre on a gradient, block the wheel opposite the
wheel being changed by placing a stone or similar object under it to prevent
the vehicle from rolling away.
Note
Please observe legal requirements when doing so.Changing a wheelChange the wheel as described below
–Pull off the hub cap. Also refer to ⇒page 235.
– Slacken the wheel bolts .
– Raise the car with the jack in the corresponding zone.
– Ta k e o f f the wheel and then put on the spare wheel.
– Lower the vehicle.
– Tighten the wheel bolts firmly in diagonal sequence with the box
spanner.
–Replace the hub cap.
toledo_angles_0706 Seite 234 Dienstag, 5. September 2006 10:32 10
Page 247 of 298

If and when245
Safety First
Operating instructions
Tips and Maintenance
Te c h n i c a l D a t a
21
Cable control unit 7,5
22 Volumetric alarm sensor/alarm siren 5
23 Diagnosis/Rain sensor/Light switch 10
24 Vacant
25 Automatic gearbox control unit connection 20
26 Vacuum pump 20
27 Vacant
28 Windscreen wiper motor/Cable control unit 20
29 Vacant
30 Cigarette lighter / socket 20
31 Vacant
32 Vacant
33 Heater 40
34 Vacant
35 Vacant
36 2.0 litre 147 kW engine 10
37 2.0 litre 147 kW engine 10
38 2.0 litre 147 kW engine 10
39 Trailer control unit (coupling) 15
40 Trailer control unit (indicators, brakes and left side) 20
41 Trailer control unit (fog light, reversing light and right side) 20
42 Towing kit 15
43 Vacant
44 Rear window heater 25
Number
Electrical equipment Amperes
toledo_angles_0706 Seite 245 Dienstag, 5. September 2006 10:32 10
Page 248 of 298

If and when
246Some of the electrical items listed in the table are only fitted on certain
models or are optional extras.
Please note that the above list, while corr ect at the time of printing, is subject
to alterations. If discrepancies should occur, please refer to the sticker on the
inside of the fuse cover for the correct information for your model. 45
Front electric windows 30
46 Rear electric windows 30
47 Engine (gauge, fuel relay) 15
48 Convenience controls 20
49 Heating controls 40
50 Heated seats 30
51 Sunroof 20
52 Headlight washer system 20
53 Towing kit 20
54 Taxi (taxi metre power supply) 5
55 Towing kit 20
56 Taxi (transmitter power supply) 15
57 Vacant
58 Central locking control unit 30
Number
Electrical equipment Amperes
toledo_angles_0706 Seite 246 Dienstag, 5. September 2006 10:32 10
Page 264 of 298

If and when
262To w i n g a n d t o w - s t a r t i n gTo w - s t a r t i n g
The use of jump leads is preferable to tow-starting.We recommend that you do not t o w - s t a r t yo u r v e h i c l e . J u m p - s ta r t i n g
is preferable ⇒page 259.
However, if your vehicle has to be tow-started:
– Engage the 2
nd or the 3
rd gear.
– Keep the clutch pressed down.
– Switch on the ignition.
– Once both vehicles are moving, release the clutch.
– As soon as the engine starts, press the clutch and move the gear lever into neutral. This helps to prevent driving into the towing
vehicle.
WARNING
The risk of accidents is high when tow-starting. The vehicle being towed
can easily collide with the towing vehicle.
Caution
When tow-starting, fuel could enter the catalytic converter and damage it.
Towing eyesPlease observe the following points if you use a tow-rope:
Fig. 202 The front right
section of the vehicle:
Fitting the front towing
eyeFig. 203 Fitting the
towing eye to the rear of
the vehicle
toledo_angles_0706 Seite 262 Dienstag, 5. September 2006 10:32 10
Page 265 of 298

If and when263
Safety First
Operating instructions
Tips and Maintenance
Te c h n i c a l D a t a
Notes for the driver of the towing vehicle
– Drive slowly at first until the tow-rope is taut. Then accelerate
gradually.
– Begin and change gears cautiously. If you are driving an auto- matic vehicle, accelerate gently.
– Remember that the brake servo and power steering are not working in the vehicle you are towing. Brake earlier than you
would normally, but with a more gentle pressure on the brake.
Notes for the driver of the towed vehicle
– Ensure that the tow-rope remains taut at all times when towing.
Fitting the towing eye
– Take the towing ring from the onboard tools.
– Pull the lower front cover down and leave the cover hanging on the vehicle.
– Remove the cover of the screw hole, insert a screwdriver into the lower slot and lever gently.
– Screw the towing eye as shown by arrow anti-clockwise to the
limit position in the front ⇒page 262, fig. 202 or rear
⇒ page 262, fig. 203 threaded hole.Tow-rope or tow-bar
It is easier and safer to tow a vehicle with a tow-bar. You should only use a
tow-rope if you do not have a tow-bar.
A tow-rope should be slight ly elastic to reduce the loading on both vehicles.
It is advisable to use a tow-rope made of synthetic fibre or similarly elastic
material. Attach the tow-rope or the tow-bar only to the towing eyes provided or a
towing bracket.
Driving style
Towing requires some experience, especially when using a tow-rope. Both
drivers should be familiar with the technique required for towing. Inexperi-
enced drivers should not attempt to tow-start or tow away another vehicle.
Do not pull too hard with the towing vehicle and take care to avoid jerking the
tow-rope. When towing on an unpaved road, there is always a risk of over-
loading and damaging the anchorage points.
The ignition of the vehicle being towed must be switched on to prevent the
steering wheel from locking and also to
allow the use of the turn signals,
horn, windscreen wipers and washers.
As the brake servo does not work if th e engine is not running, you must apply
considerably more pressure to the brake pedal than you normally would.
As the power assisted steering does not work if the engine is not running, you
will need more strength to steer than you normally would.
Towing vehicles with an automatic gearbox
•
Put the selector lever into position “N”.
•
Do not drive faster than 50 km/h when towing a vehicle.
•
Do not tow further than 50 km.
•
If a breakdown vehicle is used, the vehicle must be towed with the front
wheels raised.Note
•
Observe legal requirements when towing or tow-starting.
•
Switch on the hazard warning lights of both vehicles. However, observe
any regulations to the contrary.
•
For technical reasons, vehicles with an automatic gearbox must not be
tow-started.
toledo_angles_0706 Seite 263 Dienstag, 5. September 2006 10:32 10
Page 266 of 298

If and when
264•
If damage to your vehicle means that there is no lubricant in the gearbox,
you must raise the drive wheels while the vehicle is being towed.
•
If the vehicle has to be towed more than 50 km, the front wheels must be
raised during towing, and towing should be carried out by a qualified person.
•
The steering wheel is locked when the vehicle has no electrical power. The
vehicle must then be towed with the front wheels raised. Towing should be
carried out by a qualified person.
•
The towing eye should always be kept in the vehicle. Please refer to the
notes on ⇒page 262, “Tow-starting”.
toledo_angles_0706 Seite 264 Dienstag, 5. September 2006 10:32 10
Page 270 of 298

General notes on the technical data
268WeightsKerb weight refers to the basic model with a fuel tank filled to 90% capacity
and without optional extras. The figure quoted includes 75 kg to allow for the
weight of the driver.
For special versions and optional equipment fittings or for the addition of
accessories, the weight of the vehicle will increase ⇒.
WARNING
•
Please note that the centre of gravity may shift when transporting
heavy objects; this may affect the vehi cle's handling and lead to an acci-
dent. Always adjust your speed and dr iving style to suit road conditions
and requirements.
•
Never exceed the gross axle weight rating or the gross vehicle weight
rating. If the allowed axle load or the allowed total weight is exceeded, the
driving characteristics of the vehicle may change, leading to accidents,
injuries and damage to the vehicle.
To w i n g a t r a i l e rTrailer weightsTrailer weights
The trailer weights and drawbar loads approved are selected in intensive
trials according to precisely defined criteria. The approved trailer weights are
valid for vehicles in EU for maximum speeds of 80 km/h (in certain circum-
stances up to 100 km/h). The figures may be different in other countries. All
data in the official vehicle documents take precedence over these data ⇒. Drawbar load
The
maximum permitted weight exerted by the trailer drawbar on the ball joint
of the towing bracket must not exceed 75 kg.
In the interest of road safety, we recommend that you always tow
approaching the maximum drawbar load. The response of the trailer on the
road will be poor if th e drawbar load is too small.
If the maximum permissible drawbar load cannot be met (e.g. with small,
empty and light-weight single axle trailers or tandem axle trailers with an axle
base of less than 1 metre), at least 4% of the actual trailer weight is a legal
stipulation for a drawbar load.
WARNING
•
For safety reasons, you should not drive at speeds above 80 km/h when
towing a trailer. This also applies to countries where higher speeds are
permitted.
•
Never exceed the maximum trailer weights or the draw bar loading. If
the permissible axle load or the perm issible total weight is exceeded, the
driving characteristics of the vehicle may change, leading to accidents,
injuries and damage to the vehicle.
WheelsTyre pressure, snow chains, wheel boltsTyre pressures
The sticker with the tyre pressure values can be found on the inside of the
tank flap. The tyre pressure values given there are for cold tyres. The slightly
raised pressures of warm tyres must not be reduced ⇒.
toledo_angles_0706 Seite 268 Dienstag, 5. September 2006 10:32 10