Page 117 of 296

Controls, Instruments
117
Check left/right dipped beam (low
beam)
also applies to:
front side lights, direction indicator,
high beam, fog lights, side indicator
light, brake light, tail light, rear fog
light, reversing light, raised brake
light, side markerThe reported light is faulty. Check bulb.
Have the fault remedied at an authorized
Porsche dealer.
Daytime
driving lights offDaytime driving lights switch off when the engi-
ne is shut off. Switch on lights if necessary.
Headlight beam
adjustment faultyHave the fault remedied at an authorized
Porsche dealer.
Front lid not closed Close luggage compartment lid properly.
Rear lid not closed Close engine compartment lid properly.
Lid opener front
faultyLuggage compartment lid release is faulty.
Have the fault remedied at an authorized
Porsche dealer.
Rain sensor faulty Have the fault remedied at an authorized
Porsche dealer.
Refill washer fluid
LIMIT
Cannot be accepted
with vehicle stoppedThe current speed can only be accepted for the
acoustic warning signal when the vehicle is in
motion.
LIMIT
30Selected speed limit (e.g. 30 mph) for the
acoustic warning signal has been exceeded.
Adjust your speed if necessary.
Fuel gauge war-
ning lightConsider remaining range Refuel at next opportunity.
Instrument
panelOn-board
computerText display on on-board
computerMeaning/measure
Page 124 of 296

124
Controls, InstrumentsIf the ignition key is withdrawn and the door is
opened while the lights (not the parking light or
Welcome Home lighting) are on, a chime warns of
possible battery discharge.
In some countries, differences are possible
due to provisions of law.
Note on operation
Further individual light functions (e.g. daytime driv-
ing lights) are available in vehicles with the Sport
Chrono package.
Please observe the chapter “Individual Memory” in
the separate PCM operating instructions.
Welcome Home LightingSwitching onfMove light switch to the HOME position.
For improved visibility and security when you get
in and out of the car, the fog lights and the tail
lights remain on for a certain period of time:
–When you get out of the car, the lights are
turned on for approx. 30 seconds after the
door is opened. The off-delay time resumes
when the vehicle is locked.
On vehicles with the Sport Chrono package,
the PCM can be used to set the off-delay time.
This setting also changes the lighting period
for unlocking the vehicle.
Please observe the chapter “Individual
Memory” in the separate PCM operating
instructions.
The lights are turned on for approx. 30 seconds
when the vehicle is unlocked.
The lights go out if the ignition is switched on or
when leaving the Welcome Home lighting
If the ignition key is withdrawn and the door is ope-
ned while the lights (not the parking light left/right)
are on, a gong warns of possible battery dis-
charge.
In some countries, differences are possible
due to provisions of law.
Light SwitchLights switched off
Welcome Home Function
Parking lights, side marker lights,
license plate light, instrument illumination
Low beam, high beam
Only with ignition on
Fog lights in addition to parking lights or
low beam:
Pull switch to first click.
Indicator light on.
The fog lights will go out automatically
when the high beams are switched on.
Rear fog light in addition to the fog
lights:
Pull switch to second click.
Indicator light on.
Page 158 of 296

158
Controls, Instruments
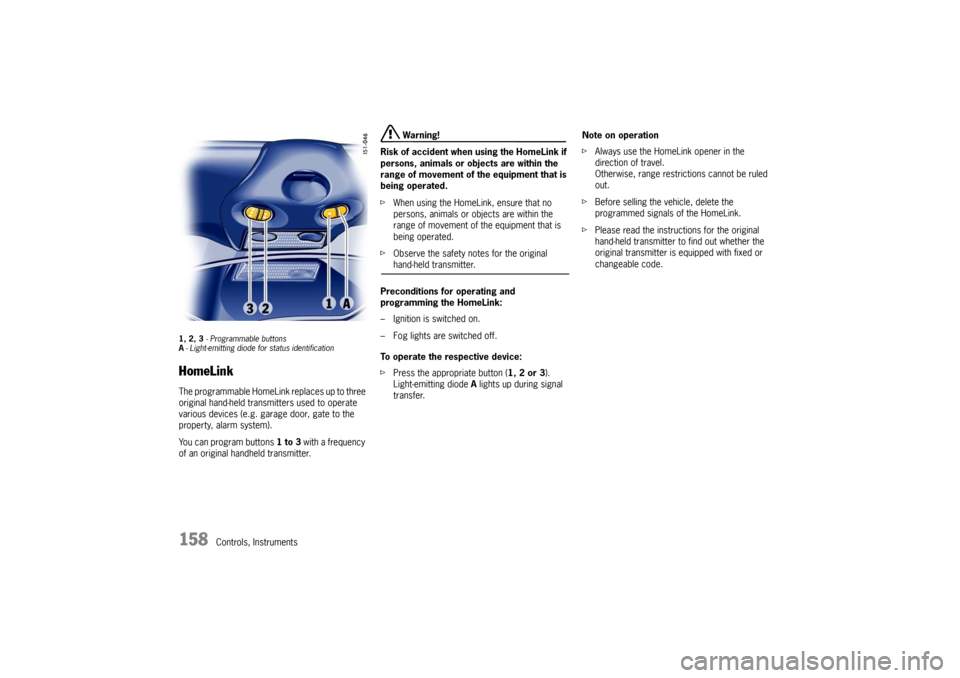
1, 2, 3 - Programmable buttons
A- Light-emitting diode for status identificationHomeLinkThe programmable HomeLink replaces up to three
original hand-held transmitters used to operate
various devices (e.g. garage door, gate to the
property, alarm system).
You can program buttons 1 to 3 with a frequency
of an original handheld transmitter.
Warning!
Risk of accident when using the HomeLink if
persons, animals or objects are within the
range of movement of the equipment that is
being operated.
fWhen using the HomeLink, ensure that no
persons, animals or objects are within the
range of movement of the equipment that is
being operated.
fObserve the safety notes for the original hand-held transmitter.
Preconditions for operating and
programming the HomeLink:
– Ignition is switched on.
– Fog lights are switched off.
To operate the respective device:
fPress the appropriate button (1, 2 or 3).
Light-emitting diode A lights up during signal
transfer.Note on operation
fAlways use the HomeLink opener in the
direction of travel.
Otherwise, range restrictions cannot be ruled
out.
fBefore selling the vehicle, delete the
programmed signals of the HomeLink.
fPlease read the instructions for the original
hand-held transmitter to find out whether the
original transmitter is equipped with fixed or
changeable code.
Page 159 of 296

Controls, Instruments
159
Allocating signals to the buttonsfPlease follow the operating instructions for the
original hand-held transmitter.
Prior to programming the HomeLink for the
first time
The following process deletes the standard codes
set at the factory. Do not repeat the process if you
program further buttons.
fKeep the two outer buttons 1 and 3
depressed for approx. 20 seconds until light-
emitting diode A begins to flash quickly.
All programmed signals of buttons 1 to 3 are
deleted.HomeLink with fixed code system
1. Press the desired button until the light-emitting
diode begins to flash slowly.
You then have approx. 5 minutes to perform
steps 2 and 3.
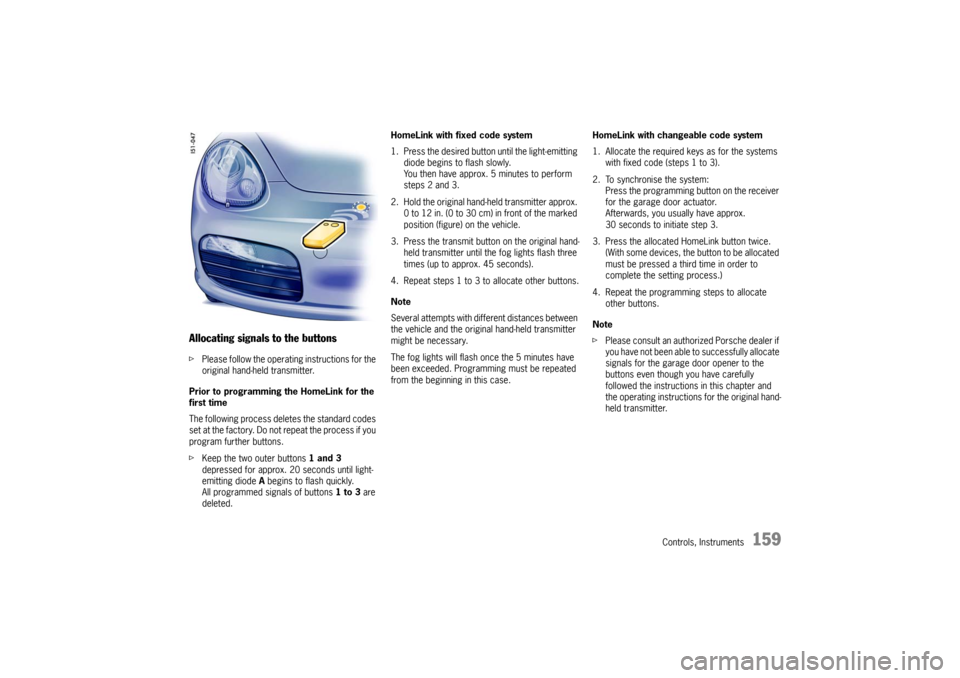
2. Hold the original hand-held transmitter approx.
0 to 12 in. (0 to 30 cm) in front of the marked
position (figure) on the vehicle.
3. Press the transmit button on the original hand-
held transmitter until the fog lights flash three
times (up to approx. 45 seconds).
4. Repeat steps 1 to 3 to allocate other buttons.
Note
Several attempts with different distances between
the vehicle and the original hand-held transmitter
might be necessary.
The fog lights will flash once the 5 minutes have
been exceeded. Programming must be repeated
from the beginning in this case.HomeLink with changeable code system
1. Allocate the required keys as for the systems
with fixed code (steps 1 to 3).
2. To synchronise the system:
Press the programming button on the receiver
for the garage door actuator.
Afterwards, you usually have approx.
30 seconds to initiate step 3.
3. Press the allocated HomeLink button twice.
(With some devices, the button to be allocated
must be pressed a third time in order to
complete the setting process.)
4. Repeat the programming steps to allocate
other buttons.
Note
fPlease consult an authorized Porsche dealer if
you have not been able to successfully allocate
signals for the garage door opener to the
buttons even though you have carefully
followed the instructions in this chapter and
the operating instructions for the original hand-
held transmitter.
Page 160 of 296

160
Controls, Instruments To reprogram a single button:
1. Press the desired button until the
light-emitting diode begins to flash slowly
(approx. 20 seconds).
You then have approx. 5 minutes to perform
steps 2 and 3.
2. Hold the original hand-held transmitter approx.
0 to 30 cm in front of the marked position
(figure) on the vehicle.
3. Press the transmit button on the original
hand-held transmitter until the fog lights flash
three times (up to approx. 45 seconds).
4. Repeat steps 1 to 3 to allocate other buttons.
Note
Several attempts with different distances between
the vehicle and the hand-held transmitter might be
necessary.
The fog lights will flash once the 5 minutes have
been exceeded. Programming must be repeated
from the beginning in this case.Deleting programmed signals of the
HomeLink
(e.g., when selling the vehicle)
Keep the two outer buttons 1 and 3 depressed
for approx. 20 seconds until light-emitting diode A
begins to flash quickly.
All programmed signals of buttons 1 to 3 are de-
leted.
Page 259 of 296
Practical Tips, Emergency Service
259
Bulb chart
Ty p e , r a t i n g
Halogen low beam H7, 55 W
Low beam with Bi-Xenon headligh Philips, D2S 35W
Halogen high beam H 9, 65W
Additional high beam with Bi-Xenon headlight H 11, 55W
Fog light H8, 35W
Tail light, rear fog light, brake light, tail light P21, 4W
Tail light, reflector P21, 5W
Reversing light P21W
Turn signal light, front and rear LL PY21W (long-life)
Door guard,/curb light/footwell light/
luggage compartment lihgtW5W
Parking light W5W Blue-Vision
License plate light C5W
Side marker Light W3W
Page 266 of 296
266
Practical Tips, Emergency Service
A - Fog light height adjustment
B - Fastening screwFog light/parking light1. Loosen the two screws B.2. Lower headlight slightly downward and
disengage locating cam in cover projection.
Unscrew light downwards at an angle.
A - Parking light
B - Fog light3. Turn the holder counter-clockwise and pull it
out.
Replace defective bulb (bayonet lock).
Push holder back in and turn towards the right.
Page 269 of 296
Practical Tips, Emergency Service
269
Tail light, leftTail lightChanging bulbs1. Remove carpeting covering the tail light.
Unscrew the securing nuts to do this.
2. Press the mounting of the lamp bracket
upwards (arrow) and remove the bulb holder.
A - Turn signal light
B - Reversing light
C - Rear fog light, rear light
D - Tail light
E - Brake light, rear light3. Replace the defective bulb (bayonet fitting).
4. Reassemble in reverse order.
Check operation of the light.
License plate lightsChanging bulb 1. Unscrew both screws A and remove the lens.
2. Remove defective bulb from between the
contact springs and replace.
3. Reassemble in reverse order.
Check operation of the light.