Page 241 of 296

Practical Tips, Emergency Service
241
Wheel Bolts
Warning!
Risk of wheel bolt breakage and wheel sepa-
ration, resulting in severe personal injury or
death.
fFollow all instructions concerning wheel bolts. fAlways clean the wheel bolts before fitting.
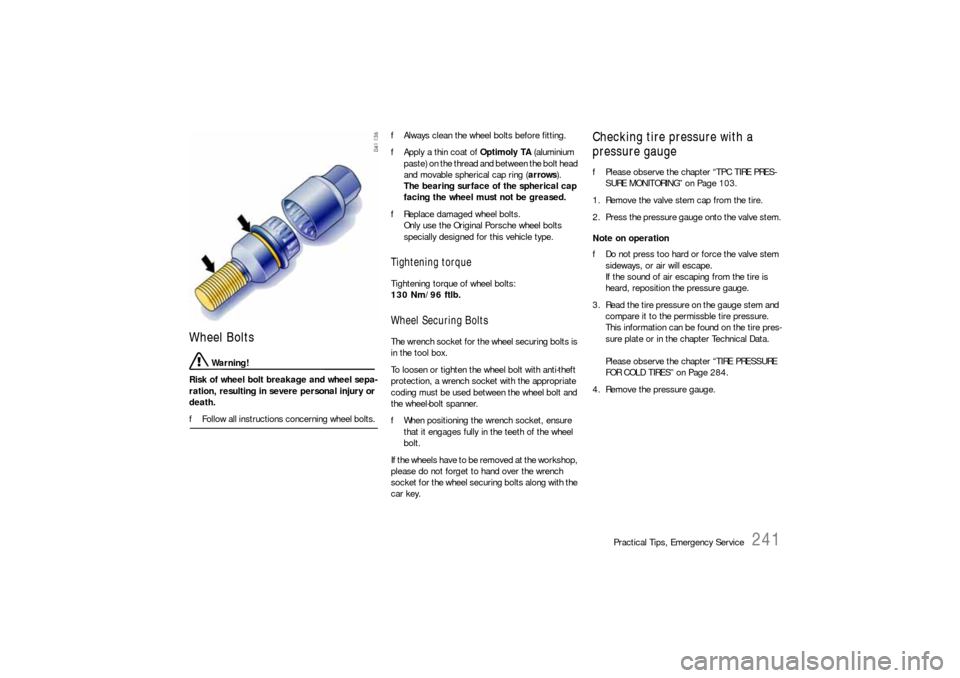
fApply a thin coat of Optimoly TA (aluminium
paste) on the thread and between the bolt head
and movable spherical cap ring (arrows).
The bearing surface of the spherical cap
facing the wheel must not be greased.
fReplace damaged wheel bolts.
Only use the Original Porsche wheel bolts
specially designed for this vehicle type.
Tightening torque Tightening torque of wheel bolts:
130 Nm/96 ftlb. Wheel Securing Bolts The wrench socket for the wheel securing bolts is
in the tool box.
To loosen or tighten the wheel bolt with anti-theft
protection, a wrench socket with the appropriate
coding must be used between the wheel bolt and
the wheel-bolt spanner.
fWhen positioning the wrench socket, ensure
that it engages fully in the teeth of the wheel
bolt.
If the wheels have to be removed at the workshop,
please do not forget to hand over the wrench
socket for the wheel securing bolts along with the
car key.
Checking tire pressure with a
pressure gaugefPlease observe the chapter “TPC TIRE PRES-
SURE MONITORING” on Page 103.
1. Remove the valve stem cap from the tire.
2. Press the pressure gauge onto the valve stem.
Note on operation
fDo not press too hard or force the valve stem
sideways, or air will escape.
If the sound of air escaping from the tire is
heard, reposition the pressure gauge.
3. Read the tire pressure on the gauge stem and
compare it to the permissble tire pressure.
This information can be found on the tire pres-
sure plate or in the chapter Technical Data.
Please observe the chapter “TIRE PRESSURE
FOR COLD TIRES” on Page 284.
4. Remove the pressure gauge.
Page 242 of 296

242
Practical Tips, Emergency Service
Changing a wheel
Warning!
Risk of injury. The car may slip off the jack.
fMake sure that no one is in the vehicle when
jacking up and changing a wheel.
fAlways place the car on stable supports if work
has to be carried out under the car.
Risk of damage to the brake discs of the
Porsche Ceramic Composite Brake (PCCB).
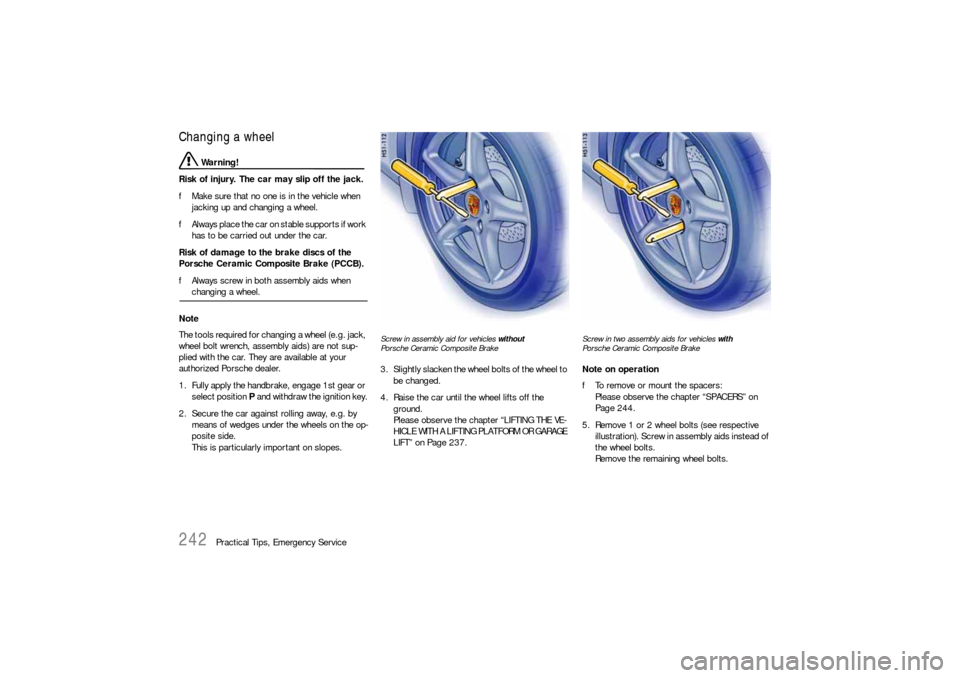
fAlways screw in both assembly aids when changing a wheel.
Note
The tools required for changing a wheel (e.g. jack,
wheel bolt wrench, assembly aids) are not sup-
plied with the car. They are available at your
authorized Porsche dealer.
1. Fully apply the handbrake, engage 1st gear or
select position P and withdraw the ignition key.
2. Secure the car against rolling away, e.g. by
means of wedges under the wheels on the op-
posite side.
This is particularly important on slopes.
Screw in assembly aid for vehicles without
Porsche Ceramic Composite Brake3. Slightly slacken the wheel bolts of the wheel to
be changed.
4. Raise the car until the wheel lifts off the
ground.
Please observe the chapter “LIFTING THE VE-
HICLE WITH A LIFTING PLATFORM OR GARAGE
LIFT” on Page 237.
Screw in two assembly aids for vehicles with
Porsche Ceramic Composite BrakeNote on operation
fTo remove or mount the spacers:
Please observe the chapter “SPACERS” on
Page 244.
5. Remove 1 or 2 wheel bolts (see respective
illustration). Screw in assembly aids instead of
the wheel bolts.
Remove the remaining wheel bolts.
Page 243 of 296
Practical Tips, Emergency Service
243
6. Take the wheel off and put a new wheel on.
7. Please observe the chapter “WHEEL BOLTS”
on Page 241.
Screw in wheel bolts; remove assembly aids
and screw in the remaining wheel bolts. Initially
tighten bolts in diagonally opposite sequence
so that the wheel is centered.
8. Lower the car completely.
9. Tighten wheel bolts in diagonally opposite
sequence.
Immediately after changing a wheel, use a
torque wrench to check the prescribed
tightening torque (130 Nm/96 ftlb.).
Page 261 of 296
Practical Tips, Emergency Service
261
Headlights
Caution!
Risk of damage to headlights due to abrasion
and excessive temperatures.
fDo not affix any coverings (e.g. “stone guards” or films) in the area of the headlights.
Note
The headlights can mist up depending on the
temperature and humidity.
fTo ensure optimum ventilation, do not cover
the gap between headlight and body
(e.g. “stone guards” or films).
Removal1. Unscrew plastic nut A.
Detach side carpeting.2. Remove rubber plugs from the unlocking
opening.
3. Place socket wrench (tool kit) on the unlocking
spindle.
The tongue of the wrench should point horizon-
tally to the rear.
4. Turn wrench approx. 180° A. The headlight is
unlocked and pushed forward slightly during
this process.
5. Turn socket wrench back until it is pointing
vertically downward B and leave in position.
6. The headlight is now unlocked and can be
pulled forward out of the wing.
Page 262 of 296
262
Practical Tips, Emergency Service
Installing1. Insert the headlight into the guide rails and
push it fully into the wing.
2. Push headlight to the rear and at the same
time the turn socket wrench until it points
horizontally to the rear C.
The headlight locking device must perceptibly
and audibly engage.
3. Insert rubber plug into the unlocking opening
and secure the carpeting.
Check the function of all lights.
Low beam, high beam and additional high
beamOpening the lid of the headlight housing
1. Unscrew the 4 screws A.
2. First lift release tab B, then push both release
tabs C upwards and take off lid.