Page 241 of 296

Practical Tips, Emergency Service
241
Wheel Bolts
Warning!
Risk of wheel bolt breakage and wheel sepa-
ration, resulting in severe personal injury or
death.
fFollow all instructions concerning wheel bolts. fAlways clean the wheel bolts before fitting.
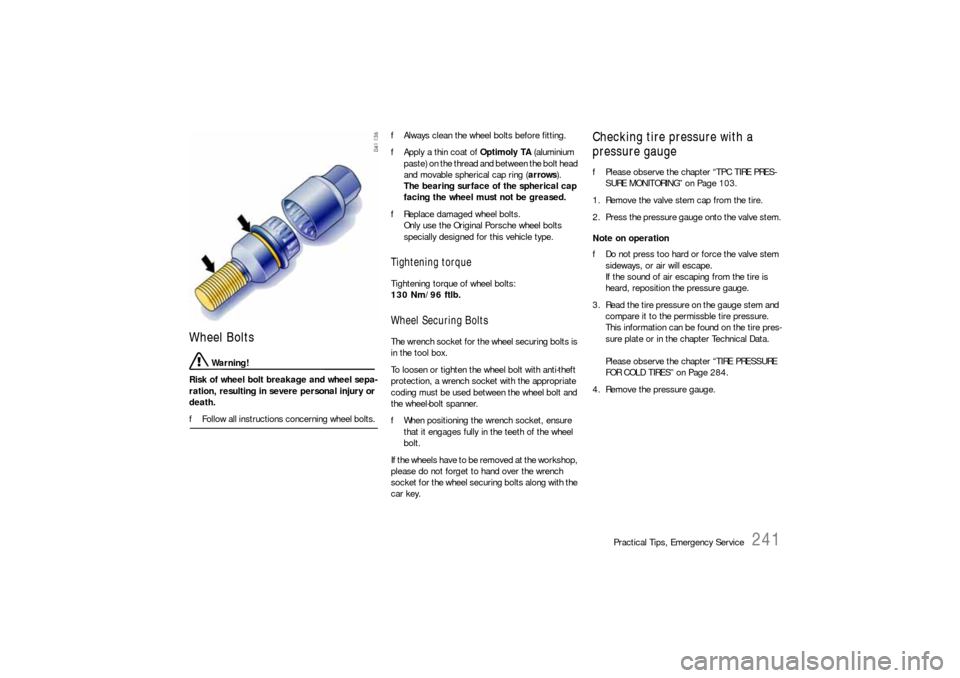
fApply a thin coat of Optimoly TA (aluminium
paste) on the thread and between the bolt head
and movable spherical cap ring (arrows).
The bearing surface of the spherical cap
facing the wheel must not be greased.
fReplace damaged wheel bolts.
Only use the Original Porsche wheel bolts
specially designed for this vehicle type.
Tightening torque Tightening torque of wheel bolts:
130 Nm/96 ftlb. Wheel Securing Bolts The wrench socket for the wheel securing bolts is
in the tool box.
To loosen or tighten the wheel bolt with anti-theft
protection, a wrench socket with the appropriate
coding must be used between the wheel bolt and
the wheel-bolt spanner.
fWhen positioning the wrench socket, ensure
that it engages fully in the teeth of the wheel
bolt.
If the wheels have to be removed at the workshop,
please do not forget to hand over the wrench
socket for the wheel securing bolts along with the
car key.
Checking tire pressure with a
pressure gaugefPlease observe the chapter “TPC TIRE PRES-
SURE MONITORING” on Page 103.
1. Remove the valve stem cap from the tire.
2. Press the pressure gauge onto the valve stem.
Note on operation
fDo not press too hard or force the valve stem
sideways, or air will escape.
If the sound of air escaping from the tire is
heard, reposition the pressure gauge.
3. Read the tire pressure on the gauge stem and
compare it to the permissble tire pressure.
This information can be found on the tire pres-
sure plate or in the chapter Technical Data.
Please observe the chapter “TIRE PRESSURE
FOR COLD TIRES” on Page 284.
4. Remove the pressure gauge.
Page 242 of 296

242
Practical Tips, Emergency Service
Changing a wheel
Warning!
Risk of injury. The car may slip off the jack.
fMake sure that no one is in the vehicle when
jacking up and changing a wheel.
fAlways place the car on stable supports if work
has to be carried out under the car.
Risk of damage to the brake discs of the
Porsche Ceramic Composite Brake (PCCB).
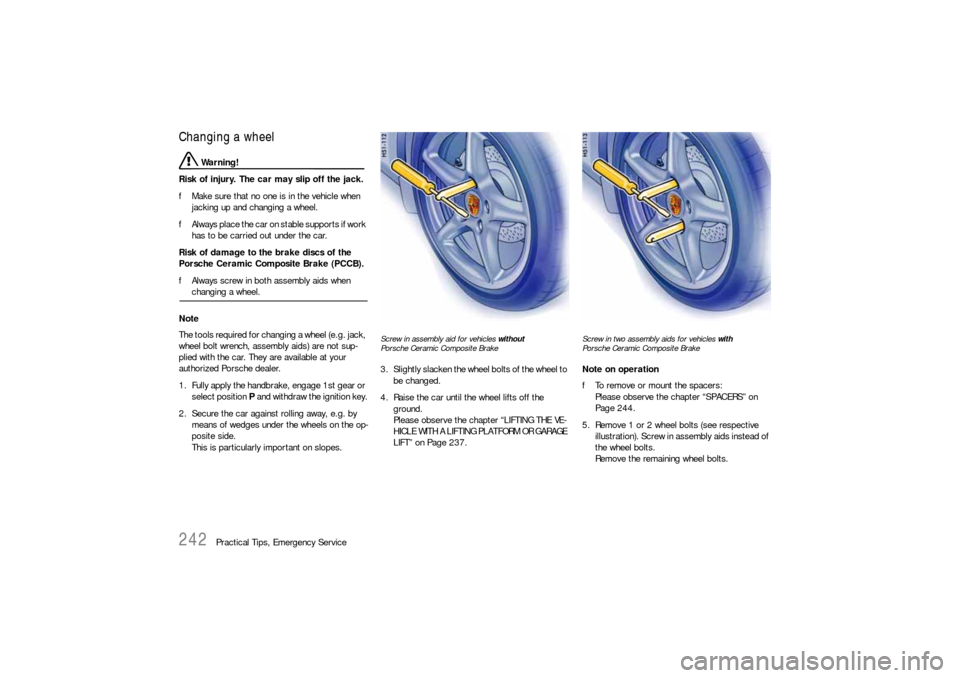
fAlways screw in both assembly aids when changing a wheel.
Note
The tools required for changing a wheel (e.g. jack,
wheel bolt wrench, assembly aids) are not sup-
plied with the car. They are available at your
authorized Porsche dealer.
1. Fully apply the handbrake, engage 1st gear or
select position P and withdraw the ignition key.
2. Secure the car against rolling away, e.g. by
means of wedges under the wheels on the op-
posite side.
This is particularly important on slopes.
Screw in assembly aid for vehicles without
Porsche Ceramic Composite Brake3. Slightly slacken the wheel bolts of the wheel to
be changed.
4. Raise the car until the wheel lifts off the
ground.
Please observe the chapter “LIFTING THE VE-
HICLE WITH A LIFTING PLATFORM OR GARAGE
LIFT” on Page 237.
Screw in two assembly aids for vehicles with
Porsche Ceramic Composite BrakeNote on operation
fTo remove or mount the spacers:
Please observe the chapter “SPACERS” on
Page 244.
5. Remove 1 or 2 wheel bolts (see respective
illustration). Screw in assembly aids instead of
the wheel bolts.
Remove the remaining wheel bolts.
Page 243 of 296
Practical Tips, Emergency Service
243
6. Take the wheel off and put a new wheel on.
7. Please observe the chapter “WHEEL BOLTS”
on Page 241.
Screw in wheel bolts; remove assembly aids
and screw in the remaining wheel bolts. Initially
tighten bolts in diagonally opposite sequence
so that the wheel is centered.
8. Lower the car completely.
9. Tighten wheel bolts in diagonally opposite
sequence.
Immediately after changing a wheel, use a
torque wrench to check the prescribed
tightening torque (130 Nm/96 ftlb.).
Page 244 of 296

244
Practical Tips, Emergency Service
SpacersfUse the spacers only together with wheels and
fastening parts approved by Porsche.
Before having spacers fitted, find out about the
current authorisation status.
Mounting an emergency spare wheel
If 5 mm spacers are fitted, these must not be
removed to mount an emergency spare wheel.
Fitting snow chains
The use of snow chains is not permitted when
5 mm spacers are mounted.
Caution!
Risk of damage to wheel housings if the
5 mm spacers are not removed before fitting
snow chains.
fIn order to enable the fitting of snow chains,
have the 5 mm spacers removed on all 4wheels.Note on operation
fTo fit/remove the spacers:
Please consult an authorized Porsche dealer.
Removing the spacersfPlease observe the chapter “CHANGING A
WHEEL” on Page 242.
1. Unscrew both countersunk screws (M6x16) on
the wheel hub.
2. Remove the spacer.
3. Fasten the brake disc with the short M6x12
countersunk screws, part No.
900.269.047.09.
Tightening torque 10 Nm (7.5 ftlb.).
4. For wheel mounting without a spacer, 5 mm
shorter wheel bolts (part No:
996.361.203.02) must be used.
Tightening torque 130 Nm (96 ftlb.).Required scope of parts if the spacers are
removed
Short countersunk screws (M6x12)
Part No: 900.269.047.09
1 set of short wheel bolts
Part No: 996.361.203.02
Short anti-theft protection devices
Part No: 996.361.057.01
Page 245 of 296
Practical Tips, Emergency Service
245
Long wheel bolt
X - bolt length approx. 50 mm
Arrows - marksWheel bolt identifying features
The long wheel bolts are identified on the face
surface of the bolt head with GT or in red, or the
moveable spherical cap ring is galvanised in red.
The long wheel bolts must only be used together
with 5 mm spacers fitted.The short wheel bolts are not marked in colour.
The short wheel bolts must only be used without
5 mm spacers fitted.
Tightening torque for both wheel bolts:
130 Nm (96 ftlb.).
Page 268 of 296
268
Practical Tips, Emergency Service
Side marker lightChanging bulb
1. Remove cap in the wheel housing liner with the
screwdriver.
2. Insert the screwdriver into the opening in the
wheel housing liner at right angles to the
direction indicator housing.
By pressing with the screwdriver, disengage
the securing spring of the direction indicator
housing. 3. Remove indicator light and undo bulb holder
(bayonet lock).
4. Remove the bulb from the holder and replace
it. Insert holder.
5. Insert the direction indicator’s retaining lugs A
into the side section at the front.
Push in direction indicator until the securing
spring B is felt to engage.
6. Press cap into the wheel housing liner.
Check operation of the light.
Page 274 of 296

274
Practical Tips, Emergency Service
Towing Certain state statutes and local ordinances prohib-
it towing with a chain, rope or even a tow bar.
In addition, damage to your vehicle may result
from improper procedures.
Consult your authorized Porsche dealer for de-
tails. Vehicle towing Flat bed towing is the preferred type of towing to
be used on Porsche vehicles.
Under certain circumstances, wheel lifts may be
used when the vehicle will not roll.
The vehicle must be towed with all four
wheels off the ground, otherwise damage to
the vehicle may result. Towing hook The towing hook is contained in the tool box.
Caution!
Risk of damage to the vehicle.
fUse the towing hook only for an emergency to
remove the vehicle off the road. The towing
hook is to be used only to pull the vehicle onto
the flat bed, tractor or towing aparatus if the
vehicle will roll freely. Under no circumstances
is the vehicle to be secured using the towing
hook. fNever use the towing hook to tow this or any
other vehicle.
fBear in mind the limited ground clearence of
your car on uneven surfaces.
Front mounting
The towing hook is stored in the tool box in the
luggage compartment.
1. Press the lower edge of the appropriate
plastic cover into the bumper until the cover
disengages.
2. Pull cover out of the bumper and let it hang by
its thread.
3. Completely screw in the towing hook.Rear mounting
1. Remove license plate.
2. Unscrew the towing hook.
3. Insert plastic cover at the lower edge of the
opening.
4. Fold the cover up and press on its upper edge
to engage it in the bumper.
5. Completely screw in the towing hook.
Page 275 of 296
Practical Tips, Emergency Service
275
Pulling vehicle onto flat bed 1. Position wooden ramps at the base of the flat
bed to reduce the angle of the pull.
2. Reel in the hoist cable and check the underside
of the vehicle for any interference.
Tieing down vehicle on flat bed 1. Carefully feed towing straps through the open-
ing in the rear wheels.
Make sure metal parts of straps do not dam-
age rim.
Make sure the strap is flat over the rim bead.
Make sure brake backing plate is not dam-
aged.
2. Secure straps to rear of flat bed.
3. Reel in hoist cable only far enough to tension
tie-down straps. 4. Carefully feed towing straps through the open-
ing in the front wheels.
Make sure metal parts of straps do not dam-
age rim.
Make sure the strap is flat over the rim bead.
Make sure brake backing plate is not dam-
aged.
5. Secure straps to front of flat bed.
6. Release tension on hoist cable, but do not dis-
connect.
Use hoist cable as a safety cable.