2006 PORSCHE BOXSTER key
[x] Cancel search: keyPage 150 of 296

150
Controls, Instruments
A - Opening front luggage compartment lid
B - Opening rear luggage compartment lid Luggage compartment lidsUnlocking fOperate the appropriate pull-button next to the
driver’s seat.
The luggage compartment is illuminated when
the respective lid is open.
fPlease observe the chapter “LOAD SWITCH-
OFF AFTER 2 HOURS OR 7 DAYS” on Page
246.The luggage compartment lid can also be un-
locked with the radio remote control.
fPlease observe the chapter “KEYS” on Page
17.
Important Note
If the vehicle battery is discharged, the front lug-
gage compartment lid can be opened only by con-
necting an external electrical power source.
fPlease observe the chapter “ELECTRICAL SYS-
TEM” on Page 246.
or the description inside the fuse box lid.
A warning message in the on-board computer
comes on if the lids are not completely closed.
fFully close the lid.
Warning message
Page 159 of 296

Controls, Instruments
159
Allocating signals to the buttonsfPlease follow the operating instructions for the
original hand-held transmitter.
Prior to programming the HomeLink for the
first time
The following process deletes the standard codes
set at the factory. Do not repeat the process if you
program further buttons.
fKeep the two outer buttons 1 and 3
depressed for approx. 20 seconds until light-
emitting diode A begins to flash quickly.
All programmed signals of buttons 1 to 3 are
deleted.HomeLink with fixed code system
1. Press the desired button until the light-emitting
diode begins to flash slowly.
You then have approx. 5 minutes to perform
steps 2 and 3.
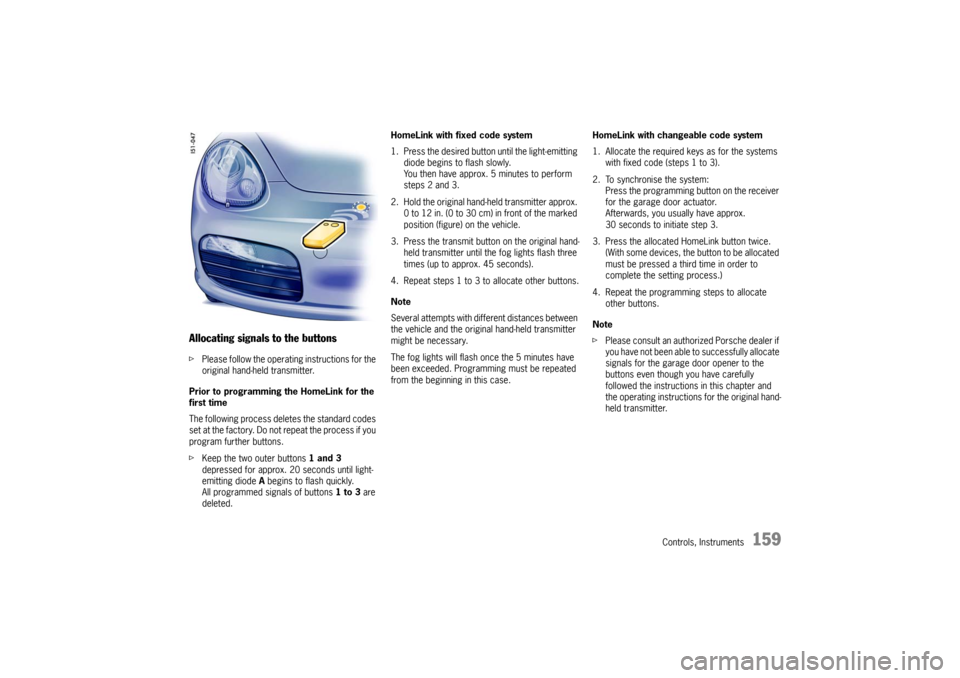
2. Hold the original hand-held transmitter approx.
0 to 12 in. (0 to 30 cm) in front of the marked
position (figure) on the vehicle.
3. Press the transmit button on the original hand-
held transmitter until the fog lights flash three
times (up to approx. 45 seconds).
4. Repeat steps 1 to 3 to allocate other buttons.
Note
Several attempts with different distances between
the vehicle and the original hand-held transmitter
might be necessary.
The fog lights will flash once the 5 minutes have
been exceeded. Programming must be repeated
from the beginning in this case.HomeLink with changeable code system
1. Allocate the required keys as for the systems
with fixed code (steps 1 to 3).
2. To synchronise the system:
Press the programming button on the receiver
for the garage door actuator.
Afterwards, you usually have approx.
30 seconds to initiate step 3.
3. Press the allocated HomeLink button twice.
(With some devices, the button to be allocated
must be pressed a third time in order to
complete the setting process.)
4. Repeat the programming steps to allocate
other buttons.
Note
fPlease consult an authorized Porsche dealer if
you have not been able to successfully allocate
signals for the garage door opener to the
buttons even though you have carefully
followed the instructions in this chapter and
the operating instructions for the original hand-
held transmitter.
Page 163 of 296

Shifting Gear
163
Tiptronic SThe Porsche Tiptronic is a five-speed transmission
with an “automatic” and a “manual” selection
mode.
In automatic selection mode (selector lever po-
sition D), gear changing is automatic.
You can change temporarily from automatic to
manual mode using the rocker switches on the
steering wheel.
In manual selection mode (selector lever posi-
tion M), you change gear using the rocker switch-
es on the steering wheel.
You can change between selector lever position D
and M as you wish while driving.
Note
Take care not to operate the rocker switches on
the steering wheel inadvertently in either auto mat-
ic or manual mode, thereby triggering undesired
gear changes.Keylock positionThe ignition key can be withdrawn only in selec-
tor lever position P.
Changing the selector lever positionThe selector lever is locked with the ignition key
withdrawn.
The selector lever can be moved from position P
or N only with:
– the ignition switched on,
– the brake pedal pressed and
– the release button pressed.Release button
The release button (arrow) in the selector lever
prevents unintentional gear changes.
The release button must be pressed when shifting
to position R or P.
StartingThe engine can be started only if the brake pedal
is depressed and the selector lever is in position
P or N.Moving offfOnly select the desired position for moving off
(D, M or R) when the engine is idling and the
brake pedal is depressed.
fSince the vehicle creeps when in gear, do not
release the brake until you want to move off.
fAfter selecting a gear, do not accelerate until
you can feel that the gear is engaged.
Page 165 of 296

Shifting Gear
165
Selector Lever Positions P – Parking lock fSelect only when car has been stopped.
fEngage parking lock after applying the hand-
brake and release it before releasing the hand-
brake.
The ignition key can be withdrawn only in
selector lever position P. R – Reverse fSelect only when car has been stopped and
the brake is applied. N – Neutral Selector lever position N must be selected for to-
wing or in car washes, for example.
fSelect the desired position for moving off (D,
M or R) only when the engine is idling and while
depressing the brake pedal.
D – Automatic selection mode fSelect position D for “normal” driving. The ge-
ars are shifted automatically according to the
accelerator position and speed.
Depending on the way the vehicle is driven and on
the resistance (e.g. uphill), the gear-changing
points are shifted towards higher or lower engine-
speed ranges.
The accelerator position, driving speed, engine
speed, longitudinal and lateral acceleration and
the road profile all have an influence on the gear-
changing characteristic.
Unwanted upward shifts, e.g. before bends, are
prevented by swiftly releasing the accelerator pe-
dal.
Depending on lateral acceleration, upward shifts
on bends are not made until the engine-speed limit
is reached.
Under braking, and depending on the amount of
deceleration, the Tiptronic shifts down earlier.
For subsequent cornering, the right gear is enga-
ged when pressure is applied to the brakes before
the bend.
The bend is taken in the right gear, and when you
accelerate out of the bend you do not have to shift
down. Sport mode switched on
fPlease observe the chapter “SPORT MODE” on
Page 63.
If the Sport mode programme is switched on,
Tiptronic switches to a sporty gear-changing map
and shortens the shifting periods.
Deceleration downshifts are commenced earlier.
Downshifts are already carried out in the case of
slight decelerations, even at higher engine
speeds.
Driving off
In 2nd gear, the vehicle drives off with the throttle
only slightly open.
Drive off in 1st gear with the throttle open wider
or when the engine is cold.
Page 174 of 296

174
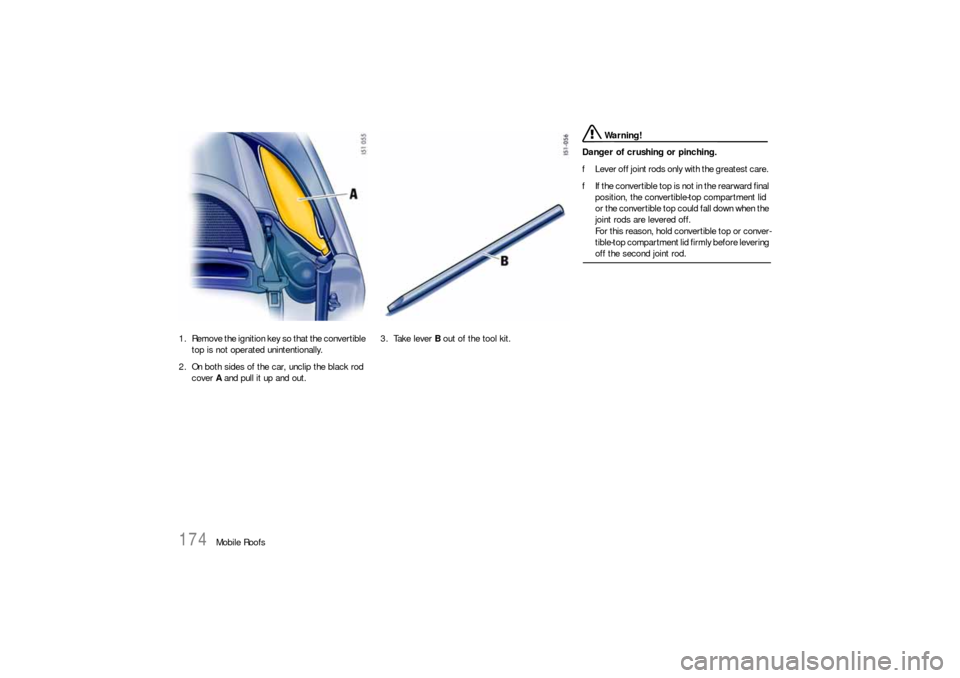
Mobile Roofs 1. Remove the ignition key so that the convertible
top is not operated unintentionally.
2. On both sides of the car, unclip the black rod
cover A and pull it up and out. 3. Take lever B out of the tool kit.
Warning!
Danger of crushing or pinching.
fLever off joint rods only with the greatest care.
fIf the convertible top is not in the rearward final
position, the convertible-top compartment lid
or the convertible top could fall down when the
joint rods are levered off.
For this reason, hold convertible top or conver-
tible-top compartment lid firmly before levering off the second joint rod.
Page 184 of 296

184
Maintenance, Car Care
Exercise Extreme Caution when
Working on your Vehicle
Danger!
Ignoring the following instructions may cau-
se serious personal injury or death.
fThe engine compartment of any motor vehicle
is a potentially hazardous area. If you are not
fully familiar with proper repair procedures, do
not attempt the adjustments described on the
following pages.
This caution applies to the entire vehicle.
fO n l y w o r k o n y o u r v e h i c l e o u t d o o r s o r i n a w e l l
ventilated area.
fEnsure that there are no open flames in the
area of your vehicle at any time when fuel fu-
mes might be present. Be especially cautious
of such devices such as hot water heaters
which ignite a flame intermittently.
fBefore working on any part in the engine com-
partment, turn the engine off and let it cool
down sufficiently. Hot engine compartment
components can burn skin on contact.
fBe alert and cautious around engine at all ti-
mes while the engine is running.
If work has to be performed with the engine
running, always set the parking brake, and
make sure the shift lever is in neutral or the se-
lector lever is in position P or N. fIn particular, be very careful to ensure that
items of clothing (ties, shirt, sleeves etc.), je-
welry, long hair, hand or fingers cannot get
caught in the engine-compartment blower, fan,
belts or other moving parts.
The radiator and radiator fans are in the front
of the car.
The fans can start or continue running as a
function of temperature, even with the engine
switched off.
Carry out work in these areas only with the en-
gine off and exercise extreme caution.
fYour Porsche is equipped with an electronic ig-
nition system. When the ignition is on, high vol-
tage is present in all wires connected with the
ignition system; therefore, exercise extreme
caution when working on any part of the engine
while the ignition is on or the engine is running.
fAlways place the vehicle on stable supports if
work has to be carried out under the vehicle.
Jacks are not suitable for this kind of work.
fWhen working under the car without safety
stands but with the wheels on the ground,
make sure the car is on level ground, the
wheels are blocked, and that the engine can-
not be started.
Remove the ignition key. fDo not smoke or allow an open flame around
the battery or fuel.
Keep a fire extinguisher in close reach.
fIncomplete or improper servicing may cause
problems in the operation of the car. If in doubt
about any servicing, have it done by your au-
thorized Porsche dealer.
Improper maintenance during the warranty pe-
riod may affect your Porsche warranty cove-
rage.
fSupplies of fluids, e.g. engine oil, brake fluid or
coolant, are hazardous to your health.
Keep these fluids out of children’s reach and
dispose of them in accordance with the appro-
priate regulations.
fSome countries require additional tools and
special spare parts to be carried.
Please make enquiries before driving abroad.
Power measurements Power measurements on dynamometers are not
approved by Porsche.
Page 185 of 296

Maintenance, Car Care
185
Wiper BladesfWhen wiper performance deteriorates, replace
the wipers.
fPlease observe the chapter “CAR CARE IN-
STRUCTIONS” on Page 209.
Caution!
Risk of damage if the wiper arm accidentally
falls back on to the window.
fAlways hold the wiper arm securely when re-
placing the wiper blade.
Risk of damage if wiper blades that are fro-
zen in place are loosened improperly.
fThaw the wiper blades before loosening them.
Maintenance note
If the wiper blades rub or squeak, this can be as a
result of the following:
– If the vehicle is washed in an automatic car
wash, residues may adhere to the windshield.
These residues can only be removed using a
special cleaning solution.
Please contact your authorized Porsche dealer
for further information.
– The wiper blades may be damaged.
fReplace damaged wiper blades as soon as
possible.
Changing windshield wiper blades
Caution!
Risk of damage.
If a wiper blade is not changed properly, it
can come loose when the car is moving.
fCheck whether the wiper blade is seated
securely.
The wiper blade must engage the wiper arm properly.
1. Apply the handbrake.
2. Switch the wipers off (position 0) and remove
the ignition key.
3. Fold windshield wiper arm away from the
windshield.
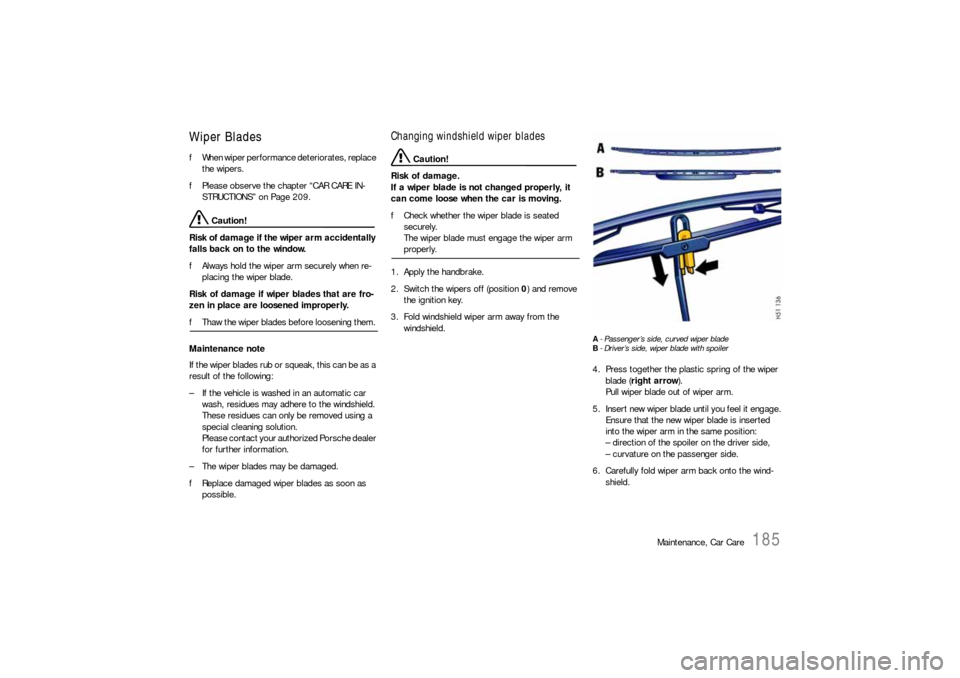
A- Passenger’s side, curved wiper blade
B- Driver’s side, wiper blade with spoiler4. Press together the plastic spring of the wiper
blade (right arrow).
Pull wiper blade out of wiper arm.
5. Insert new wiper blade until you feel it engage.
Ensure that the new wiper blade is inserted
into the wiper arm in the same position:
– direction of the spoiler on the driver side,
– curvature on the passenger side.
6. Carefully fold wiper arm back onto the wind-
shield.
Page 203 of 296

Maintenance, Car Care
203
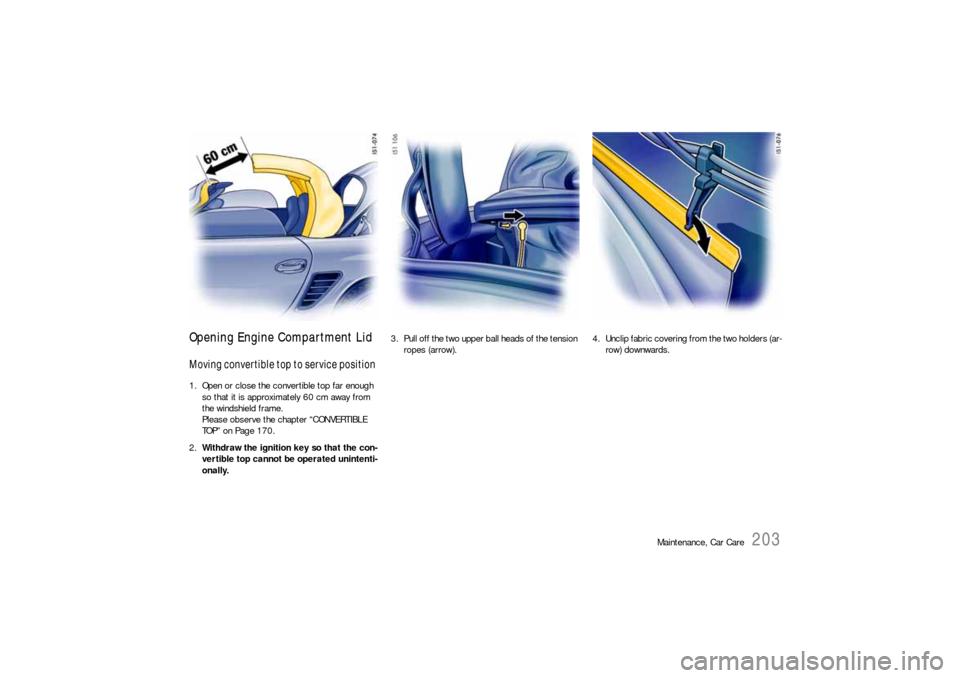
Opening Engine Compartment Lid Moving convertible top to service position 1. Open or close the convertible top far enough
so that it is approximately 60 cm away from
the windshield frame.
Please observe the chapter “CONVERTIBLE
TOP” on Page 170.
2.Withdraw the ignition key so that the con-
vertible top cannot be operated unintenti-
onally. 3. Pull off the two upper ball heads of the tension
ropes (arrow).4. Unclip fabric covering from the two holders (ar-
row) downwards.