Page 242 of 296

242
Practical Tips, Emergency Service
Changing a wheel
Warning!
Risk of injury. The car may slip off the jack.
fMake sure that no one is in the vehicle when
jacking up and changing a wheel.
fAlways place the car on stable supports if work
has to be carried out under the car.
Risk of damage to the brake discs of the
Porsche Ceramic Composite Brake (PCCB).
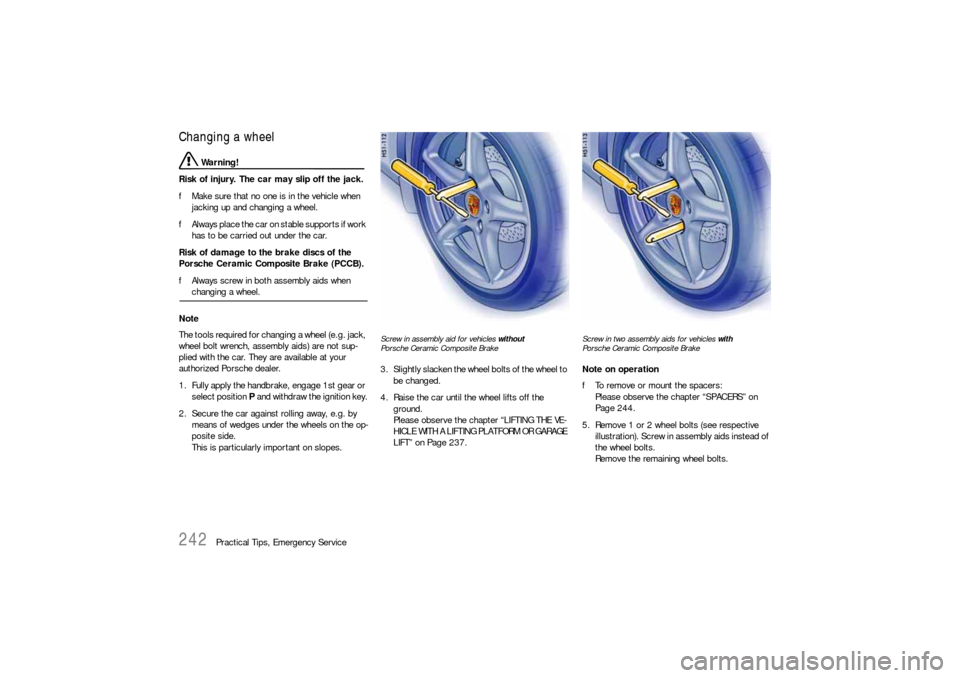
fAlways screw in both assembly aids when changing a wheel.
Note
The tools required for changing a wheel (e.g. jack,
wheel bolt wrench, assembly aids) are not sup-
plied with the car. They are available at your
authorized Porsche dealer.
1. Fully apply the handbrake, engage 1st gear or
select position P and withdraw the ignition key.
2. Secure the car against rolling away, e.g. by
means of wedges under the wheels on the op-
posite side.
This is particularly important on slopes.
Screw in assembly aid for vehicles without
Porsche Ceramic Composite Brake3. Slightly slacken the wheel bolts of the wheel to
be changed.
4. Raise the car until the wheel lifts off the
ground.
Please observe the chapter “LIFTING THE VE-
HICLE WITH A LIFTING PLATFORM OR GARAGE
LIFT” on Page 237.
Screw in two assembly aids for vehicles with
Porsche Ceramic Composite BrakeNote on operation
fTo remove or mount the spacers:
Please observe the chapter “SPACERS” on
Page 244.
5. Remove 1 or 2 wheel bolts (see respective
illustration). Screw in assembly aids instead of
the wheel bolts.
Remove the remaining wheel bolts.
Page 250 of 296

250
Practical Tips, Emergency Service
Charge stateA well-charged battery prevents starting problems
and has a longer useful life.
Traffic density, speed limits, requirements
regarding noise, exhaust gas and fuel consump-
tion reduce the engine speed and, hence, the
generator output.
However, the large number of electrical loads has
markedly increased the demand for electrical
power.
In order to avoid unintended battery
discharge
fSwitch off unnecessary electrical loads in city
traffic, on short trips and in queues.
fAlways withdraw the ignition key when leaving
the vehicle.
fAvoid frequent operation of the convertible top
and operation of the Porsche Communication
Management system when the engine is not
running.
Battery carefKeep battery surface clean and dry.
fEnsure that cell plugs and terminal clamps are
firmly secured.
Checking acid level
The acid level should be more frequently checked
by a qualified specialist workshop during the
summer months and in predominantly warm
countries.
Charging the battery
Your Porsche partner will be pleased to advise you
about a suitable charger.
1. Always observe the instructions of the charger
manufacturer.
Depending on the type of charger, the battery
may have to be disconnected. Extremely
important: disconnect the negative cable first,
and then the positive cable – danger of short
circuit!
Reconnection must be carried out in reverse
order.
2. Before charging, cold batteries must be
warmed up indoors.
3. Frozen batteries must not be charged. They
must be replaced with a new battery.
4. When charging, ensure adequate ventilation. 5. Connect charger to the battery.
Only plug into the mains and switch the
charger on when it has been correctly
connected up.
Warning!
Hydrogen gas generated by the battery
could cause an explosion, resulting in severe
personal injuries.
fCharge battery in a well ventilated area.
fNever charge a frozen battery. It may explode
because of gas trapped in the ice. Allow a fro-
zen battery to thaw out first.
fIf you get electrolyte, which is an acid, in your
eyes or on your skin, immediately rinse with
cold water for several minutes and call a doc-tor.
Page 262 of 296
262
Practical Tips, Emergency Service
Installing1. Insert the headlight into the guide rails and
push it fully into the wing.
2. Push headlight to the rear and at the same
time the turn socket wrench until it points
horizontally to the rear C.
The headlight locking device must perceptibly
and audibly engage.
3. Insert rubber plug into the unlocking opening
and secure the carpeting.
Check the function of all lights.
Low beam, high beam and additional high
beamOpening the lid of the headlight housing
1. Unscrew the 4 screws A.
2. First lift release tab B, then push both release
tabs C upwards and take off lid.
Page 268 of 296
268
Practical Tips, Emergency Service
Side marker lightChanging bulb
1. Remove cap in the wheel housing liner with the
screwdriver.
2. Insert the screwdriver into the opening in the
wheel housing liner at right angles to the
direction indicator housing.
By pressing with the screwdriver, disengage
the securing spring of the direction indicator
housing. 3. Remove indicator light and undo bulb holder
(bayonet lock).
4. Remove the bulb from the holder and replace
it. Insert holder.
5. Insert the direction indicator’s retaining lugs A
into the side section at the front.
Push in direction indicator until the securing
spring B is felt to engage.
6. Press cap into the wheel housing liner.
Check operation of the light.
Page 269 of 296
Practical Tips, Emergency Service
269
Tail light, leftTail lightChanging bulbs1. Remove carpeting covering the tail light.
Unscrew the securing nuts to do this.
2. Press the mounting of the lamp bracket
upwards (arrow) and remove the bulb holder.
A - Turn signal light
B - Reversing light
C - Rear fog light, rear light
D - Tail light
E - Brake light, rear light3. Replace the defective bulb (bayonet fitting).
4. Reassemble in reverse order.
Check operation of the light.
License plate lightsChanging bulb 1. Unscrew both screws A and remove the lens.
2. Remove defective bulb from between the
contact springs and replace.
3. Reassemble in reverse order.
Check operation of the light.
Page 274 of 296

274
Practical Tips, Emergency Service
Towing Certain state statutes and local ordinances prohib-
it towing with a chain, rope or even a tow bar.
In addition, damage to your vehicle may result
from improper procedures.
Consult your authorized Porsche dealer for de-
tails. Vehicle towing Flat bed towing is the preferred type of towing to
be used on Porsche vehicles.
Under certain circumstances, wheel lifts may be
used when the vehicle will not roll.
The vehicle must be towed with all four
wheels off the ground, otherwise damage to
the vehicle may result. Towing hook The towing hook is contained in the tool box.
Caution!
Risk of damage to the vehicle.
fUse the towing hook only for an emergency to
remove the vehicle off the road. The towing
hook is to be used only to pull the vehicle onto
the flat bed, tractor or towing aparatus if the
vehicle will roll freely. Under no circumstances
is the vehicle to be secured using the towing
hook. fNever use the towing hook to tow this or any
other vehicle.
fBear in mind the limited ground clearence of
your car on uneven surfaces.
Front mounting
The towing hook is stored in the tool box in the
luggage compartment.
1. Press the lower edge of the appropriate
plastic cover into the bumper until the cover
disengages.
2. Pull cover out of the bumper and let it hang by
its thread.
3. Completely screw in the towing hook.Rear mounting
1. Remove license plate.
2. Unscrew the towing hook.
3. Insert plastic cover at the lower edge of the
opening.
4. Fold the cover up and press on its upper edge
to engage it in the bumper.
5. Completely screw in the towing hook.
Page 275 of 296
Practical Tips, Emergency Service
275
Pulling vehicle onto flat bed 1. Position wooden ramps at the base of the flat
bed to reduce the angle of the pull.
2. Reel in the hoist cable and check the underside
of the vehicle for any interference.
Tieing down vehicle on flat bed 1. Carefully feed towing straps through the open-
ing in the rear wheels.
Make sure metal parts of straps do not dam-
age rim.
Make sure the strap is flat over the rim bead.
Make sure brake backing plate is not dam-
aged.
2. Secure straps to rear of flat bed.
3. Reel in hoist cable only far enough to tension
tie-down straps. 4. Carefully feed towing straps through the open-
ing in the front wheels.
Make sure metal parts of straps do not dam-
age rim.
Make sure the strap is flat over the rim bead.
Make sure brake backing plate is not dam-
aged.
5. Secure straps to front of flat bed.
6. Release tension on hoist cable, but do not dis-
connect.
Use hoist cable as a safety cable.