2006 PORSCHE BOXSTER ECU
[x] Cancel search: ECUPage 152 of 296
152
Controls, Instruments
Luggage Compartment Access covers(on vehicles with DVD navigation or CD changer)
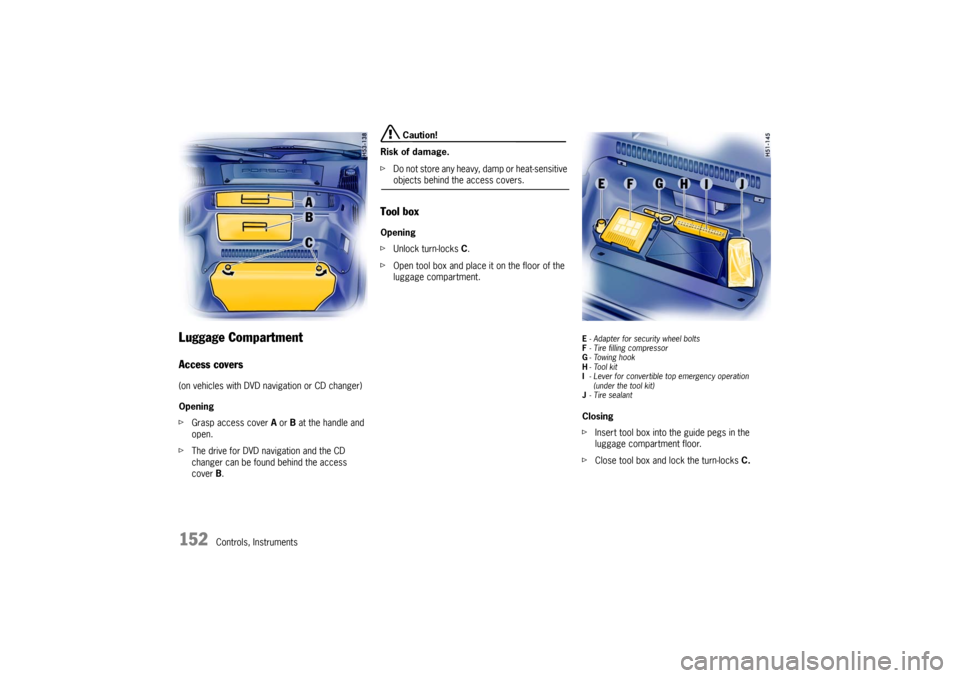
Opening
fGrasp access cover A or B at the handle and
open.
fThe drive for DVD navigation and the CD
changer can be found behind the access
cover B.
Caution!
Risk of damage.
fDo not store any heavy, damp or heat-sensitive objects behind the access covers.
Tool boxOpening
fUnlock turn-locks C.
fOpen tool box and place it on the floor of the
luggage compartment.
E- Adapter for security wheel bolts
F- Tire filling compressor
G-Towing hook
H-Tool kit
I- Lever for convertible top emergency operation
(under the tool kit)
J-Tire sealantClosing
fInsert tool box into the guide pegs in the
luggage compartment floor.
fClose tool box and lock the turn-locks C.
Page 167 of 296
Shifting Gear
167
M - Manual Selection Mode The currently selected gear is retained if you
change from D to M.
If you shift from M to D, the gear-changing map
suitable for your current driving style is selected
and the appropriate gear is selected.
Warning!
The kickdown function is not active in manual
selection mode “M”.
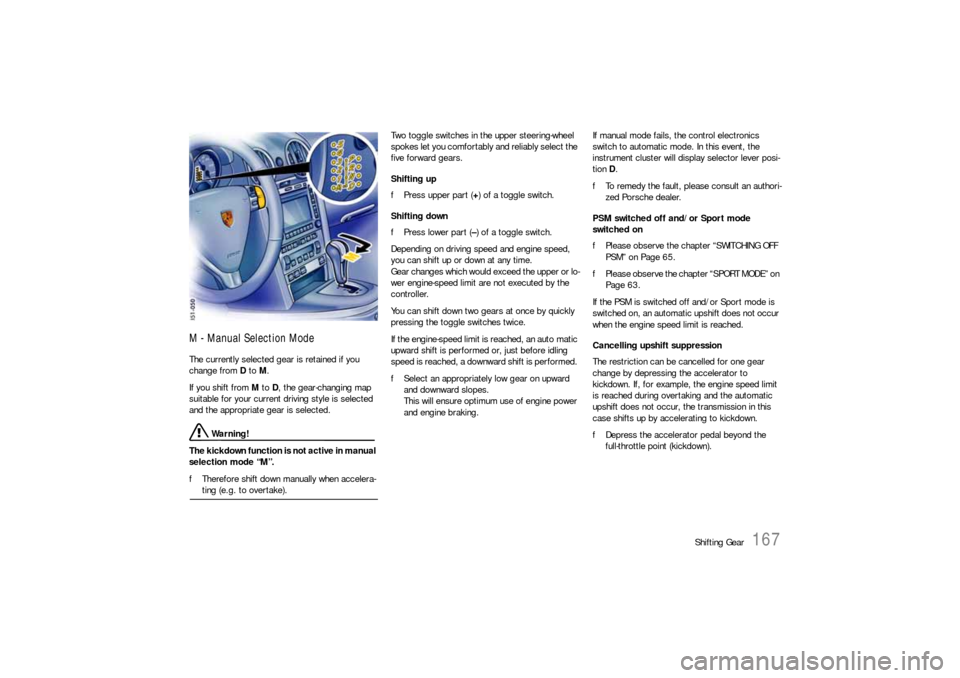
fTherefore shift down manually when accelera-ting (e.g. to overtake). Two toggle switches in the upper steering-wheel
spokes let you comfortably and reliably select the
five forward gears.
Shifting up
fPress upper part (+) of a toggle switch.
Shifting down
fPress lower part (–) of a toggle switch.
Depending on driving speed and engine speed,
you can shift up or down at any time.
Gear changes which would exceed the upper or lo-
wer engine-speed limit are not executed by the
controller.
You can shift down two gears at once by quickly
pressing the toggle switches twice.
If the engine-speed limit is reached, an auto matic
upward shift is performed or, just before idling
speed is reached, a downward shift is performed.
fSelect an appropriately low gear on upward
and downward slopes.
This will ensure optimum use of engine power
and engine braking. If manual mode fails, the control electronics
switch to automatic mode. In this event, the
instrument cluster will display selector lever posi-
tion D.
fTo remedy the fault, please consult an authori-
zed Porsche dealer.
PSM switched off and/or Sport mode
switched on
fPlease observe the chapter “SWITCHING OFF
PSM” on Page 65.
fPlease observe the chapter “SPORT MODE” on
Page 63.
If the PSM is switched off and/or Sport mode is
switched on, an automatic upshift does not occur
when the engine speed limit is reached.
Cancelling upshift suppression
The restriction can be cancelled for one gear
change by depressing the accelerator to
kickdown. If, for example, the engine speed limit
is reached during overtaking and the automatic
upshift does not occur, the transmission in this
case shifts up by accelerating to kickdown.
fDepress the accelerator pedal beyond the
full-throttle point (kickdown).
Page 170 of 296

170
Mobile Roofs
Convertible Top Brief operating instructions can be found on the
back side of the driver’s sun visor.
fPlease observe the chapter “CAR CARE IN-
STRUCTIONS” on Page 209.
Warning!
When opening or closing the convertible top,
serious personal injury may occur if a per-
son’s body parts are near or in the way of the
convertible top mechanism’s moving parts.
fMake absolutely sure that nobody can be inju-
red by the convertible-top mechanism or the convertible-top compartment lid. Do not operate convertible top:
– At temperatures below 32°F/0°C.
– When one side of the car is on a curb, a hoist
or a jack.
– When items of luggage or other objects hinder
the convertible top movement or are in abrasi-
ve contact with the convertible top or rear win-
dow.
Items of luggage or objects on the luggage
tray above the engine compartment lid must
be put in the storage box or be secured under
the net to prevent their sliding out.
– Drive only with the convertible top fully open or
closed.
fAvoid frequent operation of the convertible top
with the engine off; the vehicle battery would
be unintentionally discharged rapidly.
fThe convertible top must be operated only
when the car is stationary. Make sure there is
sufficient clearance above the convertible top
(e.g. in the garage).
fTo prevent damp stains and abrasions, only
open the convertible top in a dry, clean state.
fPark your car in the shade whenever possible,
as the fabric, rubber material and color can be
harmed by long exposure to sunlight.
Door windows If the door windows are closed, they will automati-
cally be lowered a few centimeters before the con-
vertible top is opened or closed.
The door windows close automatically when the
convertible top is locked with the latching lever on
the windshield frame. Conditions for operating the convertible
top – The ignition must be switched on
(engine running or off).
– Maximum speed 30 mph (50 km/h)
The opening/closing process of the convert-
ible top will be interrupted if the maximum
speed is exceeded.
fReduce speed.
Press button again.
The opening/closing process is ended.
Page 177 of 296
Mobile Roofs
177
WindstopfMake sure that all windstop parts are fastened
securely, especially when driving with the
convertible top open.
Note
When the convertible top is closed, it is a good
idea to remove the center section of the windstop
to permit good ventilation of the interior or for
demisting the rear window.
This is particularly the case in cold, wet weather.
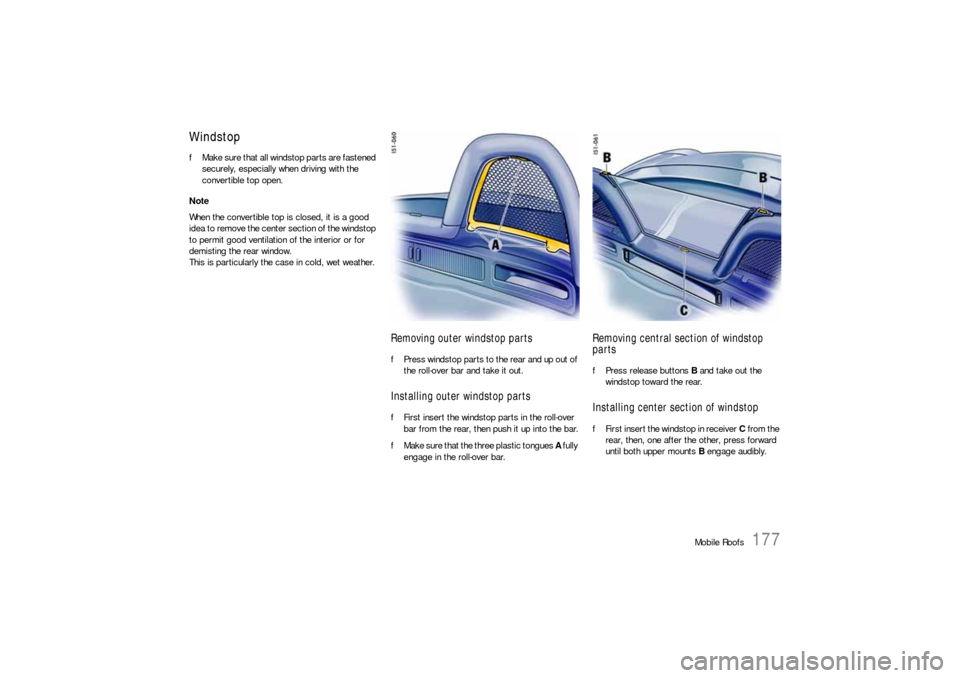
Removing outer windstop partsfPress windstop parts to the rear and up out of
the roll-over bar and take it out.Installing outer windstop partsfFirst insert the windstop parts in the roll-over
bar from the rear, then push it up into the bar.
fMake sure that the three plastic tongues A fully
engage in the roll-over bar.
Removing central section of windstop
parts fPress release buttons B and take out the
windstop toward the rear. Installing center section of windstopfFirst insert the windstop in receiver C from the
rear, then, one after the other, press forward
until both upper mounts B engage audibly.
Page 185 of 296
Maintenance, Car Care
185
Wiper BladesfWhen wiper performance deteriorates, replace
the wipers.
fPlease observe the chapter “CAR CARE IN-
STRUCTIONS” on Page 209.
Caution!
Risk of damage if the wiper arm accidentally
falls back on to the window.
fAlways hold the wiper arm securely when re-
placing the wiper blade.
Risk of damage if wiper blades that are fro-
zen in place are loosened improperly.
fThaw the wiper blades before loosening them.
Maintenance note
If the wiper blades rub or squeak, this can be as a
result of the following:
– If the vehicle is washed in an automatic car
wash, residues may adhere to the windshield.
These residues can only be removed using a
special cleaning solution.
Please contact your authorized Porsche dealer
for further information.
– The wiper blades may be damaged.
fReplace damaged wiper blades as soon as
possible.
Changing windshield wiper blades
Caution!
Risk of damage.
If a wiper blade is not changed properly, it
can come loose when the car is moving.
fCheck whether the wiper blade is seated
securely.
The wiper blade must engage the wiper arm properly.
1. Apply the handbrake.
2. Switch the wipers off (position 0) and remove
the ignition key.
3. Fold windshield wiper arm away from the
windshield.
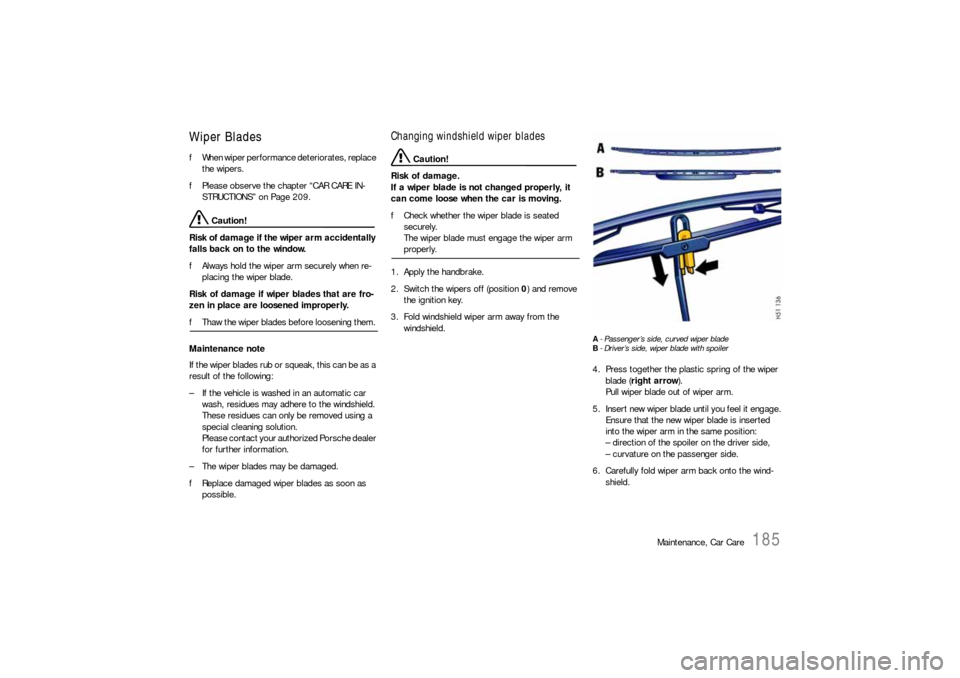
A- Passenger’s side, curved wiper blade
B- Driver’s side, wiper blade with spoiler4. Press together the plastic spring of the wiper
blade (right arrow).
Pull wiper blade out of wiper arm.
5. Insert new wiper blade until you feel it engage.
Ensure that the new wiper blade is inserted
into the wiper arm in the same position:
– direction of the spoiler on the driver side,
– curvature on the passenger side.
6. Carefully fold wiper arm back onto the wind-
shield.
Page 205 of 296
Maintenance, Car Care
205
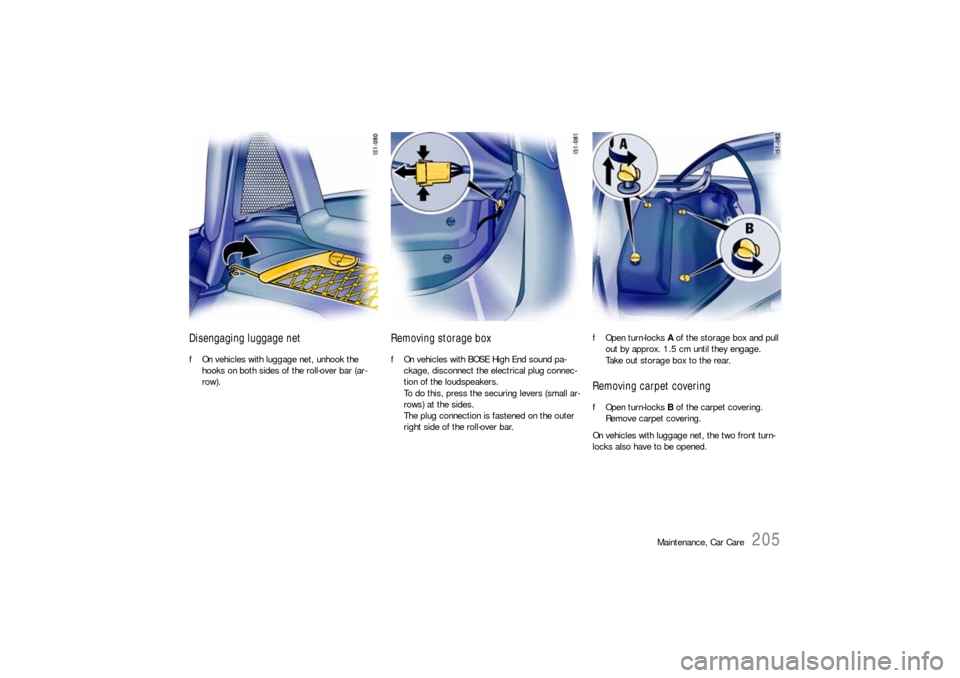
Disengaging luggage net fOn vehicles with luggage net, unhook the
hooks on both sides of the roll-over bar (ar-
row).
Removing storage box fOn vehicles with BOSE High End sound pa-
ckage, disconnect the electrical plug connec-
tion of the loudspeakers.
To do this, press the securing levers (small ar-
rows) at the sides.
The plug connection is fastened on the outer
right side of the roll-over bar. fOpen turn-locks A of the storage box and pull
out by approx. 1.5 cm until they engage.
Take out storage box to the rear.
Removing carpet covering fOpen turn-locks B of the carpet covering.
Remove carpet covering.
On vehicles with luggage net, the two front turn-
locks also have to be opened.
Page 217 of 296

Maintenance, Car Care
217
Fabric, upholstery, carpets and floor-
mats fUse only a vacuum cleaner or a medium stiff
brush.
fRemove stains and spots with Porsche stain
remover.
The Porsche range of accessories includes floor-
mats to protect the carpets in summer and winter.
Warning!
Risk of an accident.
fAlways check the movement of the pedals be-
fore driving and make sure that they are not
obstructed by a floor mat or any other object.
fSecure the floor mat to prevent it from sliding
into positions that could interfere with the safe
operation of your vehicle - do not lay them loo-
sely in the vehicle.
Your Porsche dealer will be glad to offer you nonskid-floor mats of the correct size.
Alcantara Do not use a leather care product to clean
Alcantara.
For regular care it is sufficient to clean the cover
with a soft brush.
Heavy abrasion or rubbing when cleaning causes
a lasting change in the surface.
Cleaning when lightly soiled
fWet a soft cloth with water or a neutral soap
solution and wipe off the dirt.
Cleaning when heavily soiled
fWet a soft cloth with lukewarm water or thin-
ned white spirit and dab the dirt from the out-
side in.
Safety belts If it becomes necessary to clean the belts, you
can use any mild washing agent.
Allow the belts to dry prior to retracting, but avoid
direct sunlight.
fOnly use suitable cleaners.
If unsuitable cleaners are used or any attempt
is made to dye or bleach the belts, the web-
bing may be weakened and thus constitute a
safety risk.
Page 241 of 296
Practical Tips, Emergency Service
241
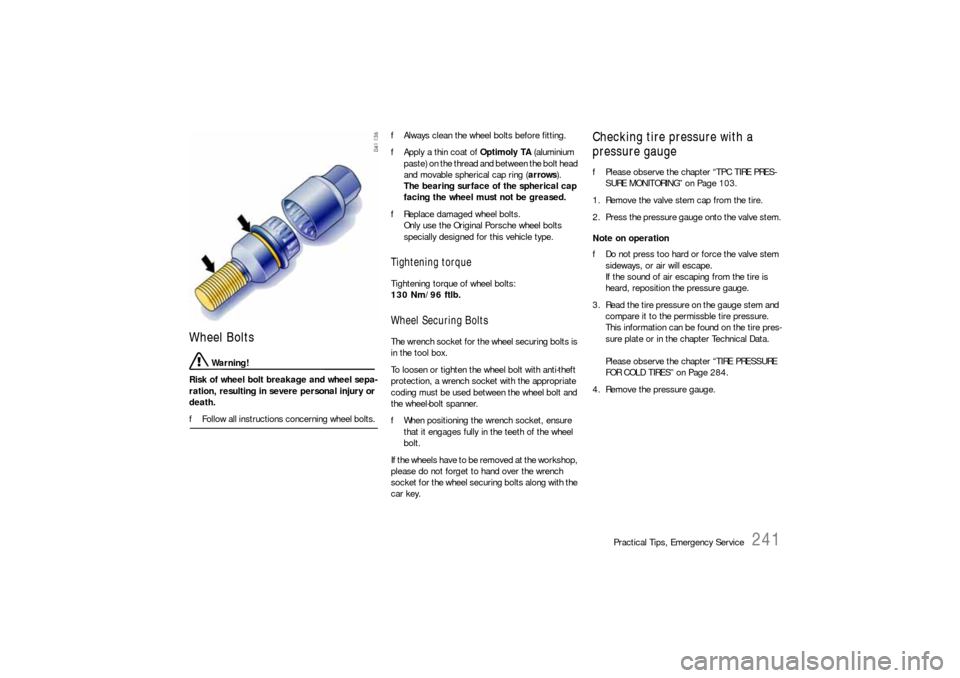
Wheel Bolts
Warning!
Risk of wheel bolt breakage and wheel sepa-
ration, resulting in severe personal injury or
death.
fFollow all instructions concerning wheel bolts. fAlways clean the wheel bolts before fitting.
fApply a thin coat of Optimoly TA (aluminium
paste) on the thread and between the bolt head
and movable spherical cap ring (arrows).
The bearing surface of the spherical cap
facing the wheel must not be greased.
fReplace damaged wheel bolts.
Only use the Original Porsche wheel bolts
specially designed for this vehicle type.
Tightening torque Tightening torque of wheel bolts:
130 Nm/96 ftlb. Wheel Securing Bolts The wrench socket for the wheel securing bolts is
in the tool box.
To loosen or tighten the wheel bolt with anti-theft
protection, a wrench socket with the appropriate
coding must be used between the wheel bolt and
the wheel-bolt spanner.
fWhen positioning the wrench socket, ensure
that it engages fully in the teeth of the wheel
bolt.
If the wheels have to be removed at the workshop,
please do not forget to hand over the wrench
socket for the wheel securing bolts along with the
car key.
Checking tire pressure with a
pressure gaugefPlease observe the chapter “TPC TIRE PRES-
SURE MONITORING” on Page 103.
1. Remove the valve stem cap from the tire.
2. Press the pressure gauge onto the valve stem.
Note on operation
fDo not press too hard or force the valve stem
sideways, or air will escape.
If the sound of air escaping from the tire is
heard, reposition the pressure gauge.
3. Read the tire pressure on the gauge stem and
compare it to the permissble tire pressure.
This information can be found on the tire pres-
sure plate or in the chapter Technical Data.
Please observe the chapter “TIRE PRESSURE
FOR COLD TIRES” on Page 284.
4. Remove the pressure gauge.