2006 PONTIAC TORRENT center console
[x] Cancel search: center consolePage 10 of 368

Manual Lumbar
If your vehicle has this
feature, the knob is
located on the front of the
driver seat lower cushion
on the inboard side.
Turn the knob clockwise or counterclockwise to
increase or decrease the lumbar support.
Heated Seats
If your vehicle has
heated seats, the
switches are located
on the center console
of the instrument panel
above the shift lever.
Press the switch, nearest to the seat, once to turn
the heated seat on to the high setting. Both indicator
lights will be lit. Press the switch a second time to
turn the heated seat to the low setting. One indicator
light will be lit. Press the switch a third time to turn
the heated seat off.
The ignition must be on for the heated seats to operate.
1-4
Page 71 of 368

Keys...............................................................2-2
Remote Keyless Entry System.........................2-3
Remote Keyless Entry System Operation...........2-4
Doors and Locks.............................................2-6
Door Locks....................................................2-6
Power Door Locks..........................................2-7
Delayed Locking.............................................2-7
Automatic Door Lock.......................................2-8
Programmable Automatic Door Unlock...............2-8
Rear Door Security Locks................................2-8
Lockout Protection..........................................2-9
Liftgate........................................................2-10
Windows........................................................2-11
Power Windows............................................2-12
Sun Visors...................................................2-12
Theft-Deterrent Systems..................................2-13
Content Theft-Deterrent.................................2-13
Passlock
®....................................................2-15
Starting and Operating Your Vehicle................2-15
New Vehicle Break-In....................................2-15
Ignition Positions..........................................2-16
Retained Accessory Power (RAP)...................2-17
Starting the Engine.......................................2-17
Engine Coolant Heater..................................2-18
Automatic Transaxle Operation.......................2-19Parking Brake..............................................2-22
Shifting Into Park (P).....................................2-23
Shifting Out of Park (P).................................2-24
Parking Over Things That Burn.......................2-25
Engine Exhaust............................................2-25
Running the Engine While Parked...................2-26
Mirrors...........................................................2-27
Manual Rearview Mirror.................................2-27
Automatic Dimming Rearview Mirror with
OnStar
®, Compass and Temperature
Display....................................................2-27
Automatic Dimming Rearview Mirror with
Compass and Temperature Display..............2-29
Outside Power Mirrors...................................2-31
Outside Convex Mirrors.................................2-32
OnStar
®System.............................................2-32
Storage Areas................................................2-34
Glove Box...................................................2-34
Cupholder(s)................................................2-34
Center Console Storage Area.........................2-35
Luggage Carrier...........................................2-35
Rear Compartment Storage Panel/Cover..........2-37
Table..........................................................2-39
Convenience Net..........................................2-40
Sunroof.........................................................2-40
Section 2 Features and Controls
2-1
Page 82 of 368

Power Windows
The window switches for all doors are located on the
center console. A window switch for each rear window
is located on each rear door.
To open a window, press the bottom of the switch.
To close a window, press the top of the switch.
The power windows operate when the ignition is RUN
or ACC (Accessory), or while in Retained Accessory
Power (RAP). SeeRetained Accessory Power (RAP)
on page 2-17.
Express-Down Window
The driver’s window switch has an express-down feature
that allows the window to be lowered without holding the
switch. The switch is labeled AUTO. Press the bottom of
the switch part way, and the driver’s window will open a
small amount. Press the switch down all the way down
and release it and the window will go down automatically.
To stop the window while it is lowering, press and
release the top of the switch.
Window Lockout
o
(Window Lockout):Your vehicle has a lockout
feature to prevent rear seat passengers from operating
the windows. Press the lockout button, located with
the power window switches, to turn the feature on
and off. When the red band on the button is showing,
the lockout feature is off.
Sun Visors
To block out glare, swing the sun visor down. You
can also detach the driver’s sun visor from the center
mount and slide it along the rod from side-to-side
for greater coverage.
Visor Vanity Mirrors
Your vehicle has covered visor vanity mirrors on both
the driver’s and passenger’s side.
2-12
Page 89 of 368

Automatic Transaxle Operation
The shift lever is located on the center console.
There are several different positions for the automatic
transaxle.
PARK (P):This position locks your front wheels.
It is the best position to use when you start your
engine because your vehicle cannot move easily.{CAUTION:
It is dangerous to get out of your vehicle if
the shift lever is not fully in PARK (P) with the
parking brake �rmly set. Your vehicle can roll.
Do not leave your vehicle when the engine
is running unless you have to. If you have
left the engine running, the vehicle can move
suddenly. You or others could be injured.
To be sure your vehicle will not move, even
when you are on fairly level ground, always
set your parking brake and move the shift
lever to PARK (P). SeeShifting Into Park (P)
on page 2-23. If you are pulling a trailer, see
Towing a Trailer on page 4-38.
Make sure the shift lever is fully in PARK (P) before
starting the engine. Your vehicle has an automatic
transaxle shift lock control system. You have to
fully apply your regular brakes before you can shift
from PARK (P) when the ignition key is in RUN.
2-19
Page 104 of 368

OnStar®Steering Wheel Controls
0
:For vehicles equipped with a Talk/Mute button,
it can be used to interact with OnStar®. SeeRadio
with CD (Base Level) on page 3-40orRadio with CD
(MP3) on page 3-50orRadio with Six-Disc CD on
page 3-65for more information.
When calling into voice mail systems, or to dial directory
numbers, press this button once, wait for the response,
say the number(s) to be dialed, wait for the number(s)
to be repeated and then say “dial”. See the OnStar
®
User’s Guide for more information.
Storage Areas
Glove Box
To open the glove box, pull the handle to the left
and pull the glove box door down until it stops and
is fully open.
Cupholder(s)
There are two cupholders located at the lower front of
the center console armrest and a molded cupholder
on the �oor of the center console.
To use the cupholders on the armrest, pull the tray
forward.
There are two cupholders located at the rear of the
center console. Pull downward on the lid to use
the cupholders.
2-34
Page 105 of 368

Center Console Storage Area
Your vehicle has a center console armrest with storage
area. Use the lever on the front of the console to
open it. There is a removable coinholder and tissue
holder inside. The coinholder can be removed by
pulling it up from the console.
Luggage Carrier
{CAUTION:
If you try to carry something on top of your
vehicle that is longer or wider than the luggage
carrier — like paneling, plywood, a mattress
and so forth — the wind can catch it as you
drive along. This can cause you to lose
control. What you are carrying could be
violently torn off, and this could cause you or
other drivers to have a collision, and of course
damage your vehicle. You may be able to carry
something like this inside. But, never carry
something longer or wider than the luggage
carrier on top of your vehicle.A luggage carrier allows you to load things on top of
your vehicle. The luggage carrier has side rails attached
to the roof, sliding crossrails (if equipped) and places
to use for tying things down. These let you load
some things on top of your vehicle, as long as they
are not wider or longer than the luggage carrier.
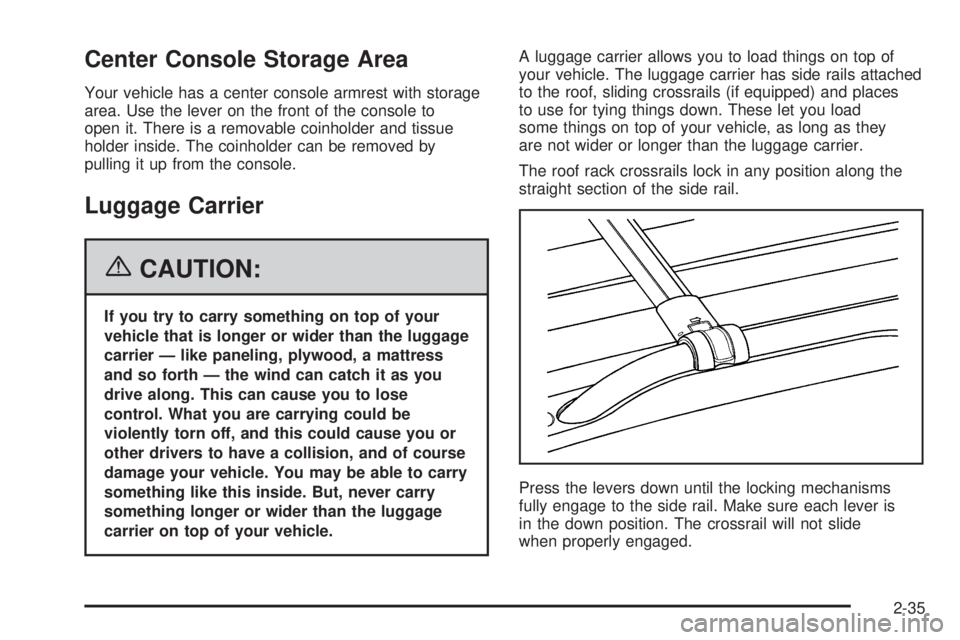
The roof rack crossrails lock in any position along the
straight section of the side rail.
Press the levers down until the locking mechanisms
fully engage to the side rail. Make sure each lever is
in the down position. The crossrail will not slide
when properly engaged.
2-35
Page 128 of 368

Battery Run-Down Protection
Your vehicle has a battery saver feature designed to
protect your vehicle’s battery.
When any interior lamp is left on and the ignition is
turned off, the battery rundown protection system will
automatically turn the lamp off after 20 minutes. This will
avoid draining the battery. If the radio is on, it will turn
off after 10 minutes or if any door on the vehicle is
opened. SeeRetained Accessory Power (RAP)
on page 2-17.
Accessory Power Outlet(s)
The accessory power outlets can be used to connect
electrical equipment such as a cellular phone or
CB radio.
The accessory power outlets are located in front of the
center console storage area, at the rear of the center
console, and in the rear cargo area.
To use the outlets, remove the cover. When not in use,
always cover the outlet with the protective cap.
Notice:Leaving electrical equipment on for
extended periods will drain the battery. Always turn
off electrical equipment when not in use and do
not plug in equipment that exceeds the maximum
amperage rating.Certain electrical accessories may not be compatible
with the accessory power outlets and could result
in blown vehicle or adapter fuses. If you experience a
problem, see your dealer for additional information
on the accessory power outlet.
Notice:Adding any electrical equipment to your
vehicle may damage it or keep other components
from working as they should. The repairs would not
be covered by your warranty. Do not use equipment
exceeding maximum amperage rating. Check
with your dealer before adding electrical equipment.
When adding electrical equipment, be sure to follow
the installation instructions included with the equipment.
Notice:Improper use of the power outlet can cause
damage not covered by your warranty. Do not hang
any type of accessory or accessory bracket from
the plug because the power outlets are designed for
accessory power plugs only.
The accessory power outlets can use equipment with
a maximum amperage rating up to 14. However,
at 14 amperage, there is a potential to drain the battery.
Extended use of the auxiliary power outlets or large
current draws may drain the battery and/or shorten
battery life.
3-18
Page 320 of 368

Instrument Panel Fuse Block
The instrument panel fuse block is located on the
passenger’s side of the center console, to the left
of the glove box near the �oor.
Fuses Usage
LOCK/MIRROR Door Lock, Power Mirror
CRUISE Cruise Control System
EPS Electric Power Steering
IGN 1 Switches, Instrument Panel Cluster
PRNDL/PWR
TRNPRNDL/Powertrain
BCM (IGN) Body Control Module
AIRBAG Airbag System
BCM/ISRVMBody Control Module,
Inside Rearview Mirror
TURN Turn Signals
HTD SEATS Heated Seats
BCM/HVACBody Control Module, Heating,
Ventilation and Air Conditioning
HZRD Hazard Warning Flashers
RADIO Radio
5-84