Page 370 of 472

Tire Size
The following illustration shows an example of a typical
passenger vehicle tire size.
(A) Passenger (P-Metric) Tire:The United States
version of a metric tire sizing system. The letter P as the
�rst character in the tire size means a passenger
vehicle tire engineered to standards set by the U.S. Tire
and Rim Association.
(B) Tire Width:The three-digit number indicates the
tire section width in millimeters from sidewall to sidewall.
(C) Aspect Ratio:A two-digit number that indicates
the tire height-to-width measurements. For example, if
the tire size aspect ratio is 60, as shown in item C of
the illustration, it would mean that the tire’s sidewall is
60 percent as high as it is wide.(D) Construction Code:A letter code is used to
indicate the type of ply construction in the tire. The
letter R means radial ply construction; the letter D means
diagonal or bias ply construction; and the letter B means
belted-bias ply construction.
(E) Rim Diameter:Diameter of the wheel in inches.
(F) Service Description:These characters represent
the load range and speed rating of the tire. The load
index represents the load carry capacity a tire is certi�ed
to carry. The load index can range from 1 to 279. The
speed rating is the maximum speed a tire is certi�ed
to carry a load. Speed ratings range from A to Z.
Tire Terminology and De�nitions
Air Pressure:The amount of air inside the tire pressing
outward on each square inch of the tire. Air pressure
is expressed in pounds per square inch (psi) or
kilopascal (kPa).
Accessory Weight:This means the combined weight
of optional accessories. Some examples of optional
accessories are, automatic transmission, power steering,
power brakes, power windows, power seats, and air
conditioning.
Aspect Ratio:The relationship of a tire’s height to
its width.
5-64
Page 384 of 472

A rear blowout, particularly on a curve, acts much like a
skid and may require the same correction you’d use
in a skid. In any rear blowout, remove your foot from the
accelerator pedal. Get the vehicle under control by
steering the way you want the vehicle to go. It may be
very bumpy and noisy, but you can still steer. Gently
brake to a stop, well off the road if possible.
If a tire goes �at, and your vehicle has a spare tire, see
Changing a Flat Tire on page 5-88. This information
shows you how to use your vehicle’s tire changing
equipment and how to change a �at tire safely.
{CAUTION:
Lifting a vehicle and getting under it to do
maintenance or repairs is dangerous without
the appropriate safety equipment and training.
The jack provided with your vehicle is
designed only for changing a �at tire. If it is
used for anything else, you or others could be
badly injured or killed if the vehicle slips off
the jack. Use the jack provided with your
vehicle only for changing a �at tire.
If a Tire Goes Flat (GXP)
GXP models have no spare tire, no tire changing
equipment, and no place for storing a spare or �at tire. If a
tire goes �at, avoid further tire and wheel damage by
driving slowly to a level place and stopping. Then do this:
1. Turn on the hazard warning �ashers. SeeHazard
Warning Flashers on page 3-6.
2. Park your vehicle. Set the parking brake �rmly and
put the shift lever in PARK (P). SeeShifting Into
Park (P) on page 2-31for additional information.
3. Turn off the engine.
4. Inspect the �at tire.
If the tire has been separated from the wheel or has
damaged sidewalls or large tears that allow rapid
air loss, call a tire repair facility. SeeRoadside
Assistance Program on page 7-6.
If the �at tire is due to a slow leak caused by a nail or
other similar road hazard, the tire in�ator kit may be used
to temporarily repair the damaged tire. The kit uses a
liquid tire sealant to seal small punctures in the tread area
of the tire. The �at tire is then in�ated to at least 30 psi
(207 kPa) and driven to evenly distribute the tire sealant.
5-78
Page 388 of 472

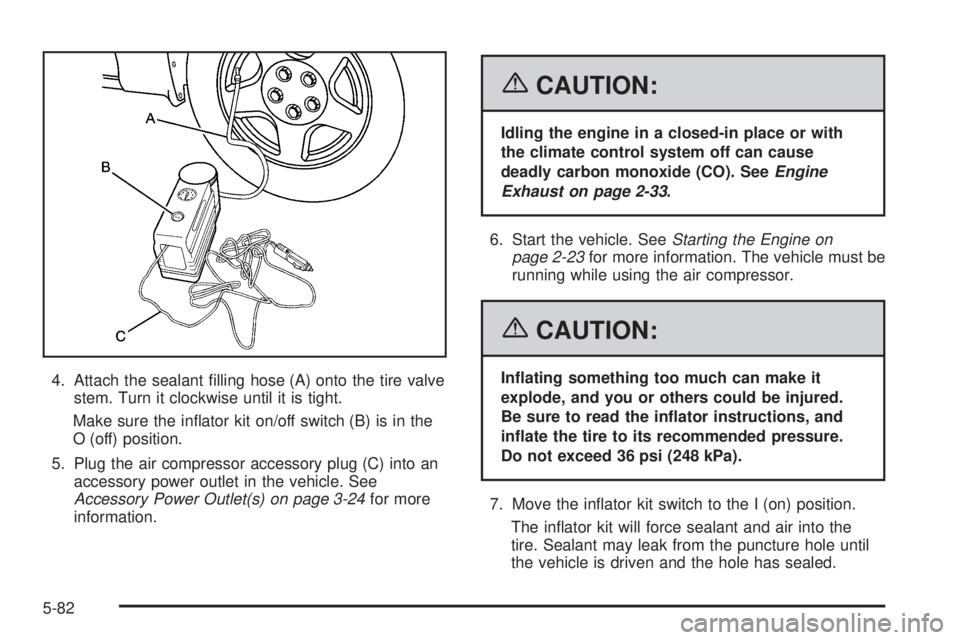
4. Attach the sealant �lling hose (A) onto the tire valve
stem. Turn it clockwise until it is tight.
Make sure the in�ator kit on/off switch (B) is in the
O (off) position.
5. Plug the air compressor accessory plug (C) into an
accessory power outlet in the vehicle. See
Accessory Power Outlet(s) on page 3-24for more
information.
{CAUTION:
Idling the engine in a closed-in place or with
the climate control system off can cause
deadly carbon monoxide (CO). SeeEngine
Exhaust on page 2-33.
6. Start the vehicle. SeeStarting the Engine on
page 2-23for more information. The vehicle must be
running while using the air compressor.
{CAUTION:
In�ating something too much can make it
explode, and you or others could be injured.
Be sure to read the in�ator instructions, and
in�ate the tire to its recommended pressure.
Do not exceed 36 psi (248 kPa).
7. Move the in�ator kit switch to the I (on) position.
The in�ator kit will force sealant and air into the
tire. Sealant may leak from the puncture hole until
the vehicle is driven and the hole has sealed.
5-82
Page 389 of 472

8. Make sure there is a proper connection between
the tire valve stem and the sealant �lling hose by
looking at the air pressure gage. If there is not
a pressure reading while the compressor is running,
the connection between the in�ator kit and the
tire is bad.
Check the attachment between the sealant �lling
hose and the tire valve stem.
9. In�ate the tire up to the recommended in�ation
pressure, found on the Tire and Loading Information
label located on the vehicle’s center pillar (B-pillar)
below the vehicle’s door latch, using the air pressure
gage on the top of the unit as a guide.
The pressure gage reading is slightly high while the
compressor is on. Turn the compressor off to get
an accurate pressure reading.
Notice:If the recommended pressure cannot be
reached after 15 minutes, the vehicle should not be
driven farther. Damage to the tire is severe and
the sealant will not be effective. Remove the
air compressor plug from the accessory power
outlet and unscrew the in�ating hose from the tire
valve. SeeRoadside Assistance Program on
page 7-6.10. Move the in�ator kit switch to the O (off) position
once the correct tire pressure is obtained.
11. Turn off the engine.
12. Unplug the air compressor accessory plug from the
accessory power outlet in the vehicle.
13. Disconnect the sealant �lling hose from the tire
valve stem, by turning it counterclockwise, and
replace the tire valve stem cap.
Be careful when handling the tire in�ator
components as they may be hot after usage.
14. Wrap the sealant �lling hose around the air
compressor channel to stow it in its original location.
5-83
Page 392 of 472

3. Pull the air compressor in�ator hose from the
sealant canister.
4. Push the air compressor in�ator hose onto the
tire valve stem and push the lever down to
secure in place.
5. Plug the air compressor accessory plug into an
accessory power outlet in the vehicle. See
Accessory Power Outlet(s) on page 3-24for more
information.
{CAUTION:
Idling the engine in a closed-in place or with
the climate control system off can cause
deadly carbon monoxide (CO). SeeEngine
Exhaust on page 2-33.
6. Start the vehicle. SeeStarting the Engine on
page 2-23for more information. The vehicle must be
running while using the air compressor.
{CAUTION:
In�ating something too much can make it
explode, and you or others could be injured.
Be sure to read the in�ator instructions, and
in�ate the tire to its recommended pressure.
Do not exceed 36 psi (248 kPa).
7. Move the in�ator kit switch to the I (on) position.
8. Make sure there is a proper connection between the
tire valve stem and the air compressor hose by
looking at the air pressure gage. If there is not a
pressure reading while the compressor is running,
the connection between the in�ator kit and the
tire is bad.
Check the attachment between the air compressor
hose and the tire valve stem.
9. In�ate the tire up to the recommended in�ation
pressure using the air pressure gage on the top
of the unit as a guide.
10. Turn off the air compressor by moving the switch to
the O (off) position.
5-86
Page 395 of 472
{CAUTION:
Changing a tire can be dangerous. The vehicle
can slip off the jack and roll over or fall on you
or other people. You and they could be badly
injured or even killed. Find a level place to
change your tire. To help prevent the vehicle
from moving:
1. Set the parking brake �rmly.
2. Put the shift lever in PARK (P).
3. Turn off the engine and do not restart
while the vehicle is raised.
4. Do not allow passengers to remain in
the vehicle.
To be even more certain the vehicle will not
move, you should put blocks at the front and
rear of the tire farthest away from the one
being changed. That would be the tire, on the
other side, at the opposite end of the vehicle.When your vehicle has a �at tire, use the following
example as a guide to assist you in the placement of
wheel blocks.
The following information will tell you next how to use
the jack and change a tire.
5-89
Page 416 of 472
Vehicle Identi�cation
Vehicle Identi�cation Number (VIN)
This is the legal identi�er for your vehicle. It appears on
a plate in the front corner of the instrument panel, on
the driver’s side. You can see it if you look through the
windshield from outside your vehicle. The VIN also
appears on the Vehicle Certi�cation and Service Parts
labels and the certi�cates of title and registration.
Engine Identi�cation
The eighth character in the VIN is the engine code. This
code will help you identify your vehicle’s engine,
speci�cations, and replacement parts.
Service Parts Identi�cation Label
You will �nd this label in the trunk. It is very helpful if you
ever need to order parts. On this label, you will �nd
the following:
VIN
Model designation
Paint information
Production options and special equipment
Be sure that this label is not removed from the vehicle.
5-110
Page 420 of 472
Underhood Fuse Block
The underhood fuse block
is located on the
passenger’s side of the
vehicle in the engine
compartment.
To remove the fuse block cover, press in on the tab at
the bottom of the cover and pull up.
Fuses Usage
1 Driver’s Side High-Beam Headlamp
2 Passenger’s Side High-Beam Headlamp
3 Driver’s Side Low-Beam Headlamp
4 Passenger’s Side Low-Beam Headlamp
5 Windshield Wipers/Washer
6 Washer/Remote Vehicle Current
7 Fog Lamps (Option)
9 Airbag
10 Accessory Power
11 Horn
V6 Engine
5-114