Page 126 of 272
STORING A LOCATIONA searched location can be stored in the
Address Book. Then it can be easily retrieved
and set as a destination (or waypoint) .
NAV2870
1. Set the destination using an appropriatemethod.
2. Highlight [Store Location] and push .
NAV2871
3. The location is stored in the Address Book.
The corresponding icon is displayed at the
set location on the map.
4-54
Setting a destination
Page 128 of 272
After you set a destination using an appropriate
method and select [OK], the system starts
calculating a route to the destination.
Select the preferred setting item and push
.
INFO:
If you have not performed any operations on the
system for several seconds, [Start] is automati-
cally selected, and the system starts route
guidance.
NAV2872
AVAILABLE ITEMS AFTER SETTING A
DESTINATION. Start:
Starts route guidance to the selected
destination.
“STARTING ROUTE GUIDANCE”
(page 5-3)
. More Routes:
Displays 3 alternative routes.“SELECTING A ROUTE” (page 5-3) .
Route Info:
Displays the route information.
“CONFIRMING A ROUTE”
(page 5-4)
. Add Way Pt.:
Allows you to edit the route by adding a
destination or waypoint.“ADDING A DESTINATION OR
WAYPOINT” (page 5-5)
PROCEDURES AFTER SETTING A
DESTINATION5-2
Route guidance
Page 129 of 272
NAV2873
STARTING ROUTE GUIDANCE1. Highlight [Start] and push
.
Route guidance starts.
NAV2874
SELECTING A ROUTE1. Highlight [More Routes] and push .
2. Highlight the preferred route condition and push .
3. Push /
to return to the
previous screen.
NAV2875
Available route conditions&1Short. Time (Blue):
Prioritizes by the shortest time.
&2Min. FWY (Red):
Minimizes the use of freeways.
&3Short. Dist. (Green):
Prioritizes by the shortest distance.INFO:
. After you select a route, a preview is
displayed on the right side of the screen.
. The 3 routes may not always be different.
Route guidance
5-3
Page 132 of 272
NAV2880
3. The selected location is displayed at thecenter of the map. Highlight [Add to Route]
after confirming the location and push
.
INFO:
You can modify the location by selecting
[Alter Location]. The method of adjusting a
location is the same as the one for a
destination.“ADJUSTING THE LOCATION OF
THE DESTINATION” (page 4-51)
NAV2881
4. Highlight [Destination] or [Waypoint] and push .
The system starts calculating a route that
includes the added destination or waypoint.
When the calculation is finished, the route is
displayed.
INFO:
.
If a waypoint was added, [More Routes]
cannot be selected.
.
If a destination was added, the prior
destination becomes a waypoint.
5-6
Route guidance
Page 134 of 272

GUIDANCE SCREENS AND PREVIEW
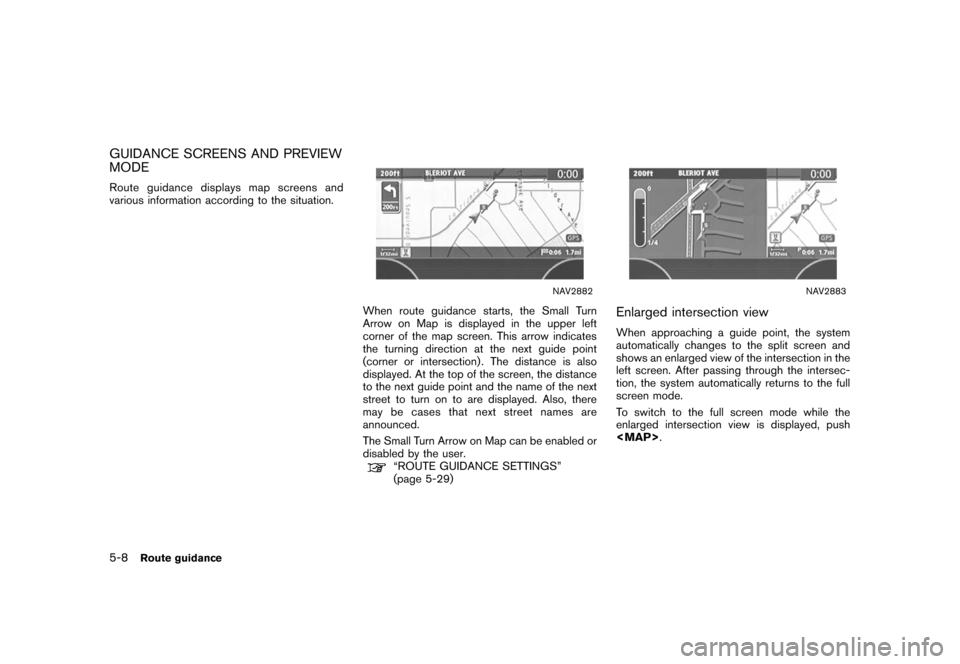
MODERoute guidance displays map screens and
various information according to the situation.
NAV2882
When route guidance starts, the Small Turn
Arrow on Map is displayed in the upper left
corner of the map screen. This arrow indicates
the turning direction at the next guide point
(corner or intersection) . The distance is also
displayed. At the top of the screen, the distance
to the next guide point and the name of the next
street to turn on to are displayed. Also, there
may be cases that next street names are
announced.
The Small Turn Arrow on Map can be enabled or
disabled by the user.
“ROUTE GUIDANCE SETTINGS”
(page 5-29)
NAV2883
Enlarged intersection viewWhen approaching a guide point, the system
automatically changes to the split screen and
shows an enlarged view of the intersection in the
left screen. After passing through the intersec-
tion, the system automatically returns to the full
screen mode.
To switch to the full screen mode while the
enlarged intersection view is displayed, push
Page 135 of 272
NAV2884
Junction guidanceWhile driving on a freeway, when the vehicle is
approximately 1 mile (approximately 2 km) from a
junction, the system automatically switches to
the split screen and displays an enlarged view of
the junction (3D) in the left screen.
After passing the junction, the system automa-
tically returns to the full screen mode.
To switch to the full screen mode while the
enlarged junction view is displayed, push
Page 137 of 272
.Route Information:
Allows you to confirm the route by the route
information or simulation.
“CONFIRMING A ROUTE”
(page 5-26)
. Guidance Settings:
You can set various guidance information to
be displayed during route guidance and
activate or deactivate route and/or voice
guidance.“ROUTE GUIDANCE SETTINGS”
(page 5-29)
Route guidance
5-11
Page 138 of 272
.Route Priority Settings
Allows you to set the priority for the route
calculation.
. Detailed Route Priorities
Allows you to set detailed route conditions.
“DETAILED ROUTE PRIORITIES”
(page 5-13)
ROUTE PRIORITY SETTINGSThe route can be recalculated after changing the
route calculation conditions anywhere along the
route.Basic operation1. Push .
2. Highlight [Route Priority] and push .
3. Highlight the preferred condition and push . The indicator for the selected
condition illuminates.
4. When the current location map screen or route setting screen is displayed, the system
recalculates a route with the set conditions.
NAV2887
Available conditions.Fastest Route:
Prioritizes by the fastest time.
. Minimize Freeway:
Minimizes the use of freeways. .
Shortest Route:
Prioritizes by the shortest route.
INFO:
Only one of these conditions can be utilized at a
time.
SETTING CONDITIONS FOR THE
ROUTE CALCULATION5-12
Route guidance