Page 12 of 281
1. Tachometer (P.2-5)
2. Turn signal indicator (P.2-20)/Hazard indica-
tor (P.2-21)
3. Speedometer (P.2-4)
4. Fuel gauge (P.2-6)
5. Engine coolant temperature gauge (P.2-5)
6. Warning/Indicator lights (P.2-7)
7. Odometer (Total/Twin trip) (P.2-4)/Clock
(P.2-24)
8. Reset button for trip odometer (P.2-4)/Clock
adjustment (P.2-24)
9. Automatic Transmission (AT) shift position
indicator* (P.5-10)
* If so equipped
SIC2394
METERS AND GAUGES
Illustrated table of contents
0-7
�
06.4.14/T30-J/V5.0
�
Page 17 of 281
LUMBAR SUPPORT (for driver’s
seat)The lumbar support feature provides lower back
support to the driver.
Turn the lever forward or backward to adjust the
seat lumbar area.
FRONT POWER SEAT
ADJUSTMENT (if so equipped for
driver’s seat)
WARNING
�Do not adjust the driver’s seat while
driving so full attention may be given
to vehicle operation.
�Do not leave children unattended in-
side the vehicle. They could unknow-
ingly activate switches or controls.
Unattended children could become
involved in serious accidents.Operating tips�The seat motor has an auto-reset overload
protection circuit. If the motor stops during
operation, wait 30 seconds, then reactivate
the switch.
�Do not operate the power support seat
for a long period of time when the engine is
off. This will discharge the battery.
SPA1729A
1-4
Safety — Seats, seat belts and supplemental restraint system
�
06.4.14/T30-J/V5.0
�
Page 19 of 281

REAR SEAT ADJUSTMENT
Folding1. Store the rear cup holder in the center con-
sole.
2. Secure the seat belt on the clip.
3. Remove the head restraints. (The removed
head restraints can be stored on the reclining
lock plate.)
4. Pull the strap forward and bring up the seat
cushion
�1.
5. After removing the tonneau cover (if so
equipped) from each rear seatback, pull up
the knoband fold the seatback down
�2.6. When resetting the seat, be sure to hold the
seat belt buckles so that they do not fall
between the seatback and the seat cushion
and install the head restraints.
WARNING
�Never allow anyone to ride in the
cargo area or on the rear seat when it
is in the fold-down position. Use of
these areas by passengers without
proper restraints could result in seri-
ous injury in an accident or suddenstop.
�It is extremely dangerous to ride in a
cargo area inside of a vehicle. In a
collision, people riding in these areas
are more likely to be seriously in-
jured or killed.
�Do not allow people to ride in any
area of your vehicle that is not
equipped with seats and seat
belts. Be sure everyone in your ve-
hicle is in a seat and using a seat belt
properly.
�Do not fold down the rear seats when
occupants are in the rear seat area or
any luggage is on the rear seat.
�Head restraints should be adjusted
properly as they may provide signifi-
cant protection against injury in an
accident. Always replace and adjust
them properly if they have been re-
moved for any reason.
�If the head restraints are removed for
any reason, they should be securely
stored to prevent them from causing
SPA1348A
1-6
Safety — Seats, seat belts and supplemental restraint system
�
06.4.14/T30-J/V5.0
�
Page 21 of 281
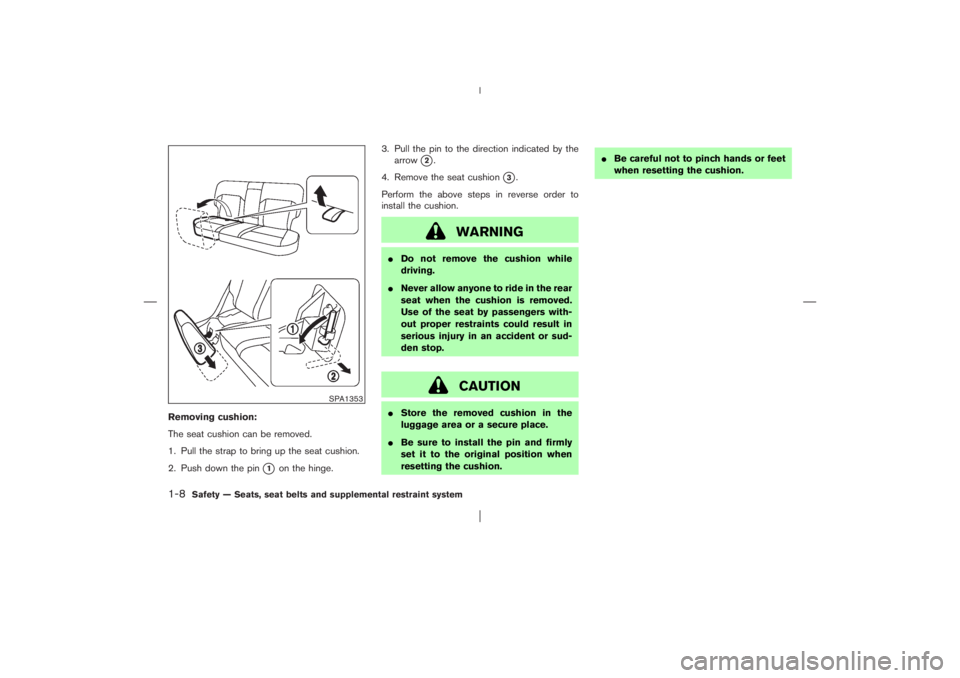
Removing cushion:
The seat cushion can be removed.
1. Pull the strap to bring up the seat cushion.
2. Push down the pin
�1
on the hinge.3. Pull the pin to the direction indicated by the
arrow
�2.
4. Remove the seat cushion
�3.
Perform the above steps in reverse order to
install the cushion.
WARNING
�Do not remove the cushion while
driving.
�Never allow anyone to ride in the rear
seat when the cushion is removed.
Use of the seat by passengers with-
out proper restraints could result in
serious injury in an accident or sud-
den stop.
CAUTION
�Store the removed cushion in the
luggage area or a secure place.
�Be sure to install the pin and firmly
set it to the original position when
resetting the cushion.�Be careful not to pinch hands or feet
when resetting the cushion.
SPA1353
1-8
Safety — Seats, seat belts and supplemental restraint system
�
06.4.14/T30-J/V5.0
�
Page 66 of 281
23. Rear window/outside mirror defroster
switch
24. Multi box
25. Heater/air conditioner control
26. Glove box
27. Upper glove box
* If so equipped
1. Tachometer
2. Turn signal indicator/Hazard indicator
3. Speedometer
4. Fuel gauge
5. Engine coolant temperature gauge6. Warning/Indicator lights
7. Odometer (Total/Twin trip)
8. Reset knobfor trip odometer
9. Automatic Transmission (AT) shift position
indicator (if so equipped)
SIC2982
METERS AND GAUGES
Instruments and controls
2-3
�
06.4.14/T30-J/V5.0
�
Page 67 of 281

SPEEDOMETER AND ODOMETER
SpeedometerThe speedometer indicates vehicle speed.Odometer/Twin trip odometerThe odometer
�1/twin trip odometer
�2
are
displayed when the ignition switch is in the ON
position.
The odometer records the total distance the
vehicle has been driven.
The twin trip odometer records the distance of
individual trips.Changing the display:
Push the reset knob
�3
to change the trip
odometer display as follows:
TRIP A→TRIP B→CLOCK
→TEM-
PERATURE (Outside air — °C)→TRIP A
Resetting the trip odometer:
Push the reset knob
�3
for more than 1 second
to reset the trip odometer to zero.
Outside air temperature displayWhen the outside air temperature is 3°C or
lower, the display blinks to give a warning.
If the outside air temperature becomes 3°C or
lower when the display is in one of the other
modes, the display switches to the outside air
temperature display mode and blinks. If the
outside air temperature becomes above 3°C or
the display mode is not switched for 1 minute, it
returns to the display mode previously set.
Even while the display is blinking, the display
mode can be switched to the one previously set
by pushing the reset knob.
The ambient temperature sensor is located in
front of the radiator. The sensor may be affected
by road or engine heat, wind directions and
other driving conditions. The display may differ
from the actual ambient temperature or thetemperature displayed on various signs or bill-
boards.
Clock displayRefer to “Clock” later in this section for further
details on the clock adjustment.
SIC2395
2-4
Instruments and controls
�
06.4.14/T30-J/V5.0
�
Page 112 of 281

1. Pull the hood lock release handle
�1
located
below the instrument panel; the hood will
then spring up slightly.
2. Move the lever
�2
at the front of the hood
with your fingertips and raise the hood.
3. Insert the assist bar�3
into the slot in the
front edge of the hood.
4. When closing the hood, reset the assist bar
to its original position, then slowly close the
hood and make sure it locks into place.
WARNING
�Make sure the hood is completely
closed and latched before driving.
Failure to do so could cause the hood
to fly open and result in an accident.
�If you see steam or smoke coming
from the engine compartment, to
avoid injury do not open the hood.�The power door lock system allows you to
lock or unlock all doors including the back
door simultaneously.
�Pull the opener handle to open the back door.
WARNING
Do not drive with the back door open.
This could allow dangerous exhaust
gases to be drawn into the vehicle. See
“Precautions when starting and driving”
in the “5. Starting and driving” section
SPA1817
SPA1722A
HOODBACK DOOR
Pre-driving checks and adjustments
3-7
�
06.4.14/T30-J/V5.0
�
Page 123 of 281
 of the maintenance
schedule. To determine the recommended
maintenance interval, refer to your “NISSAN
S")
1. Reset the driving distance to the new main-
tenance schedule.
2. Set the interval (mileage) of the maintenance
schedule. To determine the recommended
maintenance interval, refer to your “NISSAN
Service and Maintenance Guide”.
3. To display the MAINTENANCE INFORMA-
TION automatically when the set trip distance
is reached, highlight the “Display Mainte-
nance Notification” key with the joystick and
push the “ENTER” button.
4. To return the display to MAINTENANCE
INFO., push the “PREVIOUS” button.Maintenance information display cannot be op-
erated when the vehicle is moving. Stop the
vehicle in a safe place to see the information.
Maintenance notificationThe “MAINTENANCE NOTIFICATION” screen
(“ENGINE OIL” or “OIL FILTER”) will be auto-
matically displayed as shown when both of the
following conditions are met:
�the vehicle is driven the set distance and the
ignition switch is turned OFF.
�the ignition switch is turned ON the next time
the vehicle will be driven.
To return to the previous display after the
“MAINTENANCE NOTIFICATION” screen is
displayed, push the “PREVIOUS” button.
SAA1277
SAA0968
4-4
Heater, air conditioner and audio systems
�
06.4.14/T30-J/V5.0
�

2. Turn signal indicator (P.2-20)/Hazard indica-
tor (P.2-21)
3. Speedometer (P.2-4)
4. Fuel gauge (P.2-6)
5. Engine coolant temperature gauge (P.2-5)
6. Warning/Indicator lights")
The lumbar support feature provides lower back
support to the driver.
Turn the lever forward or backward to adjust the
seat lumbar area.
FRONT POWER SEAT
ADJUSTMENT")