Page 219 of 281

�Keep the battery surface clean and dry. Any
corrosion should be washed off with a solu-
tion of baking soda and water.
�Make certain the terminal connections are
clean and securely tightened.
�If the vehicle is not to be used for 30 days or
longer, disconnect the (—) negative battery
terminal cable to prevent discharging it.
WARNING
�Do not expose the battery to flames
or electrical sparks. Hydrogen gas
generated by battery action is explo-
sive. Do not allow battery fluid to
contact your skin, eyes, fabrics, or
painted surfaces. After touching a
battery or battery cap, do not touch
or rub your eyes. Thoroughly wash
your hands. If the acid contacts your
eyes, skin or clothing, immediately
flush with water for at least 15 min-
utes and seek medical attention.
�Battery posts, terminals and related
accessories contain lead and leadcompounds. Wash hands after han-
dling.
�Do not operate the vehicle if the fluid
in the battery is low. Low battery fluid
can cause a higher load on the bat-
tery which can generate heat, reduce
battery life, and in some cases lead
to an explosion.
�When working on or near a battery,
always wear suitable eye protection
and remove all jewelry.
�Keep the battery out of the reach of
children.
Check the fluid level in each cell. It should be
between the UPPER LEVEL
�1
and LOWER
LEVEL
�2
lines.
If the side of the battery is not visible, the
electrolyte level can be checked through each
filler opening as illustrated.
If it is necessary to add fluid, add only distilled
water to bring the level to the indicator in each
filler opening.Do not overfill.
Vehicles operated in high temperatures or under
severe conditions require frequent checks of the
battery fluid level.
1. Remove the cell plugs
�A.
DI0137MA
BATTERY8-16
Maintenance and do-it-yourself
�
06.4.14/T30-J/V5.0
�
Page 220 of 281
2. Add distilled water up to the UPPER LEVEL
�1.
3. Tighten cell plugs
�A.
JUMP STARTINGIf jump starting is necessary, see “Jump starting”
in the “6. In case of emergency” section. If the
engine does not start by jump starting, the
battery may have to be replaced. Contact a
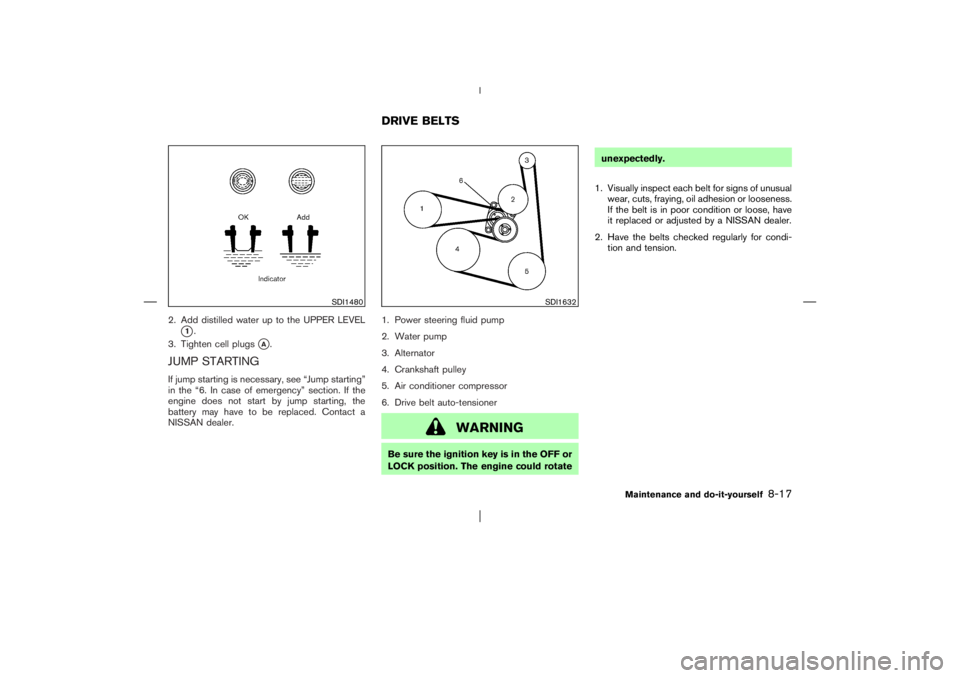
NISSAN dealer.1. Power steering fluid pump
2. Water pump
3. Alternator
4. Crankshaft pulley
5. Air conditioner compressor
6. Drive belt auto-tensioner
WARNING
Be sure the ignition key is in the OFF or
LOCK position. The engine could rotateunexpectedly.
1. Visually inspect each belt for signs of unusual
wear, cuts, fraying, oil adhesion or looseness.
If the belt is in poor condition or loose, have
it replaced or adjusted by a NISSAN dealer.
2. Have the belts checked regularly for condi-
tion and tension.
SDI1480
SDI1632
DRIVE BELTS
Maintenance and do-it-yourself
8-17
�
06.4.14/T30-J/V5.0
�
Page 221 of 281

WARNING
Be sure the engine and ignition switch
are off and that the parking brake is
engaged securely.
CAUTION
Be sure to use the correct socket to
remove the spark plugs. An incorrect
socket can damage the spark plugs.
REPLACING SPARK PLUGSIf replacement is required, see a NISSAN dealer
for servicing.Platinum-tipped spark plugsIt is not necessary to replace the platinum-tipped�Aspark plugs as frequently as the conventional
type spark plugs since they will last much longer.
Follow the maintenance schedule, but do not
reuse them by cleaning or regapping.
Always replace with recommended
platinum-tipped spark plugs.The filter element should not be cleaned and
reused. Replace it according to the maintenance
log shown in the separate Service and Mainte-
nance Guide. When replacing the filter, wipe the
inside of the air cleaner housing and the cover
with a damp cloth.
WARNING
�Operating the engine with the air
cleaner removed can cause you or
others to be burned. The air cleaner
not only cleans the air, it stops flame
SDI0145C
SDI1637
SPARK PLUGS AIR CLEANER8-18
Maintenance and do-it-yourself
�
06.4.14/T30-J/V5.0
�
Page 222 of 281

if the engine backfires. If it is not
there, and the engine backfires, you
could be burned. Do not drive with
the air cleaner removed and be care-
ful when working on the engine with
the air cleaner removed.
�Never pour fuel into the throttle body
or attempt to start the engine with
the air cleaner removed. Doing so
could result in serious injury.
CAUTION
�After wiper blade replacement, return
the wiper arm to its original position.
Otherwise it may be damaged when
the engine hood is opened.
�Make sure the wiper blades contact
the glass, otherwise the arm may be
damaged from wind pressure.
�Worn windshield wiper blades can
damage the windshield and impair
driver vision.CLEANINGIf your windshield is not clear after using the
windshield washer or if a wiper blade chatters
when running, wax or other material may be on
the blade or windshield.
Clean the outside of the windshield with a
washer solution or a mild detergent. Your wind-
shield is clean if beads do not form when rinsing
with clear water.
Clean the blade by wiping it with a cloth soaked
in a washer solution or a mild detergent. Then
rinse the blade with clear water. If your wind-shield is still not clear after cleaning the blades
and using the wiper, replace the blades.WINDSHIELD WIPER BLADES
Maintenance and do-it-yourself
8-19
�
06.4.14/T30-J/V5.0
�
Page 223 of 281
REPLACINGReplace the wiper blades if they are worn.
1. Pull the wiper arm.
2. Push the lock pin
�A, then remove the wiper
blade
�1.
3. Insert the new wiper blade to the wiper arm
until a click sounds.
If you wax the surface of the hood, be
careful not to let wax get into the washer
nozzle. This may cause clogging or im-
proper windshield washer operation. If wax
gets into the nozzle, remove it with a
needle or small pin
�1.
SDI1649
SDI0425C
8-20
Maintenance and do-it-yourself
�
06.4.14/T30-J/V5.0
�
Page 224 of 281

CHECKING PARKING BRAKEFrom the released position, pull the parking
brake lever up
�Aslowly and firmly. If the number
of clicks is out of the range listed below, see a
NISSAN dealer.
Pulling force:
196 N (20 kg, 44 lb)
Range:
6 to 7 clicks
CHECKING BRAKE PEDALWith the engine running, check the distance
�A
between the upper surface of the pedal and the
metal floor. If it is out of the range listed below,
see a NISSAN dealer.
Depressing force:
490 N (50 kg, 110 lb)
Range:
85 mm (3.35 in) or more (AT model)
80 mm (3.15 in) or more (MT model)
Self-adjusting brakesYour vehicle is equipped with self-adjusting
brakes.
The disc-type brakes self-adjust every time the
brake pedal is applied.
WARNING
See a NISSAN dealer and have it
checked if the brake pedal height does
not return to normal.Brake pad wear indicatorsThe disc brake pads on your vehicle have au-
dible wear indicators. When a brake pad re-
quires replacement, it will make a high pitched
scraping or screeching sound when the vehicle
is in motion whether or not the brake pedal is
depressed. Have the brakes checked as soon as
possible if the wear indicator sound is heard.
Under some driving or climate conditions, occa-
sional brake squeak, squeal or other noise may
be heard. Occasional brake noise during light to
moderate stops is normal and does not affect
the function or performance of the brake system.
Proper brake inspection intervals should
SDI1447B
DI1020MR
PARKING BRAKE AND BRAKE
PEDAL
Maintenance and do-it-yourself
8-21
�
06.4.14/T30-J/V5.0
�
Page 225 of 281

be followed.For additional information, see the
separate Service and Maintenance Guide.BRAKE BOOSTERCheck the brake booster function as follows:
1. With the engine off, press and release the
brake pedal several times. When brake pedal
movement (distance of travel) remains the
same from one pedal application to the next,
continue on to the next step.
2. While depressing the brake pedal, start the
engine. The pedal height should drop a little.
3. With the brake pedal depressed, stop the
engine. Keeping the pedal depressed for
about 30 seconds, the pedal height should
not change.
4. Run the engine for one minute without de-
pressing the brake pedal, then turn it off.
Depress the brake pedal several times. The
pedal travel distance will decrease gradually
with each depression as the vacuum is re-
leased from the booster.
If the brakes do not operate properly, see a
NISSAN dealer.Some vehicles are equipped with engine com-
partment and passenger compartment fuse
boxes that use only type
�A
fuses. Other ve-
hicles are equipped with type�A
fuses in the
engine compartment fuse box and type
�Bfuses
in the passenger compartment fuse box.
Type
�Afuses are provided as spare fuses. They
are stored in the passenger compartment fuse
box.
Type
�A
fuses can be installed in the engine
compartment and passenger compartment fuse
boxes.If a type
�A
fuse is used to replace a type
�B
fuse, the type
�A
fuse will not be level with the
fuse pocket as shown in the illustration. This will
not affect the performance of the fuse. Make
sure the fuse is installed in the fuse box securely.
Type
�B
fuses cannot be installed in the under-
hood fuse boxes. Only use type
�A
fuses in the
underhood fuse boxes.
SDI1751
SDI1752
FUSES
8-22
Maintenance and do-it-yourself
�
06.4.14/T30-J/V5.0
�
Page 226 of 281
ENGINE COMPARTMENT
CAUTION
Never use a fuse of higher or lower
amperage rating than that specified on
the fuse box cover. This could damage
the electrical system or cause a fire.If any electrical equipment does not operate,
check for an open fuse.
1. Be sure the ignition switch and headlight
switch are OFF.
2. Open the engine hood.
3. Remove the fusible link cover.
4. Remove the fuse with the fuse puller.
5. If the fuse is open
�A, replace it with a new
fuse
�B.
6. If a new fuse also opens, have the electrical
system checked and repaired by a NISSAN
dealer.
Fusible linksIf any electrical equipment does not operate and
fuses are in good condition, check the fusible
links. If any of these fusible links are melted,
replace only with genuine NISSAN parts.
SDI1928
SDI1753
Type A
SDI1754
Type B
Maintenance and do-it-yourself
8-23
�
06.4.14/T30-J/V5.0
�