Page 22 of 281

HEAD RESTRAINT ADJUSTMENT
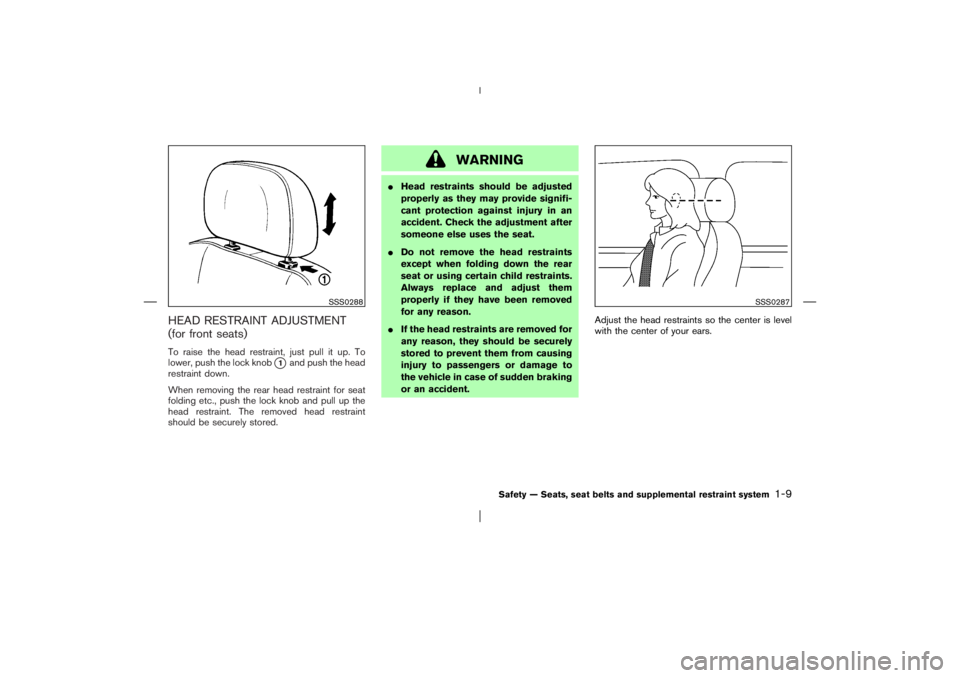
(for front seats)To raise the head restraint, just pull it up. To
lower, push the lock knob
�1and push the head
restraint down.
When removing the rear head restraint for seat
folding etc., push the lock knoband pull up the
head restraint. The removed head restraint
should be securely stored.
WARNING
�Head restraints should be adjusted
properly as they may provide signifi-
cant protection against injury in an
accident. Check the adjustment after
someone else uses the seat.
�Do not remove the head restraints
except when folding down the rear
seat or using certain child restraints.
Always replace and adjust them
properly if they have been removed
for any reason.
�If the head restraints are removed for
any reason, they should be securely
stored to prevent them from causing
injury to passengers or damage to
the vehicle in case of sudden braking
or an accident.Adjust the head restraints so the center is level
with the center of your ears.
SSS0288
SSS0287
Safety — Seats, seat belts and supplemental restraint system
1-9
�
06.4.14/T30-J/V5.0
�
Page 29 of 281

you could be thrown into it and re-
ceive neck or other serious injuries.
You could also slide under the lap
belt and receive serious internal inju-
ries.
�For most effective protection when
the vehicle is in motion, the seat
should be upright. Always sit well
back in the seat and adjust the seat
belt properly.
Fastening the seat belts1. Adjust the seat. See “Seats” earlier in this
section.
2. Slowly pull the seat belt out of the retractor
and insert the tongue into the buckle until it
snaps. For additional information regarding
the rear center seat belt, see “Rear center
seat belt” later in this section.
�The retractor is designed to lock during
a sudden stop or on impact. A slow
pulling motion will permit the belt to
move, and allow you some freedom of
movement in the seat.�If the seat belt cannot be pulled from its
fully retracted position, firmly pull the
belt and release it. Then smoothly pull
the belt out of the retractor.
3. Position the lap belt portionlow and snug
on the hipsas shown.
4. Pull the shoulder belt portion toward the
retractor to take up extra slack. Make sure the
shoulder belt is routed over your shoulder
and across your chest.
The front passenger and rear seat belts have a
locking mechanism for child restraint installation.
It is referred to as the automatic locking mode.
SSS0290
Front seat
SSS0293
Rear seat
SSS0291A
Rear seat
1-16
Safety — Seats, seat belts and supplemental restraint system
�
06.4.14/T30-J/V5.0
�
Page 30 of 281

When the locking mechanism is activated the
seat belt cannot be extended again until the seat
belt tongue is detached from the buckle and fully
retracted. For additional information, see “Child
restraints” later in this section.
The automatic locking mode should be
used only for child restraint installation.
During normal seat belt use by a passen-
ger, the locking mode should not be acti-
vated. If it is activated it may cause uncom-
fortable seat belt tension.
WARNING
When fastening the seat belts, be cer-
tain that seatbacks are completely se-
cured in the latched position. If they are
not completely secured, passengers
may be injured in an accident or sudden
stop.
Unfastening the seat beltsTo unfasten the belt, press the button on the
buckle. The seat belt will automatically retract.Checking seat belt operationYour seat belt retractors are designed to lock
belt movement using two separate methods:
�when the belt is pulled quickly from the
retractor.
�when the vehicle slows down rapidly.
You can check their operation as follows:
�grasp the shoulder belt and pull quickly for-ward. The retractor should lock and restrict
further belt movement.
If the retractor does not lock during this check or
if you have any questions about belt operation,
see a NISSAN dealer.
SSS0326
Safety — Seats, seat belts and supplemental restraint system
1-17
�
06.4.14/T30-J/V5.0
�
Page 31 of 281

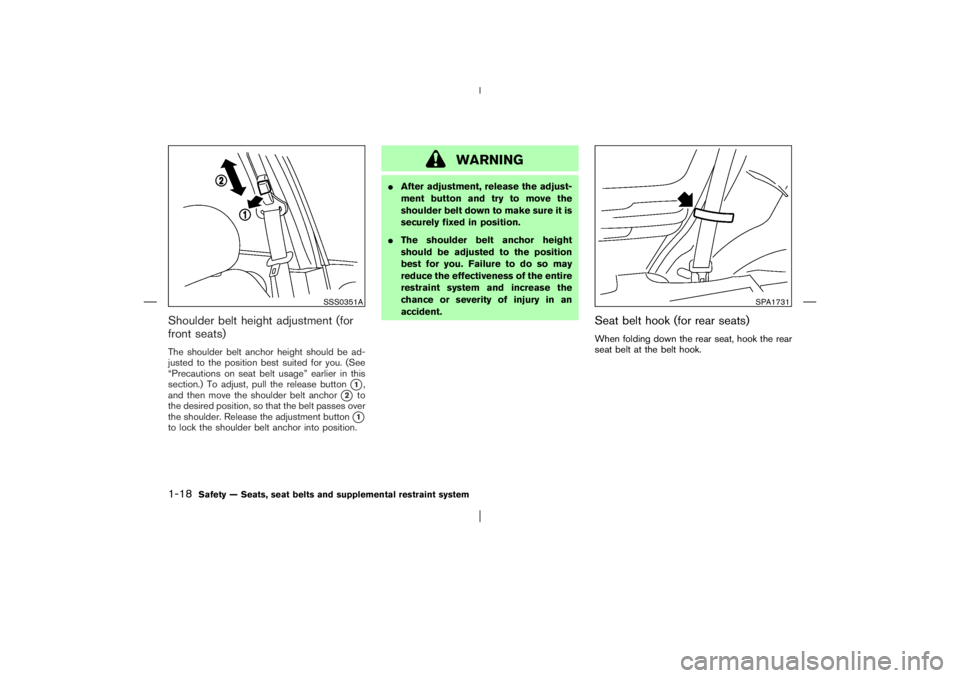
Shoulder belt height adjustment (for
front seats)The shoulder belt anchor height should be ad-
justed to the position best suited for you. (See
“Precautions on seat belt usage” earlier in this
section.) To adjust, pull the release button
�1,
and then move the shoulder belt anchor
�2
to
the desired position, so that the belt passes over
the shoulder. Release the adjustment button�1
to lock the shoulder belt anchor into position.
WARNING
�After adjustment, release the adjust-
ment button and try to move the
shoulder belt down to make sure it is
securely fixed in position.
�The shoulder belt anchor height
should be adjusted to the position
best for you. Failure to do so may
reduce the effectiveness of the entire
restraint system and increase the
chance or severity of injury in an
accident.
Seat belt hook (for rear seats)When folding down the rear seat, hook the rear
seat belt at the belt hook.
SSS0351A
SPA1731
1-18
Safety — Seats, seat belts and supplemental restraint system
�
06.4.14/T30-J/V5.0
�
Page 34 of 281

and use. When purchasing a child
restraint, be sure to select one which
will fit your child and vehicle. It may
not be possible to properly install
some types of child restraints in your
vehicle.
�If the child restraint is not anchored
properly, the risk of a child being
injured in a collision or a sudden stop
greatly increases.
�Adjustable seatbacks should be po-
sitioned to fit the child restraint, but
as upright as possible.
�After attaching the child restraint,
test it before you place the child in it.
Push it from side to side. Try to tug it
forward and check to see if the belt
holds the restraint in place. The child
restraint should not move more than
25 mm (1 inch). If the restraint is not
secure, tighten the belt as necessary,
or put the restraint in another seat
and test it again. You may need to try
a different child restraint. Not all
child restraints fit in all types of
vehicles.�If you must install a front-facing child
restraint in the front seat, see “Child
restraint installation on front passen-
ger seat” later in this section.
�When your child restraint is not in
use, keep it secured with a seat belt
to prevent it from being thrown
around in case of a sudden stop or
accident.
CAUTION
Remember that a child restraint left in a
closed vehicle can become very hot.
Check the seating surface and buckles
before placing your child in the child
restraint.
CHILD RESTRAINT INSTALLATION
ON REAR SEAT CENTER OR
OUTBOARD POSITIONS
WARNING
�The three-point rear seat belts on
your vehicle are equipped with an
automatic locking mode retractor
which must be used when installing a
child restraint.
�Failure to do so will result in the child
restraint not being properly secured.
It could tip over or otherwise be un-
secured and cause injury to the child
in a sudden stop or collision.
Safety — Seats, seat belts and supplemental restraint system
1-21
�
06.4.14/T30-J/V5.0
�
Page 36 of 281

3. Pull on the shoulder belt until all of the belt is
fully extended. At this time, the belt retractor
is in the automatic locking mode (child re-
straint mode). It reverts back to emergency
locking mode when the belt is fully retracted.4. Allow the belt to retract. Pull up on the belt to
remove any slack in the belt.5. Before placing the child in the child restraint,
use force to tilt the child restraint from side to
side, and tug it forward to make sure that it is
securely held in place. It should not move
more than 25 mm (1 inch). If it does move
more than 25 mm (1 inch), pull again on the
shoulder belt to further tighten the child
restraint. If unable to properly secure the
restraint, move the restraint to another rear
seating position and try again, or try a differ-
ent child restraint. Not all child restraints fit in
all types of vehicles.
6. Check that the retractor is in the automatic
locking mode by trying to pull more belt out of
the retractor. If you cannot pull any more belt
SSS0422
SSS0423
SSS0333
Safety — Seats, seat belts and supplemental restraint system
1-23
�
06.4.14/T30-J/V5.0
�
Page 37 of 281
webbing out of the retractor, the belt is in the
automatic locking mode.
7. Check to make sure that the child restraint is
properly secured prior to each use. If the belt
is not locked, repeat steps 3 through 6.
After the child restraint is removed and the seat
belt is allowed to wind back into the retractor,
the automatic locking mode (child restraint
mode) is canceled.
Rear facingWhen you install a child restraint in a rear
outboard or center seat, follow these steps:
1. Position the child restraint on the seat. Al-
ways follow the restraint manufacturer’s in-
structions.
SSS0392
Rear outboard seat
SSS0358
Rear center seat
1-24
Safety — Seats, seat belts and supplemental restraint system
�
06.4.14/T30-J/V5.0
�
Page 38 of 281
2. Route the seat belt tongue through the child
restraint and insert it into the buckle until you
hear and feel the latch engage.
Be sure to follow the child restraint manufac-
turer’s instructions for belt routing.3. Pull on the shoulder belt until all of the belt is
fully extended. At this time, the belt retractor
is in the automatic locking mode (child re-
straint mode). It reverts back to emergency
locking mode when the belt is fully retracted.4. Allow the belt to retract. Pull up on the belt to
remove any slack in the belt.
SSS0335
SSS0258A
SSS0259A
Safety — Seats, seat belts and supplemental restraint system
1-25
�
06.4.14/T30-J/V5.0
�