2006 NISSAN QUEST start stop button
[x] Cancel search: start stop buttonPage 97 of 352

twice and the horn beeps once as a re-
minder that the doors are already locked.
The horn may or may not beep. Refer to
“Personalized settings menu” (vehicles with
monochrome screen) or “Vehicle electronic
systems” (vehicles with color screen) in the
“Display screen, heater, air conditioner and
audio systems” section later in this manual.
4. Confirm that the
indicator light comes
on. Thelight stays on for about 30
seconds. The vehicle security system is now
pre-armed. After about 30 seconds the ve-
hicle security system automatically shifts
into the armed phase. The
light begins
to flash once every 3 seconds. If, during the
30-second pre-arm time period, the door is
unlocked by the key or the keyfob, or the
ignition key is turned to ACC or ON, the
system will not arm.
cIf the key is turned slowly when locking
the door, the system may not arm. Fur-
thermore, if the key is turned beyond
the vertical position toward the unlock
position to remove the key, the system
may be disarmed when the key is re-
moved. If the indicator light fails to
glow for 30 seconds, unlock the door
once and lock it again.cEven when the driver and/or passen-
gers are in the vehicle, the system will
arm with all doors closed and locked
with the ignition key in the OFF posi-
tion.
Vehicle security system activation
The vehicle security system will give the following
alarm:
cThe headlights blink and the horn sounds
intermittently.
cThe alarm automatically turns off after ap-
proximately 50 seconds. However, the alarm
reactivates if the vehicle is tampered with
again. The alarm can be shut off by unlocking
a door with the key, or by pressing the
button on the keyfob.
The alarm is activated by:
copening a door without using the key or
keyfob (even if the door is unlocked by using
the inside lock knob or the power door lock
switch) .
How to stop an activated alarm
The alarm stops only by unlocking a door with the
key, or by pressing thebutton on the key-
fob.
NISSAN VEHICLE IMMOBILIZER
SYSTEM
The NISSAN Vehicle Immobilizer System will not
allow the engine to start without the use of a
registered key.
If the engine fails to start using a registered key
(for example, when interference is caused by
another registered key, an automated toll road
device or automatic payment device on the key
ring) , restart the engine using the following pro-
cedures:
1. Leave the ignition switch in the ON position
for approximately 5 seconds.
2. Turn the ignition switch to the OFF or LOCK
position, and wait approximately 10 sec-
onds.
3. Repeat steps 1 and 2.
4. Restart the engine while holding the device
(which may have caused the interference)
separate from the registered key.
If the no start condition re-occurs, NISSAN rec-
ommends placing the registered key on a sepa-
rate key ring to avoid interference from other
devices.
Instruments and controls2-15
ZREVIEW COPYÐ2006 Quest(van)
Owners ManualÐUSA_English(nna)
05/27/05Ðtbrooks
X
Page 116 of 352
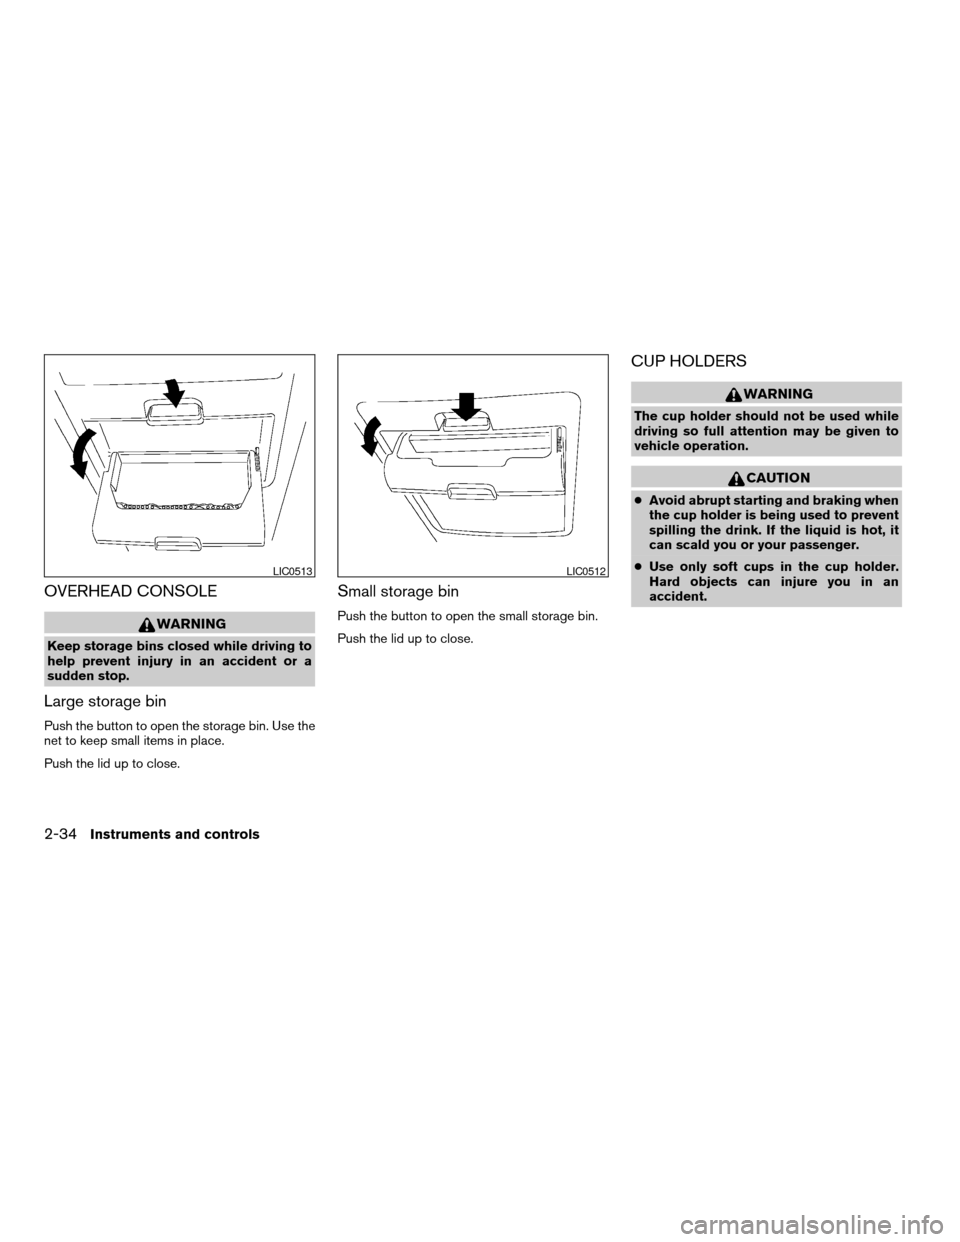
OVERHEAD CONSOLE
WARNING
Keep storage bins closed while driving to
help prevent injury in an accident or a
sudden stop.
Large storage bin
Push the button to open the storage bin. Use the
net to keep small items in place.
Push the lid up to close.
Small storage bin
Push the button to open the small storage bin.
Push the lid up to close.
CUP HOLDERS
WARNING
The cup holder should not be used while
driving so full attention may be given to
vehicle operation.
CAUTION
cAvoid abrupt starting and braking when
the cup holder is being used to prevent
spilling the drink. If the liquid is hot, it
can scald you or your passenger.
cUse only soft cups in the cup holder.
Hard objects can injure you in an
accident.
LIC0513LIC0512
2-34Instruments and controls
ZREVIEW COPYÐ2006 Quest(van)
Owners ManualÐUSA_English(nna)
05/27/05Ðtbrooks
X
Page 140 of 352
warning chime will sound if an open operation is
attempted. The door can be opened manually
part way.
Power Close:
The door automatically moves from the fully open
position to the secondary position. When the
sliding door reaches the secondary position, the
cinching motor engages and pulls the door to its
primary latch position. Power close takes ap-
proximately4–7seconds. The power close
feature can be activated by the switches on the
keyfob, the overhead console and the door pillar.
cIf the inside or outside handle is activated
while the cinching motor is engaged, the
cinching motor will disengage and release
the latch.
cThe keyfob button must be held for 0.5 sec-
ond before the door closes.
cThe switch on the door pillar can only be
used to close the door if the main ON/OFF
switch is ON.
Reverse:
The door will reverse direction immediately dur-
ing power open or power close if the keyfob,
overhead console or door pillar switch is
pressed. A chime will sound to announce the
reversal.Auto Reverse:
If an obstacle is detected during power open or
power close, a warning chime will sound and the
door will reverse direction and return to the full
open or full close position. If a second obstacle is
detected, the door motion will stop and the clutch
mode will be engaged.
WARNING
There are some small distances immedi-
ately before the closed position which
cannot be detected. Make sure that all
passengers have their hands, etc., inside
the vehicle before closing the door.
Clutch Mode:
To help prevent unexpected slams due to gravity,
the clutch mode is engaged intermittently for
approximately5–8seconds when power open
or close is interrupted due to multiple obstacles,
low battery voltage or the main ON/OFF switch
turned to OFF. The door must then be opened or
closed manually.
Restarting the power sliding door
Some power sliding door functions will become
disabled after the battery terminal is discon-
nected and/or the electrical supply is interrupted.The following procedure must be used to restart
each power sliding door so that all functions are
enabled.
1. Turn the main on/off switch to OFF.
2. Manually open the power sliding door to its
fully open position.
3. Turn the main on/off switch to ON.
4. Press and hold the power sliding door
switch on the overhead console until the
door closes.
5. Release the switch.
6. Press and hold the power sliding door
switch on the overhead console until the
door opens as far as it can.
7. Release the switch.
8. Press and hold the power sliding door
switch on the overhead console until the
door closes.
9. Release the switch.
The power sliding door should now work properly.
NOTE:
The restarting procedure must be com-
pleted for both the left-hand and right-
hand power sliding doors (if so equipped) .
3-8Pre-driving checks and adjustments
ZREVIEW COPYÐ2006 Quest(van)
Owners ManualÐUSA_English(nna)
05/27/05Ðtbrooks
X
Page 144 of 352

Operating the power sliding door (if so
equipped)
Push and hold the button on the keyfob for about
0.5 second to open or close the power sliding
door.
The door will reverse direction immediately dur-
ing power open or power close if the keyfob
button is pressed. A chime will sound to an-
nounce the reversal.
For more information, see “Operating the power
sliding door” earlier in this section.
Operating the power lift gate (if so
equipped)
Push and hold the button on the keyfob for about
0.5 second to open or close the lift gate. The
hazard warning lights flash and a chime sounds
to indicate the power open or power close se-
quence has started.
The lift gate will reverse direction immediately
during power open or power close if the keyfob
button is pressed. A chime will sound to an-
nounce the reversal.
For more information, see “Lift gate” later in this
section.
Using the panic alarm
If you are near your vehicle and feel threatened,
you may activate the panic alarm to call attention
by pushing and holding the
button on the
keyfob forlonger than 0.5 second.
The panic alarm and headlights will stay on for 25
seconds.
The panic alarm stops when:
cit has run for 25 seconds, or
cany button is pushed on the keyfob.
LPD0212LPD0213LPD0211
3-12Pre-driving checks and adjustments
ZREVIEW COPYÐ2006 Quest(van)
Owners ManualÐUSA_English(nna)
05/27/05Ðtbrooks
X
Page 148 of 352
and a chime sounds to indicate the power open
sequence has been started.
cThe lift gate can be opened by the overhead
console switch and the keyfob even if the
vehicle is locked. The lift gate will individually
unlock and open. Once the lift gate is
closed, its lock will align to the vehicle’s lock
or unlock status.
cThe keyfob button must be held for 0.5 sec-
ond before the lift gate opens.
cThe lift gate must be unlocked to open it with
the outside opener handle.
cThe switch on the rear pillar cannot be used
to open the lift gate.
A warning chime will sound if the shift selector
lever is moved out of P (Park) during a power
open operation.
Power Close:
The power lift gate automatically moves from the
fully open position to the secondary position.
When the lift gate reaches the secondary posi-
tion, the cinching motor engages and pulls the lift
gate to its primary latch position. Power close
takes approximately7–10seconds. The power
close feature can be activated by the switch on
the keyfob, the overhead console and the rearpillar. The hazard lights flash and a chime sounds
to indicate the power close sequence has been
started.
cIf the outside opener handle is activated
while the cinching motor is engaged, the
cinching motor will disengage and release
the latch.
cThe keyfob button must be held for 0.5 sec-
ond before the lift gate closes.
cThe switch on the rear pillar can only be used
to close the lift gate if the main ON/OFF
switch is ON.
Reverse:
The power lift gate will reverse direction immedi-
ately during power open or power close if the
keyfob, overhead console or rear pillar switch is
pressed. A chime will sound to announce the
reversal.
Auto Reverse:
If an obstacle is detected during power open or
power close, a warning chime will sound and the
lift gate will reverse direction and return to the full
open or full close position. If a second obstacle is
detected, the lift gate motion will stop and the
drive motor will disengage. The lift gate will enter
manual mode.A pinch strip is mounted on each side of the lift
gate. If an obstacle is detected by a pinch strip
during power close, the lift gate will reverse di-
rection and return to the full open position.
NOTE:
If the pinch strip is damaged or removed,
the power close function will not operate.
WARNING
There are some small distances immedi-
ately before the closed position which
cannot be detected. Make sure that all
passengers have their hands, etc., inside
the vehicle before closing the lift gate.
Manual Mode:
If power operation is not available, the lift gate
may be operated manually. Power operation may
not be available if the main ON/OFF switch is in
the OFF position, if multiple obstacles have been
detected in a single power cycle, or if battery
voltage is low.
3-16Pre-driving checks and adjustments
ZREVIEW COPYÐ2006 Quest(van)
Owners ManualÐUSA_English(nna)
05/27/05Ðtbrooks
X
Page 162 of 352
WARNING
cPositioning of the heating or air condi-
tioning controls and display controls
should not be done while driving in or-
der that full attention may be given to
the driving operation.
cDo not disassemble or modify this sys-
tem. If you do, it may result in accidents,
fire, or electrical shock.
cDo not use this system if you notice any
abnormality, such as a frozen screen or
lack of sound. Continued use of the
system may result in accident, fire or
electric shock.
cIn case you notice any foreign object in
the system hardware, spill liquid on it,
or notice smoke or smell coming from
it, stop using the system immediately
and contact your nearest NISSAN
dealer. Ignoring such conditions may
lead to accidents, fire or electrical
shock.
When you use this system, make sure the engine
is running.
If you use the system with the engine not
running (ignition ON or ACC) for a long
time, it will use up all the battery power,
and the engine will not start.Reference symbols:
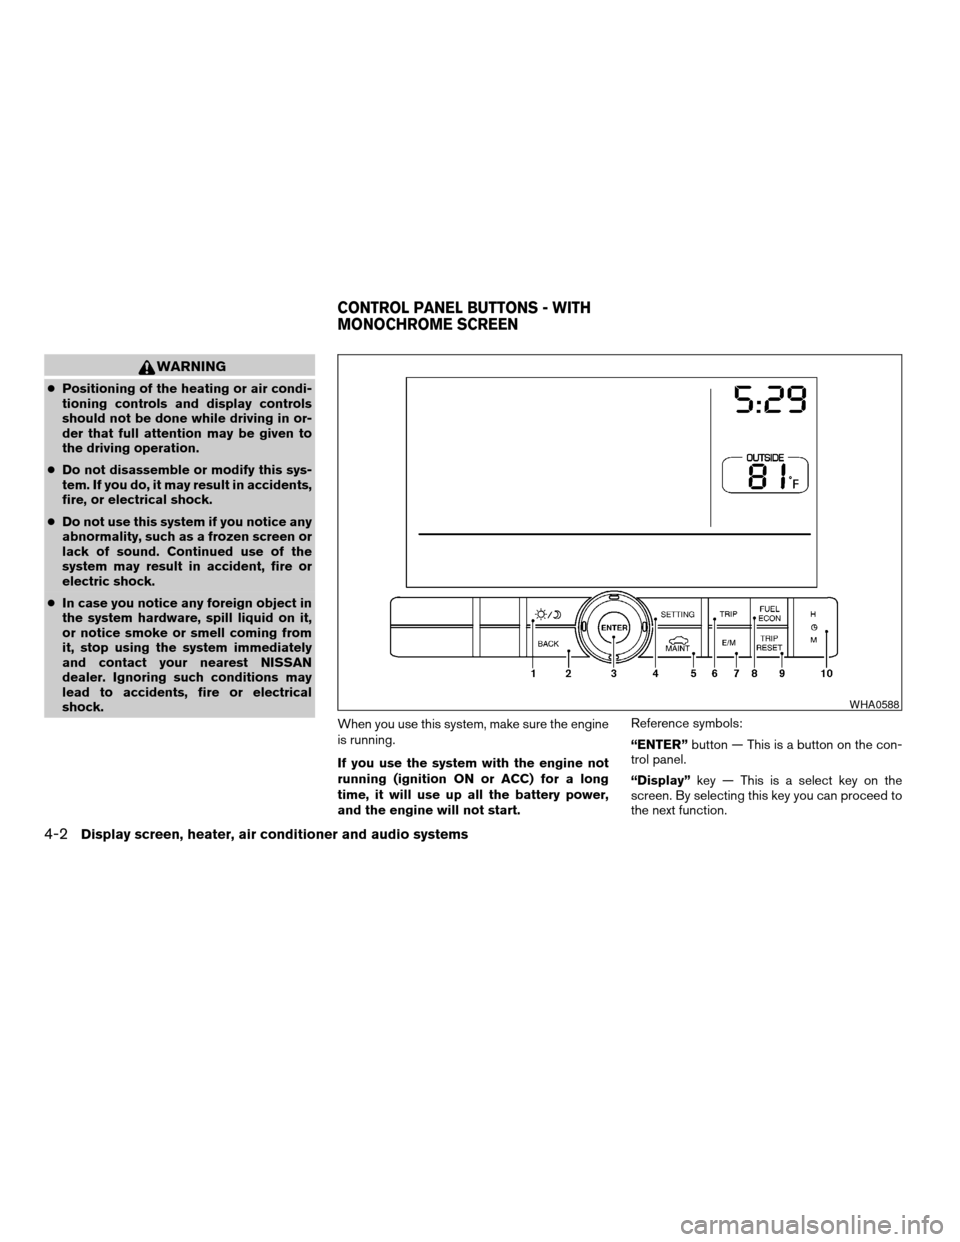
“ENTER”button — This is a button on the con-
trol panel.
“Display”key — This is a select key on the
screen. By selecting this key you can proceed to
the next function.
WHA0588
CONTROL PANEL BUTTONS - WITH
MONOCHROME SCREEN
4-2Display screen, heater, air conditioner and audio systems
ZREVIEW COPYÐ2006 Quest(van)
Owners ManualÐUSA_English(nna)
05/27/05Ðtbrooks
X
Page 207 of 352
If the battery cable is disconnected, or if the fuse
opens, the radio memory will be canceled. In that
case, reset the desired stations.
Radio data system (RDS):
RDS stands for Radio Data System, and is a data
information service transmitted by some radio
stations on the FM band (not AM band) and/or
SAT radio encoded within a regular radio broad-
cast. Currently, most RDS stations are in large
cities, but many stations are now considering
broadcasting RDS data.
Program type (PTY):
PTY can be used to search for a certain program
type. Certain areas have a limited number of
stations that transmit RDS. Many stations trans-
mit call letters and frequencies only.
Searching or scanning by program type may yield
a limited number of selections.
When PROG/RPT button is pressed for more
than 1.5 seconds during FM or SAT (if so
equipped) mode, the PTY name of the current
tuned station is displayed. During this time if the
PTY data code is zero or the data is unreadable,
the display will show NONE.
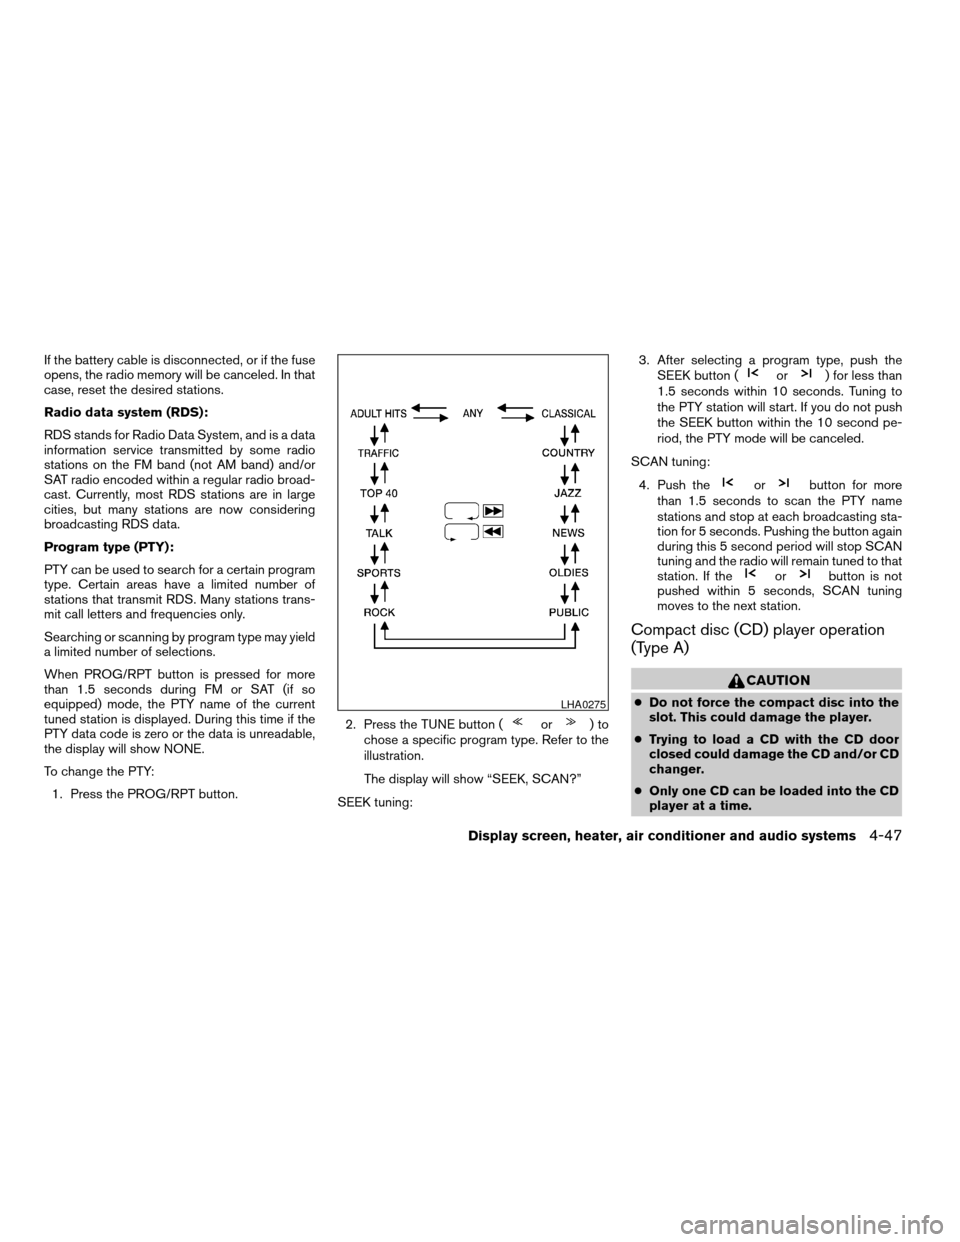
To change the PTY:
1. Press the PROG/RPT button.2. Press the TUNE button (
or)to
chose a specific program type. Refer to the
illustration.
The display will show “SEEK, SCAN?”
SEEK tuning:3. After selecting a program type, push the
SEEK button (
or) for less than
1.5 seconds within 10 seconds. Tuning to
the PTY station will start. If you do not push
the SEEK button within the 10 second pe-
riod, the PTY mode will be canceled.
SCAN tuning:
4. Push the
orbutton for more
than 1.5 seconds to scan the PTY name
stations and stop at each broadcasting sta-
tion for 5 seconds. Pushing the button again
during this 5 second period will stop SCAN
tuning and the radio will remain tuned to that
station. If the
orbutton is not
pushed within 5 seconds, SCAN tuning
moves to the next station.
Compact disc (CD) player operation
(Type A)
CAUTION
cDo not force the compact disc into the
slot. This could damage the player.
cTrying to load a CD with the CD door
closed could damage the CD and/or CD
changer.
cOnly one CD can be loaded into the CD
player at a time.LHA0275
Display screen, heater, air conditioner and audio systems4-47
ZREVIEW COPYÐ2006 Quest(van)
Owners ManualÐUSA_English(nna)
05/27/05Ðtbrooks
X
Page 208 of 352

Turn the ignition key to the ACC or ON position
and insert the compact disc into the slot with the
label side facing up. The compact disc will be
guided automatically into the slot and start play-
ing.
If the radio is already operating, it will automati-
cally turn off and the compact disc will play.
If the system has been turned off while the com-
pact disc was playing, pushing the ON·OFF/VOL
control knob will start the compact disc.
CD button:
When the CD button is pushed with the system
off and the compact disc loaded, the system will
turn on and the compact disc will start to play.
When the CD button is pushed with the compact
disc loaded but the radio playing, the radio will
automatically be turned off and the compact disc
will start to play.
REW (Rewind) , FF (Fast
Forward):
When the
(rewind) or(fast forward)
button is pushed while the compact disc is being
played, the compact disc will play while rewind-
ing or fast forwarding. When the button is re-
leased, the compact disc will return to normal
play speed.
SEEK/TRACK:
When the
button is pushed for less than
1.5 seconds while a compact disc is playing, the
track being played returns to its beginning. Push
several times to skip back through tracks. The
compact disc will go back the number of times
the button is pushed.
When the
button is pushed for less than
1.5 seconds while a compact disc is playing, the
next track will start to play from its beginning.
Push several times to skip through tracks. The
compact disc will advance the number of times
the button is pushed. (When the last track on the
compact disc is skipped through, the first track
will be played.)
When the
orbutton is pushed for
more than 1.5 seconds, each track will play for
about 10 seconds. To stop playing, push
the
button.
REPEAT (RPT):
When the PROG/RPT button is pushed while the
compact disc is being played, the play pattern
can be changed as follows:
ALL DISC RPT!1 TRACK RPT!1 DISC RDM
!ALL DISC RPTALL DISC RPT: the entire disk will be repeated
1 TRACK RPT: the current track will be repeated
1 DISC RDM: all tracks will be played randomly
REAR ON·OFF:
Pushing the REAR ON·OFF button for less than
1.5 seconds turns the rear seat audio controller
on. REAR CONT ON will display. Pushing it again
will turn the rear seat audio controller off. REAR
CONT OFF will display. If the vehicle is not
equipped with a rear seat audio controller, the
display will show “REAR AV N/A”.
Pushing the REAR ON·OFF button for more than
1.5 seconds will turn the DVD player on (if so
equipped) .
When the REAR ON·OFF button is pushed for
more than 1.5 seconds with a DVD loaded and
another audio source playing, the other source
will automatically be turned off and the DVD will
start to play.
(SPEAKER CONTROL) button:
Push this button to turn the rear speakers off and
headphones on. Push this button again to turn
rear seat speakers back on and headphones off.
4-48Display screen, heater, air conditioner and audio systems
ZREVIEW COPYÐ2006 Quest(van)
Owners ManualÐUSA_English(nna)
05/27/05Ðtbrooks
X