2006 NISSAN QUEST start stop button
[x] Cancel search: start stop buttonPage 210 of 352

the button is pushed. (When the last track on the
compact disc is skipped through, the first track
will be played.)
When pushing the
orbutton for more
than 1.5 seconds, each track will play for about
10 seconds. To stop playing, push
the
button again.
CD select buttons:
To play another CD that has been loaded, push a
CD select button (1 – 6) .
REPEAT (RPT):
When the PROG/RPT play button is pushed
while the compact disc is played, the play pattern
can be changed as follows:
ALL DISC RPT!1 DISC RPT!1 TRACK RPT
!ALL DISC RDM!1 DISC RDM!ALL DISC
RPT
ALL DISC RPT: All discs loaded will be repeated.
1 DISC RPT: The disc that is currently playing will
be repeated.
1 TRACK RPT: The track that is currently playing
will be repeated
ALL DISC RDM: Tracks from all discs will be
played randomly
1 DISC RDM: Tracks from the disc that is cur-
rently playing will be played randomlyREAR ON·OFF:
Pushing the REAR ON·OFF button for less than
1.5 seconds turns the rear seat audio controller
on. REAR CONT ON will display. Pushing it again
will turn the rear seat audio controller off. REAR
CONT OFF will display. If the vehicle is not
equipped with a rear seat audio controller, the
display will show “REAR AV N/A”.
Pushing the REAR ON·OFF button for more than
1.5 seconds will turn the DVD player on (if so
equipped) .
When the REAR ON·OFF button is pushed for
more than 1.5 seconds with a DVD loaded and
another audio source playing, the other source
will automatically be turned off and the DVD will
start to play.
(SPEAKER CONTROL) button:
Push this button to turn the rear speakers off and
headphones on. Push this button again to turn
rear seat speakers back on and headphones off.
CD EJECT:
Current disc:
cPress the slot number (1 – 6) for the desired
disc, then press the
button. The com-
pact disc will be ejected. If the disc is not
removed within 15 seconds, the disc will
reload.
All discs:
cPress and hold the
button for more
than 1.5 seconds. The compact discs will be
ejected one by one. If a disc is not removed
within 15 seconds, or the
button is
pressed again during the eject sequence,
the entire disc eject sequence will be can-
celed.
When this button is pushed while the compact
disc is being played, the compact disc will eject
and the last source will be played.
CD IN indicator:
The slot numbers (1 – 6) will illuminate if CDs
have been loaded into the changer in CD mode
only.
4-50Display screen, heater, air conditioner and audio systems
ZREVIEW COPYÐ2006 Quest(van)
Owners ManualÐUSA_English(nna)
05/27/05Ðtbrooks
X
Page 215 of 352

CAUTION
cThe glass screen on the liquid crystal
display may break if hit with a hard or
sharp object. If the glass breaks, do not
touch the liquid crystalline material,
which contains a small amount of mer-
cury. In case of contact with skin, wash
immediately with soap and water.
cUse a damp, soft cloth when cleaning
the DVD Entertainment System compo-
nents. Do not use solvents or cleaning
solutions.
cDo not attempt to use the system in
extreme temperature conditions [below
-4°F (-20°C) or above 158°F (70°C)].
cTo avoid draining the vehicle battery, do
not operate the system more than 15
minutes without starting the engine.
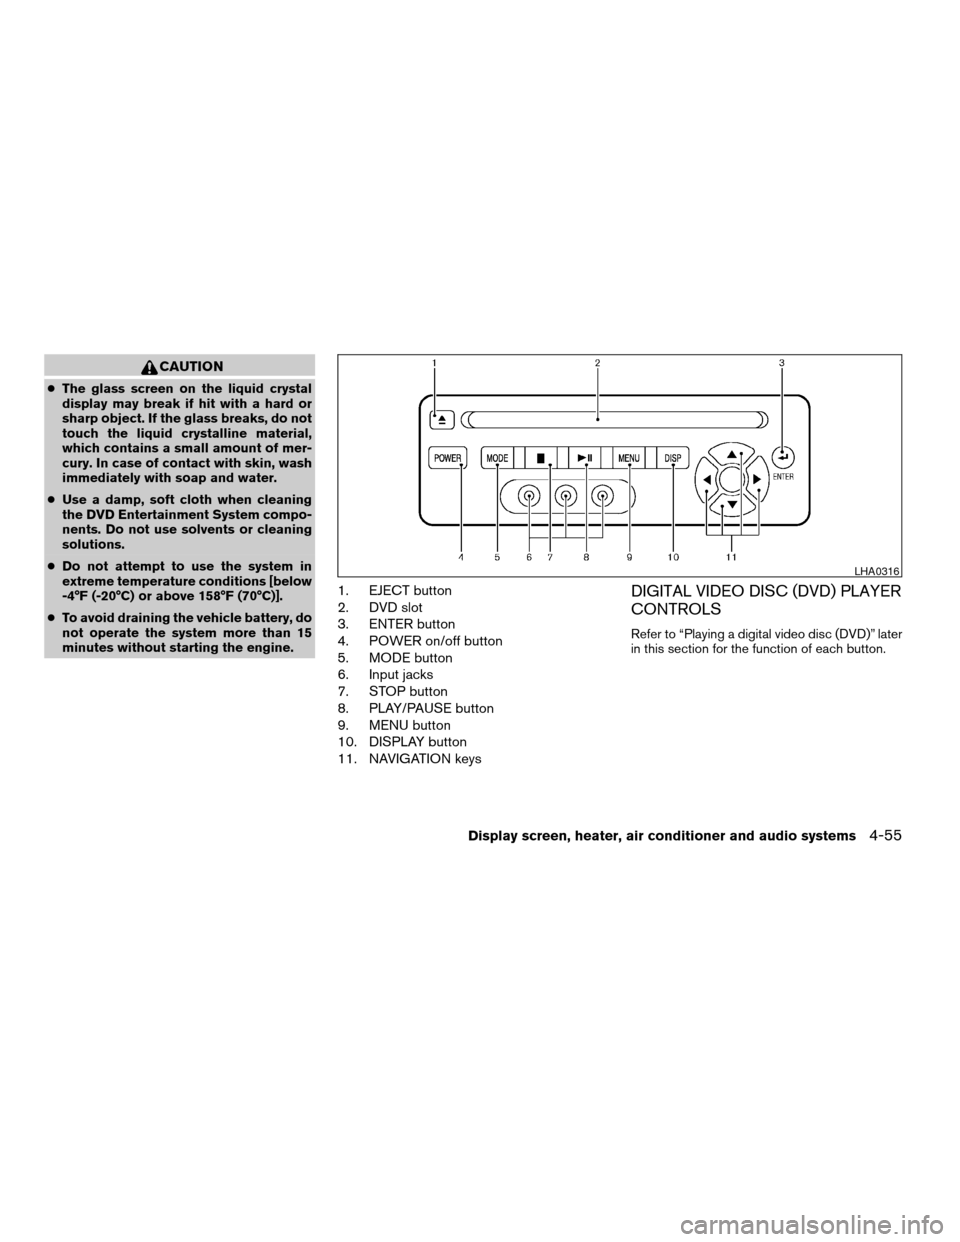
1. EJECT button
2. DVD slot
3. ENTER button
4. POWER on/off button
5. MODE button
6. Input jacks
7. STOP button
8. PLAY/PAUSE button
9. MENU button
10. DISPLAY button
11. NAVIGATION keysDIGITAL VIDEO DISC (DVD) PLAYER
CONTROLS
Refer to “Playing a digital video disc (DVD)” later
in this section for the function of each button.
LHA0316
Display screen, heater, air conditioner and audio systems4-55
ZREVIEW COPYÐ2006 Quest(van)
Owners ManualÐUSA_English(nna)
05/27/05Ðtbrooks
X
Page 219 of 352

NEXT CHAPTER/
PREVIOUS CHAPTER
(Remote control only):
When the
(NEXT CHAPTER) button is
pushed while the DVD is being played, the pro-
gram next to the present one will start to play from
its beginning. Push several times to skip through
programs. The DVD will advance the number of
times the button is pushed. When
the
(PREVIOUS CHAPTER) button is
pushed, the program being played returns to its
beginning. Push several times to skip back
through programs. The DVD will go back the
number of times the button is pushed.
orPAUSE:
When the PLAY/PAUSE button on the player or
the PAUSE button on the remote control is
pushed, the player will pause playing of the me-
dia. In pause mode, the player will show
on
the upper left corner of the display until the player
is changed to another mode.
STOP:
Push the STOP button once to stop playing the
media. The display will show
in the upper
left corner of the display for 4 seconds, and the
last disc position will be stored. When the PLAY
button is pushed again, it will resume at the
stored disc track and time position.If the STOP button is pushed again when the
player is already in Stop mode, it will reinitialize
the pointer to the beginning of the disc. In effect it
will ignore the last stored disc position and upon
receipt of the next play message it will begin at
the Title Menu, or at “the beginning of the disc”.
EJECT:
When the EJECT button is pushed with the DVD
loaded, it will be ejected.
The display will show the EJECT symbol
in
the upper left corner of the display for 4 seconds
once the EJECT button is pushed.
If the DVD is not loaded, the display will show
“NO DISC”.
If the DVD comes out and is not removed within
25 seconds, it will be pulled back into the slot to
protect it.
DISPLAY:
If the DISPLAY control is pushed for less than 2
seconds, the display menu will appear on the
screen.
cThe display menu will remain on the screen
for 10 seconds if no subsequent control
activations occur.cUse NAVIGATION KEYS to navigate within
the display menu, and use ENTER to select
the item.
cHolding the DISPLAY control on the face-
plate for longer than approximately 2 sec-
onds while in the display menu will reset the
display characteristics to their nominal val-
ues. (Faceplate feature only)
If the DISPLAY control button on the faceplate is
pushed for more than 2 seconds, the media
track/time information will be displayed along the
bottom of the display. Pushing the DISPLAY con-
trol for more than 2 seconds will remove the
media track/time information from the display.
(Faceplate feature only)
NAVIGATION KEYS:
If media is in PLAY mode, activation of the NAVI-
GATION KEYS (Up, Down, Left, and Right) will
perform the following functions: next
chapter/track, previous chapter/track, fast re-
verse and fast forward, and the display will
show
,,andrespec-
tively in the upper left corner of the display for 4
seconds. (Faceplate feature only)
If media is in PAUSE mode, activation of the
NAVIGATION KEYS (Up, Down and Right) will
perform the following functions: next
chapter/track, previous chapter/track and slow
Display screen, heater, air conditioner and audio systems4-59
ZREVIEW COPYÐ2006 Quest(van)
Owners ManualÐUSA_English(nna)
05/27/05Ðtbrooks
X
Page 234 of 352

AUTOMATIC TRANSMISSION
WARNING
cDo not depress the accelerator pedal
while shifting from P (Park) or N (Neu-
tral) to R (Reverse) , or L (Low) . Always
depress the brake pedal until shifting is
completed. Failure to do so could cause
you to lose control and have an
accident.
cCold engine idle speed is high, so use
caution when shifting into a forward or
reverse gear before the engine has
warmed up.
cNever shift to P (Park) or R (Reverse)
while the vehicle is moving. This could
cause an accident.
CAUTION
cWhen stopping the vehicle on an uphill
grade, do not hold the vehicle by de-
pressing the accelerator pedal. The foot
brake should be used for this purpose.
cDo not downshift abruptly on slippery
roads. This may cause a loss of control.
The automatic transmission in your vehicle is
electronically controlled to produce maximum
power and smooth operation.The recommended operating procedures for this
transmission are shown on the following pages.
Follow these procedures for maximum vehicle
performance and driving enjoyment.
Starting the vehicle
1. After starting the engine, fully depress the
foot brake pedal before attempting to move
the shift selector lever out of the P (Park)
position.
2. Keep the foot brake pedal depressed and
move the shift selector lever into a driving
gear.
3. Release the foot brake, then gradually start
the vehicle in motion.
The automatic transmission is designed so
the foot brake pedal MUST be depressed
before shifting from P (Park) to any drive
position while the ignition switch is in the
ON position.
The shift selector lever cannot be moved
out of P (Park) and into any of the other
gear positions if the ignition key is turned
to the LOCK, OFF or ACC position or if the
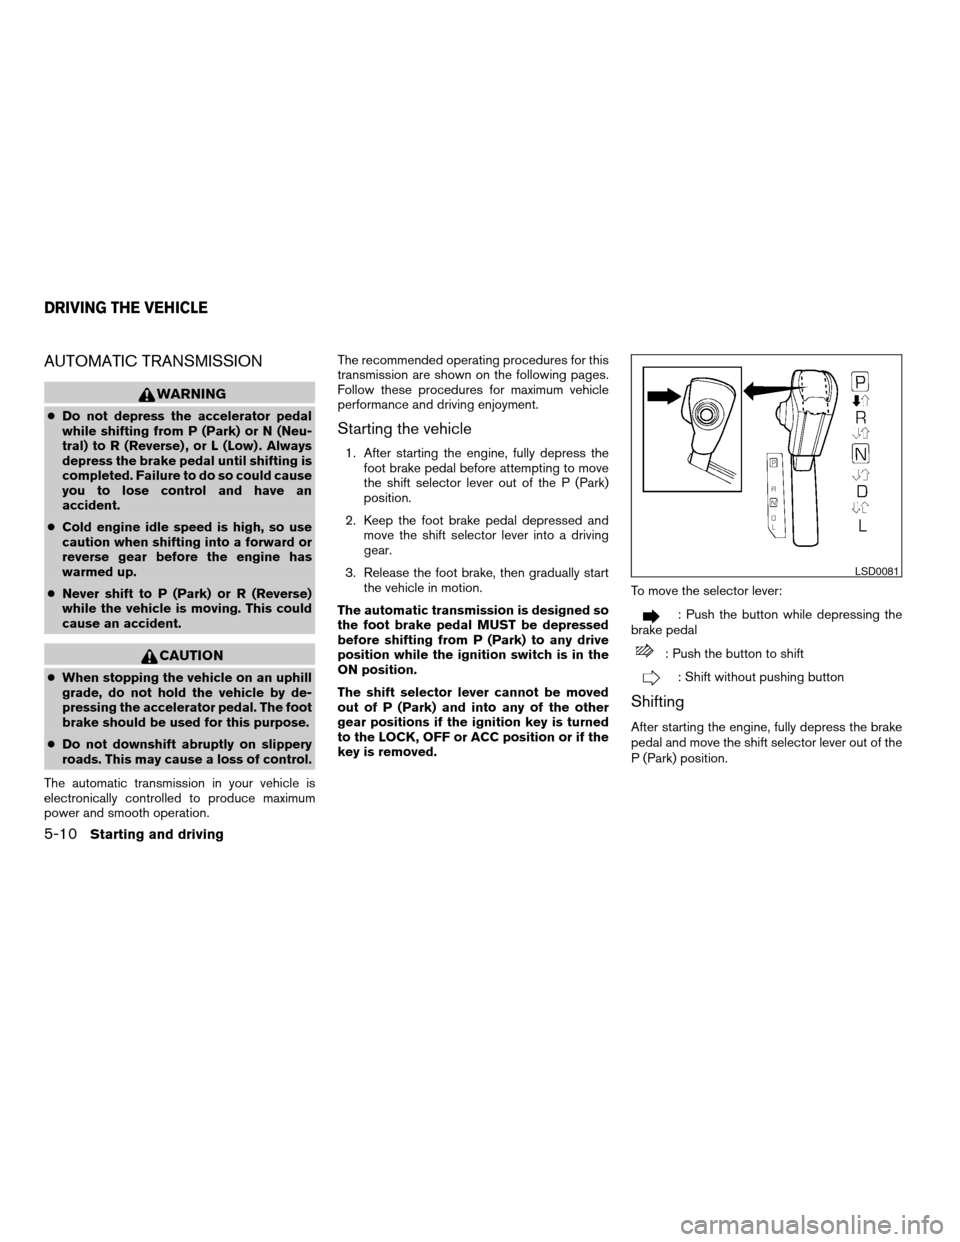
key is removed.To move the selector lever:
: Push the button while depressing the
brake pedal
: Push the button to shift
: Shift without pushing button
Shifting
After starting the engine, fully depress the brake
pedal and move the shift selector lever out of the
P (Park) position.
LSD0081
DRIVING THE VEHICLE
5-10Starting and driving
ZREVIEW COPYÐ2006 Quest(van)
Owners ManualÐUSA_English(nna)
05/27/05Ðtbrooks
X
Page 339 of 352

10 Index
A
Active head restraint...............1-8
Adjusting pedal position............3-20
Air bag
(See supplemental restraint system).....1-49
Air bag system
Front (See supplemental front impact
air bag system)...............1-55
Side and curtain (See supplemental side
air bag and curtain side-impact air bag
system)...................1-60
Air bag warning labels.............1-63
Air bag warning light...........1-63, 2-11
Air cleaner housing filter............8-17
Air conditioner
Air conditioner operation..........4-30
Air conditioner service...........4-40
Air conditioner specification label.....9-11
Air conditioner system refrigerant and oil
recommendations..............9-6
Heater and air conditioner
controls................4-28, 4-37
Rear seat air conditioner..........4-40
Servicing air conditioner..........4-40
Air flow charts..................4-31
Alarm system
(See vehicle security system).........2-14
Anchor point locations.............1-39
Antenna.....................4-54
Anti-lock brake system (ABS).........5-19Anti-lock brake warning light..........2-8
Audible reminders................2-14
Audio system..................4-41
AM-FM-SAT radio with compact disc
(CD) changer................4-44
AM-FM-SAT radio with compact disc
(CD) player.................4-44
Compact Disc (CD) changer.......4-49
Compact disc (CD) player.........4-47
Radio....................4-41
Rear audio controls.............4-53
Steering wheel audio control switch. . . .4-51
Autolight switch.................2-20
Automatic
Automatic drive positioner.........3-24
Automatic power window switch.....2-41
Automatic transmission fluid (ATF). . . .8-11
Automatic transmission position indicator
light.....................2-11
Driving with automatic transmission. . . .5-10
Transmission selector lever lock release .5-12
Automatic anti-glare inside mirror.......3-22
B
Battery......................8-14
Charge warning light.............2-8
Before starting the engine............5-9
Belts (See drive belts).............8-16
Bench seat adjustment (3rd row). . . .1-8, 1-12
Booster seats..................1-44Brake
Anti-lock brake system (ABS).......5-19
Brake booster................8-23
Brake fluid..................8-13
Brake light (See stop light).........8-28
Brake pedal.................8-22
Brake system................5-18
Brake warning light..............2-8
Brake wear indicators........2-14, 8-22
Parking brake check............8-22
Parking brake operation..........5-13
Self-adjusting brakes............8-22
Break-in schedule................5-16
Brightness control
Instrument panel..............2-22
Brightness/Contrast button. . . .4-7, 4-15, 4-25
Control panel buttons.....4-7, 4-15, 4-25
Bulb check/instrument panel..........2-7
Bulb replacement................8-28
C
Capacities and recommended
fuel/lubricants...................9-2
Captain’s chair adjustment (2nd row)......1-6
Car phone or CB radio.............4-64
Cargo (See vehicle loading information) . . .9-12
CD care and cleaning.............4-51
CD changer (See audio system)........4-49
CD player (See audio system).........4-47
Child restraint with top tether strap......1-38
ZREVIEW COPYÐ2006 Quest(van)
Owners ManualÐUSA_English(nna)
05/27/05Ðtbrooks
X
Page 344 of 352

Precautions when starting and driving . . .5-2
Push starting.................6-9
Starting the engine..............5-9
Startup Screen
Control panel buttons...........4-17
Startup screen display.............4-17
Steering
Power steering fluid.............8-13
Power steering system...........5-18
Tilting steering wheel............3-20
Steering wheel audio control switch......4-51
Stop light....................8-28
Storage.....................2-27
Storage bin.........2-30, 2-34, 2-37, 2-38
Storage compartment.............2-28
Storage tray...............2-28, 2-29
Sun visors....................3-21
Sunglasses case................2-31
Sunglasses holder...............2-31
Sunroof.....................2-43
Supplemental air bag warning labels.....1-63
Supplemental air bag warning light . . .1-63, 2-11
Supplemental front impact air bag system . .1-55
Supplemental restraint system
Information and warning labels.......1-63
Precautions on supplemental restraint
system....................1-49
Supplemental restraint system
(Supplemental air bag system).........1-49
Supplemental side and curtain side-impact
air bag system..................1-60
Switch
Autolight switch...............2-20
Automatic power window switch.....2-41
Fog light switch...............2-22
Hazard warning flasher switch.......2-23Headlight and turn signal switch......2-19
Headlight control switch..........2-19
Ignition switch................5-7
Lights on demand switch..........2-44
Main ON/OFF switch
(for power doors)...........3-6, 3-14
Overdrive switch..............5-13
Power door lock switch...........3-5
Rear sonar system off switch.......2-25
Rear window and outside mirror defroster
switch....................2-18
Rear window wiper and washer
switches...................2-17
Traction control system (TCS) off
switch....................2-25
Turn signal switch..............2-22
Vehicle dynamic control (VDC) off
switch....................2-25
Windshield wiper and washer switch . . .2-16
T
Tachometer....................2-4
Temperature gauge
Engine coolant temperature gauge.....2-5
Theft (NISSAN vehicle immobilizer system) ,
engine start..............2-15, 3-2, 5-8
Third row bench seat adjustment.....1-8, 1-12
Three-way catalyst................5-2
Tilting steering wheel..............3-20
Tire
Flat tire....................6-2
Spare tire................6-4, 8-44
Tire chains..................8-41
Tire placard.................9-11Tire pressure................8-32
Tire rotation.................8-41
Types of tires................8-39
Uniform tire quality grading.........9-19
Wheels and tires..............8-32
Wheel/tire size................9-8
Tire pressure
Low tire pressure warning light.......2-9
Tire pressure display.....4-5, 4-5, 4-11, 4-19
Tire pressure monitoring system......5-3, 5-5
Tire rotation maintenance reminder. . . .4-5, 4-5,
4-11, 4-19
Top tether strap child restraint.........1-38
Towing
Flat towing..................9-19
Tow truck towing..............6-10
Towing load/specification.........9-16
Trailer towing................9-15
Traction control system (TCS) off switch . . .2-25
Transceiver
HomeLinkTUniversal Transceiver.....2-47
Transmission
Automatic transmission fluid (ATF). . . .8-11
Driving with automatic transmission. . . .5-10
Selector lever lock release.........5-12
Travel (See registering your vehicle in another
country)......................9-9
TRIP button..............4-3, 4-9, 4-17
Trip button
Control panel buttons......4-3, 4-9, 4-17
Trip odometer...................2-4
Turn signal switch................2-22
10-6
ZREVIEW COPYÐ2006 Quest(van)
Owners ManualÐUSA_English(nna)
05/27/05Ðtbrooks
X