2006 NISSAN QUEST climate control
[x] Cancel search: climate controlPage 12 of 352

1. Ventilators (P. 4-27)
2. Headlight/fog light (if so equipped)/turn
signal switch (P. 2-19)
3. Steering wheel switch for audio control
(if so equipped) (P. 4-51)
4. Driver supplemental air bag/horn
(P. 1-49, P. 2-24)
5. Cruise control main/set switches
(P. 5-14)
6. Windshield wiper/washer switch and
rear window wiper/washer switch
(P. 2-16, 2-17)
7. Meters and gauges (P. 2-3)
8. Display screen/Navigation system*
(P. 4-2, 4-8 &4-16 )
9. Warning/indicator lights (P. 2-7)
10. Front passenger supplemental air bag
(P. 1-49)
11. Glove box (P. 2-31)
12. Climate controls (P. 4-28, 4-37)
13. Hazard warning flasher switch (P. 2-23)
14. Audio system controls (P. 4-41)
15. Display screen/Navigation system*
controls (P. 4-2)
16. Shift selector lever (P. 5-10)
17. Tilt steering wheel controls (P. 3-20)
WIC0837
INSTRUMENT PANEL
0-6Illustrated table of contents
ZREVIEW COPYÐ2006 Quest(van)
Owners ManualÐUSA_English(nna)
05/27/05Ðtbrooks
X
Page 84 of 352

1. Ventilators (P. 4-27)
2. Headlight/fog light (if so equipped)/turn
signal switch (P. 2-19)
3. Steering wheel switch for audio control
(if so equipped) (P. 4-51)
4. Driver supplemental air bag/horn
(P. 1-49, P. 2-24)
5. Cruise control main/set switches
(P. 5-14)
6. Windshield wiper/washer switch and
rear window wiper/washer switch
(P. 2-16, 2-17)
7. Meters and gauges (P. 2-3)
8. Display screen/Navigation system*
(P. 4-8, P. 4-2, P. 4-16)
9. Warning/indicator lights (P. 2-7)
10. Front passenger supplemental air bag
(P. 1-49)
11. Glove box (P. 2-31)
12. Climate controls (P. 4-28, 4-37)
13. Hazard warning flasher switch (P. 2-23)
14. Audio system controls (P. 4-41)
15. Display screen/Navigation system*
controls (P. 4-8, P. 4-2, P. 4-16)
16. Shift selector lever (P. 5-10)
17. Tilt steering wheel control (P. 3-20)
WIC0837
INSTRUMENT PANEL
2-2Instruments and controls
ZREVIEW COPYÐ2006 Quest(van)
Owners ManualÐUSA_English(nna)
05/27/05Ðtbrooks
X
Page 168 of 352

When you use this system, make sure the engine
is running.
If you use the system with the engine not
running (ignition ON or ACC) for a long
time, it will use up all the battery power,
and the engine will not start.
Reference symbols:
“ENTER”button — This is a button on the con-
trol panel.
“Display”key — This is a select key on the
screen. By selecting this key you can proceed to
the next function.NAMES OF THE COMPONENTS
1.brightness control button (P. 4-25)
2. BACK (previous) button (P. 4-3)
3. Joystick and ENTER push button (P. 4-16)
4. SETTING button (P. 4-20)
5.
(maintenance) button (P. 4-5)
6. TRIP drive computer button (P. 4-3)
7. E/M (English/Metric) button (P. 4-4)
8. FUEL ECON button (P. 4-4)
9. TRIP RESET button (P. 4-3)10. Clock adjust button (hours/minutes) (P. 4-4)
HOW TO USE JOYSTICK AND
“ENTER” BUTTON
Choose an item on the display using the joystick
and push the“ENTER”button for operation.
HOW TO USE “BACK” BUTTON
This button has two functions.
cGo back to the previous display (cancel) .
If you press the“BACK”button during setup, the
setup will be canceled and/or the display will
return to the previous screen.
cFinish setup.
If you press this button after the setup is com-
pleted, the setup will start over, and the display
will return to the climate control or audio mode
and Navigation screen.
Display screen without navigation
LHA0589
CONTROL PANEL BUTTONS —
COLOR SCREEN WITHOUT
NAVIGATION SYSTEM
4-8Display screen, heater, air conditioner and audio systems
ZREVIEW COPYÐ2006 Quest(van)
Owners ManualÐUSA_English(nna)
05/27/05Ðtbrooks
X
Page 176 of 352

When you use this system, make sure the engine
is running.
If you use the system with the engine not
running (ignition ON or ACC) for a long
time, it will use up all the battery power,
and the engine will not start.
Reference symbols:
“ENTER”button — This is a button on the con-
trol panel.
“Display”key — This is a select key on the
screen. By selecting this key you can proceed to
the next function.NAMES OF THE COMPONENTS
1.brightness control button (P. 4-25)
2. BACK (previous) button (P. 4-8)
3. Joystick and ENTER push button (P. 4-8)
4. SETTING button (P. 4-20)
5. TRIP drive computer button (P. 4-17)
6. DEST button*
7. MAP button*
8. ROUTE button*
9. GUIDE VOICE button*10. Zoom in button*
11. Zoom out button*
*For Navigation system control buttons, refer to
the separate Navigation System Owner’s
Manual.
HOW TO USE JOYSTICK AND
“ENTER” BUTTON
Choose an item on the display using the joystick
and push the“ENTER”button for operation.
HOW TO USE “BACK” BUTTON
This button has two functions.
cGo back to the previous display (cancel) .
If you press the“BACK”button during setup, the
setup will be canceled and/or the display will
return to the previous screen.
cFinish setup.
If you press this button after the setup is com-
pleted, the setup will start over, and the display
will return to the climate control or audio mode
and Navigation screen.
Display screen with navigation
LHA0551
CONTROL PANEL BUTTONS —
COLOR SCREEN WITH NAVIGATION
SYSTEM
4-16Display screen, heater, air conditioner and audio systems
ZREVIEW COPYÐ2006 Quest(van)
Owners ManualÐUSA_English(nna)
05/27/05Ðtbrooks
X
Page 197 of 352

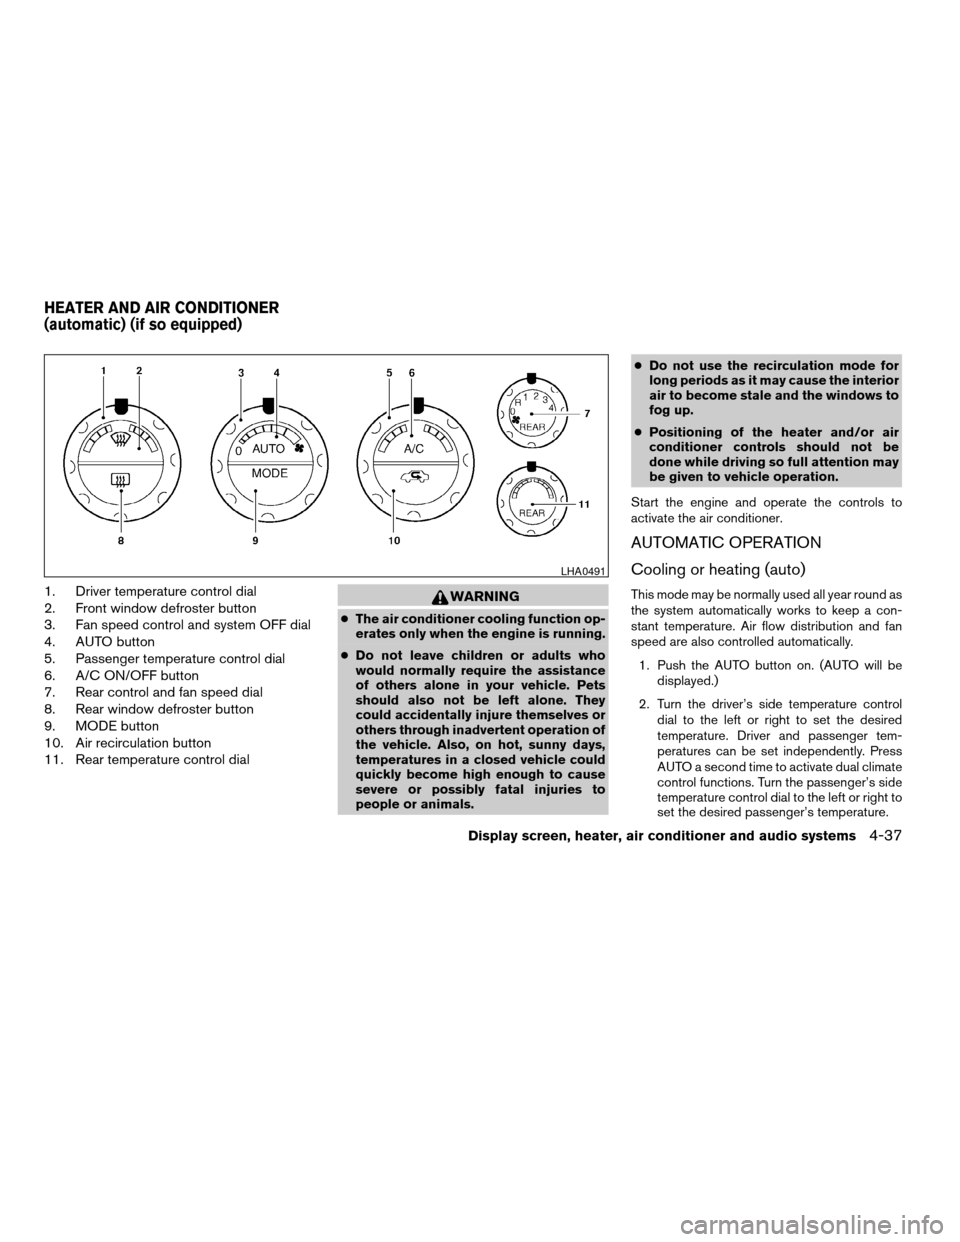
1. Driver temperature control dial
2. Front window defroster button
3. Fan speed control and system OFF dial
4. AUTO button
5. Passenger temperature control dial
6. A/C ON/OFF button
7. Rear control and fan speed dial
8. Rear window defroster button
9. MODE button
10. Air recirculation button
11. Rear temperature control dialWARNING
cThe air conditioner cooling function op-
erates only when the engine is running.
cDo not leave children or adults who
would normally require the assistance
of others alone in your vehicle. Pets
should also not be left alone. They
could accidentally injure themselves or
others through inadvertent operation of
the vehicle. Also, on hot, sunny days,
temperatures in a closed vehicle could
quickly become high enough to cause
severe or possibly fatal injuries to
people or animals.cDo not use the recirculation mode for
long periods as it may cause the interior
air to become stale and the windows to
fog up.
cPositioning of the heater and/or air
conditioner controls should not be
done while driving so full attention may
be given to vehicle operation.
Start the engine and operate the controls to
activate the air conditioner.
AUTOMATIC OPERATION
Cooling or heating (auto)
This mode may be normally used all year round as
the system automatically works to keep a con-
stant temperature. Air flow distribution and fan
speed are also controlled automatically.
1. Push the AUTO button on. (AUTO will be
displayed.)
2. Turn the driver’s side temperature control
dial to the left or right to set the desired
temperature. Driver and passenger tem-
peratures can be set independently. Press
AUTO a second time to activate dual climate
control functions. Turn the passenger’s side
temperature control dial to the left or right to
set the desired passenger’s temperature.
LHA0491
HEATER AND AIR CONDITIONER
(automatic) (if so equipped)
Display screen, heater, air conditioner and audio systems4-37
ZREVIEW COPYÐ2006 Quest(van)
Owners ManualÐUSA_English(nna)
05/27/05Ðtbrooks
X
Page 199 of 352

1. Rear fan speed control dial.
2. Rear temperature control dial.
REAR CONTROL DIAL
You can adjust the climate control system for rear
seat passengers using the dials on the main
control panel. Front passengers can control the
rear functions by placing the controls on any
setting other than the “R”.
OPERATING TIPS
cWhen the engine coolant temperature and
outside air temperature are low, the air flow
from the foot outlets may not operate for a
maximum of 150 seconds. However, this is
not a malfunction. After the coolant tempera-
ture warms up, air flow from the foot outlets
will operate normally.
The sunload sensor
s1, located on the top center
of the instrument panel, helps the system main-
tain a constant temperature. Do not put anything
on or around this sensor.
WHA0509LIC0515
Display screen, heater, air conditioner and audio systems4-39
ZREVIEW COPYÐ2006 Quest(van)
Owners ManualÐUSA_English(nna)
05/27/05Ðtbrooks
X
Page 333 of 352

also pass the other vehicle before you can
safely change lanes.
cTo maintain engine braking efficiency and
electrical charging performance, do not use
5th gear (manual transmission) or overdrive
(automatic transmission) .
cAvoid holding the brake pedal down too long
or too frequently. This could cause the
brakes to overheat, resulting in reduced
braking efficiency.
cIncrease your following distance to allow for
greater stopping distances while towing a
trailer. Anticipate stops and brake gradually.
cDo not use cruise control while towing a
trailer.
cCheck your hitch, trailer wiring harness con-
nections, and trailer wheel lug nuts after 50
miles (80 km) of travel and at every break.
cWhen stopped in traffic for long periods of
time in hot weather, put the vehicle in the P
(Park) position.
When towing a trailer, transmission
oil/fluid should be changed more fre-
quently. For additional information, see the
“Maintenance and do-it-yourself” section
earlier in this manual.FLAT TOWING
Towing your vehicle with all four wheels on the
ground is sometimes called flat towing. This
method is sometimes used when towing a vehicle
behind a recreational vehicle, such as a motor
home.
CAUTION
cFailure to follow these guidelines can
result in severe transmission damage.
cWhenever flat towing your vehicle, al-
ways tow forward, never backward.
cDO NOT tow any automatic transmis-
sion vehicle with all four wheels on the
ground (flat towing) . Doing so WILL
DAMAGE internal transmission parts
due to lack of transmission lubrication.
cFor emergency towing procedures refer
to “Towing recommended by NISSAN”
in the “In case of emergency” section of
this manual.
Automatic Transmission
To tow a vehicle equipped with an automatic
transmission, an appropriate vehicle dollyMUST
be placed under the towed vehicle’s drive
wheels.Alwaysfollow the dolly manufacturer’s
recommendations when using their product.DOT (Department of Transportation) Quality
Grades: All passenger car tires must conform to
federal safety requirements in addition to these
grades.
Quality grades can be found where applicable on
the tire sidewall between tread shoulder and
maximum section width. For example:
Treadwear 200 Traction AA Temperature A
Treadwear
Treadwear grade is a comparative rating based
on tire wear rate when tested under controlled
conditions on specified government test courses.
For example, a tire graded 150 would wear one
and a half (1-1/2) times as well on the govern-
ment course as a tire graded 100. However,
relative tire performance depends on actual driv-
ing conditions, and may vary significantly due to
variations in driving habits, service practices and
differences in road characteristics and climate.
Traction AA, A, B and C
The traction grades, from highest to lowest, are
AA, A, B, and C. Those grades represent the
tire’s ability to stop on wet pavement as mea-
sured under controlled conditions on specified
government test surfaces of asphalt and con-
crete. A tire marked C may have poor traction
performance.
UNIFORM TIRE QUALITY GRADING
Technical and consumer information9-19
ZREVIEW COPYÐ2006 Quest(van)
Owners ManualÐUSA_English(nna)
05/27/05Ðtbrooks
X
Page 352 of 352

1. Engine oil 8-8
2. Window washer fluid 8-14
3. Engine coolant 8-7
4. Power steering fluid 8-13
5. Meters and gauges 2-3
6. Audio system 4-41; Climate controls 4-28,
4-37
7. Spare tire 6-2
8. Fuel-filler door release 3-18; Fuel recom-
mendation 9-3
9. Keys 3-2
10. Seat belts 1-15
11. Front seats 1-2
12. Hood release 3-13
13. Brake fluid 8-13
14. Battery 8-14
15. Automatic transmission fluid 8-11, 8-12
LGS0019
QUICK REFERENCE
10-14Filling information
ZmaxÐnna -
Owners ManualÐUSA_English(nna)
05/27/05Ðtbrooks
X