Page 859 of 1226

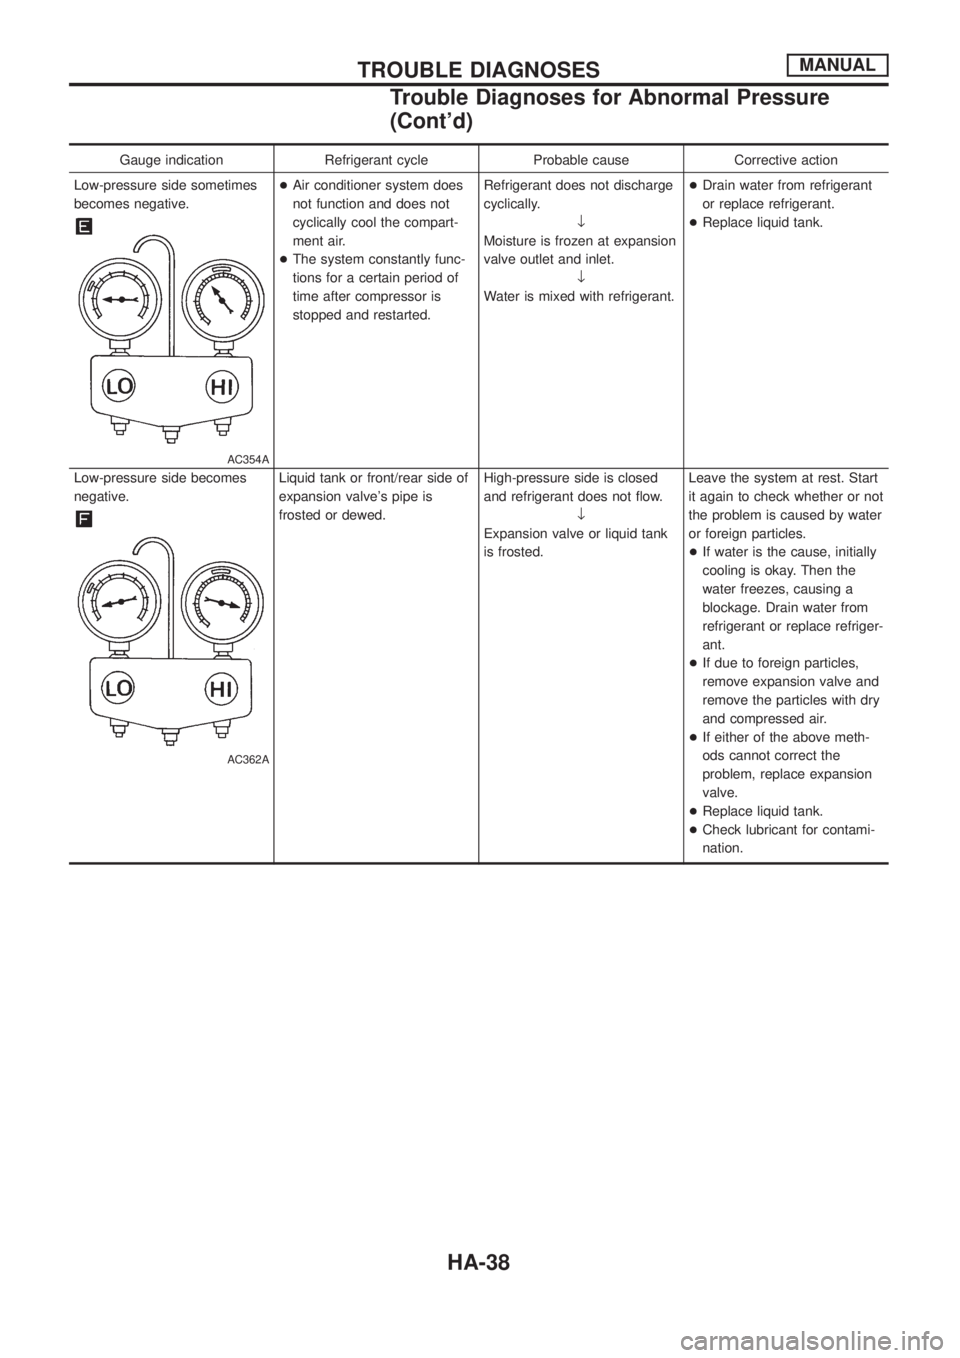
Gauge indication Refrigerant cycle Probable cause Corrective action
Low-pressure side sometimes
becomes negative.
AC354A
+Air conditioner system does
not function and does not
cyclically cool the compart-
ment air.
+The system constantly func-
tions for a certain period of
time after compressor is
stopped and restarted.Refrigerant does not discharge
cyclically.
¯
Moisture is frozen at expansion
valve outlet and inlet.
¯
Water is mixed with refrigerant.+Drain water from refrigerant
or replace refrigerant.
+Replace liquid tank.
Low-pressure side becomes
negative.
AC362A
Liquid tank or front/rear side of
expansion valve's pipe is
frosted or dewed.High-pressure side is closed
and refrigerant does not ¯ow.
¯
Expansion valve or liquid tank
is frosted.Leave the system at rest. Start
it again to check whether or not
the problem is caused by water
or foreign particles.
+If water is the cause, initially
cooling is okay. Then the
water freezes, causing a
blockage. Drain water from
refrigerant or replace refriger-
ant.
+If due to foreign particles,
remove expansion valve and
remove the particles with dry
and compressed air.
+If either of the above meth-
ods cannot correct the
problem, replace expansion
valve.
+Replace liquid tank.
+Check lubricant for contami-
nation.
TROUBLE DIAGNOSESMANUAL
Trouble Diagnoses for Abnormal Pressure
(Cont'd)
HA-38
Page 935 of 1226

Maintenance of Lubricant Quantity in
Compressor
The lubricant used to lubricate the compressor circulates through
the system with the refrigerant. Add lubricant to compressor when
replacing any component or after a large gas leakage occurred. It
is important to maintain the speci®ed amount.
If lubricant quantity is not maintained properly, the following mal-
functions may result:
+Lack of lubricant: May lead to a seized compressor
+Excessive lubricant: Inadequate cooling (thermal exchange
interference)
LUBRICANT
Name: Nissan A/C System Oil Type S
Part number: KLH00-PAGS0
CHECKING AND ADJUSTING
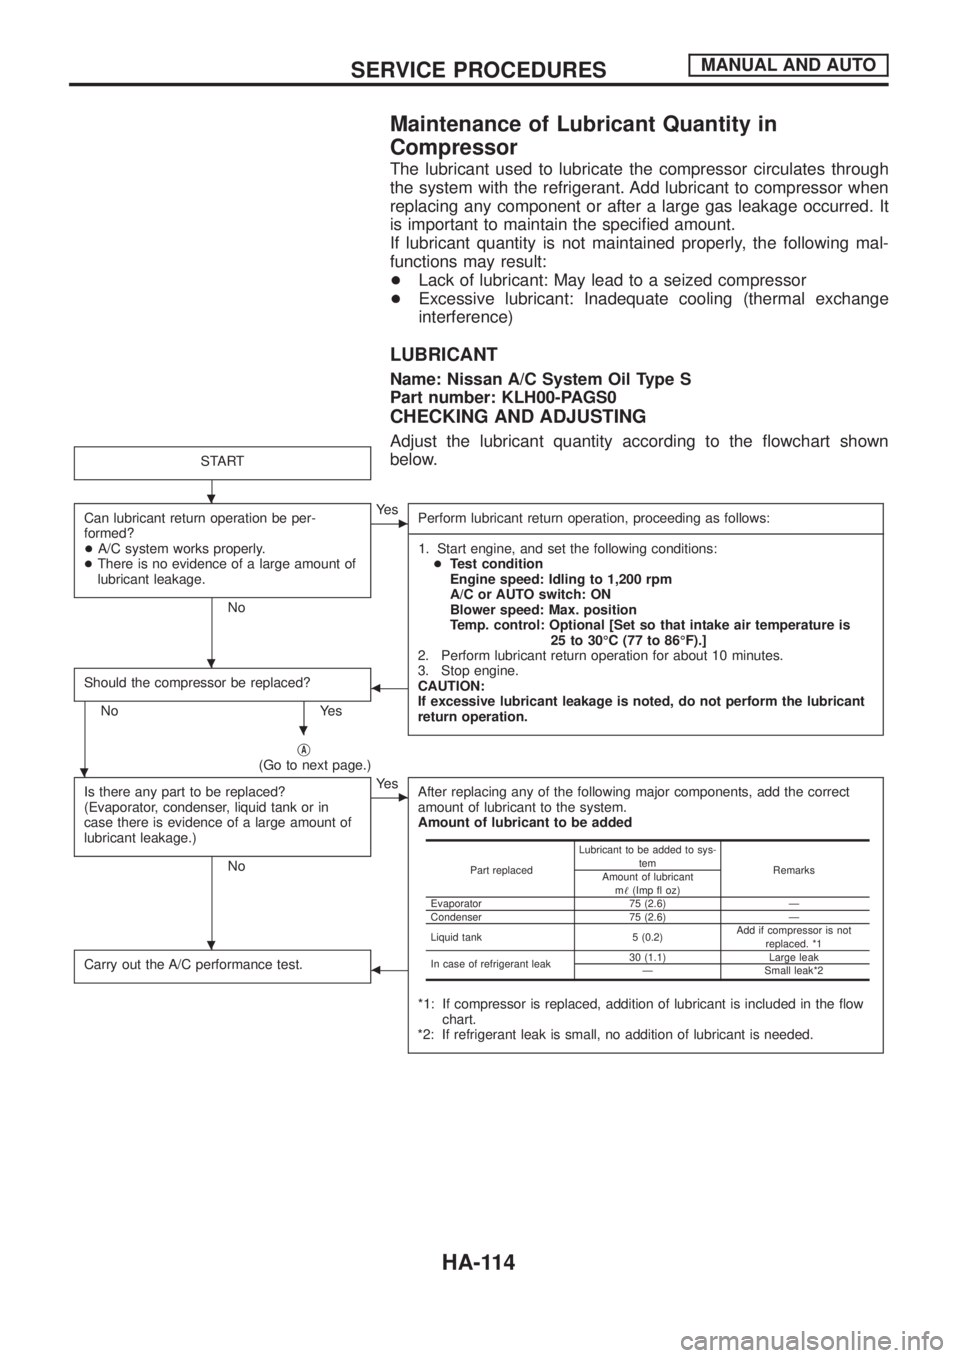
Adjust the lubricant quantity according to the ¯owchart shown
below.
START
Can lubricant return operation be per-
formed?
+A/C system works properly.
+There is no evidence of a large amount of
lubricant leakage.
No
cYe s
Perform lubricant return operation, proceeding as follows:
------------------------------------------------------------------------------------------------------------------------------------------------------------------------------------------------------------------------------------------------------------------------------------------------------------------------------------------------------------------------------------------------------------------------------------------------------------------------------------------------------------------------------------
1. Start engine, and set the following conditions:
+Test condition
Engine speed: Idling to 1,200 rpm
A/C or AUTO switch: ON
Blower speed: Max. position
Temp. control: Optional [Set so that intake air temperature is
25 to 30ÉC (77 to 86ÉF).]
2. Perform lubricant return operation for about 10 minutes.
3. Stop engine.
CAUTION:
If excessive lubricant leakage is noted, do not perform the lubricant
return operation.
Should the compressor be replaced?
No Yes
b
jA(Go to next page.)
Is there any part to be replaced?
(Evaporator, condenser, liquid tank or in
case there is evidence of a large amount of
lubricant leakage.)
No
cYe s
After replacing any of the following major components, add the correct
amount of lubricant to the system.
Amount of lubricant to be added
*1: If compressor is replaced, addition of lubricant is included in the ¯ow
chart.
*2: If refrigerant leak is small, no addition of lubricant is needed.
Carry out the A/C performance test.b
Part replacedLubricant to be added to sys-
tem
Remarks
Amount of lubricant
m!(Imp ¯ oz)
Evaporator 75 (2.6) Ð
Condenser 75 (2.6) Ð
Liquid tank 5 (0.2)Add if compressor is not
replaced. *1
In case of refrigerant leak30 (1.1) Large leak
Ð Small leak*2
.
.
.
.
.
SERVICE PROCEDURESMANUAL AND AUTO
HA-114
Page 936 of 1226

jA
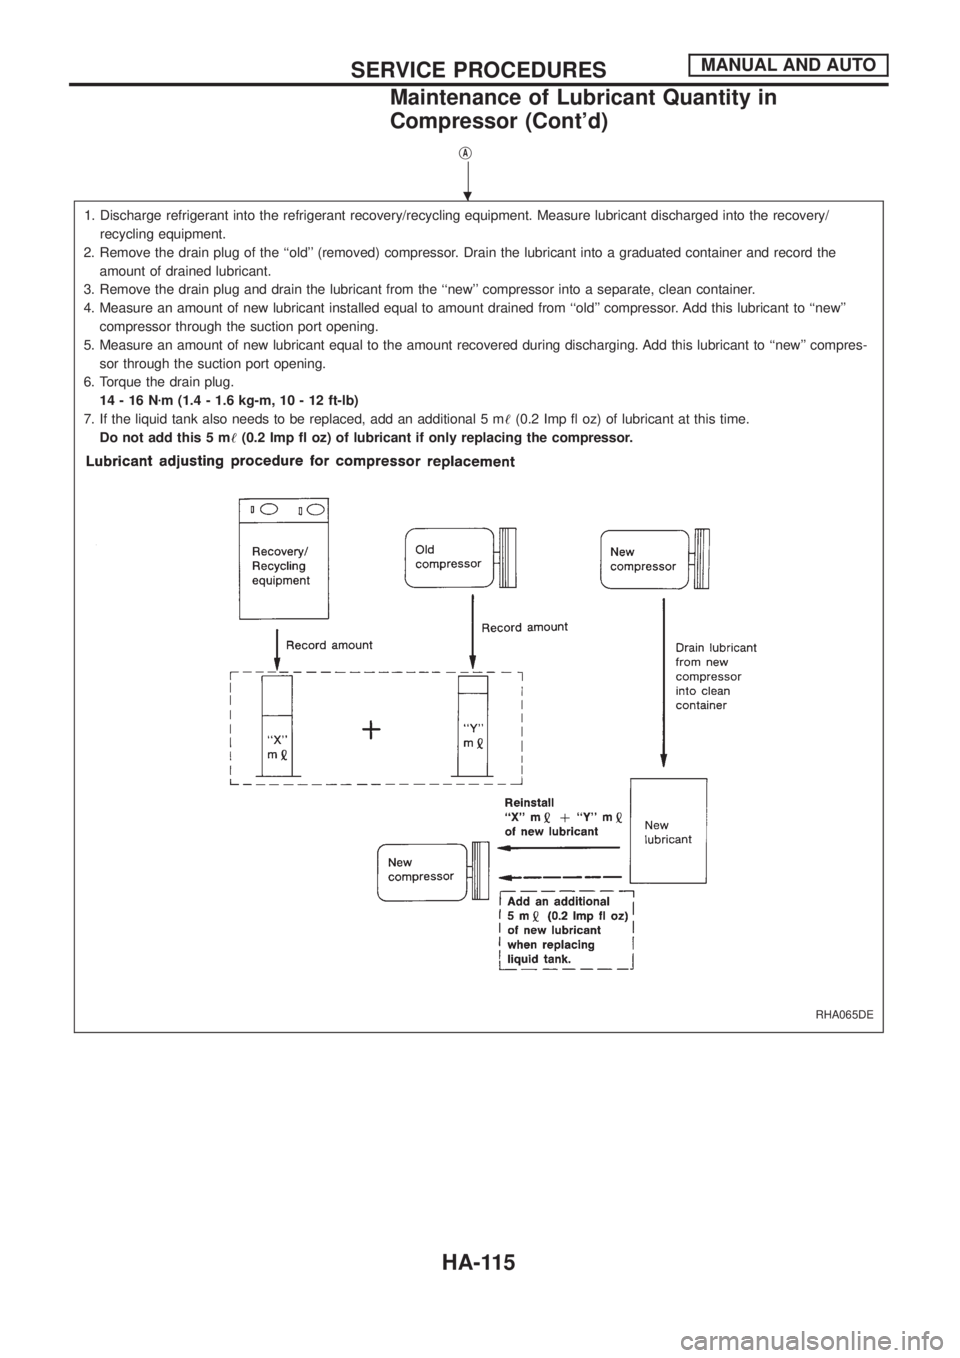
1. Discharge refrigerant into the refrigerant recovery/recycling equipment. Measure lubricant discharged into the recovery/
recycling equipment.
2. Remove the drain plug of the ``old'' (removed) compressor. Drain the lubricant into a graduated container and record the
amount of drained lubricant.
3. Remove the drain plug and drain the lubricant from the ``new'' compressor into a separate, clean container.
4. Measure an amount of new lubricant installed equal to amount drained from ``old'' compressor. Add this lubricant to ``new''
compressor through the suction port opening.
5. Measure an amount of new lubricant equal to the amount recovered during discharging. Add this lubricant to ``new'' compres-
sor through the suction port opening.
6. Torque the drain plug.
14-16Nzm (1.4 - 1.6 kg-m, 10 - 12 ft-lb)
7. If the liquid tank also needs to be replaced, add an additional 5 m!(0.2 Imp ¯ oz) of lubricant at this time.
Do not add this 5 m!(0.2 Imp ¯ oz) of lubricant if only replacing the compressor.
RHA065DE
.
SERVICE PROCEDURESMANUAL AND AUTO
Maintenance of Lubricant Quantity in
Compressor (Cont'd)
HA-115
Page 941 of 1226

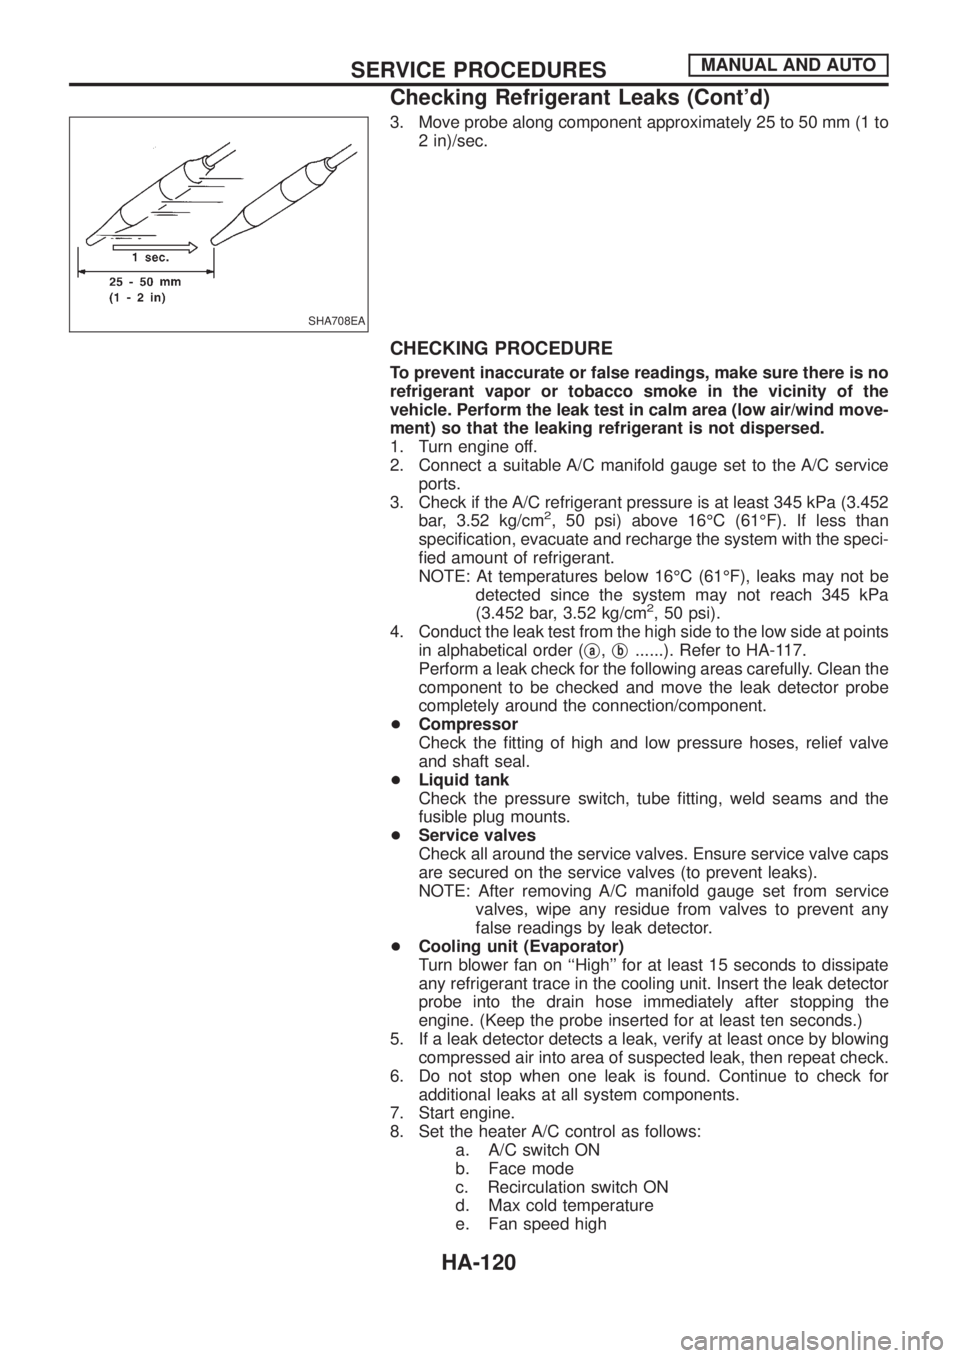
3. Move probe along component approximately 25 to 50 mm (1 to
2 in)/sec.
CHECKING PROCEDURE
To prevent inaccurate or false readings, make sure there is no
refrigerant vapor or tobacco smoke in the vicinity of the
vehicle. Perform the leak test in calm area (low air/wind move-
ment) so that the leaking refrigerant is not dispersed.
1. Turn engine off.
2. Connect a suitable A/C manifold gauge set to the A/C service
ports.
3. Check if the A/C refrigerant pressure is at least 345 kPa (3.452
bar, 3.52 kg/cm
2, 50 psi) above 16ÉC (61ÉF). If less than
speci®cation, evacuate and recharge the system with the speci-
®ed amount of refrigerant.
NOTE: At temperatures below 16ÉC (61ÉF), leaks may not be
detected since the system may not reach 345 kPa
(3.452 bar, 3.52 kg/cm
2, 50 psi).
4. Conduct the leak test from the high side to the low side at points
in alphabetical order (j
a,jb......). Refer to HA-117.
Perform a leak check for the following areas carefully. Clean the
component to be checked and move the leak detector probe
completely around the connection/component.
+Compressor
Check the ®tting of high and low pressure hoses, relief valve
and shaft seal.
+Liquid tank
Check the pressure switch, tube ®tting, weld seams and the
fusible plug mounts.
+Service valves
Check all around the service valves. Ensure service valve caps
are secured on the service valves (to prevent leaks).
NOTE: After removing A/C manifold gauge set from service
valves, wipe any residue from valves to prevent any
false readings by leak detector.
+Cooling unit (Evaporator)
Turn blower fan on ``High'' for at least 15 seconds to dissipate
any refrigerant trace in the cooling unit. Insert the leak detector
probe into the drain hose immediately after stopping the
engine. (Keep the probe inserted for at least ten seconds.)
5. If a leak detector detects a leak, verify at least once by blowing
compressed air into area of suspected leak, then repeat check.
6. Do not stop when one leak is found. Continue to check for
additional leaks at all system components.
7. Start engine.
8. Set the heater A/C control as follows:
a. A/C switch ON
b. Face mode
c. Recirculation switch ON
d. Max cold temperature
e. Fan speed high
SHA708EA
SERVICE PROCEDURESMANUAL AND AUTO
Checking Refrigerant Leaks (Cont'd)
HA-120
Page 957 of 1226
Special Service Tools*: Special tool or commercial equivalent
Tool number
Tool nameDescription
ST25051001*
Oil pressure gauge
NT558
Measuring oil pressure
Maximum measuring range:
2,452 kPa (24.5 bar, 25
kg/cm
2, 356 psi)
ST25052000*
Hose
NT559
Adapting oil pressure gauge
to cylinder block
EG17650301
Radiator cap tester
adapter
NT564
Adapting radiator cap tester
to radiator ®ller neck
a: 28 (1.10) dia.
b: 31.4 (1.236) dia.
c: 41.3 (1.626) dia.
Unit: mm (in)
KV99103510
Radiator plate pliers A
NT224
Installing radiator upper and
lower tanks
KV99103520
Radiator plate pliers B
NT225
Removing radiator upper and
lower tanks
WS39930000
Tube presser
NT052
Pressing the tube of liquid gas-
ket
PRECAUTIONS AND PREPARATION
LC-2
Page 969 of 1226
Radiator
REMOVAL AND INSTALLATION
1. Remove under cover.
2. Drain coolant from radiator drain plug.
3. Disconnect radiator upper and lower hoses.
4. Remove radiator lower shroud.
5. Disconnect reservoir tank hose.
6. Remove radiator.
7. After repairing or replacing radiator, install any part removed in
reverse order of removal.
Re®lling Engine Coolant
For details on re®lling engine coolant, refer to MA section (``REFILL-
ING ENGINE COOLANT'', ``Changing Engine Coolant'').
SLC198B
ENGINE COOLING SYSTEM
LC-14
Page 971 of 1226
Radiator (Aluminum type)
Aluminum radiator can be disassembled by using special proce-
dures and special service tools.
DISASSEMBLY
1. Remove tank with Tool.
+Grip the crimped edge and bend it upwards so that Tool slips
off.
Do not bend excessively.
SLC882AB
SLC903
SLC893
ENGINE COOLING SYSTEM
LC-16
Page 972 of 1226
+In areas where Tool cannot be used, use a screwdriver to bend
the edge up.
Be careful not to damage tank.
2. Make sure the edge stands straight up.
3. Remove oil cooler from tank. (A/T model only)
ASSEMBLY
1. Install oil cooler.
Pay attention to direction of conical washer.
2. Clean contact portion of tank.
3. Install sealing rubber.
Push it in with ®ngers.
Be careful not to twist sealing rubber.
SLC908A
SLC931
SLC894
SLC932
SLC917A
ENGINE COOLING SYSTEM
Radiator (Aluminum type) (Cont'd)
LC-17