2006 NISSAN PATHFINDER Drive
[x] Cancel search: DrivePage 133 of 344

3 Pre-driving checks and adjustments
Keys .............................................3-2
Nissan vehicle immobilizer system keys...........3-2
Doors............................................3-3
Locking with key................................3-3
Locking with inside lock knob....................3-3
Locking with power door lock switch.............3-4
Child safety rear door lock.......................3-4
Remote keyless entry system.......................3-5
How to use remote keyless entry system..........3-5
Hood............................................3-8
Lift gate..........................................3-8
Lift gate release................................3-9
Glass hatch.......................................3-9
Fuel-filler door...................................3-10
Opening the fuel-filler lid.......................3-10Fuel-filler cap.................................3-10
Steering wheel...................................3-12
Tilt operation..................................3-12
Pedal position adjustment (if so equipped)..........3-12
Sun visors.......................................3-13
Vanity mirrors.................................3-13
Mirrors..........................................3-14
Rearview mirror (if so equipped).................3-14
Automatic anti-glare rearview mirror
(if so equipped)...............................3-14
Outside mirrors...............................3-16
Automatic drive positioner (if so equipped)..........3-17
Memory storage function.......................3-17
Entry/exit function.............................3-18
System operation..............................3-19
ZREVIEW COPYÐ2006 Pathfinder(pat)
Owners ManualÐUSA_English(nna)
07/29/05Ðcathy
X
Page 134 of 344

1. Two master keys (black) with transpon-
der chip and chrome NISSAN brand
symbol on one side
2. Valet key (black) with transponder chip
3. Key number plate
4. Transponder chip
A key number plate is supplied with your keys.
Record the key number and keep it in a safe place
(such as your wallet) , not in the vehicle. If you lose
your keys, see a NISSAN dealer for duplicates by
using the key number. NISSAN does not record
key numbers so it is very important to keep track
of your key number plate.A key number is only necessary when you have
lost all keys and do not have one to duplicate
from. If you still have a key, your NISSAN dealer
can duplicate it.
NISSAN VEHICLE IMMOBILIZER
SYSTEM KEYS
You can only drive your vehicle using the master
or valet keys which are registered to the NISSAN
Vehicle Immobilizer System components in your
vehicle. These keys have a transponder chip in
the key head.
The master key can be used for all the locks.
The valet key cannot be used for the glove box
lock.
To protect belongings when you leave a key with
someone, give them the valet key only.
Never leave these keys in the vehicle.
Additional or replacement keys:
If you still have a key, the key number is not
necessary when you need extra NISSAN Vehicle
Immobilizer System keys. Your dealer can dupli-
cate your existing key. As many as five NISSAN
Vehicle Immobilizer System keys can be used
with one vehicle. You should bring all NISSAN
Vehicle Immobilizer System keys that you have to
your NISSAN dealer for registration. This is be-cause the registration process will erase the
memory of all key codes previously registered
into the NISSAN Vehicle Immobilizer System.
After the registration process, these components
will only recognize keys coded into the NISSAN
Vehicle Immobilizer System during registration.
Any key that is not given to your dealer at the time
of registration will no longer be able to start your
vehicle.
Do not allow the immobilizer system key, which
contains an electrical transponder, to come into
contact with salt water. This could affect system
function.
WPD0128
KEYS
3-2Pre-driving checks and adjustments
ZREVIEW COPYÐ2006 Pathfinder(pat)
Owners ManualÐUSA_English(nna)
07/29/05Ðcathy
X
Page 135 of 344

WARNING
cAlways have the doors locked while
driving. Along with the use of seat belts,
this provides greater safety in the event
of an accident by helping to prevent
persons from being thrown from the
vehicle. This also helps keep children
and others from unintentionally open-
ing the doors, and will help keep out
intruders.
cBefore opening any door, always look
for and avoid oncoming traffic.
cDo not leave children unattended inside
the vehicle. They could unknowingly ac-
tivate switches or controls. Unattended
children could become involved in seri-
ous accidents.
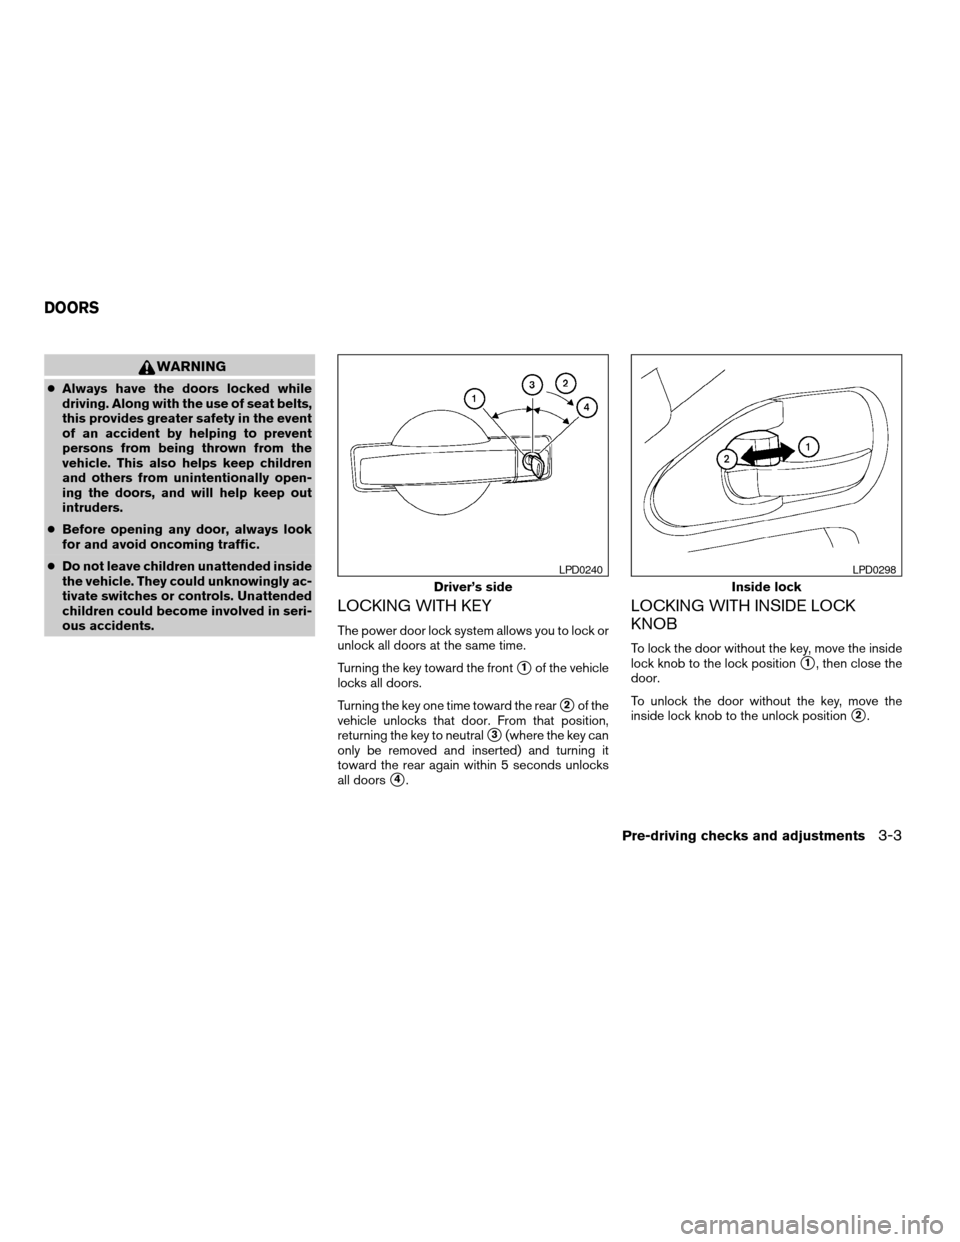
LOCKING WITH KEY
The power door lock system allows you to lock or
unlock all doors at the same time.
Turning the key toward the front
s1of the vehicle
locks all doors.
Turning the key one time toward the rear
s2of the
vehicle unlocks that door. From that position,
returning the key to neutral
s3(where the key can
only be removed and inserted) and turning it
toward the rear again within 5 seconds unlocks
all doors
s4.
LOCKING WITH INSIDE LOCK
KNOB
To lock the door without the key, move the inside
lock knob to the lock position
s1, then close the
door.
To unlock the door without the key, move the
inside lock knob to the unlock position
s2.
Driver’s side
LPD0240
Inside lock
LPD0298
DOORS
Pre-driving checks and adjustments3-3
ZREVIEW COPYÐ2006 Pathfinder(pat)
Owners ManualÐUSA_English(nna)
07/29/05Ðcathy
X
Page 136 of 344

LOCKING WITH POWER DOOR
LOCK SWITCH
To lock all the doors without a key, push the door
lock switch (driver or front passenger side) , to the
lock position
s1. When locking the door this way,
be certain not to leave the key inside the vehicle.
To unlock all the doors without a key, push the
door lock switch (driver or front passenger side)
to the unlock position
s2.
Lockout protection
When the power door lock switch (driver’s or
front passenger’s side) is moved to the lock
position with the key in the ignition and any door
open, all doors will lock and unlock automatically.
This helps to prevent the keys from being acci-
dently locked inside the vehicle.
CHILD SAFETY REAR DOOR LOCK
Child safety locks help prevent the rear doors
from being opened accidentally, especially when
small children are in the vehicle.
The child safety lock levers are located on the
edge of the rear doors.
When the lever is in the lock position, the
door can be opened only from the outside.
Door lock switch
LPD0183LPD0299
3-4Pre-driving checks and adjustments
ZREVIEW COPYÐ2006 Pathfinder(pat)
Owners ManualÐUSA_English(nna)
07/29/05Ðcathy
X
Page 138 of 344

cWhen thebutton is pushed with all
doors locked, the hazard warning lights flash
twice and the horn beeps once as a re-
minder that the doors are already locked.
cIf a door is open and you push the
button, the doors will lock but the horn will
not beep and the hazard warning lights will
not flash.
The horn may or may not beep. For vehicles
without navigation system, refer to “Silencing the
horn beep feature” later in this section. For ve-
hicles with navigation system, refer to “Vehicle
electronic systems” in the “Display screen,
heater, air conditioner and audio systems” sec-
tion later in this manual.
Unlocking doors
Push thebutton on the keyfob once.
cOnly the driver’s door unlocks.
cThe hazard warning lights flash once if all
doors are completely closed with the ignition
key in any position except the ON position.
cThe interior lights turn on and the light timer
activates for 30 seconds when the interior
light switch is in the DOOR position with the
ignition key in any position except the ON
position.Push the
button on the keyfob again within
5 seconds.
cAll doors unlock.
cThe hazard warning lights flash once if all
doors are completely closed.
The interior lights can be turned off without wait-
ing 30 seconds by inserting the key into the
ignition and turning to the ON or START position,
locking the doors with the keyfob or pushing the
interior light switch to the off position.
Auto relock
When thebutton on the keyfob is pushed,
all doors will lock automatically within 1 minute
unless one of the following operations is per-
formed:
cAny door is opened.
cA key is inserted into the ignition switch and
the key is turned from OFF to ON.
Linking the keyfob to automatic drive
positioner memory
If the vehicle is equipped with automatic drive
positioner, the keyfob can be linked to a memory
setting.
See “Automatic driver positioner” later in this
section.
LPD0210
3-6Pre-driving checks and adjustments
ZREVIEW COPYÐ2006 Pathfinder(pat)
Owners ManualÐUSA_English(nna)
07/29/05Ðcathy
X
Page 140 of 344

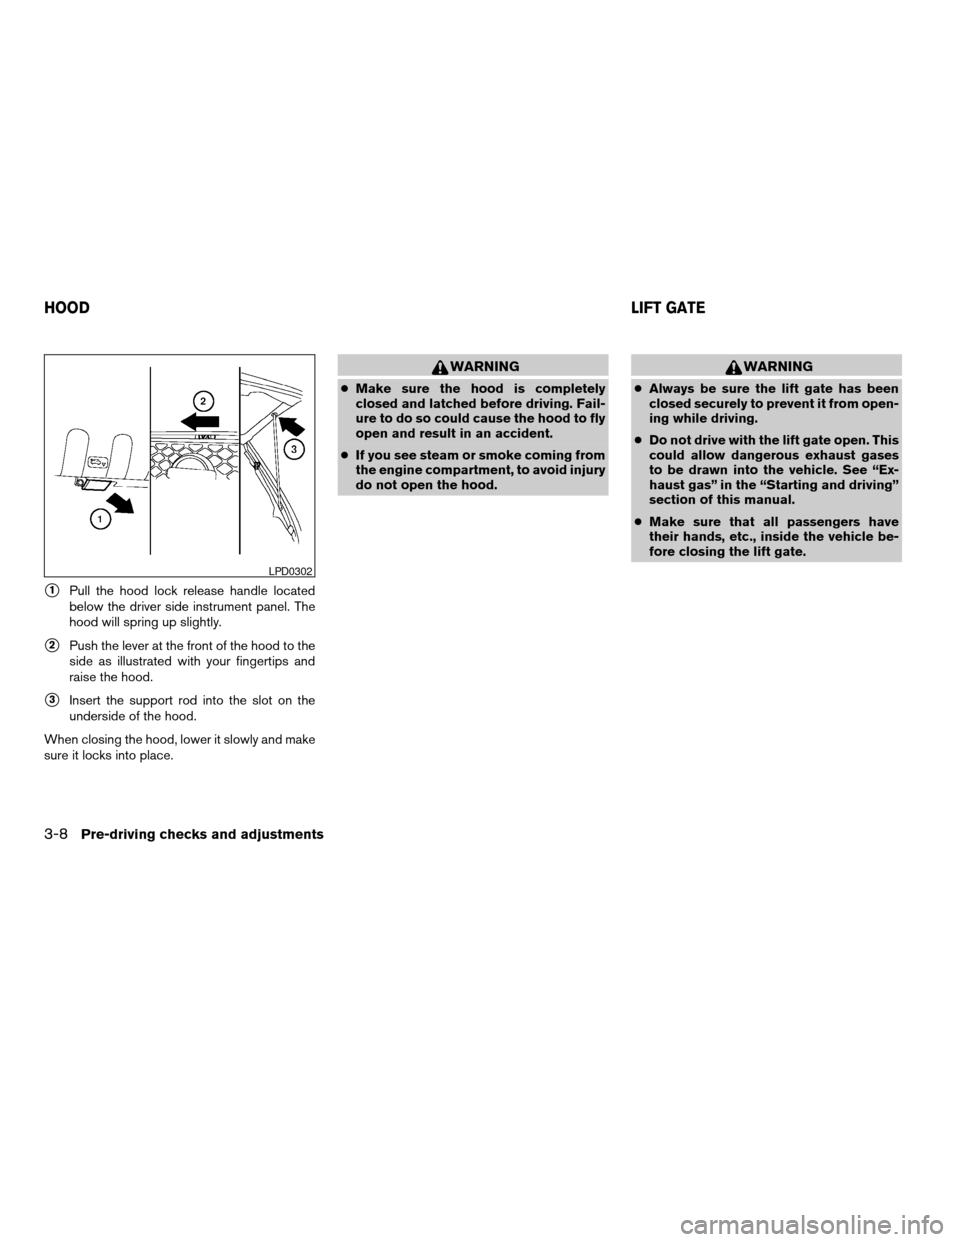
s1Pull the hood lock release handle located
below the driver side instrument panel. The
hood will spring up slightly.
s2Push the lever at the front of the hood to the
side as illustrated with your fingertips and
raise the hood.
s3Insert the support rod into the slot on the
underside of the hood.
When closing the hood, lower it slowly and make
sure it locks into place.
WARNING
cMake sure the hood is completely
closed and latched before driving. Fail-
ure to do so could cause the hood to fly
open and result in an accident.
cIf you see steam or smoke coming from
the engine compartment, to avoid injury
do not open the hood.
WARNING
cAlways be sure the lift gate has been
closed securely to prevent it from open-
ing while driving.
cDo not drive with the lift gate open. This
could allow dangerous exhaust gases
to be drawn into the vehicle. See “Ex-
haust gas” in the “Starting and driving”
section of this manual.
cMake sure that all passengers have
their hands, etc., inside the vehicle be-
fore closing the lift gate.
LPD0302
HOODLIFT GATE
3-8Pre-driving checks and adjustments
ZREVIEW COPYÐ2006 Pathfinder(pat)
Owners ManualÐUSA_English(nna)
07/29/05Ðcathy
X
Page 142 of 344

NOTE:
The lift gate must be unlocked in order to
open the glass hatch.
WARNING
Do not drive with the glass hatch open.
This could allow dangerous exhaust gases
to be drawn into the vehicle. See “Exhaust
gas” in the “Starting and driving” section
of this manual.
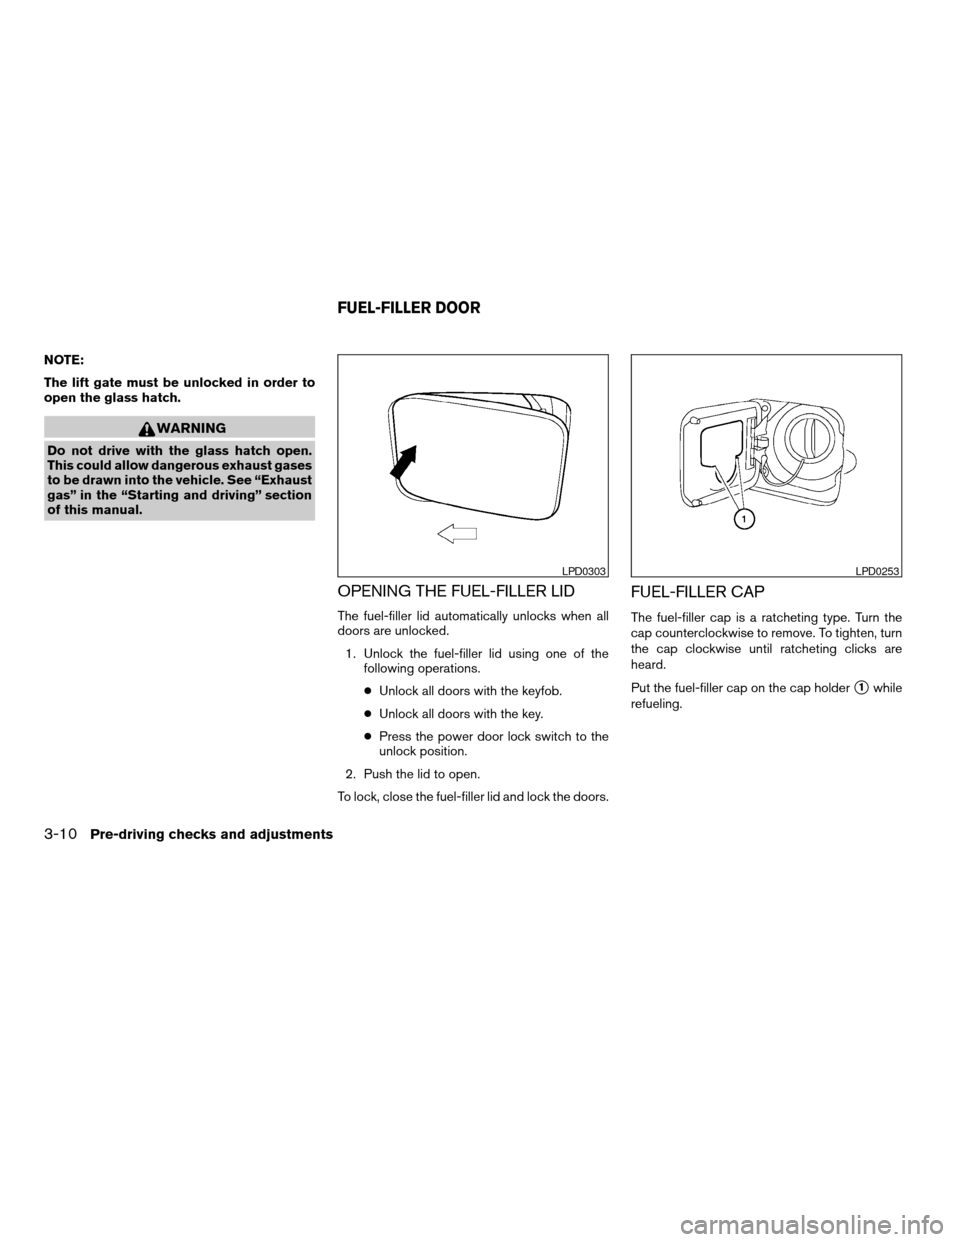
OPENING THE FUEL-FILLER LID
The fuel-filler lid automatically unlocks when all
doors are unlocked.
1. Unlock the fuel-filler lid using one of the
following operations.
cUnlock all doors with the keyfob.
cUnlock all doors with the key.
cPress the power door lock switch to the
unlock position.
2. Push the lid to open.
To lock, close the fuel-filler lid and lock the doors.
FUEL-FILLER CAP
The fuel-filler cap is a ratcheting type. Turn the
cap counterclockwise to remove. To tighten, turn
the cap clockwise until ratcheting clicks are
heard.
Put the fuel-filler cap on the cap holder
s1while
refueling.
LPD0303LPD0253
FUEL-FILLER DOOR
3-10Pre-driving checks and adjustments
ZREVIEW COPYÐ2006 Pathfinder(pat)
Owners ManualÐUSA_English(nna)
07/29/05Ðcathy
X
Page 143 of 344

WARNING
cGasoline is extremely flammable and
highly explosive under certain condi-
tions. You could be burned or seriously
injured if it is misused or mishandled.
Always stop the engine and do not
smoke or allow open flames or sparks
near the vehicle when refueling.
cFuel may be under pressure. Turn the
cap a third of a turn, and wait for any
“hissing” sound to stop to prevent fuel
from spraying out and possibly causing
personal injury. Then remove the cap.
cDo not attempt to top off the fuel tank
after the fuel pump nozzle shuts off
automatically. Continued refueling may
cause fuel overflow, resulting in fuel
spray and possibly a fire.
cUse only an original equipment type
fuel-filler cap as a replacement. It has a
built-in safety valve needed for proper
operation of the fuel system and emis-
sion control system. An incorrect cap
can result in a serious malfunction and
possible injury. It could also cause the
malfunction indicator light to come on.
cNever pour fuel into the throttle body to
attempt to start your vehicle.cDo not fill a portable fuel container in
the vehicle or trailer. Static electricity
can cause an explosion of flammable
liquid, vapor or gas in any vehicle or
trailer. To reduce the risk of serious
injury or death when filling portable fuel
containers:
– Always place the container on the
ground when filling.
– Do not use electronic devices when
filling.
– Keep the pump nozzle in contact
with the container while you are fill-
ing it.
– Use only approved portable fuel con-
tainers for flammable liquid.
CAUTION
cIf fuel is spilled on the vehicle body,
flush it away with water to avoid paint
damage.cTighten until the fuel-filler cap clicks.
Failure to tighten the fuel-filler cap
properly may cause the
mal-
function indicator light (MIL) to illumi-
nate. If the
light illuminates be-
cause the fuel-filler cap is loose or
missing, tighten or install the cap and
continue to drive the vehicle.
The
light should turn off after a
few driving trips. If the
light
does not turn off after a few driving
trips, have the vehicle inspected by a
NISSAN dealer.
cFor additional information, see the
“Malfunction indicator light (MIL)” in
the “Instruments and Controls” section
earlier in this manual.
Pre-driving checks and adjustments3-11
ZREVIEW COPYÐ2006 Pathfinder(pat)
Owners ManualÐUSA_English(nna)
07/29/05Ðcathy
X