2006 NISSAN NOTE Car key
[x] Cancel search: Car keyPage 67 of 235

WARNING
Always secure cargo with ropes or straps to help
prevent it from sliding or shifting. Do not place
cargo higher than the seatbacks. In a sudden
stop or collision, unsecured cargo could cause
personal injury.
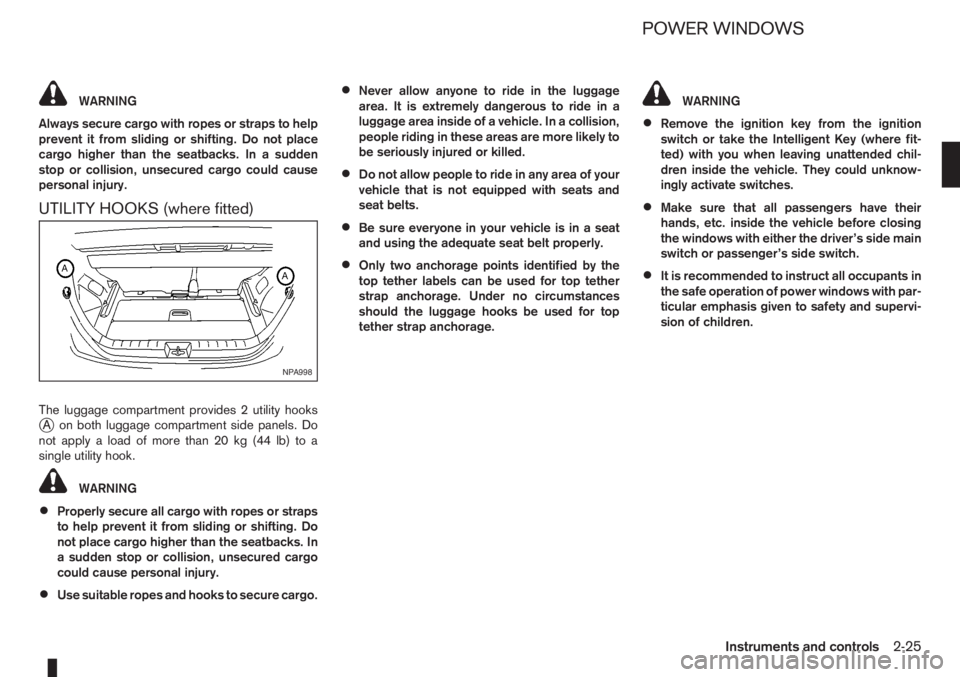
UTILITY HOOKS (where fitted)
The luggage compartment provides 2 utility hooksjA on both luggage compartment side panels. Do
notapplyaloadofmorethan20kg(44lb)toa
single utility hook.
WARNING
•Properly secure all cargo with ropes or straps
to help prevent it from sliding or shifting. Do
not place cargo higher than the seatbacks. In
a sudden stop or collision, unsecured cargo
could cause personal injury.
•Use suitable ropes and hooks to secure cargo.
•Never allow anyone to ride in the luggage
area. It is extremely dangerous to ride in a
luggage area inside of a vehicle. In a collision,
people riding in these areas are more likely to
be seriously injured or killed.
•Do not allow people to ride in any area of your
vehicle that is not equipped with seats and
seat belts.
•Be sure everyone in your vehicle is in a seat
and using the adequate seat belt properly.
•Only two anchorage points identified by the
top tether labels can be used for top tether
strap anchorage. Under no circumstances
should the luggage hooks be used for top
tether strap anchorage.
WARNING
•Remove the ignition key from the ignition
switch or take the Intelligent Key (where fit-
ted) with you when leaving unattended chil-
dren inside the vehicle. They could unknow-
ingly activate switches.
•Make sure that all passengers have their
hands, etc. inside the vehicle before closing
the windows with either the driver’s side main
switch or passenger’s side switch.
•It is recommended to instruct all occupants in
the safe operation of power windows with par-
ticular emphasis given to safety and supervi-
sion of children.
NPA998
POWER WINDOWS
Instruments and controls2-25
Page 76 of 235

•The Intelligent Key contains a miniature radio
transmitter that may be affected when placed
near metal objects.
•Keep the Intelligent Key away from mobile
phones, lap-top computers and other metal
objects or electronics.
STARTING THE ENGINE WITH THE
INTELLIGENT KEY
See “Ignition knob (where fitted)” in the “5. Starting
and driving” section.
CAUTION
•Make sure you carry the Intelligent Key with
you when starting and driving the vehicle.
•If the Intelligent Key is too far away from the
passenger compartment, the vehicle may not
start.
WARNING
•Always look before opening any doors, to
avoid an accident with oncoming traffic.
•Never leave children or adults who would nor-
mally require the support of others alone in
the vehicle. They could unknowingly activate
switches or controls and inadvertently
become involved in a serious accident.
SUPER LOCK SYSTEM (Right-hand
drive models)
WARNING
For Super Lock System equipped models, failure
to follow the precautions below may lead to haz-
ardous situations. Make sure the Super Lock Sys-
tem activation is always safely conducted.
•When the vehicle is occupied, never lock the
doors with the integrated keyfob. Doing so
will trap the occupants, since the Super Lock
System prevents the doors from being opened
from the inside of the vehicle.
•Only operate the integrated keyfob lock but-
ton when there is a clear view of the vehicle.
This is to prevent anybody from being trapped
inside the vehicle through the Super Lock
System activation.
Locking the doors with the integrated keyfob will
lock all doors including the back door and activate
the Super Lock System. This means that none ofthe doors can be opened from the inside, adding
extra security in case of break-in or theft.
The system will be released when the door is un-
locked with the integrated keyfob.
The Super Lock System will not activate when the
doors are locked with the power door lock switch or
the key.
Emergency situations
If the Super Lock System is activated due to a traf-
fic accident or other unexpected circumstances
while you are in the vehicle:
•Insert the key/emergency key in the ignition
switch, turn it to the ON position, the Super Lock
system will be released and all doors can be
unlocked.
•Open or break the door window on the front
passenger’s side, remove the protection cap on
the passenger’s side door handle, insert the key
into the passenger’s side door key cylinder and
turn it to the unlock position, after which you will
be able to open the door.
•Remove the key from the ignition switch and un-
lock the door using the integrated keyfob.
DOOR LOCKS
3-6Pre-driving checks and adjustments
Page 77 of 235

VEHICLE DEAD BATTERY –
LEFT-HAND SIDE DOOR HANDLE
The left-hand side door can be locked or unlocked
with the door key/emergency key when the vehi-
cle’s battery is dead.
To lock the door with the key/emergency
key
1. If necessary, carefully remove the protection capjA (where fitted) on the left-hand side door
handle by inserting the key/emergency key in the
cap’s base slot and pry it off.
2. To lock the door
j1 , insert the key/emergency
key in the left-hand side door handle key cylinder
and turn it towards the front of the vehicle
jF.
To unlock the door
j2 , turn the key/emergency
key towards the rear of the vehicle.
The left-hand side door handle can only be locked
from the outside by using the key/emergency key
when the door is closed.See “Ignition knob (where fitted)” in the “5. Starting
and driving” section for access to the Intelligent sys-
tem emergency key.
CAUTION
The alarm system will be triggered when the door
is opened using the key/emergency key (NISSAN
alarm equipped models). To stop the alarm, turn
the ignition key/emergency key to the ON posi-
tion.
Initialising the system after vehicle
battery loading or replacement
After recharging or replacing the battery, you should
release (initialise) the system by:
•Inserting the key/emergency key into the ignition
switch and then turning it to the ON position.
•Unlocking the vehicle using the integrated key-
fob.
LOCKING WITH POWER DOOR
LOCK SWITCH
CAUTION
When locking the door with the power door lock
switch, be sure not to leave the key inside the
vehicle.
Central door lock equipped models
Operating the power door lock switch located on
the centre console will lockj1 or unlockj2 all
doors when the driver’s door is closed (the indica-
tor light
j3 comes on when all doors are locked).
However, a chime will sound and the doors will not
lock if the power door lock switch is pressed when
a passenger door is open, even if the driver’s door
is closed.
NOTE
•It is also possible to open the driver’s door,
move the power door lock switch to the lock
j1 position and close the door to lock all doors
unless the key is in the ignition or the Intelli-
gent Key (where fitted) is left inside the ve-
hicle.
•If the integrated Intelligent Keyfob lock button
(where fitted) is pressed inside the vehicle, all
doors lock, the power door lock indicator light
j3 comes on and the power door unlock side
of the switchj2 cannot be activated (central
door lock equipped models and Super Lock
equipped models). To unlock, press the inte-
grated Intelligent Keyfob unlock button. How-
ever, note that if the door is manually opened
from inside after having pressed the Keyfob
NPA927Z
NPA868Z
Centre console
Pre-driving checks and adjustments3-7
Page 116 of 235
![NISSAN NOTE 2006 Owners Manual [Pair Device]:
1. Press the<SETUP>button. Select the [Blue-
tooth] key using the<TUNE/MENU>dial. Then
press the<ENTER>button.
You can register up to 5 different Bluetooth mo-
bile phones. However, you NISSAN NOTE 2006 Owners Manual [Pair Device]:
1. Press the<SETUP>button. Select the [Blue-
tooth] key using the<TUNE/MENU>dial. Then
press the<ENTER>button.
You can register up to 5 different Bluetooth mo-
bile phones. However, you](/manual-img/5/56797/w960_56797-115.png)
[Pair Device]:
1. Press the
tooth] key using the
press the
You can register up to 5 different Bluetooth mo-
bile phones. However, you can only use one de-
vice at a time. If you have 5 different Bluetooth
registered devices, a new device can only re-
place one of the 5 existing paired devices. Use
[Delete Device] key to delete one of the existing
paired devices. For details, see “[Delete Device]”
later in this section.
2. Select the [Pair Device] key.
The pairing procedure depends on the
connected device:
•Mobile phone:
The message [Ready to Pair Pin:1234] will
be displayed.
•Audio device without PIN code:
The Bluetooth connection will be automati-
cally connected without any further input.
•Audio device with PIN code:
A new screen will appear. Assign the 4 digit
PIN code by turning the
to each code and press the
to confirm. Then select [Validate] and press
made.
The 4–digit PIN code is provided with the
audio device, see the owner’s manual of the
audio device.
3. On Bluetooth® audio/mobile phone devices.
1) Switch on the Bluetooth® connection, if not
already switched on.
2) Switch on the search mode for Bluetooth®
devices. If the search mode finds a device it
will be shown on the device display.
3) When a device is found use the
to select [My Car].
4) Enter the number code shown on the relevant
device with the device’s own keypad, and
press the confirmation key on the device it-
self. Refer to the relevant Bluetooth® device
owner’s manual for further details.
When successfully paired a notification message
will be displayed, then the audio system displaywill return to the current audio source display.
During connection the following status icons will
be displayed (top left of the display): Signal
strength (), Battery status* () and Blue-
tooth “ON” ().
*: If the low battery message comes on, the
Bluetooth® device must be recharged soon.
The pairing procedure and operation may vary ac-
cording to device type and compatibility. See the
Bluetooth® owner’s manual for further details.
NOTE
•For device details, see your audio/mobile
phone Owner’s Manual.
•For assistance with the Bluetooth® audio/
mobile phone integration, please visit your lo-
cal NISSAN dealer.
[Select Device]:
The paired device list shows which Bluetooth® au-
dio or mobile phone devices have been paired or
registered with the Bluetooth® audio system. If the
list contains devices then select the appropriate de-
vice to connect to the Bluetooth® audio system.
The following symbols (where fitted) indicate the
capability of the registered device:
•: Mobile phone integration
•: Audio streaming (A2DP- Advanced Audio
Distribution Profile)
NAA1202
4-32Heater and air conditioner, and audio system
Page 125 of 235

5Starting and drivingStarting and driving
Running-in schedule ................................................ 5-2
Before starting the engine ........................................ 5-2
Precautions when starting and driving ...................... 5-3
Exhaust gas (Carbon Monoxide) ......................... 5-3
Three-way catalyst (Petrol engine models)................ 5-4
To help prevent damage ..................................... 5-4
Turbocharger system (Diesel engine models) ........... 5-4
Diesel particulate filter (where fitted) ........................ 5-5
Care when driving ................................................... 5-5
Engine cold start period ...................................... 5-5
Loading luggage ................................................. 5-5
Driving on wet roads ........................................... 5-5
Driving under winter conditions ........................... 5-5
Ignition switch.......................................................... 5-6
Manual transmission ........................................... 5-6
Automatic transmission ....................................... 5-6
Steering lock ...................................................... 5-7
Key positions ...................................................... 5-7
NISSAN Anti-Theft System (NATS)..................... 5-7
Ignition knob (where fitted)....................................... 5-7
Manual transmission ........................................... 5-8
Automatic transmission ....................................... 5-8
Steering lock ...................................................... 5-8
Ignition knob position .......................................... 5-8
Emergency key – Intelligent Key dead battery
situation .............................................................. 5-9
NISSAN Anti-Theft System (NATS)..................... 5-9
Starting the engine................................................... 5-10
Driving ..................................................................... 5-11
Driving with manual transmission......................... 5-11Driving with automatic transmission..................... 5-12
Speed limiter ........................................................... 5-15
Speed limiter operations ..................................... 5-16
Cruise control system .............................................. 5-18
Precautions on cruise control system .................. 5-19
Cruise control system operations ........................ 5-19
Ultrasonic Parking Sensor (where fitted) .................. 5-22
Parking .................................................................... 5-22
Trailer towing ........................................................... 5-24
Operating precautions ........................................ 5-24
Tyre pressure ..................................................... 5-25
Safety chains ...................................................... 5-25
Trailer brakes...................................................... 5-25
Trailer detection (where fitted) ............................ 5-25
Installation of coupling device ............................. 5-25
Vehicle security........................................................ 5-26
Power steering system............................................. 5-27
Brake system ........................................................... 5-27
Brake precautions .............................................. 5-27
Anti-lock Braking System (ABS).......................... 5-28
Electronic Stability Programme (ESP) system
(where fitted) ........................................................... 5-29
Electronic Stability Programme (ESP) OFF
switch................................................................. 5-30
Cold weather driving................................................ 5-31
Battery ............................................................... 5-31
Engine coolant .................................................... 5-31
Tyre equipment ................................................... 5-31
Special winter equipment.................................... 5-32
Corrosion protection ........................................... 5-32
Page 132 of 235

CAUTION
•Make sure you carry the Intelligent Key with
you when operating the vehicle.
•Never leave the Intelligent Key inside the ve-
hicle when you leave the vehicle.
•If the Intelligent Key is too far away from the
driver, the vehicle may not start.
MANUAL TRANSMISSION
The ignition lock is designed so that the knob can
ONLY be turned to the LOCK position when the
PUSH release button has first been depressed.
NOTE
•The ignition knob warning light () blinks
and the buzzer sounds twice when the igni-
tion knob is turned to the “OFF” position. De-
press the PUSH release button
j2 , then turn
the ignition knob to the LOCK position. See
“Warning/indicator lights and audible
reminders” in the “2. Instruments and
controls” section for further details regarding
the functionality of the ignition knob warning
light.
•When the emergency key is being used, the
PUSH release buttonj2 must be depressed
in order to turn the ignition knob to the LOCK
position although the ignition knob warning
light (
) will not blink and the buzzer will not
sound.
AUTOMATIC TRANSMISSION
The ignition knob is designed so that it cannot be
turned to the LOCK position until the selector lever
is moved to the P (Park) position. The selector lever
can only be moved from the P (Park) position when
the ignition knob is in the ON position and the
footbrake pedal is depressed.
NOTE
The ignition knob warning light (
) blinks and a
buzzer sounds twice when the ignition knob is
turned to the “OFF” position. Make sure that the
selector lever is in the P (Park) position, then turn
the ignition knob to the LOCK position. See
“Warning/indicator lights and audible reminders”
in the “2. Instruments and controls” section for
further details regarding the functionality of the
ignition knob warning light.
STEERING LOCK
To lock the steering wheel
In the LOCK position, turn the steering wheel 1/6 of
a turn from the straight up position.
To unlock the steering wheel
Depress the brake pedal, push the ignition knob and
turn it towards the Acc position while gently rotating
the steering wheel right or left.
IGNITION KNOB POSITION
LOCK (Normal parking position) (0)
The steering lock can be only be locked from this
position.
“OFF” (1)
The engine can be turned off without locking the
steering wheel.
Acc (Accessories) (2)
This position activates electrical accessories, such
as the radio, when the engine is not running.
ON (Normal operating position) (3)
This position turns on the ignition system and the
electrical accessories.
START (4)
The engine starter activates and the engine will start.
As soon as the engine has started, release the knob
immediately. It will return to the ON position.
5-8Starting and driving
Page 134 of 235

ligent Key, turn the ignition knob to the LOCK posi-
tion, wait for 5 seconds and turn the knob to the
START position again to start the engine.
For additional information, see “Security system” in
the “3. Pre-driving checks and adjustments” sec-
tion.1. Apply the handbrake.
2.Manual transmission models:
Move the gear lever to N (Neutral) position, and
depress the clutch pedal to the floor while start-
ing the engine.
Automatic transmission models:
Depress the brake pedal and move the selector
lever to the P (Park) or N (Neutral) position. (P
position is preferred).
NOTE
The starter is designed not to operate if the
selector lever is out of the P (Park) or N (Neu-
tral) position.
3. Models without Intelligent Key:
Rotate the steering wheel left to right to release
the ignition lock whilst turning the ignition switch
to the ON position.
Models with Intelligent key:
•MT models – keep the clutch pedal
depressed and/or depress the brake pedal
then:
•AT – depress the brake pedal then:
1) Push the ignition knob.
2) Rotate the steering wheel left to right to
release the ignition lock whilst turning the
ignition knob to the ON position.CAUTION
•Make sure you carry the Intelligent Key with
you when operating the vehicle.
•If the Intelligent Key is too far away from
the driver, the vehicle may not start.
4. For diesel engine models: Wait until the glow
indicator light
goes out.
5. Start the engine with your foot on the brake pedal,
not on the accelerator pedal, by turning the
ignition switch to START.
6. Release the ignition switch when the engine
starts. If the engine starts, but fails to run, repeat
the above procedure.
For petrol engine models:
•If the engine is very hard to start for example
in extremely cold or hot weather, or when
restarting, Proceed as follows:
a. Depress the accelerator pedal a little (ap-
proximately 1/3 to the floor) and hold it
and then start the engine.
b. Release the ignition switch and the accel-
erator pedal when the engine starts.
•If the engine is very hard to start because it is
flooded. Proceed as follows:
a. Depress the accelerator pedal all the way
to the floor and hold it.
b. Start the engine for 5-6 seconds and stop.
After starting the engine, release the ac-
celerator pedal.
STARTING THE ENGINE
5-10Starting and driving
Page 148 of 235

•Turn the ignition switch to the LOCK position
and remove the key/Intelligent Key (where fit-
ted).Your new vehicle was designed to be used primarily
to carry passengers and luggage.
Remember that towing a trailer will place additional
loads on your vehicle’s engine, drive-train, steering,
braking and other systems. Towing a trailer will also
exaggerate other conditions, such as sway caused
by crosswinds, rough road surfaces or passing
trucks. Driving style and speed must be adjusted
according to the circumstances. Before towing a
trailer, see a NISSAN dealer or qualified workshop
for an explanation of towing equipment and its
proper use.
OPERATING PRECAUTIONS
•Avoid towing a trailer during the running-in
schedule.
•Choose proper coupling devices (trailer hitch,
safety chain, roof carrier, etc.) for your vehicle
and trailer. These devices are available from a
NISSAN dealer or qualified workshop where you
can also obtain more detailed information about
trailer towing.
Heavy-duty kits are available at a NISSAN dealer
or qualified workshop.
•It is advisable to contact a NISSAN dealer or
qualified workshop for towing details, before
towing a trailer up steep slopes for long dis-
tances.
•Never allow the total trailer load (trailer weight
plus its cargo weight) to exceed the maximum
set for the coupling device.Contact a NISSAN dealer or qualified workshop
for more information on this matter.
•The trailer must be loaded so that heavy goods
are distributed over the axle and as low in the
trailer as possible. Poor load distribution can se-
riously affect the stability of the trailer and tow
vehicle.
•Do not exceed the maximum permitted vertical
load on the trailer hitch.
•Before driving, make sure that the lighting sys-
tem of the trailer works properly.
•Avoid abrupt starts, accelerations and stops.
•Avoid sharp turns and lane changes.
•Always drive your vehicle at a moderate speed.
•Always block the wheels on both vehicle and
trailer when parking. Apply the handbrake (where
fitted) on the trailer. Parking on a steep slope is
not recommended.
If parking on a steep slope is unavoidable it is
also advisable to put the vehicle into gear, or
select P (Park, AT models), and turn the front
wheels into the kerb (in addition to the other pre-
cautions described). Before parking on a steep
slope consider the incline (the towing weights
quoted are for a 12% slope).
•Follow the trailer manufacturer’s instructions.
TRAILER TOWING
5-24Starting and driving