2006 NISSAN NOTE change time
[x] Cancel search: change timePage 102 of 235
2) Press and hold buttons 1 and 4 simultaneously.
3) Press the power (
) button and the radio will
switch on.
4) Release all the buttons and the display will show
LANGUAGE.
5) Press the
orbutton and the lan-
guage setting display will change as follows:
ENGLISH⇔FRENCH⇔GERMAN⇔ITALIAN
⇔DUTCH⇔SPANISH⇔POLISH⇔ENGLISH
Once the language has been set, switch off and
switch on again the audio unit by pressing the power
button. For details, contact your NISSAN dealer or
qualified workshop.
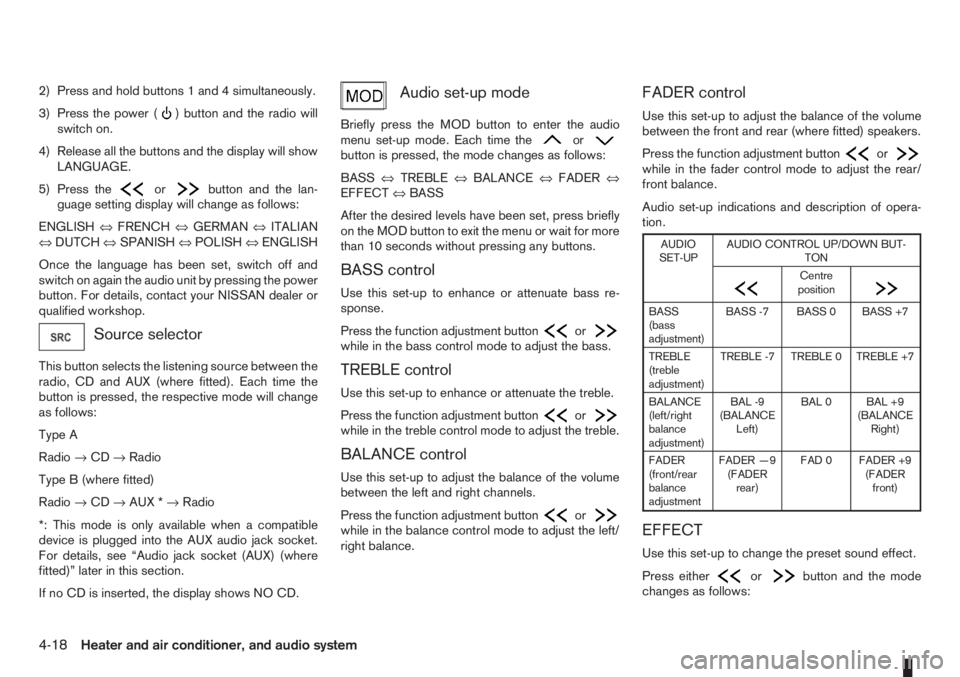
Source selector
This button selects the listening source between the
radio, CD and AUX (where fitted). Each time the
button is pressed, the respective mode will change
as follows:
Type A
Radio→CD→Radio
Type B (where fitted)
Radio→CD→AUX *→Radio
*: This mode is only available when a compatible
device is plugged into the AUX audio jack socket.
For details, see “Audio jack socket (AUX) (where
fitted)” later in this section.
If no CD is inserted, the display shows NO CD.
Audio set-up mode
Briefly press the MOD button to enter the audio
menu set-up mode. Each time theorbutton is pressed, the mode changes as follows:
BASS⇔TREBLE⇔BALANCE⇔FADER⇔
EFFECT⇔BASS
After the desired levels have been set, press briefly
on the MOD button to exit the menu or wait for more
than 10 seconds without pressing any buttons.
BASS control
Use this set-up to enhance or attenuate bass re-
sponse.
Press the function adjustment button
orwhile in the bass control mode to adjust the bass.
TREBLE control
Use this set-up to enhance or attenuate the treble.
Press the function adjustment button
orwhile in the treble control mode to adjust the treble.
BALANCE control
Use this set-up to adjust the balance of the volume
between the left and right channels.
Press the function adjustment button
orwhile in the balance control mode to adjust the left/
right balance.
FADER control
Use this set-up to adjust the balance of the volume
between the front and rear (where fitted) speakers.
Press the function adjustment button
orwhile in the fader control mode to adjust the rear/
front balance.
Audio set-up indications and description of opera-
tion.
AUDIO
SET-UPAUDIO CONTROL UP/DOWN BUT-
TON
m
Centre
position
m
BASS
(bass
adjustment)BASS -7 BASS 0 BASS +7
TREBLE
(treble
adjustment)TREBLE -7 TREBLE 0 TREBLE +7
BALANCE
(left/right
balance
adjustment)BAL -9
(BALANCE
Left)BAL 0 BAL +9
(BALANCE
Right)
FADER
(front/rear
balance
adjustmentFADER —9
(FADER
rear)FAD 0 FADER +9
(FADER
front)
EFFECT
Use this set-up to change the preset sound effect.
Press either
orbutton and the mode
changes as follows:
4-18Heater and air conditioner, and audio system
Page 105 of 235
When the news mode is activated and the radio
receives a news code from a FM broadcasting sta-
tion, the actual playing mode will be interrupted.
Once the news broadcast has finished, the audio
unit will return to the previous source. During the
interruption, the display alternates between NEWS
and the broadcasting station name.
1. NEWS standby mode
•The news standby mode can be activated while
in FM (radio) or CD mode (if FM was previously
selected in the radio mode).
•Pressing thebutton, the news standby
mode will switch off and the NEWS icon will dis-
appear from the display.
2. NEWS interruption mode
•A news interruption will be announced and
NEWS will be displayed when the radio detects
the news code from the tuned station or EON
stations. The audio system will change to the
interrupting station and the name of the interrupt-
ing station will be displayed.
•Pressing thebutton during a news inter-
ruption will cause the audio unit to return to the
previous source. However, news standby mode
remains active.
•When the CD button is pressed during a news
interruption mode, the radio will change to CD
mode and news stand-by mode is not cancelled.
If the radio wave band changes to the MW or LW,
then the news standby mode will be switched off.
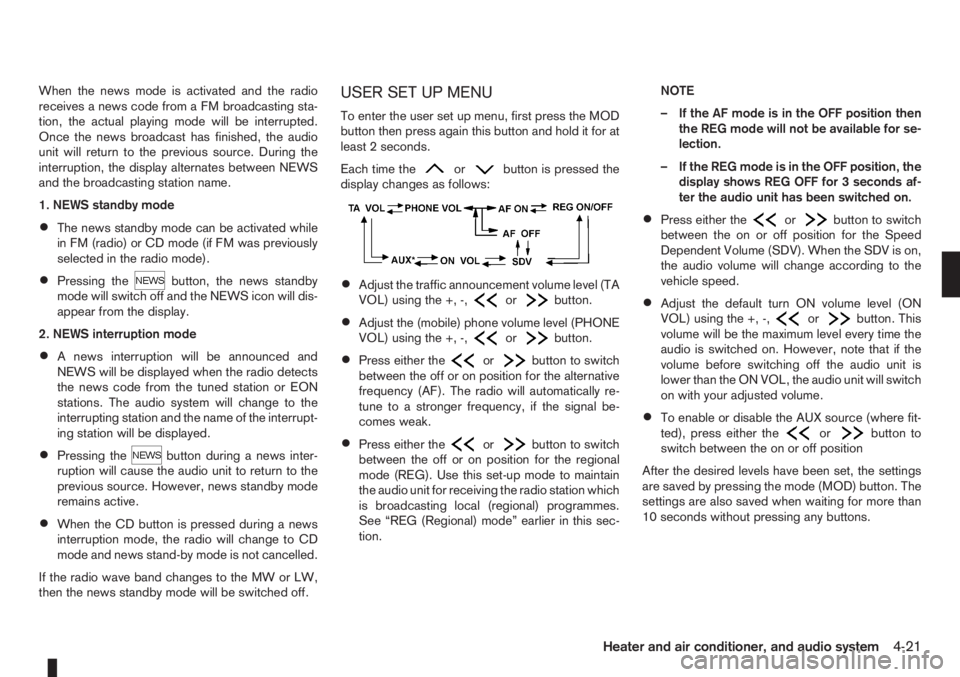
USER SET UP MENU
To enter the user set up menu, first press the MOD
button then press again this button and hold it for at
least 2 seconds.
Each time the
orbutton is pressed the
display changes as follows:
•Adjust the traffic announcement volume level (TA
VOL) using the +, -,orbutton.
•Adjust the (mobile) phone volume level (PHONE
VOL) using the +, -,orbutton.
•Press either theorbutton to switch
between the off or on position for the alternative
frequency (AF). The radio will automatically re-
tune to a stronger frequency, if the signal be-
comes weak.
•Press either theorbutton to switch
between the off or on position for the regional
mode (REG). Use this set-up mode to maintain
the audio unit for receiving the radio station which
is broadcasting local (regional) programmes.
See “REG (Regional) mode” earlier in this sec-
tion.NOTE
– If the AF mode is in the OFF position then
the REG mode will not be available for se-
lection.
– If the REG mode is in the OFF position, the
display shows REG OFF for 3 seconds af-
ter the audio unit has been switched on.
•Press either theorbutton to switch
between the on or off position for the Speed
Dependent Volume (SDV). When the SDV is on,
the audio volume will change according to the
vehicle speed.
•Adjust the default turn ON volume level (ON
VOL) using the +, -,orbutton. This
volume will be the maximum level every time the
audio is switched on. However, note that if the
volume before switching off the audio unit is
lower than the ON VOL, the audio unit will switch
on with your adjusted volume.
•To enable or disable the AUX source (where fit-
ted), press either theorbutton to
switch between the on or off position
After the desired levels have been set, the settings
are saved by pressing the mode (MOD) button. The
settings are also saved when waiting for more than
10 seconds without pressing any buttons.
Heater and air conditioner, and audio system4-21
Page 110 of 235

TA Traffic announcement
This function operates in FM (Radio), CD or AUX
mode.
•Pressing the
The TA indicator is displayed while TA mode is
on.
•When
switched off and the TA indicator will disappear
from the display.
Traffic announcement interrupt function:
When a traffic announcement is received, the an-
nouncement is tuned in and the display shows a
notification message with the radio station name e.g.
[TA: Radio 1].
Once the traffic announcement has finished, the unit
returns to the source that was active before the traf-
fic announcement started.
If
the traffic announcement interrupt mode is can-
celled. The TA mode returns to the standby mode
and the audio unit returns to the previous source.
SETUP BUTTON
To configure Audio, Clock, Bluetooth, Language or
Scroll direction settings, perform the following pro-
cedure:
1. Press the
2. Press the
clockwise, the display will appear in the following
order:
[Audio]⇔[Clock]⇔[Bluetooth]⇔[Language]
⇔[Scroll Direction]
After the desired levels have been set, press either
the <
> (Back) button repeatedly, the
pressing any buttons to exit the menu screen.
Display brightness (Day/Night mode)
Press the
switch the display brightness between the daytime
and nighttime mode.
Audio adjustments
Press the
screen then select [Audio].
Each time the
will change as follows:
[Bass]→[Treble]→[Balance]→[Fade]→[AUX
VOL]→[SPD VOL]→setup menu screen [Audio]
→[Bass]
Bass control:
Use this control to enhance or attenuate bass re-
sponse sound.
Turn the
clockwise to adjust the bass settings then press
Use this control to enhance or attenuate the treble.
Turn the
clockwise to adjust the treble settings then press
Balance control:
Use this control to adjust the balance of the volume
between the left and right speakers.
Turn the
clockwise to adjust the left/right balance then press
Fade (Fader) control:
Use this control to adjust the balance of the volume
between the front and rear (where fitted) speakers.
Turn the
clockwise to adjust the front/rear balance then press
AUX VOL (Auxiliary volume) control:
Use this control to adjust the volume output from the
auxiliary source.
Turn the
clockwise to select [LO], [MID], or [HI] mode then
press
4-26Heater and air conditioner, and audio system
Page 111 of 235
![NISSAN NOTE 2006 Owners Manual SPD VOL (Speed volume) control:
This mode controls the volume output from the
speakers automatically in relation to vehicle speed.
When [SPD VOL] is displayed, turn the<TUNE/
MENU>dial clockwise or an NISSAN NOTE 2006 Owners Manual SPD VOL (Speed volume) control:
This mode controls the volume output from the
speakers automatically in relation to vehicle speed.
When [SPD VOL] is displayed, turn the<TUNE/
MENU>dial clockwise or an](/manual-img/5/56797/w960_56797-110.png)
SPD VOL (Speed volume) control:
This mode controls the volume output from the
speakers automatically in relation to vehicle speed.
When [SPD VOL] is displayed, turn the
the volume level.
Adjusting the setting to 0 (zero) turns off the speed
volume feature. Increasing the speed volume setting
results in the audio volume increasing more rapidly
with vehicle speed. Once chosen, press
to save the setting.
Clock setting
The [Clock] set up screen will appear when select-
ing the [Clock] item from the set up menu.
[Set Time]:
Select [Set Time] then adjust the clock as follows:
1. The hour display will start flashing. Turn the
2. Press the
will start flashing.
3. Turn the
minute.
4. Press
[On/Off]:
Set the clock display between on or off when the
audio unit is turned off.
If set in the [ON] position, the clock will be dis-
played when the audio unit is turned off either bypressing the<
>button or when the ignition
switch is placed in the “OFF” position.
[Clock Format):
Set the clock display between 24-hour mode and
12-hour clock mode.
Bluetooth®
For activation or deactivation details, see “BLUE-
TOOTH® settings” later in this section
Language
Select the appropriate language and press the
automatically adapt the language setting.
•[French]
•[English]
•[German]
•[Spanish]
•[Portuguese]
•[Italian]
•[Dutch]
•[Turkish]
•[Russian]
Scroll direction
Sets the scroll direction of the
For example, to change the way in which you turn
the dial (anticlockwise or clockwise) in order to scroll
up or down a list.
COMPACT DISC (CD) OPERATION
The CD player can play a music CD or an encoded
MP3/WMA CD and while listening to those CD’s
certain text might be able to be displayed (when CD
encoded with text is being used).
Press the
start to play.
When
mode is already operating, it will automatically turn
off the playing source and the CD play mode will
start.
However, if the CD disc is not loaded, then a notifi-
cation message will be displayed and the audio unit
remains in radio or AUX source mode.
CAUTION
•Do not force the CD into the slot. This could
damage the player.
•Do not use 8 cm (3.1 in) discs.
CD insert (CD player)
Insert the CD disc into the slot with the label side
facing up. The disc will be guided automatically into
the slot and will start playing. After loading the disc,
track information will be displayed.
NOTE
•The CD player accepts normal audio CD or
CD recorded with MP3/WMA files.
Heater and air conditioner, and audio system4-27
Page 123 of 235
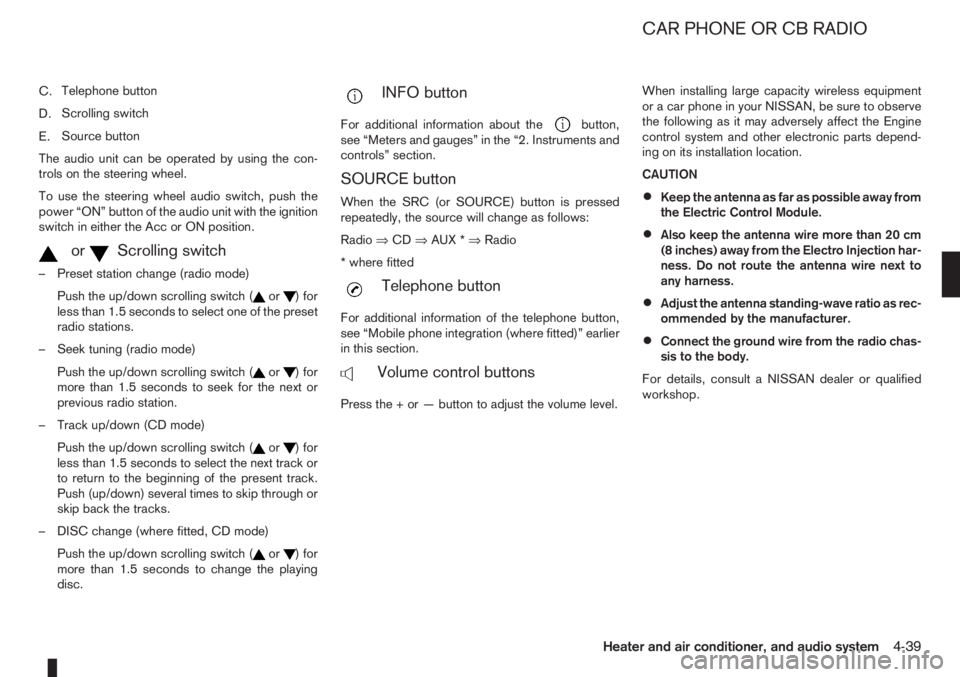
C.Telephone button
D.Scrolling switch
E.Source button
The audio unit can be operated by using the con-
trols on the steering wheel.
To use the steering wheel audio switch, push the
power “ON” button of the audio unit with the ignition
switch in either the Acc or ON position.
mormScrolling switch
– Preset station change (radio mode)
Push the up/down scrolling switch (
or) for
less than 1.5 seconds to select one of the preset
radio stations.
– Seek tuning (radio mode)
Push the up/down scrolling switch (
or) for
more than 1.5 seconds to seek for the next or
previous radio station.
– Track up/down (CD mode)
Push the up/down scrolling switch (
or) for
less than 1.5 seconds to select the next track or
to return to the beginning of the present track.
Push (up/down) several times to skip through or
skip back the tracks.
– DISC change (where fitted, CD mode)
Push the up/down scrolling switch (
or) for
more than 1.5 seconds to change the playing
disc.
mINFO button
For additional information about thebutton,
see “Meters and gauges” in the “2. Instruments and
controls” section.
SOURCE button
When the SRC (or SOURCE) button is pressed
repeatedly, the source will change as follows:
Radio⇒CD⇒AUX *⇒Radio
* where fitted
mTelephone button
For additional information of the telephone button,
see “Mobile phone integration (where fitted)” earlier
in this section.
mVolume control buttons
Press the + or — button to adjust the volume level.When installing large capacity wireless equipment
or a car phone in your NISSAN, be sure to observe
the following as it may adversely affect the Engine
control system and other electronic parts depend-
ing on its installation location.
CAUTION
•Keep the antenna as far as possible away from
the Electric Control Module.
•Also keep the antenna wire more than 20 cm
(8 inches) away from the Electro Injection har-
ness. Do not route the antenna wire next to
any harness.
•Adjust the antenna standing-wave ratio as rec-
ommended by the manufacturer.
•Connect the ground wire from the radio chas-
sis to the body.
For details, consult a NISSAN dealer or qualified
workshop.
CAR PHONE OR CB RADIO
Heater and air conditioner, and audio system4-39
Page 127 of 235
WARNING
•Do not leave children or adults who would
normally require the support of others alone
in your vehicle. Pets should also not be left
alone. They could accidentally injure them-
selves or others through inadvertent opera-
tion of the vehicle. Also, on hot, sunny days,
temperatures in a closed vehicle could quickly
become high enough to cause severe or pos-
sibly fatal injuries to people or animals.
•To prevent luggage or packages from sliding
forward during braking, do not stack anything
in the cargo area higher than the seatbacks.
•Secure all cargo with ropes or straps to pre-
vent it from sliding or shifting.
•Failure to follow proper seating instructions
see “Seats” in the “1. Safety — seats, seat
belts and supplemental restraint system” sec-
tion, could result in serious personal injury in
an accident or sudden stop.
EXHAUST GAS (Carbon Monoxide)
WARNING
•Do not breathe exhaust gases; they contain
colourless and odourless carbon monoxide.
Carbon monoxide is a dangerous gas and can
cause unconsciousness or death.
•If you suspect that exhaust fumes are enter-
ing the vehicle, drive with all windows fully
open and have the vehicle inspected immedi-
ately.
•Do not run the engine in closed spaces, such
as a garage, for any longer than is absolutely
necessary.
•Do not park the vehicle with the engine run-
ning for any extended length of time.
•Keep the back door closed while driving, oth-
erwise exhaust gases could be drawn into the
passenger compartment. If you must drive in
this way for some reason, take the following
steps:
1) Open all the windows.
2) Manual air conditioner equipped models:
Move the air intake lever to the
posi-
tion.
Automatic air conditioner equipped mod-
els: Switch on the outside air mode.
3) Set the fan speed control to the maximum
position to circulate the air.
•If electrical wiring or other cable connections
must pass to a trailer through the seal of the
body, follow the manufacturer’s recommen-
dations to prevent carbon monoxide entry into
the vehicle.
•When a vehicle has been stopped in an open
area with its engine running for any significant
length of time, turn the fan on to force outside
air into the vehicle.
•The exhaust system and body should be in-
spected by a NISSAN dealer or qualified work-
shop whenever:
– the vehicle is raised for service.
– you suspect that exhaust fumes are enter-
ing into the passenger compartment.
– you notice a change in the sound of the
exhaust system.
– you have had an accident involving dam-
age to the exhaust system, underbody, or
rear of the vehicle.
PRECAUTIONS WHEN STARTING
AND DRIVING
Starting and driving5-3
Page 128 of 235
NISSAN GREEN PROGRAM
The three-way catalyst is an emission control device
installed in the exhaust system. In the converter,
exhaust gases are burned at high temperatures to
help reduce pollutants.
CAUTION
•The exhaust gas and the exhaust system are
very hot. While the engine is running, keep
people or flammable materials away from the
exhaust pipe.
•Do not stop or park the vehicle over flam-
mable materials such as dry grass, waste pa-
per or rags, as they may burn easily.
•When parking, ensure that people or flam-
mable materials are kept away from the ex-
haust pipe.
TO HELP PREVENT DAMAGE
CAUTION
•Use UNLEADED PETROL ONLY, specifically
the recommended type. For details, see “Ca-
pacities and recommended fuel/lubricants” in
the “9. Technical information” section.
•Do not use leaded petrol. Leaded petrol will
seriously damage three-way catalyst.
Deposits from leaded petrol will seriously re-
duce the three-way catalyst’s ability to help
reduce exhaust pollutants.
•Keep your engine tuned up. Malfunctions in
the ignition, fuel injection, or electrical sys-
tems can cause over-rich fuel flow into the
converter, causing it to overheat.
•Avoid driving with an extremely low fuel level.
Running out of fuel could cause the engine to
misfire, damaging the three-way catalyst.
•Do not keep driving if the engine misfires, or
if noticeable loss of performance or other un-
usual operating conditions are detected. Have
the vehicle inspected promptly by a NISSAN
dealer or qualified workshop.
•Do not race the engine while warming it up.
•Do not push or tow your vehicle to start the
engine.The turbocharger system uses engine oil for lubrica-
tion and cooling of its rotating components. The tur-
bocharger turbine turns at extremely high speeds
and it can reach an extremely high temperature. It is
essential to maintain a flow of clean oil through the
turbocharger system. A sudden interruption to the
oil supply may cause a malfunction in the turbo-
charger.
To ensure prolonged life and performance of the
turbocharger, it is essential to comply with the fol-
lowing maintenance procedure:
CAUTION
•Change the engine oil of the turbo-charged
diesel engine as prescribed. See the sepa-
rately provided Warranty Information & Main-
tenance Booklet for additional information.
•Use only the recommended engine oil. See
“Capacities and recommended fuel/
lubricants” in the “9. Technical information”
section.
•If the engine has been operating at high rpm
for an extended period of time, let it idle for a
few minutes prior to shutdown.
•Do not accelerate the engine to high rpm im-
mediately after starting it.
THREE-WAY CATALYST (Petrol
engine models)TURBOCHARGER SYSTEM
(Diesel engine models)
5-4Starting and driving
Page 135 of 235
c. Start the engine with your foot off the ac-
celerator pedal. Release the ignition
switch when the engine starts.
If the engine starts, but fails to run, repeat
the procedure from step a.
CAUTION
•Do not operate the starter for more than 15
seconds at a time. If the engine does not start,
turn the ignition switch to the “OFF” position
and wait 10 seconds (Petrol engine models)
or 20 seconds (Diesel engine models) before
cranking again, otherwise the starter could be
damaged.
•If it becomes necessary to start the engine
with a booster battery and jumper leads, the
instructions and cautions contained in the
“Jump-starting” in the “6. In case of
emergency” section should be carefully fol-
lowed.
7.Warm-up
Allow the engine to idle for at least 30 seconds
after starting. Drive at moderate speed for a short
distance first, especially in cold weather.
WARNING
Do not leave the vehicle unattended while the
engine is warming up.
DRIVING WITH MANUAL
TRANSMISSION
CAUTION
•Do not rest your foot on the clutch pedal while
driving. This may cause clutch damage.
•Stop your vehicle completely before shifting
into the R (Reverse) position.
•When you are shifting from one gear to an-
other, be certain to depress the clutch pedal
all the way to the floor to avoid clashing or
chipping the gears.
•Avoid abrupt starts and acceleration for your
safety.
•When quick acceleration is required for some
reason, shift to a lower gear and accelerate
until the vehicle reaches the maximum speed
in each gear. Do not exceed the speed limit of
any gear. Pay special attention when acceler-
ating or when shifting into a lower gear on
slippery surfaces. Sudden acceleration or
down shifting could cause the wheels to skid
and result in loss of control.
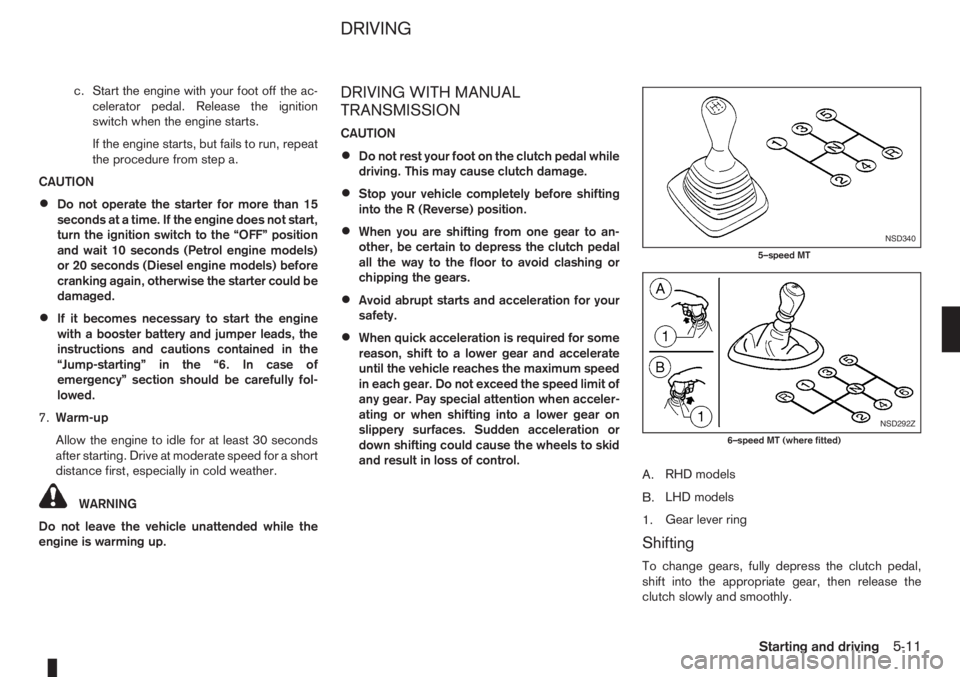
A.RHD models
B.LHD models
1.Gear lever ring
Shifting
To change gears, fully depress the clutch pedal,
shift into the appropriate gear, then release the
clutch slowly and smoothly.
NSD340
5–speed MT
NSD292Z
6–speed MT (where fitted)
DRIVING
Starting and driving5-11