2006 NISSAN FRONTIER ECO mode
[x] Cancel search: ECO modePage 93 of 336

This unit has the following functions:
cMeasures terrestrial magnetism and indi-
cates heading direction of vehicle
cIndicates outside air temperature
With the ignition switch in the ON position, press
the
button as described in the chart below
to activate various features of the automatic anti-
glare review mirror.
Push and hold
the
button for about:Feature:
(Push button again for about 1 sec-
ond to change settings)
1 secondCompass/outside temperature dis-
play toggles on/off
3 secondsOutside temperature display toggles
between °F and °C
8 secondsCompass zone can be changed to
correct false compass readings
10 seconds Compass enters calibration mode
For information about the automatic anti-glare
feature, refer to “Automatic anti-glare rearview
mirror” in the “Pre-driving checks and adjust-
ments” section.
OUTSIDE TEMPERATURE DISPLAY
Push thebutton for about 1 second when
the ignition key is in the ON position to toggle the
outside temperature and compass direction dis-
play
s1on or off.
cTo change from °F to °C, push and hold
the
button for about 3 seconds until
the display begins to flash. Press the button
again to toggle between °F and °C. Once
you have selected °F or °C, the display will
continue to flash for about 5 seconds, then
the temperature will display.cWhen the outside temperature is between
140°F (60°C) and 194°F (90°C) , the display
will read 140°F (60°C) . When the tempera-
ture is above 194°F (90°C) , the display will
read “SC”.
cWhen the outside temperature is between
-40°F (-40°C) and -60°F (-51°C) , the dis-
play will read -40°F (-40°C) . When the tem-
perature is below -60°F (-51°C) , the display
will read “OC”.
cThe outside temperature sensor is located in
front of the radiator. The sensor may be
affected by road or engine heat, wind direc-
tion and other driving conditions. The display
may differ from the actual outside tempera-
ture or the temperature displayed on various
signs or billboards.
cTemperature display will not update unless
the vehicle is moving faster than 12 MPH
(20 km/h) , or the ignition switch has been
OFF for 4 hours.
LIC0583
COMPASS AND OUTSIDE
TEMPERATURE DISPLAY (if so
equipped)
Instruments and controls2-9
ZREVIEW COPYÐ2006 Truck/Frontier(d22)
Owners ManualÐUSA_English(nna)
10/26/05Ðtbrooks
X
Page 99 of 336

4WD warning light (
model)
The 4WD warning light comes on when the key
switch is turned to ON. It turns off soon after the
engine is started.
If the engine or vehicle is not functioning properly,
the warning light will either remain illuminated or
blink. See “4WD warning light” in the “Starting
and driving” section.
CAUTION
cIf the warning light comes on or blinks
during operation, have your vehicle
checked by a NISSAN dealer as soon as
possible.
cDo not drive on dry hard surface roads
in the 4H or 4LO position. If the 4WD
warning light turns on when you are
driving on dry hard surface roads:
– in the 4H position, shift the 4WD shift
switch to 2WD.
– in the 4LO position for automatic
transmission models, stop the ve-
hicle and shift the transmission se-
lector lever to the N position with the
brake pedal depressed and shift the
4WD shift switch to 2WD.– in the 4LO position for manual trans-
mission models, stop the vehicle and
shift the transmission shift lever to
the N position with the clutch pedal
depressed and shift the 4WD shift
switch to 2WD.
cIf the warning light is still on after the
above operation, have your vehicle
checked by a NISSAN dealer as soon as
possible.
Low fuel warning light
This light comes on when the fuel level in the fuel
tank is getting low. Refuel as soon as it is conve-
nient, preferably before the fuel gauge reaches E
(Empty) .There will be a small reserve of fuel
in the tank when the fuel gauge needle
reaches E (Empty) .
Low tire pressure warning
light
Your vehicle is equipped with a tire pressure
monitoring system (TPMS) that monitors the tire
pressure of all tires except the spare.
The low tire pressure warning light warns of low
tire pressure or indicates that the TPMS is not
functioning properly.After the ignition switch is turned ON, this light
illuminates for about 1 second and turns off.
Low tire pressure warning:
If the vehicle is being driven with low tire pres-
sure, the warning light will illuminate.
When the low tire pressure warning light illumi-
nates, you should stop and adjust the tire pres-
sure to the recommended COLD tire pressure
shown on the Tire and Loading Information label
to turn the light OFF.
For additional information, see “Tire pressure
monitoring system (TPMS)” in the “Starting and
driving” section and in the “In case of emergency”
section.
TPMS malfunction:
If the TPMS is not functioning properly, the low
tire pressure warning light will flash for approxi-
mately 1 minute when the ignition switch is
turned ON. The light will remain on after the 1
minute. Have the system checked by a NISSAN
dealer.
For additional information, see “Tire pressure
monitoring system (TPMS)” in the “Starting and
driving” section.
Instruments and controls2-15
ZREVIEW COPYÐ2006 Truck/Frontier(d22)
Owners ManualÐUSA_English(nna)
10/14/05Ðdebbie
X
Page 101 of 336

(if so equipped) , and pre-tensioner seat belt sys-
tems need servicing and your vehicle must be
taken to a NISSAN dealer:
cThe supplemental air bag warning light re-
mains on after approximately 7 seconds.
cThe supplemental air bag warning light
flashes intermittently.
cThe supplemental air bag warning light does
not come on at all.
Unless checked and repaired, the supplemental
restraint system (air bag system) and/or the pre-
tensioner seat belts may not function properly.
For additional details see “Supplemental restraint
system” in the “Safety—Seats, seat belts and
supplemental restraint system” section of this
manual.
WARNING
If the supplemental air bag warning light
is on, it could mean that the supplemental
front air bag, supplemental side air bag (if
so equipped) , curtain side-impact air bag
systems (if so equipped) and/or pre-
tensioner seat belt systems will not oper-
ate in an accident. To help avoid injury to
yourself or others, have your vehicle
checked by a NISSAN dealer as soon as
possible.
INDICATOR LIGHTS
Automatic transmission
position indicator light
When the ignition key is turned to the ON posi-
tion, this indicator light shows the automatic
transmission selector lever position. See “Driving
the vehicle” in the “Starting and driving” section
of this manual.
Cruise main switch indicator
light (if so equipped)
The light comes on when the cruise control main
switch is pushed. The light goes out when the
main switch is pushed again. When the cruise
main switch indicator light comes on, the cruise
control system is operational.
Cruise set switch indicator
light (if so equipped)
The light comes on while the vehicle speed is
controlled by the cruise control system. If the light
blinks while the engine is running, it may indicate
the cruise control system is not functioning prop-
erly. Have the system checked by a NISSAN
dealer.
Electronic locking rear
differential (E-Lock) system
on indicator light (if so
equipped)
This light comes on when the electronic locking
rear differential (E-Lock) system clutch is fully
engaged.
The indicator light flashes when the system is first
turned on. When the system fully engages, the
light remains on. If the switch is on and the
indicator light continues to flash, the system is
not engaged.
For additional information, see “Electronic lock-
ing rear differential (E-Lock) system switch” later
in this section and “Electronic locking rear differ-
ential (E-Lock) system” in the “Starting and driv-
ing” section of this manual.
4WD shift indicator light
(
model)
The light should turn off within 1 second after
turning the ignition switch to ON.
While the engine is running, the 4WD shift indi-
cator light will illuminate the position selected by
the 4WD shift switch.
Instruments and controls2-17
ZREVIEW COPYÐ2006 Truck/Frontier(d22)
Owners ManualÐUSA_English(nna)
10/14/05Ðdebbie
X
Page 102 of 336

The 4WD shift indicator light may blink
while shifting from one drive mode to the
other.
Front passenger air bag
status light
The front passenger air bag status light ()
will be lit and the passenger front air bag will be
OFF depending on how the front passenger seat
is being used.
For front passenger air bag status light operation,
see “Front passenger air bag and status light” in
the “Safety — Seats, seat belts and supplemental
restraint system” section of this manual.
High beam indicator light
(Blue)
This blue light comes on when the headlight high
beams are on and goes out when the low beams
are selected.
The high beam indicator light also comes on
when the passing signal is activated.
Hill descent control (HDC)
system on indicator light (if so
equipped)
When the ignition switch is turned ON, this light
comes on briefly and then turns off.The light comes on when the hill descent control
system is activated.
If the HDC switch is on and the indicator light
blinks, the system is not engaged.
If the indicator light does not come on or blink
when the hill descent switch is on, the system
may not be functioning properly. Have the system
checked by a NISSAN dealer.
For additional information, see “Hill descent con-
trol (HDC) switch” later in this section and “Hill
descent control (HDC) system” in the “Starting
and driving” section of this manual.
Malfunction indicator light
(MIL)
If this indicator light comes on steady or blinks
while the engine is running, it may indicate a
potential emission control malfunction.
The malfunction indicator light may also come on
steady if the fuel-filler cap is loose or missing, or if
the vehicle runs out of fuel. Check to make sure
the fuel-filler cap is installed and closed tightly,
and that the vehicle has at least 3 gallons (11.4
liters) of fuel in the fuel tank.
After a few driving trips, the
light should
turn off if no other potential emission control
system malfunction exists.If this indicator light comes on steady for 20
seconds and then blinks for 10 seconds when
the engine is not running, it indicates that the
vehicle is not ready for an emission control sys-
tem inspection/maintenance test. See “Readi-
ness for inspection/maintenance (I/M) test” in the
“Technical and consumer information” section of
this manual.
Operation
The malfunction indicator light will come on in
one of two ways:
cMalfunction indicator light on steady — An
emission control system malfunction has
been detected. Check the fuel-filler cap. If
the fuel-filler cap is loose or missing, tighten
or install the cap and continue to drive the
vehicle. The
light should turn off after
a few driving trips. If thelight does not
turn off after a few driving trips, have the
vehicle inspected by a NISSAN dealer. You
do not need to have your vehicle towed to
the dealer.
cMalfunction indicator light blinking — An en-
gine misfire has been detected which may
damage the emission control system. To re-
duce or avoid emission control system dam-
age:
2-18Instruments and controls
ZREVIEW COPYÐ2006 Truck/Frontier(d22)
Owners ManualÐUSA_English(nna)
10/14/05Ðdebbie
X
Page 103 of 336

– do not drive at speeds above 45 MPH
(72 km/h) .
– avoid hard acceleration or deceleration.
– avoid steep uphill grades.
– if possible, reduce the amount of cargo
being hauled or towed.
The malfunction indicator light may stop blinking
and come on steady. Have the vehicle inspected
by a NISSAN dealer. You do not need to have
your vehicle towed to the dealer.
CAUTION
Continued vehicle operation without hav-
ing the emission control system checked
and repaired as necessary could lead to
poor driveability, reduced fuel economy,
and possible damage to the emission con-
trol system.
Overdrive off indicator light
(automatic transmission
models only)
This light comes on when the overdrive function
is OFF.
The automatic transmission overdrive function is
controlled by the overdrive switch.See “Driving the vehicle” in the “Starting and
driving” section of this manual.
Security indicator light (if so
equipped)
This light blinks whenever the ignition switch is in
the LOCK, OFF or ACC position. This function
indicates the security system equipped on the
vehicle is operational.
For additional information, see “Security sys-
tems” later in this section.
Slip indicator light for models
with ABLS (if so equipped)
This indicator light comes on if the active brake
limited slip is activated. If activated, the system
will apply braking to the slipping drive wheel(s) ,
giving the non-slipping wheel(s) more traction.
Slip indicator light for models
with VDC (if so equipped)
This indicator light will blink when the traction
control system is limiting wheel spin. Slippery
road conditions may exist if the slip indicator
blinks on. If this happens, adjust your driving
accordingly.
The slip indicator light also comes on when you
turn the ignition key to the ON position. The light
will turn off after about 2 seconds if the system isoperational. If the light does not come on or does
not go off, have the traction control system
checked by a NISSAN dealer.
If the battery is removed or discharged, the trac-
tion control system is disabled and the slip indi-
cator light will not turn off after 2 seconds when
the ignition switch is turned to the ON position.
To reset the system, you must perform the reset
procedure. Refer to “Vehicle dynamic control
(VDC) system” in the “Starting and driving” sec-
tion of this manual.
If the light does not go off after performing the
reset procedure, have the traction control system
checked by a NISSAN dealer.
Transfer 4LO position
indicator light (
model)
The light should turn off within 1 second after
turning the ignition switch to ON.
This light comes on when the 4WD shift switch is
set in the 4LO position with the ignition key in the
ON position.
The transfer case may be damaged if you shift the
switch while driving.
Make sure the transfer 4LO position indicator
light turns on when you shift the 4WD shift switch
to 4LO.
Instruments and controls2-19
ZREVIEW COPYÐ2006 Truck/Frontier(d22)
Owners ManualÐUSA_English(nna)
10/17/05Ðdebbie
X
Page 104 of 336

The indicator light may blink while shifting
from one drive mode to the other.
The 4LO indicator light must stop blinking and
remain illuminated or turn off before shifting the
transmission into gear. If the transmission selec-
tor lever is shifted from the N position to any other
gear when the 4LO indicator light is blinking, the
vehicle may move unexpectedly.
When you shift between 4H and 4LO, follow the
instructions below:
cFor automatic transmission models, stop the
vehicle and shift the transmission selector
lever to the N position with the brake pedal
depressed, then depress and turn the 4WD
shift switch to 4LO or 4H.
cFor manual transmission models, stop the
vehicle and shift the transmission selector
lever to the N position with the clutch pedal
depressed, then depress and turn the 4WD
shift switch to 4LO or 4H.
You cannot move the transfer 4WD shift switch
between 4H and 4LO unless you stop the vehicle
and shift the transmission selector lever to the N
position with the brake pedal (AT models) or
clutch pedal (MT models) depressed.Turn signal/hazard indicator
lights
The appropriate light flashes when the turn signal
switch is activated.
Both lights flash when the hazard switch is turned
on.
Vehicle dynamic control off
indicator light (if so equipped)
This indicator light comes on when the vehicle
dynamic control off switch is pushed to OFF, the
transfer case is in the 4LO position (
model) , or when the vehicle dynamic control sys-
tem is not functioning properly. This indicates the
vehicle dynamic control system is not operating.
Push the vehicle dynamic control off switch again
or restart the engine and the system will operate
normally. See “Vehicle dynamic control (VDC)
system” in the “Starting and driving” section of
this manual.
The vehicle dynamic control light also comes on
when you turn the ignition key to the ON position.
The light will turn off after about 2 seconds if the
system is operational. If the light stays on or
comes on along with the SLIP indicator light
while you are driving, have the vehicle dynamic
control system checked by a NISSAN dealer.If the battery is removed or discharged, the ve-
hicle dynamic control system is disabled and the
VDC indicator light will not turn off after 2 sec-
onds when the ignition switch is turned to the ON
position. To reset the system, you must perform
the reset procedure. Refer to “Vehicle dynamic
control (VDC) system” in the “Starting and driv-
ing” section of this manual.
If the light does not go off after performing the
reset procedure, have the traction control system
checked by a NISSAN dealer.
While the vehicle dynamic control system is op-
erating, you might feel slight vibration or hear the
system working when starting the vehicle or ac-
celerating, but this is normal.
The VDC system will be disabled and the VDC
light will illuminate when the electronic locking
rear differential (E-lock) system switch (if so
equipped) is turned on and the E-lock system is
engaged. If the E-lock system disengages or the
switch is turned off, the VDC system will be
enabled and the VDC light will turn off.
2-20Instruments and controls
ZREVIEW COPYÐ2006 Truck/Frontier(d22)
Owners ManualÐUSA_English(nna)
10/17/05Ðdebbie
X
Page 121 of 336

WARNING
cProperly secure all cargo with ropes or
straps to help prevent it from sliding or
shifting. In a sudden stop or collision,
unsecured cargo could cause personal
injury.
cThe cargo restrained in the under-seat
storage bins must not exceed the
weight limits listed below or the bins
may not stay secured. In a sudden stop
or collision, the unsecured bins could
cause personal inury.
King cab model: 16 lb (7.25 kg)
Crew cab model
Driver’s side: 16 lb (7.25 kg)
Passenger’s side: 25 lb (11.33 kg)
cIf the under-seat storage bins are re-
moved for any reason, they should be
securely stored to prevent them from
causing injury to passengers or damage
to the vehicle in case of sudden braking
or an accident.
cDo not place sharp objects in the under-
seat storage bins. Such objects may
become dangerous projectiles and
cause injury when the vehicle is moving
or if the vehicle is involved in a collision.To access the under-seat storage bins:
For King cab model, lift up the jump seat. Refer to
“Jump seat” in the “Safety—Seats, seat belts and
supplemental restraint system” section earlier in
this manual.
For Crew cab model, lift up the rear bench seat.
Refer to “Folding the rear bench seat” in the
“Safety—Seats, seat belts and supplemental re-
straint system” section earlier in this manual.
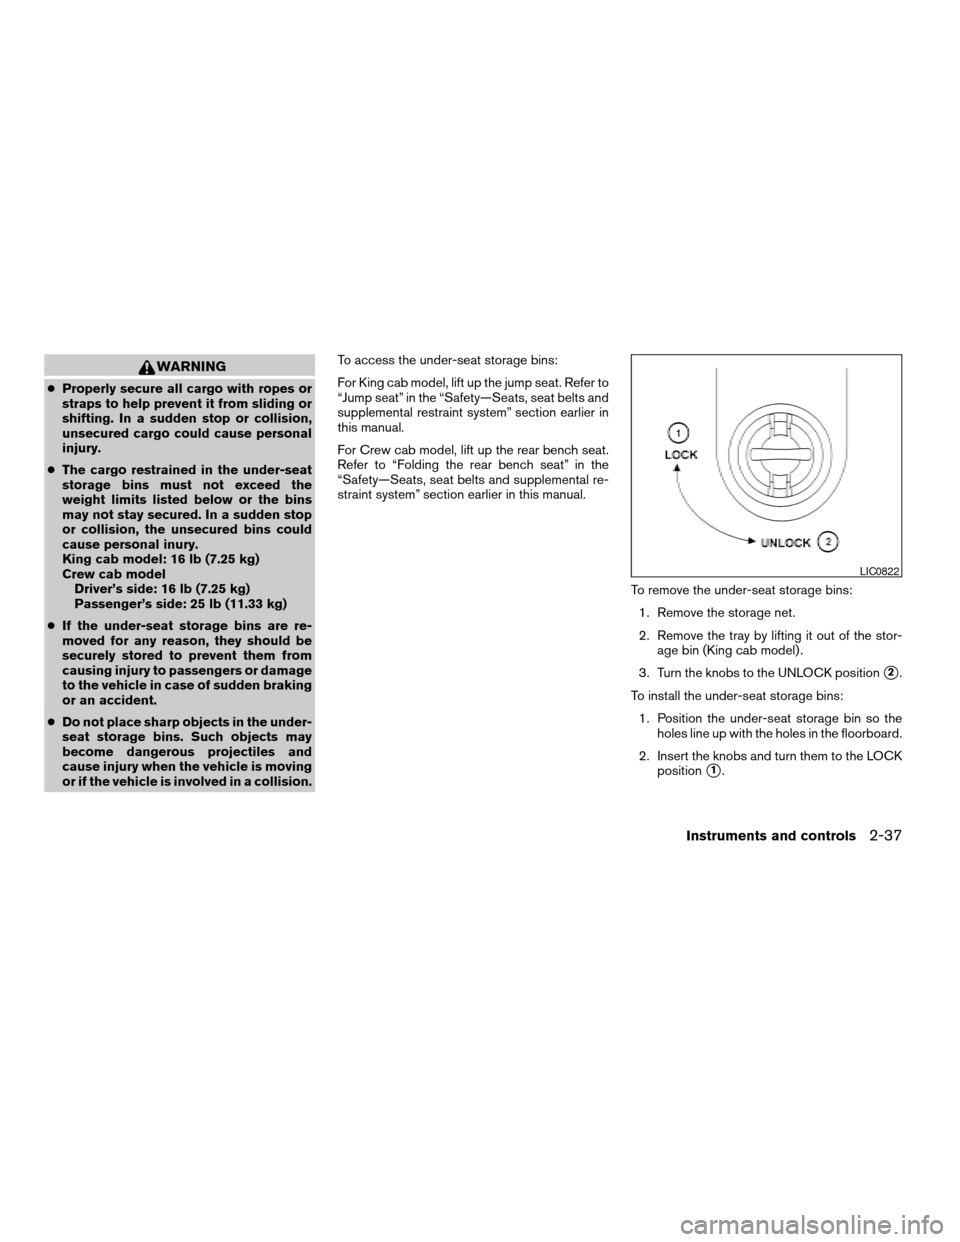
To remove the under-seat storage bins:
1. Remove the storage net.
2. Remove the tray by lifting it out of the stor-
age bin (King cab model) .
3. Turn the knobs to the UNLOCK position
s2.
To install the under-seat storage bins:
1. Position the under-seat storage bin so the
holes line up with the holes in the floorboard.
2. Insert the knobs and turn them to the LOCK
position
s1.
LIC0822
Instruments and controls2-37
ZREVIEW COPYÐ2006 Truck/Frontier(d22)
Owners ManualÐUSA_English(nna)
10/17/05Ðdebbie
X
Page 128 of 336

If you hear wind noise coming from the roof rack
while driving, adjust the roof rack crossbar to the
neutral position, rearward ofDon the side rails.
WARNING
Properly secure all cargo with ropes or
straps to help prevent it from sliding or
shifting. In a sudden stop or collision, un-
secured cargo could cause personal
injury.
CAUTION
Use care when placing or removing items
from the roof rack. If you cannot comfort-
ably lift the items onto the roof rack from
the ground, use a ladder or stool.
POWER WINDOWS (if so equipped)
WARNING
cMake sure that all passengers have
their hands, etc. inside the vehicle while
it is in motion and before closing the
windows. Use the window lock switch
to prevent unexpected use of the power
windows.
cDo not leave children unattended inside
the vehicle. They could unknowingly ac-
tivate switches or controls and become
trapped in a window. Unattended chil-
dren could become involved in serious
accidents.
The power windows operate when the ignition
switch is in the ON position, or for about 45
seconds after the ignition switch is turned to the
OFF position. If the driver’s or passenger’s door
is opened during this period of about 45 sec-
onds, power to the windows is canceled.
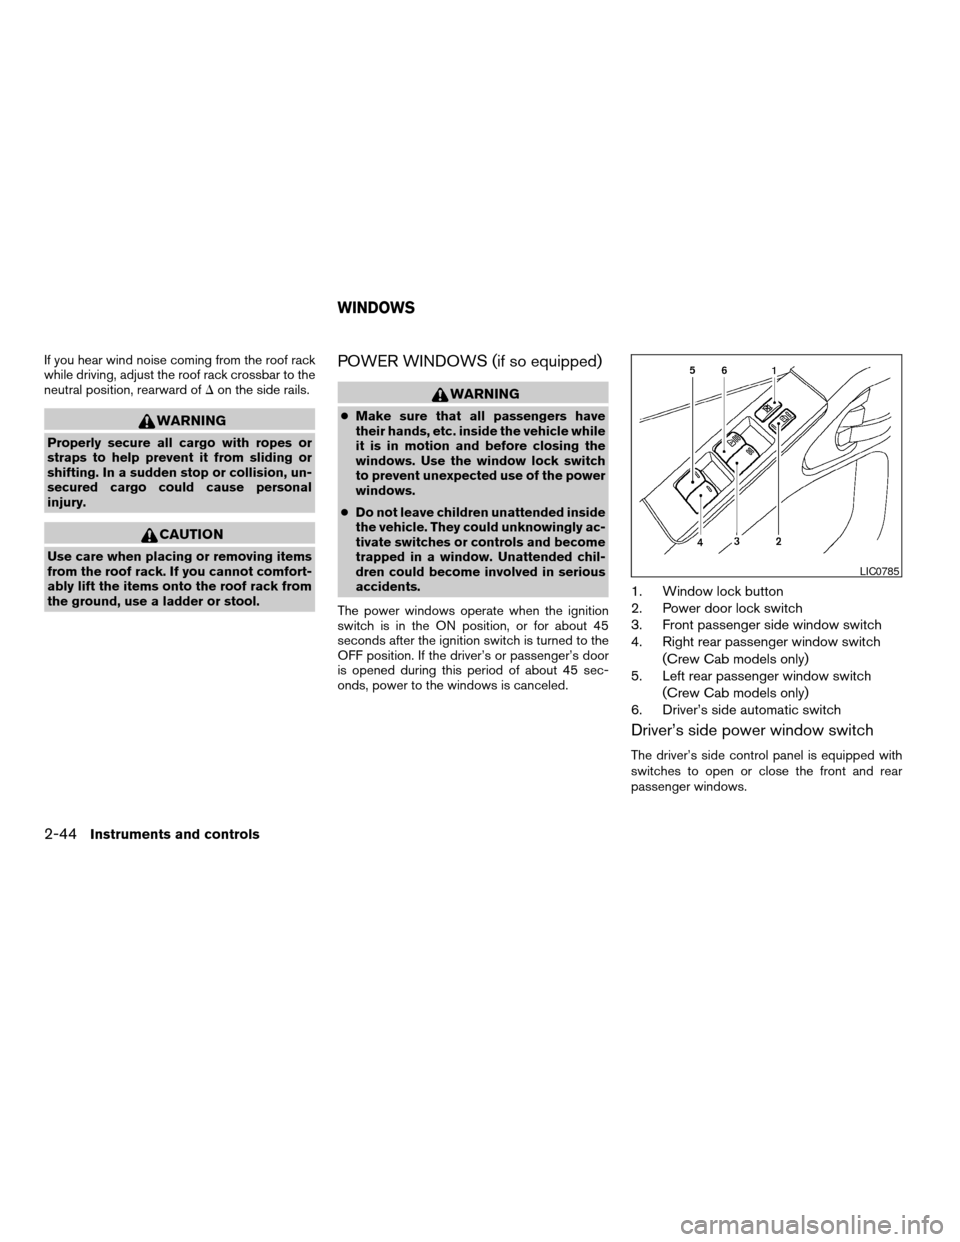
1. Window lock button
2. Power door lock switch
3. Front passenger side window switch
4. Right rear passenger window switch
(Crew Cab models only)
5. Left rear passenger window switch
(Crew Cab models only)
6. Driver’s side automatic switch
Driver’s side power window switch
The driver’s side control panel is equipped with
switches to open or close the front and rear
passenger windows.
LIC0785
WINDOWS
2-44Instruments and controls
ZREVIEW COPYÐ2006 Truck/Frontier(d22)
Owners ManualÐUSA_English(nna)
10/17/05Ðdebbie
X