2006 NISSAN ARMADA rear view mirror
[x] Cancel search: rear view mirrorPage 92 of 352

2 Instruments and controls
Instrument panel...................................2-2
Meters and gauges................................2-3
Speedometer and odometer.....................2-4
Tachometer....................................2-5
Engine coolant temperature gauge...............2-5
Fuel gauge....................................2-6
Engine oil pressure gauge.......................2-6
Voltmeter......................................2-7
Automatic transmission fluid temperature
gauge (if so equipped)..........................2-7
Compass and outside temperature display...........2-8
Outside temperature display.....................2-8
Compass display...............................2-9
Warning/indicator lights and audible reminders......2-12
Checking bulbs...............................2-12
Warning lights................................2-13
Indicator lights................................2-17
Audible reminders.............................2-19
Security systems.................................2-20
Vehicle security system.........................2-20
Nissan vehicle immobilizer system...............2-21
Windshield wiper and washer switch...............2-22
Switch operation..............................2-22Rear window wiper and washer switch..............2-23
Rear window and outside mirror defroster switch.....2-24
Headlight and turn signal switch....................2-24
Headlight control switch........................2-24
Daytime running light system (Canada only)......2-26
Instrument brightness control...................2-27
Turn signal switch.............................2-27
Fog light switch (if so equipped)................2-27
Hazard warning flasher switch.....................2-28
Horn............................................2-28
Heated seat (if so equipped).......................2-29
Vehicle dynamic control (VDC) off switch............2-29
Rear sonar system off switch......................2-30
Tow mode switch.................................2-30
Power outlet.....................................2-31
Cigarette lighter..................................2-32
Storage.........................................2-33
Instrument panel storage trays..................2-33
Console box..................................2-33
Glove box....................................2-35
Sunglasses holder.............................2-35
Map pockets..................................2-36
Seatback pocket..............................2-36
ZREVIEW COPYÐ2006 Armada(wzw)
Owners ManualÐUSA_English(nna)
06/15/05Ðdebbie
X
Page 116 of 352

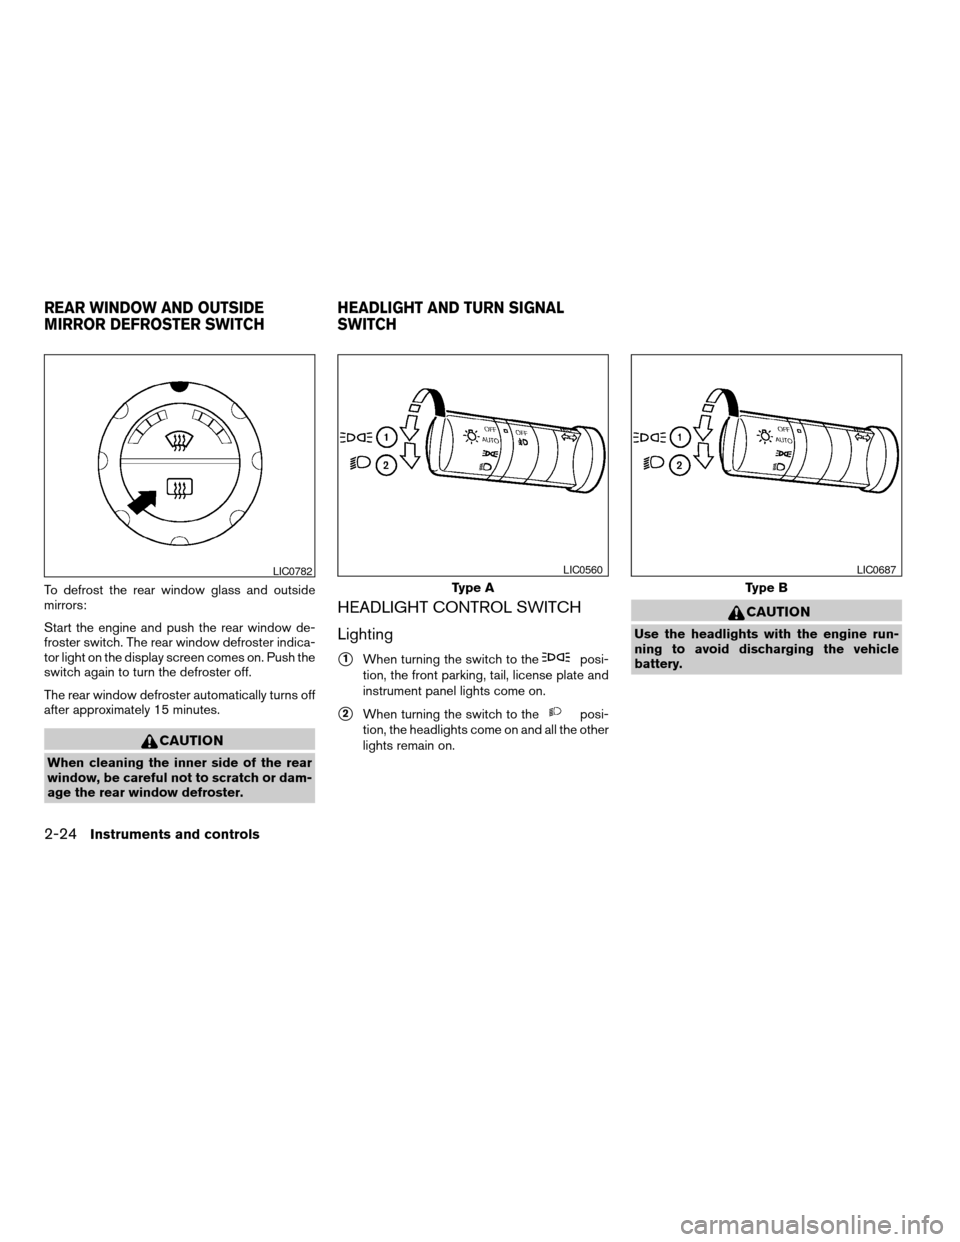
To defrost the rear window glass and outside
mirrors:
Start the engine and push the rear window de-
froster switch. The rear window defroster indica-
tor light on the display screen comes on. Push the
switch again to turn the defroster off.
The rear window defroster automatically turns off
after approximately 15 minutes.
CAUTION
When cleaning the inner side of the rear
window, be careful not to scratch or dam-
age the rear window defroster.
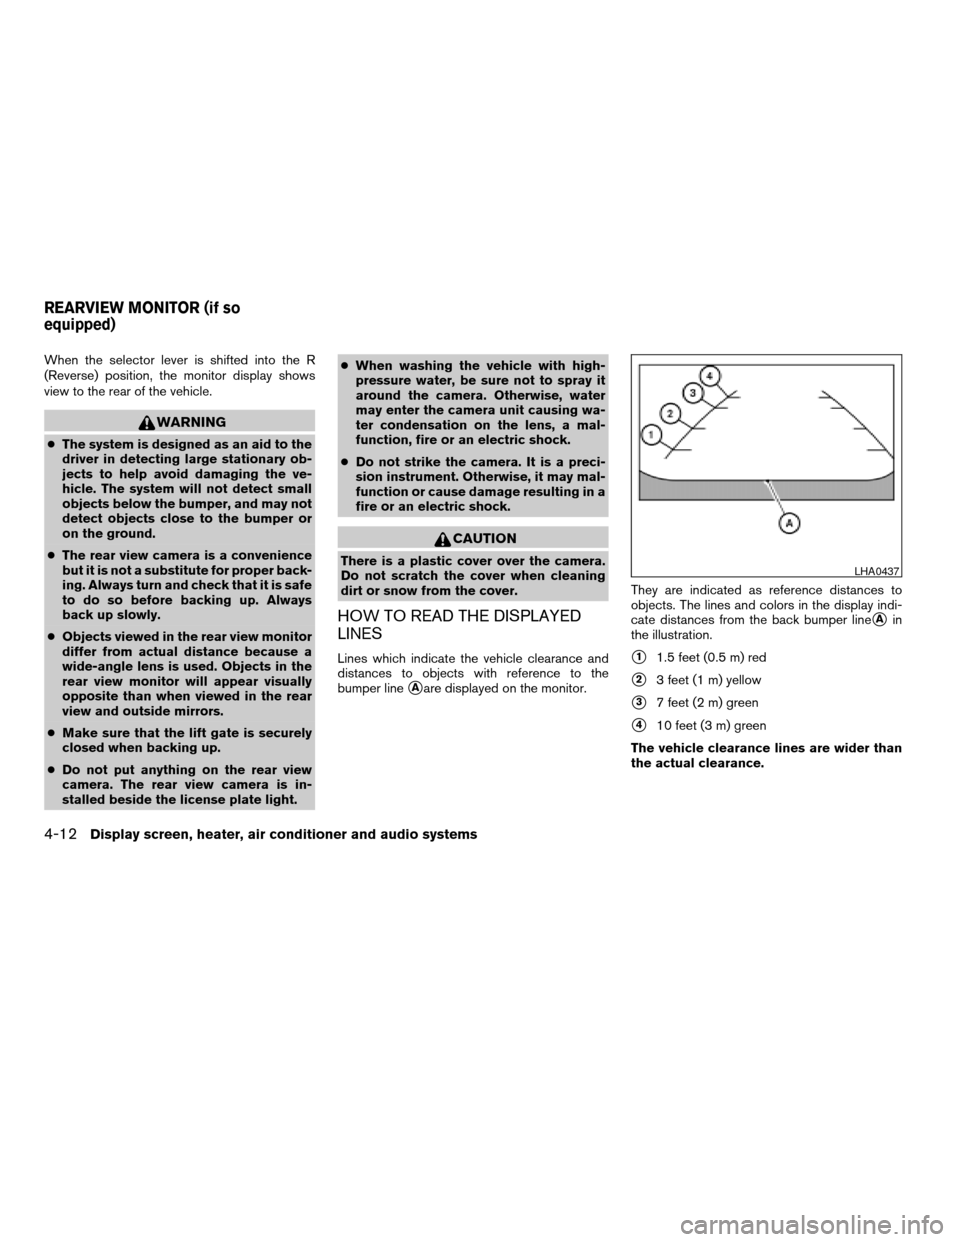
HEADLIGHT CONTROL SWITCH
Lighting
s1When turning the switch to theposi-
tion, the front parking, tail, license plate and
instrument panel lights come on.
s2When turning the switch to theposi-
tion, the headlights come on and all the other
lights remain on.
CAUTION
Use the headlights with the engine run-
ning to avoid discharging the vehicle
battery.
LIC0782
Type A
LIC0560
Type B
LIC0687
REAR WINDOW AND OUTSIDE
MIRROR DEFROSTER SWITCHHEADLIGHT AND TURN SIGNAL
SWITCH
2-24Instruments and controls
ZREVIEW COPYÐ2006 Armada(wzw)
Owners ManualÐUSA_English(nna)
06/15/05Ðdebbie
X
Page 149 of 352

3 Pre-driving checks and adjustments
Keys .............................................3-2
Nissan vehicle immobilizer system keys...........3-2
Doors............................................3-3
Locking with key................................3-3
Locking with inside lock knob....................3-4
Locking with power door lock switch.............3-4
Child safety rear door lock.......................3-5
Remote keyless entry system.......................3-5
How to use remote keyless entry system..........3-6
Hood............................................3-9
Lift gate..........................................3-9
Operating the manual lift gate...................3-10
Operating the power lift gate
(if so equipped)...............................3-10
Cancel switch.................................3-12
Lift gate release...............................3-13Glass hatch......................................3-14
Fuel-filler door...................................3-14
Fuel filler cap..................................3-14
Steering wheel...................................3-16
Tilt operation..................................3-16
Pedal position adjustment.........................3-16
Sun visors.......................................3-17
Vanity mirrors.................................3-17
Mirrors..........................................3-18
Automatic anti-glare rearview mirror.............3-18
Outside mirrors...............................3-18
Automatic drive positioner (if so equipped)..........3-20
Memory storage function.......................3-20
Entry/exit function.............................3-21
System operation..............................3-22
ZREVIEW COPYÐ2006 Armada(wzw)
Owners ManualÐUSA_English(nna)
06/15/05Ðdebbie
X
Page 166 of 352

AUTOMATIC ANTI-GLARE
REARVIEW MIRROR
The inside mirror is designed so that it automati-
cally dims according to the intensity of the head-
lights of the vehicle following you. The automatic
anti-glare feature operates only when the ignition
switch is in the ON position.
The indicator light
s1will illuminate when the
automatic anti-glare feature is operating.
To turn off the anti-glare feature, push the
button. The indicator light will turn off.
To turn on the anti-glare feature again, push
the
button.The indicator light will turn on.NOTE:
Do not hang any objects over the sensors
s2or apply glass cleaner to the sensors.
Doing so will reduce the sensitivity of the
sensors, resulting in improper operation.
OUTSIDE MIRRORS
The outside mirror remote control will operate
only when the ignition switch is in the ACC or ON
position.
Move the small switch
s1to select the right or left
mirror. Adjust each mirror to the desired position
using the large switch
s2.
WPD0331LPD0237
MIRRORS
3-18Pre-driving checks and adjustments
ZREVIEW COPYÐ2006 Armada(wzw)
Owners ManualÐUSA_English(nna)
06/15/05Ðdebbie
X
Page 168 of 352

Automatic anti-glare outside mirrors (if
so equipped)
The outside mirrors will automatically dim during
nighttime conditions to reduce the glare from the
headlights of trailing vehicles. The automatic anti-
glare feature operates only when the ignition
switch is in the ON position.
The automatic anti-glare feature will be on when
starting the vehicle. The indicator light on the
automatic anti-glare rearview mirror will illuminate
when the automatic anti-glare feature is operat-
ing.
To turn off the anti-glare feature, push the
button on the rearview mirror. The indicator light
will turn off.
To turn on the anti-glare feature again, push
the
button on the rearview mirror. The in-
dicator light will turn on.
For information on the automatic anti-glare rear-
view mirror, see “Automatic anti-glare rearview
mirror” earlier in this section.
Heated mirrors
The outside mirrors can be heated to defrost,
defog, or de-ice for improved visibility. For addi-
tional information, see “Rear window and outside
mirror defroster switch” in the “Instrument and
controls” section of this manual.The automatic drive positioner system has two
features:
cMemory storage function
cEntry/exit function
MEMORY STORAGE FUNCTION
Two positions for the driver’s seat, accelerator
and brake pedals, and outside mirrors can be
stored in the automatic drive positioner memory.
Follow these procedures to use the memory sys-
tem.
1. Set the automatic transmission selector le-
ver to the P (Park) position.
2. Turn the ignition ON.
LPD0260
AUTOMATIC DRIVE POSITIONER (if
so equipped)
3-20Pre-driving checks and adjustments
ZREVIEW COPYÐ2006 Armada(wzw)
Owners ManualÐUSA_English(nna)
06/16/05Ðdebbie
X
Page 182 of 352

When the selector lever is shifted into the R
(Reverse) position, the monitor display shows
view to the rear of the vehicle.
WARNING
cThe system is designed as an aid to the
driver in detecting large stationary ob-
jects to help avoid damaging the ve-
hicle. The system will not detect small
objects below the bumper, and may not
detect objects close to the bumper or
on the ground.
cThe rear view camera is a convenience
but it is not a substitute for proper back-
ing. Always turn and check that it is safe
to do so before backing up. Always
back up slowly.
cObjects viewed in the rear view monitor
differ from actual distance because a
wide-angle lens is used. Objects in the
rear view monitor will appear visually
opposite than when viewed in the rear
view and outside mirrors.
cMake sure that the lift gate is securely
closed when backing up.
cDo not put anything on the rear view
camera. The rear view camera is in-
stalled beside the license plate light.cWhen washing the vehicle with high-
pressure water, be sure not to spray it
around the camera. Otherwise, water
may enter the camera unit causing wa-
ter condensation on the lens, a mal-
function, fire or an electric shock.
cDo not strike the camera. It is a preci-
sion instrument. Otherwise, it may mal-
function or cause damage resulting in a
fire or an electric shock.
CAUTION
There is a plastic cover over the camera.
Do not scratch the cover when cleaning
dirt or snow from the cover.
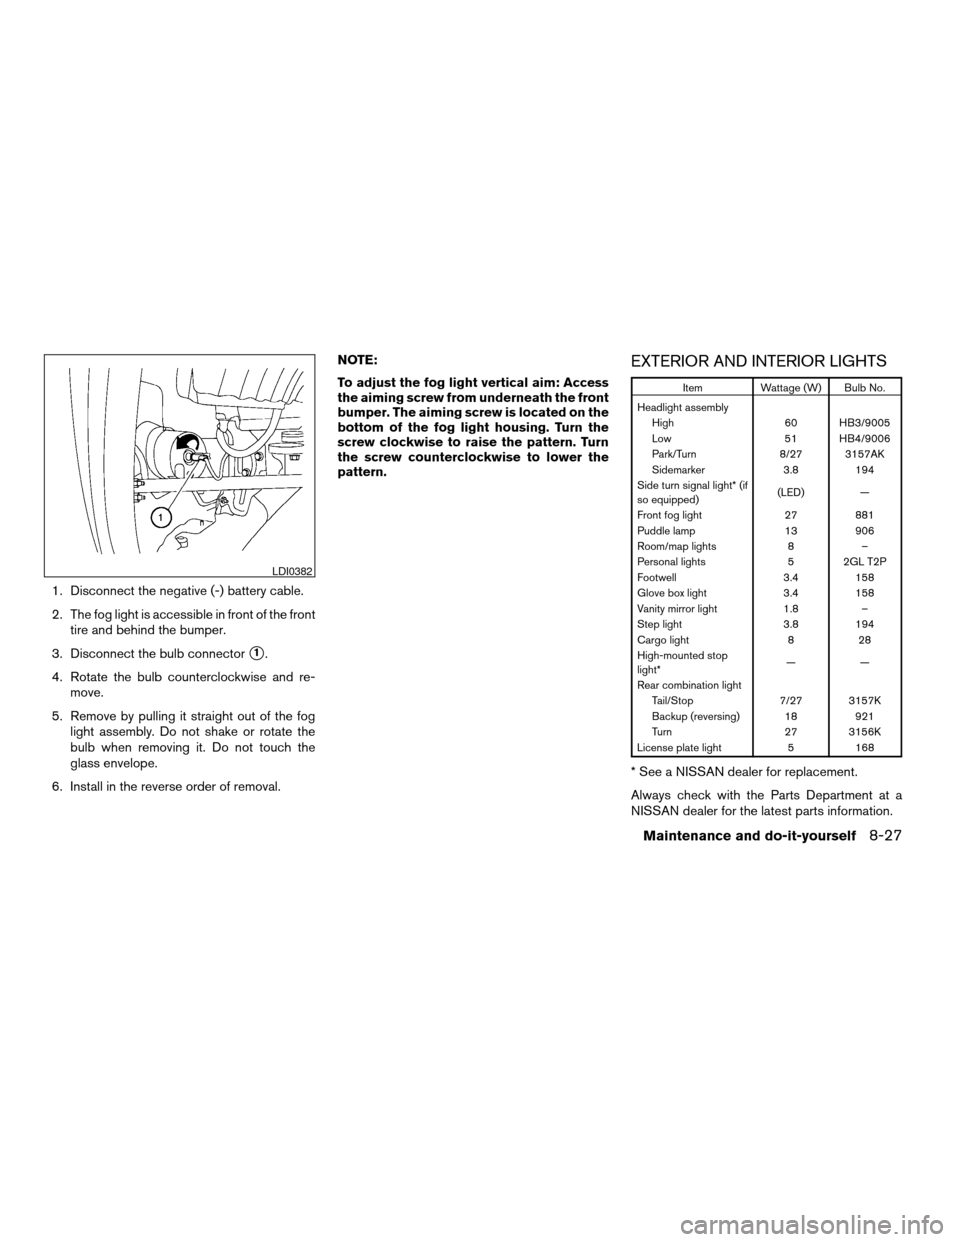
HOW TO READ THE DISPLAYED
LINES
Lines which indicate the vehicle clearance and
distances to objects with reference to the
bumper line
sAare displayed on the monitor.They are indicated as reference distances to
objects. The lines and colors in the display indi-
cate distances from the back bumper line
sAin
the illustration.
s11.5 feet (0.5 m) red
s23 feet (1 m) yellow
s37 feet (2 m) green
s410 feet (3 m) green
The vehicle clearance lines are wider than
the actual clearance.
LHA0437
REARVIEW MONITOR (if so
equipped)
4-12Display screen, heater, air conditioner and audio systems
ZREVIEW COPYÐ2006 Armada(wzw)
Owners ManualÐUSA_English(nna)
06/16/05Ðdebbie
X
Page 293 of 352

1. Disconnect the negative (-) battery cable.
2. The fog light is accessible in front of the front
tire and behind the bumper.
3. Disconnect the bulb connector
s1.
4. Rotate the bulb counterclockwise and re-
move.
5. Remove by pulling it straight out of the fog
light assembly. Do not shake or rotate the
bulb when removing it. Do not touch the
glass envelope.
6. Install in the reverse order of removal.NOTE:
To adjust the fog light vertical aim: Access
the aiming screw from underneath the front
bumper. The aiming screw is located on the
bottom of the fog light housing. Turn the
screw clockwise to raise the pattern. Turn
the screw counterclockwise to lower the
pattern.
EXTERIOR AND INTERIOR LIGHTS
Item Wattage (W) Bulb No.
Headlight assembly
High 60 HB3/9005
Low 51 HB4/9006
Park/Turn 8/27 3157AK
Sidemarker 3.8 194
Side turn signal light* (if
so equipped)(LED) —
Front fog light 27 881
Puddle lamp 13 906
Room/map lights 8 –
Personal lights 5 2GL T2P
Footwell 3.4 158
Glove box light 3.4 158
Vanity mirror light 1.8 –
Step light 3.8 194
Cargo light 8 28
High-mounted stop
light*——
Rear combination light
Tail/Stop 7/27 3157K
Backup (reversing) 18 921
Turn 27 3156K
License plate light 5 168
* See a NISSAN dealer for replacement.
Always check with the Parts Department at a
NISSAN dealer for the latest parts information.
LDI0382
Maintenance and do-it-yourself8-27
ZREVIEW COPYÐ2006 Armada(wzw)
Owners ManualÐUSA_English(nna)
06/16/05Ðdebbie
X
Page 331 of 352

Pre-towing tips
cBe certain your vehicle maintains a level
position when a loaded and/or unloaded
trailer is hitched. Do not drive the vehicle if it
has an abnormal nose-up or nose-down
condition; check for improper tongue load,
overload, worn suspension or other possible
causes of either condition.
cAlways secure items in the trailer to prevent
load shift while driving.
cLoad the trailer so approximately 60% of the
trailer load is in the front half and 40% is in
the back half.
cCheck your hitch, trailer tire pressure, ve-
hicle tire pressure, trailer light operation, and
trailer wheel lug nuts every time you attach a
trailer to the vehicle.
cBe certain your rearview mirrors conform to
all federal, state or local regulations. If not,
install any mirrors required for towing before
driving the vehicle.
Trailer towing tips
In order to gain skill and an understanding of the
vehicle’s behavior, you should practice turning,
stopping and backing up in an area which is free
from traffic. Steering stability and braking perfor-mance will be somewhat different than under
normal driving conditions.
cAlways secure items in the trailer to prevent
load shift while driving.
cAvoid abrupt starts, acceleration or stops.
cAvoid sharp turns or lane changes.
cAlways drive your vehicle at a moderate
speed.
cWhen backing up, hold the bottom of the
steering wheel with one hand. Move your
hand in the direction in which you want the
trailer to go. Make small corrections and
back up slowly. If possible, have someone
guide you when you are backing up.
cAlways block the wheels on both vehicle and
trailer when parking. Parking on a slope is
not recommended; however, if you must do
so, first block the wheels and apply the park-
ing brake, and then move the transmission
shift selector lever into the P (Park) position.
If you move the shift selector lever to the P
(Park) position before blocking the wheels
and applying the parking brake, transmission
damage could occur.
c
When going down a hill, shift into a lower gear
and use the engine braking effect. When go-
ing up a long grade, downshift the transmis-sion to a lower gear and reduce speed to
reduce chances of engine overloading and/or
overheating. However, for long steep grades,
do not stay in 1st gear when driving above 35
MPH (56 km/h) or 2nd gear when driving
above 58 MPH (93 km/h) .
cIf the engine coolant rises to an extremely
high temperature when the air conditioner
system is on, turn off the air conditioner.
Coolant heat can be additionally vented by
opening the windows, switching the fan
control to high and setting the temperature
control to the HOT position.
cTrailer towing requires more fuel than normal
circumstances.
cAvoid towing a trailer for your vehicle’s first
500 miles (805 km) .
cFor the first 500 miles (805 km) that you do
tow, do not drive over 50 MPH (80 km/h) .
cHave your vehicle serviced more often than
at intervals specified in the recommended
Maintenance Schedule in the “NISSAN Ser-
vice and Maintenance Guide”.
cWhen making a turn, your trailer wheels will
be closer to the inside of the turn than your
vehicle wheels. To compensate for this,
make a larger than normal turning radius
during the turn.
Technical and consumer information9-23
ZREVIEW COPYÐ2006 Armada(wzw)
Owners ManualÐUSA_English(nna)
06/16/05Ðdebbie
X