Page 15 of 168
13
OVERVIEW REPAIRS OPERATION CONTROLS DATA INDEX
1 Tachometer68
with indicator and warning lamps,
page16ff
2 Display for onboard computer69
without onboard computer:
Display of outside temperature and cur-
rent vehicle speed
3 Speedometer with indicator and warn-
ing lamps, page16 ff4 Indicator for
>Odometer66
>Trip odometer66
>Service interval68
>Program indicator for automatic
transmission with Steptronic57
>Clock
5 Trip odometer, reset to zero66
Setting the clock666 Fuel gauge67
7 Engine coolant temperature gauge67
DISPLAY ELEMENTS
Page 16 of 168
14
1Tachometer68
with indicator and warning lamps,
page16ff
2 Display for onboard computer3 Speedometer with indicator and warn-
ing lamps, page16 ff
4 Trip odometer, reset to zero66
Setting the clock665 Indicator for
>Odometer66
>Trip odometer66
>Service interval68
>Program indicator for automatic
transmission with Steptronic57
>Clock
DISPLAY ELEMENTS WITH NAVIGATION SYSTEM* OR COCKPIT CHRONO PACK*
Page 68 of 168

66
ODOMETER CLOCK FUEL GAUGE
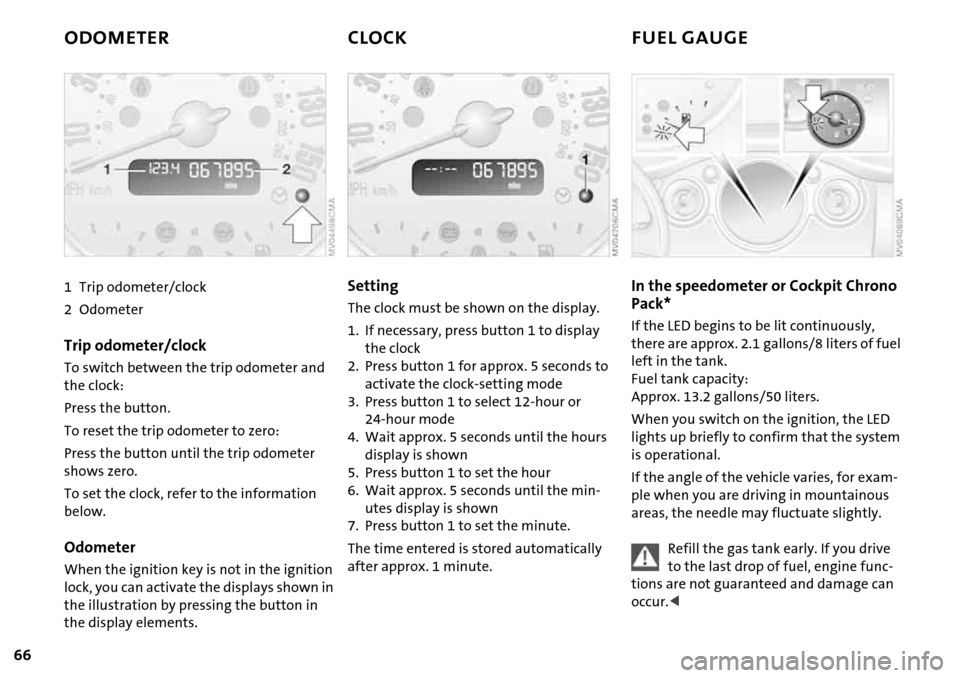
1 Trip odometer/clock
2Odometer
Trip odometer/clock
To switch between the trip odometer and
the clock:
Press the button.
To reset the trip odometer to zero:
Press the button until the trip odometer
shows zero.
To set the clock, refer to the information
below.
Odometer
When the ignition key is not in the ignition
lock, you can activate the displays shown in
the illustration by pressing the button in
the display elements.
Setting
The clock must be shown on the display.
1. If necessary, press button 1 to display
the clock
2. Press button 1 for approx. 5 seconds to
activate the clock-setting mode
3. Press button 1 to select 12-hour or
24-hour mode
4. Wait approx. 5 seconds until the hours
display is shown
5. Press button 1 to set the hour
6. Wait approx. 5 seconds until the min-
utes display is shown
7. Press button 1 to set the minute.
The time entered is stored automatically
after approx. 1 minute.
In the speedometer or Cockpit Chrono
Pack*
If the LED begins to be lit continuously,
there are approx. 2.1 gallons/8 liters of fuel
left in the tank.
Fuel tank capacity:
Approx. 13.2 gallons/50 liters.
When you switch on the ignition, the LED
lights up briefly to confirm that the system
is operational.
If the angle of the vehicle varies, for exam-
ple when you are driving in mountainous
areas, the needle may fluctuate slightly.
Refill the gas tank early. If you drive
to the last drop of fuel, engine func-
tions are not guaranteed and damage can
occur.<
Page 140 of 168

138
VEHICLE BATTERY
Storage location
MINI COOPER and MINI COOPER Convert-
ible:
The battery is located in the engine com-
partment, refer to page112.
MINI COOPER S and MINI COOPER S Con-
vertible:
The battery is located in the luggage com-
partment under the floor mat.
Battery care
The battery is absolutely maintenance-free,
that is, the original electrolyte will normally
last for the service life of the battery under
moderate climatic conditions. Your MINI
Dealer will be glad to advise you if you have
any questions regarding the battery.
Charging the battery
Only charge the battery in the vehicle via
the terminals in the engine compartment
with the engine switched off, refer to
'Jump-starting', page140.
Disposal
After replacing old batteries, return
the used batteries to your MINI
Dealer or to a recycling point. Maintain the
battery in an upright position for transport
and storage. Secure the battery to prevent
it from tilting during transport.<
Power failure
After a temporary power failure, e.g. due to
a discharged battery, some of your vehicle's
equipment will function only to a limited
extent and must be reinitialized or read-
justed. Individual settings are also lost and
must be reprogrammed:
>The clock must be reset, refer to page66
>The power windows must be reinitial-
ized, refer to page32
>Radio
*:
The stations must be reset, refer to the
Owner's Manual for Radio
>Navigation system
*:
It may take some time for its operability
to be restored, refer to the Owner's Man-
ual for Navigation System.