Page 1 of 64
Introduction
3
How to get going 4
System overview
7
Audio features
11
AM/FM 11
CD 14
DVD (if equipped) 15
Sound features 19
Speed compensated volume 22
System features
22
Date/time settings 23
Security 25
Help 26
Navigation features
31
Map icons 34
Destination entry 36
Previous destination 38
Address book 39
Point of Interest (POI) 41
Intersection 45
Freeway entrance/exit 46
Destination way points 48
Map preferences 50
Quick POIs 53
Avoid areas 53
Table of Contents
1
2006 Navigator(nav)
Supplement
USA(fus)
Page 3 of 64

NAVIGATION SYSTEM
Your vehicle is equipped with a navigation system which allows you to
listen to the radio, play CDs, and also navigate the vehicle using a
navigation map DVD.
Your system has a large range of features, yet is easy to use. Guidance is
shown on the display screen and is supplemented with voice prompts.
The display screen provides full information for operating the system
through the use of tabbed menus, text screens, and map displays. Screen
selections are made by touching the desired selection on the touch
screen.
DRIVING RESTRICTIONS
In order to prevent the navigation system from distracting the driver,
access to certain functions are restricted when the vehicle is traveling
above 5 MPH. (For example, only QUICK DEST (Destination) items are
available for destination entry. Refer toDestination Programming).
When the vehicle is in motion, the following functions are restricted:
•Scrolling of long lists
•Continuous scrolling of map
2006 Navigator(nav)
Supplement
USA(fus)
Introduction
3
Page 6 of 64

TO USE THE NAVIGATION SYSTEM:
1. Ensure that the vehicle ignition is on, and the navigation map DVD is
loaded into the navigation map DVD player.
2. Press DEST.
3. Select the desired type of
destination entry: Quick Destination,
Previous Destination, Address Book,
POI, Address (shown), Map, Phone
Number, Intersection or Freeway
Entrance/Exit.
4. Enter the required information.
Please note that:
•The system uses a Smart Speller, which facilitates entering information
through the keyboard.
•Accented characters in English, Spanish and French will be converted
internally to non-accented characters for search purposes.
5. The screen will show the point
entered in a map. If this is the
intended destination, press SET AS
DESTINATION. COMPUTING
ROUTE will display while the
system is computing the route.
6. Select the desired route on the
right hand side of the screen. There
will be up to three routes possible
from which to choose, each
highlighted with a different color.
For each route, the overall distance,
route conditions and the estimated
travel time are displayed.
7. Press START ROUTE and follow the instructions.
2006 Navigator(nav)
Supplement
USA(fus)
Introduction
6
Page 8 of 64
 in radio mode, tune to the selection. Press and
hold the desired memory preset button (1–6")
Refer to the System Overview
graphics on the previous page.
1.Memory presets:To save a
station (AM/FM1/FM2) in radio mode, tune to the selection. Press and
hold the desired memory preset button (1–6). Press the memory preset
buttons (1-6) to access your preset stations. In CD mode, press the
memory preset buttons (1-6) to play the disc in the corresponding slot
location.
2.CD slot:To load a CD: Press LOAD and a specific memory preset to
load a CD to a specific slot. Once LOAD CD# appears in the display, the
CD door will open. Insert the CD label side up.
3.
(Eject):Press the eject
button to eject a single disc. Press
and hold the button to eject all discs
present in the system. To eject a specific disc, EJECT and then press the
corresponding memory preset button. If you do not select a specific disc,
the system will automatically eject the disc that is currently playing.
4.LOAD:Press the load button to
load a single disc. Press and hold
the button to load discs in all empty
slot locations.
5.MAP:Press to access the
navigation map. Press while the map
display is active to re-center the
map on the current vehicle position. Press the button while the map
display is active and a route is active to step through the different map
guidance views.
6.DEST (Destination):Press to
access the navigation destination
entry menu. Press while in the
navigation destination entry menu to show additional destination entry
techniques.
7.NAV (Navigation):Press to
access the navigation menu. Press
while in the navigation menu to step
through the navigation menu tabs.
2006 Navigator(nav)
Supplement
USA(fus)
System overview
8
Page 23 of 64
•SAMPLE MAP:Shows you how the map will appear with the current
settings
DATE/TIME
To access the date/time settings:
1. Ensure that the navigation system is ON.
2. Press MENU. The Menu screen will display.
3. Press DATE / TIME. You may then select from the following options:
SHOW CLOCK / SHOW CALENDAR:Press to toggle between CLOCK
and CALENDAR screens. Under the CLOCK screen, the following
buttons will be available:
•CLOCK ON/OFF :Press ON to enable the clock display in the status
bar. Press OFF to disable the clock display in the status bar.
•TIME SET BUTTONS:Press + or – to adjust the hours and minutes.
•24 HOUR FORMAT:If enabled, the system will display military time.
If disabled, the user must select AM or PM.
•DAYLIGHT SAVINGS TIME:Automatically prompts you to adjust
the clock according to the daylight savings calendar.
•SHOW CALENDAR:Press to display the calendar screen.
2006 Navigator(nav)
Supplement
USA(fus)
System features
23
Page 27 of 64
2. Press MENU.
3. Press HELP. You may then select from:
•BASIC OPERATION:This screen will provide basic help with the
hard buttons on the system, providing a brief description for each
button.
•DRIVING RESTRICTIONS:This screen will inform you that due to
driver distraction and safety concerns, certain features will be
restricted when the vehicle is in motion.
•NAVIGATION DVD INFORMATION:Press to access information on
the navigation map DVD — basic operation , how to access the DVD,
and also replacement and contact information for the Customer
Relationship Center.
SYSTEM INFORMATION
The system information screen gives you contact information, current
location and access to the Navigation DVD. To access the System
Information screen:
1. Ensure that the system is on.
2006 Navigator(nav)
Supplement
USA(fus)
System features
27
Page 28 of 64
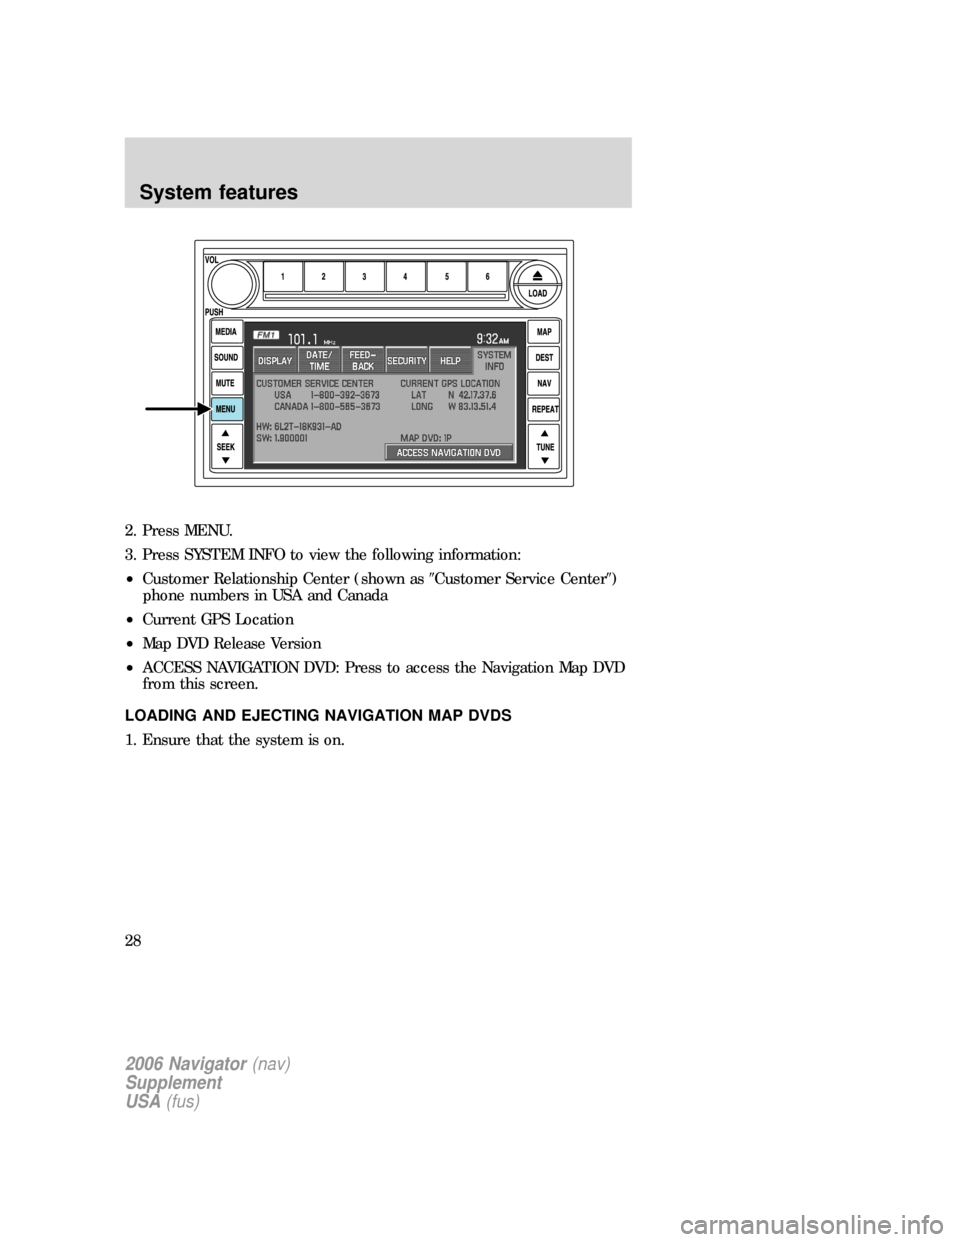
2. Press MENU.
3. Press SYSTEM INFO to view the following information:
•Customer Relationship Center (shown as�Customer Service Center�)
phone numbers in USA and Canada
•Current GPS Location
•Map DVD Release Version
•ACCESS NAVIGATION DVD: Press to access the Navigation Map DVD
from this screen.
LOADING AND EJECTING NAVIGATION MAP DVDS
1. Ensure that the system is on.
2006 Navigator(nav)
Supplement
USA(fus)
System features
28
Page 29 of 64

2. Press MENU.
3. Press SYSTEM INFO.
4. Press ACCESS NAV DVD. The
following disclaimer will appear:
To access the navigation DVD, select
the OPEN button below. This will
cause the display to open. If the
navigation DVD is installed, it will
be ejected automatically. The screen
will close automatically when a disc is inserted, or if no activity is
detected for 5 minutes.
5. Press OPEN. The navigation screen will fold down, allowing you to
access the navigation DVD slot. Insert the DVD with the printed side up
into the lowest slot. Do not allow moisture or foreign objects to enter the
slot. The system then will check the disk inserted. If valid, it will install
the software and restart the system
LATEST MAP DVDS
The map content is constantly changing due to new roads, traffic,
restrictions, etc. Therefore, it is not always possible to exactly match the
DVD map with the current roadways. For best results, always use the
latest version of the map DVD. Map information is regularly updated, but
all areas are not necessarily covered to the same level of detail. Some
2006 Navigator(nav)
Supplement
USA(fus)
System features
29
 15
Sound features 19
Speed compensated volume 22
System features
22
Date/time settings 23
Securit")