Page 25 of 64

•NONE:Press to turn off all audible beeps. You may press any button
and no beeps will be heard.
LANGUAGE:One must be selected at all times:
•ENGLISH:Press to set the system language to English.
•ESPANOL:Press to set the system language to North American
Spanish.
•FRANCAIS:Press to set the system language to North American
French.
VOICE VOLUME:Press +/- to select voice prompt volume level (1–34).
You may also turn the volume control during a voice prompt to adjust
the volume level.
TEST:Press to hear an audio sample of voice prompt at the currently
selected volume.
NAVIGATION GUIDANCE:Press ON to hear navigation guidance voice
prompts. Press OFF to turn the voice prompts off.
DEFAULT SETTING:Press to clear any current settings and return to
the system default settings.
SECURITY
Your navigation system has a special security feature which allows you to
enable the valet mode. In valet mode, if your vehicle is being parked by a
valet, they will be unable to access any of the navigational information
(addresses, destinations, etc.), change any settings or eject any CDs or
the navigation DVD. To access and enable valet mode:
1. Ensure that the navigation system is on.
2006 Navigator(nav)
Supplement
USA(fus)
System features
25
Page 27 of 64
2. Press MENU.
3. Press HELP. You may then select from:
•BASIC OPERATION:This screen will provide basic help with the
hard buttons on the system, providing a brief description for each
button.
•DRIVING RESTRICTIONS:This screen will inform you that due to
driver distraction and safety concerns, certain features will be
restricted when the vehicle is in motion.
•NAVIGATION DVD INFORMATION:Press to access information on
the navigation map DVD — basic operation , how to access the DVD,
and also replacement and contact information for the Customer
Relationship Center.
SYSTEM INFORMATION
The system information screen gives you contact information, current
location and access to the Navigation DVD. To access the System
Information screen:
1. Ensure that the system is on.
2006 Navigator(nav)
Supplement
USA(fus)
System features
27
Page 28 of 64
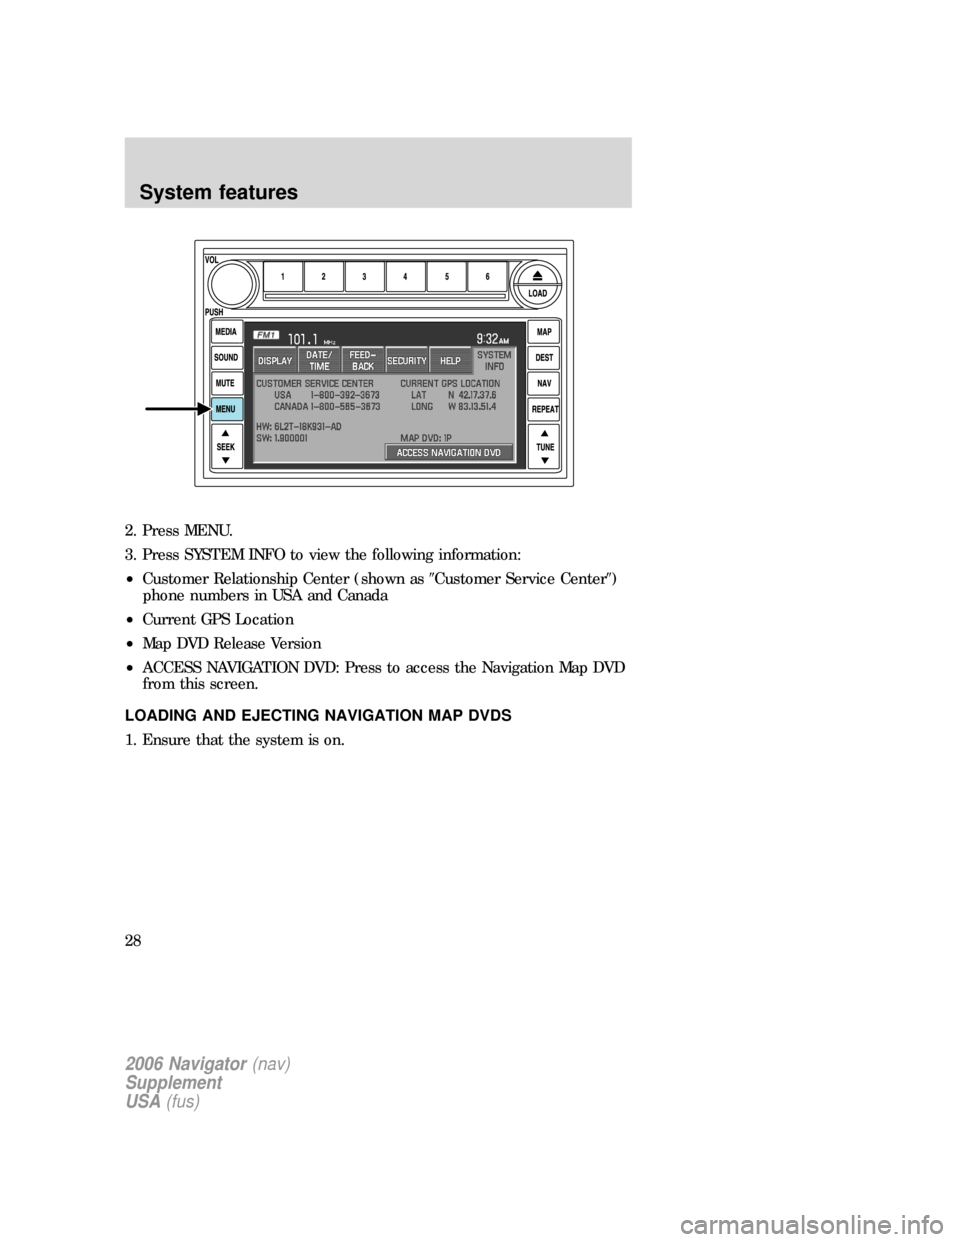
2. Press MENU.
3. Press SYSTEM INFO to view the following information:
•Customer Relationship Center (shown as�Customer Service Center�)
phone numbers in USA and Canada
•Current GPS Location
•Map DVD Release Version
•ACCESS NAVIGATION DVD: Press to access the Navigation Map DVD
from this screen.
LOADING AND EJECTING NAVIGATION MAP DVDS
1. Ensure that the system is on.
2006 Navigator(nav)
Supplement
USA(fus)
System features
28
Page 29 of 64

2. Press MENU.
3. Press SYSTEM INFO.
4. Press ACCESS NAV DVD. The
following disclaimer will appear:
To access the navigation DVD, select
the OPEN button below. This will
cause the display to open. If the
navigation DVD is installed, it will
be ejected automatically. The screen
will close automatically when a disc is inserted, or if no activity is
detected for 5 minutes.
5. Press OPEN. The navigation screen will fold down, allowing you to
access the navigation DVD slot. Insert the DVD with the printed side up
into the lowest slot. Do not allow moisture or foreign objects to enter the
slot. The system then will check the disk inserted. If valid, it will install
the software and restart the system
LATEST MAP DVDS
The map content is constantly changing due to new roads, traffic,
restrictions, etc. Therefore, it is not always possible to exactly match the
DVD map with the current roadways. For best results, always use the
latest version of the map DVD. Map information is regularly updated, but
all areas are not necessarily covered to the same level of detail. Some
2006 Navigator(nav)
Supplement
USA(fus)
System features
29
Page 30 of 64
areas, in particular private roads, may not be included on the MAP DVD.
To help with accuracy, always use the latest DVD version for navigation.
Updates to the database will have no effect on the contents of the
address book and other user settings. Loading an older version of the
map DVD may result in data loss.
ORDERING ADDITIONAL MAP DVDS
If you wish to order a replacement map, an additional map, or an
updated DVD, please contact the Ford Customer Service Center at 1
(800) 392–3673 (USA) or 1 (800) 565–3673 (CANADA).
2006 Navigator(nav)
Supplement
USA(fus)
System features
30
Page 31 of 64
DISCLAIMER
After each ignition cycle, a
disclaimer display will appear. Press
AGREE to the content of the screen
in order to access the navigation
functions. If you do not press
AGREE, you will only have access to
non-navigation functions.
MAP MODE
To enter map mode:
1. Ensure that the system is on.
2. Press MAP. The map screen will display.
When in MAP mode, an icon appears on the upper left side of the
screen; this is a toggle button to change the view of the map displayed.
The following methods exist for orientation of the map:
2006 Navigator(nav)
Supplement
USA(fus)
Navigation features
31
Page 33 of 64

QUICK TOUCH BUTTONS
When in Map mode, you have the
ability to view six quick touch
buttons. In order to view these,
press and release anywhere on the
map display. The map position will
not change and they will appear on
the map. These buttons are:
•TIME TO DESTINATION:Displays the distance and estimated
travel time to the selected destination on the left side of the screen.
When selected, a popup screen will also display the Estimated Time of
Arrival (ETA).
•CURRENT POSITION:Press to show the vehicle’s current location
(street and State/Province).
•SET AS DEST:Press in order to select a scrolled location on the map
as your destination. (You may scroll the map by pressing your index
finger on the map display. When you reach the desired location,
simply let go and then press SET AS DEST to go to the Destination
Map View Screen.
•POI/POI OFF:Allows you to select from various Point of Interest
(POI) icons as well as turn them on/off in the map display. Only one
kind of POI will display on the map at a time (i.e, restaurants, banks,
etc). The selected PIO icon will show on the button.
Note:This is only possible for scales equal or smaller than 0.75mi / 1km.
If a navigational route is in progress, the following buttons will also
appear at the bottom of the screen when a route exists:
•VIEW ROUTE:Press to adjust the map display to the right scale.
This scale allows the entire route to be visible in the screen. This
screen will also display the following options:
VIEW DEST:Press to shift the destination to the center of the map
display
TURN LIST:Press to view a list of the roads and waypoints for the
planned route. You can change the route by selecting to AVOID any of
the roads or to DELETE any of the waypoints. At this point the system
will refigure the planned route based on the criteria.
•EDIT ROUTE:Press in order to adjust the following features of the
current route:
DETOUR:Press to select a portion of the route for the navigation
system to avoid. Select the desired distance (between one and 100
2006 Navigator(nav)
Supplement
USA(fus)
Navigation features
33
Page 36 of 64

DESTINATION PROGRAMMING
Press DEST to set a destination.
There are nine ways to program a
destination. Most of these will be
restricted when the vehicle is in
motion. One tab for each method
will appear on the screen when
DEST is pressed. An additional tab
with the symbol→or←will be
displayed for additional methods. When entering a destination, the
system uses a Smart Speller, which facilitates entering information
through the keyboard.
QUICK DESTINATION
Press the Quick Destination tab to
view the possible destination
choices when the vehicle is in
motion.
•EMERGENCY:There are two
categories of Hospital and Police
that can be selected under the
Emergency category. They can be
searched for in order of their
distance from the vehicle’s
current location. The maximum
length for the search result will
be 25 items.
•FIND NEAREST POI:You can
select five POI categories at a
time. Of these five possible, you
can search for one at a time in
the vicinity of the vehicle
position. The defaults for these
five categories are shown in the
graphic, and can be changed.
Refer toQuick POIs.
2006 Navigator(nav)
Supplement
USA(fus)
Navigation features
36