Page 87 of 409

86 Safety and SecurityDriving safety systemsThe electrohydraulic brake servo assis-
tance switches off automatically�
approximately 2 minutes after you
turned the SmartKey in the starter
switch to position0 or removed the
SmartKey
�
approximately 20 seconds after you
locked the vehicle from outside Note on driving with the electrohydrau-
lic brake system
�
Following extended periods of only mi-
nor loads to your brake system, you
should occasionally apply the brakes
when traveling at high speeds. This im-
proves the grip of the brake pads and
prevents possible brake noise.
�
After driving on wet or snow-covered
roads, you should apply your brakes
firmly before parking your vehicle. This
produces heat which serves to dry the
brake disks.
�
On long and steep grades, shift to a
lower gear (gear range1, 2, or 3) to
prevent the brakes from overheating
and to reduce brake wear.
�
After hard braking, it is advisable to
drive on for some time so that the air
stream will cool down the brakes fast-
er.
�
Only Mercedes-Benz approved compo-
nents (e.g. brake pads) should be in-
stalled on your vehicle. Brake pads not
approved by Mercedes-Benz may im-
pair the safety of your vehicle.
Warning!
G
Make sure not to endanger any other road
users when carrying out these braking
maneuvers.
Page 88 of 409

87 Safety and Security
Performance enhancement system
�Performance enhancement system
Airbrake
The Airbrake enhances the vehicle’s driv-
ing stability. It adapts the aerodynamics of
the vehicle to the driving conditions ac-
cording to the speed and the mode set.
This is achieved using a moveable spoiler.
The Airbrake is located at the rear edge of
the trunk lid.Warning!
G
When operating the Airbrake, make sure
there is no danger of anyone being harmed
by the Airbrake operation (i.e. raising and
lowering of flap). Be especially careful when
small children are around.
Warning!
G
The following factors increase the risk of ac-
cidents:�
Excessive speed, especially in turns
�
Wet and slippery road surfaces
�
Following another vehicle too closely
The Airbrake cannot reduce this risk.
Always adjust your driving style to the pre-
vailing road and weather conditions.
iIf the ESP
® is active, the Airbrake is
automatically deactivated.
iIn winter operation, the maximum ef-
fectiveness of the Airbrake is only
achieved with winter tires (M + S tires)
or snow chains as required.
Page 90 of 409
89 Safety and Security
Performance enhancement system
Automatic mode
This mode should be used for normal driv-
ing conditions.�
Slide the Airbrake switch4 to
position2.
With the ignition on, the Airbrake
swings upwards to an angle of 5° and
then returns to its initial position.
When the vehicle exceeds a speed of
60 mph (95 km/h), the Airbrake
swings up to an angle of 10°. Rapid braking
If you need to brake in an emergency from
a speed of more than 60 mph (95 km/h),
the Airbrake automatically swings upwards
to an angle of 62°.
This allows you to achieve the best possi-
ble braking performance in an emergency.
Warning!
G
Hard braking activates the Airbrake which
may block the view through the interior rear
view mirror. In this case, monitor the traffic
behind you through the exterior rear view
mirrors.
Page 98 of 409

97 Controls in detail
Locking and unlocking
Warning!
G
When leaving the vehicle, always remove the
SmartKey from the starter switch, take it
with you, and lock the vehicle. Do not leave
children unattended in the vehicle, or with
access to an unlocked vehicle. It is possible
for children to open a locked door from the
inside, which could result in an accident
and/or serious injury.!To prevent possible malfunction, avoid
exposing the SmartKey to high levels of
electromagnetic radiation.
iUSA only:
This device complies with Part 15 of
the FCC Rules. Operation is subject to
the following two conditions:
(1) This device may not cause harmful
interference, and
(2) this device must accept any inter-
ference received, including interfer-
ence that may cause undesired
operation.
Any unauthorized modification to this
device could void the user’s authority
to operate the equipment.
iCanada only:
This device complies with RSS-210 of
Industry Canada. Operation is subject
to the following two conditions:
(1) This device may not cause interfer-
ence, and
(2) this device must accept any inter-
ference received, including interfer-
ence that may cause undesired
operation of the device.
Any unauthorized modification to this
device could void the user’s authority
to operate the equipment.iYou can also open and close the power
windows using the SmartKey, see
“Summer opening feature”
(�page 195) and “Convenience clos-
ing feature” (
�page 196).
When you unlock the vehicle, the elec-
trohydraulic brake system is activated.
Page 102 of 409

101 Controls in detail
Locking and unlocking
The vehicle must be unlocked.�
Pull on handle2 and lift the trunk lid.
The trunk can also be opened using
buttonŠ on the SmartKey or from its
inside in an emergency, see “Trunk emer-
gency release” (
�page 102).
Opening the trunk from the inside
You can open the trunk from the inside if
the vehicle is stationary.
A minimum height clearance of
5.5 ft (1.65 m) is required to open the
trunk lid.
The switch is located on the lower part of
the center console.1Remote trunk opening switch
�
Press remote trunk lid release
switch1 until the trunk lid unlocks
and opens slightly.
�
Lift the trunk lid.
The trunk can also be opened using
buttonŠ on the SmartKey or from its
inside in an emergency, see “Trunk emer-
gency release” (
�page 102).
Closing the trunk lid
1Handle
!Always make sure that there is suffi-
cient overhead clearance.
!Always make sure that there is suffi-
cient overhead clearance.
Warning!
G
To prevent possible personal injury, always
keep hands and fingers away from the trunk
opening when closing the trunk lid. Be espe-
cially careful when small children are
around.
Only drive with the trunk closed as, among
other dangers such as blocked visibility, ex-
haust fumes may enter the vehicle interior.
Page 104 of 409

103 Controls in detail
Locking and unlocking
Automatic locking
The doors and the trunk lock automatically
when the vehicle is set into motion.
You can open a locked door from the in-
side. Open door only when conditions are
safe to do so.
You can deactivate the automatic locking
using the control system (
�page 137).
Locking and unlocking from the inside
You can lock or unlock the vehicle from in-
side using the central locking switches.
This can be useful, for example, if you want
to unlock the passenger door from the in-
side or want to lock the vehicle before
starting to drive.
The central locking switch does not lock or
unlock the fuel filler flap.
iThe emergency release button does
not open the trunk lid if the vehicle
battery is discharged or disconnected.
If the vehicle has previously been
locked from the outside with the
SmartKey, opening the trunk from the
inside using the emergency release
button will trigger the anti-theft alarm
system.
To cancel the alarm, do one of the
following:�
Press buttonŒ or‹ on the
SmartKey.
�
Insert the SmartKey in the starter
switch.
iThe doors unlock automatically after an
accident if the force of the impact ex-
ceeds a preset threshold.
The vehicle locks automatically when
the ignition is switched on and the
wheels are turning at vehicle speeds of
approximately 9 mph (15 km/h) or
more. You could therefore lock yourself
out when the vehicle�
is pushed
�
is on a test stand
Warning!
G
When leaving the vehicle, always remove the
SmartKey from the starter switch, take it
with you, and lock the vehicle. Do not leave
children unattended in the vehicle, or with
access to an unlocked vehicle. Unsuper-
vised use of vehicle equipment may cause
an accident and/or serious personal injury.
Page 105 of 409
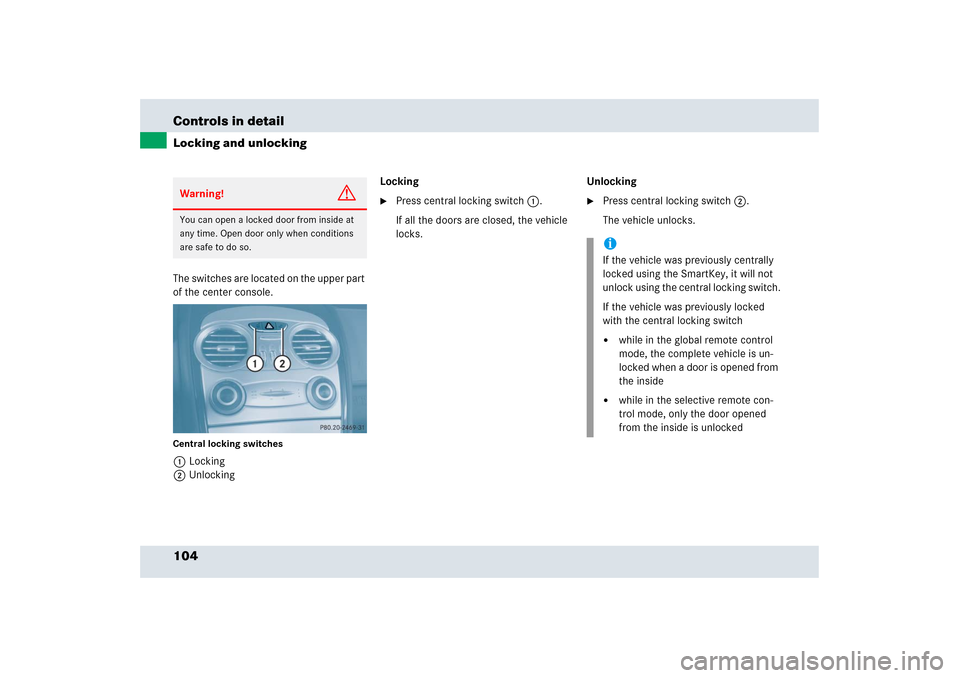
104 Controls in detailLocking and unlockingThe switches are located on the upper part
of the center console.Central locking switches1Locking
2UnlockingLocking
�
Press central locking switch1.
If all the doors are closed, the vehicle
locks.Unlocking
�
Press central locking switch2.
The vehicle unlocks.
Warning!
G
You can open a locked door from inside at
any time. Open door only when conditions
are safe to do so.
iIf the vehicle was previously centrally
locked using the SmartKey, it will not
unlock using the central locking switch.
If the vehicle was previously locked
with the central locking switch�
while in the global remote control
mode, the complete vehicle is un-
locked when a door is opened from
the inside
�
while in the selective remote con-
trol mode, only the door opened
from the inside is unlocked
Page 106 of 409

and (
�page 53).
Exterior lamp swi")
105 Controls in detail
Lighting
�Lighting
For information on how to switch on the
headlamps and use the turn signals, see
“Switching on headlamps” (
�page 52)
and (
�page 53).
Exterior lamp switch
The exterior lamp switch is located on the
dashboard to the left of the steering wheel.
MOff
UAutomatic headlamp mode
CParking lamps (also tail lamps,
license plate lamps, side marker
lamps, instrument panel lamps)
BLow beam headlamps (or high
beam headlamps when the
combination switch is pushed
forward) and parking lampsˆStanding lamps, right (turn left one
stop)
‚Standing lamps, left (turn left two
stops)
iIf you drive in countries where vehicles
drive on the other side of the road than
the country where the vehicle is regis-
tered, you must have the headlamps
modified for symmetrical low beams.
Relevant information can be obtained
at your authorized Mercedes-Benz
Center.
iIf you remove the SmartKey from the
starter switch and open the driver’s
door while the parking lamps or low
beam headlamps are switched on, then �
a warning sounds
�
$ appears in the left multifunc-
tion display
�
the message
Turn off lamps
appears in right multifunction dis-
play