Page 167 of 481
166 Controls in detailAutomatic transmission*
Downshifting�
Briefly press the inside1 of one of the
buttons on the steering wheel.
The transmission will shift to the next
lower gear as permitted by the shift
program. This action simultaneously limits
the gear range of the transmission
(
�page 160).Upshifting
�
Briefly press the outside2 of one of
the buttons on the steering wheel.
The transmission will shift to the next
higher gear as permitted by the shift
program. This action simultaneously
extends the gear range of the transmis-
sion.
iYou cannot shift with the steering
wheel gearshift buttons when the gear
selector lever is in positionP,N orR.
The last selected program
mode (CorS) is switched on when the
engine is restarted.
Warning!
G
On slippery road surfaces, never downshift
in order to obtain braking action. This could
result in drive wheel slip and reduced
vehicle control. Your vehicle’s ABS will not
prevent this type of loss of control.
Page 169 of 481

168 Controls in detailAutomatic transmission*Downshifting�
Briefly press button1 on the left side
of the steering wheel.
The transmission will shift to the next
lower gear as permitted by the shift
program. This action simultaneously limits
the gear range of the transmission
(
�page 160) when you are driving in the
automatic program mode (CorS).Upshifting
�
Briefly press button2 on the right
side of the steering wheel.
The transmission will shift to the next
higher gear as permitted by the shift
program. This action simultaneously
extends the gear range of the transmission
when you are driving in the automatic
program mode (CorS).Canceling gear range limit
�
Press and hold button2 on the right
side of the steering wheel until
D
reappears in the multifunction display.
The transmission will shift from the current
gear range directly to gear rangeD.
Shifting into optimal gear range
�
Press and hold button1 on the left
side of the steering wheel.
The transmission will automatically select
the gear range suited for optimal
acceleration and deceleration. This will
involve shifting down one or more gears.
Warning!
G
On slippery road surfaces, never downshift
in order to obtain braking action. This could
result in drive wheel slip and reduced
vehicle control. Your vehicle’s ABS will not
prevent this type of loss of control.
Page 172 of 481
")
171 Controls in detail
Automatic transmission*
�
Briefly press the gear selector lever to
the right in theD+direction.
or
�
Briefly press button2 on the right
side of the steering wheel
(�page 167).
The transmission shifts to the next
higher gear.
If, instead of the manual program mode
symbolM, thep symbol appears in the
multifunction display (
�page 158), shift to
the next higher gear. The fuel supply will
otherwise be interrupted to prevent the
engine from overrevving.Downshifting
�
Briefly press the gear selector lever to
the left in theD-direction.
or
�
Briefly press button1 on the left side
of the steering wheel (
�page 167).
The transmission shifts to the next
lower gear.Kickdown
Using the kickdown when driving in the
manual program modeM is not possible.
Warning!
G
On slippery road surfaces, never downshift
in order to obtain braking action. This could
result in drive wheel slip and reduced
vehicle control. Your vehicle’s ABS will not
prevent this type of loss of control.iWhen you brake or stop, the transmis-
sion shifts down to a gear from which
you can easily accelerate or take off.
Page 175 of 481

174 Controls in detailGood visibilityAuto-dimming mirrors*
The reflection brightness of the exterior
rear view mirrors and the interior rear view
mirror will respond automatically to glare
when�
ignition is switched on
and
�
incoming light from headlamps falls on
the sensor in the interior rear view
mirror
The rear view mirrors will not react if
�
reverse gearR is engaged
�
interior lighting is switched on
Warning!
G
The auto-dimming function does not react if
incoming light is not aimed directly at sen-
sors in the interior rear view mirror.
The interior rear view mirror and the exterior
rear view mirror on the driver’s side do not
react, for example, if the wind screen is in-
stalled.
Glare can endanger you and others.Warning!
G
In case of an accident, liquid electrolyte may
escape from the mirror housing if the mirror
glass breaks.
Electrolyte has an irritating effect. Do not al-
low the liquid to come into contact with
eyes, skin, clothing, or the respiratory sys-
tem. In case it does, immediately flush af-
fected area with water, and seek medical
help if necessary.
!Electrolyte drops coming into contact
with the vehicle paint finish can only be
completely removed while in their
liquid state and by applying plenty of
water.Warning!
G
Exercise care when using the passen-
ger-side exterior rear view mirror. The mirror
surface is convex (outwardly curved surface
for a wider field of view). Objects in mirror
are closer than they appear. Check your in-
terior rear view mirror or glance over your
shoulder before changing lanes.
Page 177 of 481
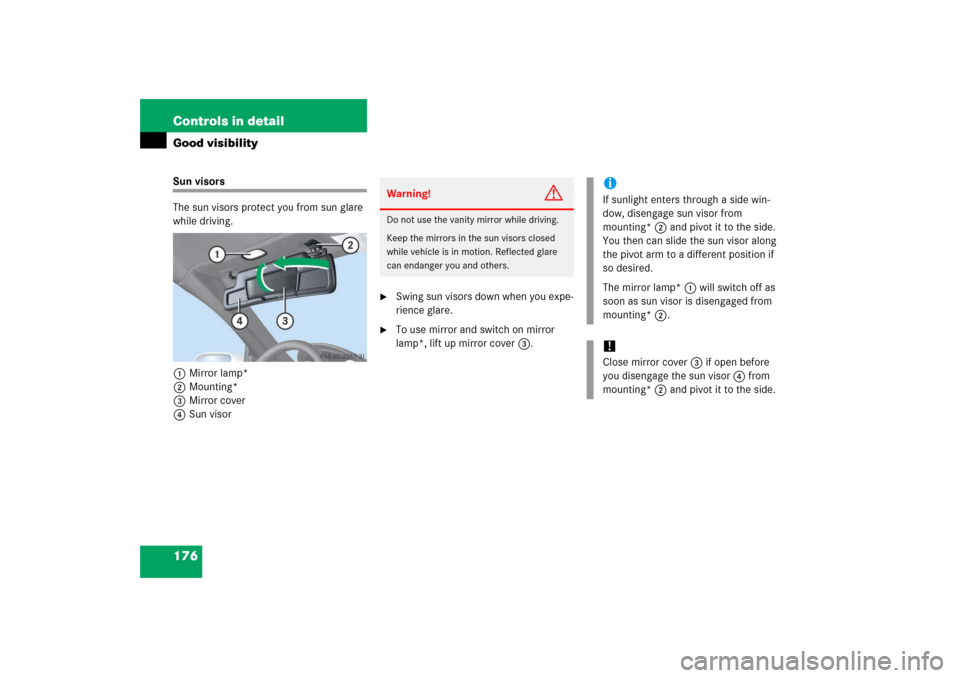
176 Controls in detailGood visibilitySun visors
The sun visors protect you from sun glare
while driving.
1Mirror lamp*
2Mounting*
3Mirror cover
4Sun visor
�
Swing sun visors down when you expe-
rience glare.
�
To use mirror and switch on mirror
lamp*, lift up mirror cover3.Warning!
G
Do not use the vanity mirror while driving.
Keep the mirrors in the sun visors closed
while vehicle is in motion. Reflected glare
can endanger you and others.
iIf sunlight enters through a side win-
dow, disengage sun visor from
mounting*2 and pivot it to the side.
You then can slide the sun visor along
the pivot arm to a different position if
so desired.
The mirror lamp*1 will switch off as
soon as sun visor is disengaged from
mounting*2.!Close mirror cover3 if open before
you disengage the sun visor4 from
mounting*2 and pivot it to the side.
Page 178 of 481

177 Controls in detail
Good visibility
Rear window defroster
The rear window defroster uses a large
amount of power. To keep the battery
drain to a minimum, switch off the defrost-
er as soon as the rear window is clear.
The defroster is automatically deactivated
after approximately 6 to 17 minutes of op-
eration depending on the outside tempera-
ture.Switching on
�
Press the rear window defroster
switchF in the control panel of the
climate control (
�page 179) or the au-
tomatic climate control* (
�page 192).
The indicator lamp on the rear window
defroster switchF comes on.Switching off
�
Press the rear window defroster
switchF again in the control panel
of the climate control or the automatic
climate control*.
The indicator lamp on the rear window
defroster switchF goes out.
Warning!
G
Any accumulation of snow and ice should be
removed from the rear window before driv-
ing. Visibility could otherwise be impaired,
endangering you and others.
!The rear window defroster cannot be
switched on when the retractable hard-
top is open. The indicator lamp starts
flashing if the hardtop is open.�
Close the retractable hardtop first.
The rear window defroster can be
switched on again.
!If the rear window defroster switches
off too soon and the indicator lamp
starts flashing, this means that too
many electrical consumers are operat-
ing simultaneously and there is insuffi-
cient voltage in the battery. The system
responds automatically by deactivating
the rear window defroster.
As soon as the battery has sufficient
voltage, the rear window defroster au-
tomatically turns itself back on.
Page 181 of 481

180 Controls in detailClimate controlThe climate control is operational whenev-
er the engine is running. The system cools
or heats the interior depending on the se-
lected interior temperature and the cur-
rent outside temperature.Nearly all dust particles, pollutants and
odors are filtered out before outside air en-
ters the interior through the air distribution
system.
The air conditioning will not engage (no
cooling) if the A/Cmode is deactivated
(
�page 179).
Warning!
G
When operating the climate control, the air
that enters the passenger compartment
through the air vents can be very hot or very
cold (depending on the set temperature).
This may cause burns or frostbite to unpro-
tected skin in the immediate area of the air
vents. Always keep sufficient distance be-
tween unprotected parts of the body and the
air vents. If necessary, use the air distribu-
tion controls (
�page 179) to direct the air
to air vents in the vehicle interior that are
not in the immediate area of unprotected
skin.
Warning!
G
Follow the recommended settings for heat-
ing and cooling given on the following pag-
es. Otherwise the windows could fog up,
impairing visibility and endangering you and
others.
iSevere conditions (e.g. strong air pollu-
tion) may require replacement of the fil-
ter before its scheduled interval.
A clogged filter will reduce the air vol-
ume to the interior.
If the vehicle interior is hot, ventilate
the interior before driving off. The cli-
mate control will then adjust the interi-
or temperature to the set value much
faster.
Keep the air intake grille in front of the
windshield free of snow and debris.
When the retractable hardtop is closed,
do not obstruct air flow by placing ob-
jects on the air flow-through exhaust
slots below the rear window.
Page 186 of 481
185 Controls in detail
Climate control
Deactivating�
Press buttonP (
�page 179) again.
The indicator lamp on the button goes
out.
The previous settings are once again in
effect.Windshield fogged on the outside
�
Switch the windshield wipers on
(�page 56).
�
Turn air distribution control3 to
positionaorY (
�page 179).
Air recirculation mode
Switch to air recirculation mode to prevent
unpleasant odors from entering the vehicle
from the outside (e.g. before driving
through a tunnel). This setting cuts off the
intake of outside air and recirculates the
air in the interior.
iThe cooling remains switched on.
Warning!
G
Fogged windows impair visibility, endanger-
ing you and others. If the windows begin to
fog on the inside, switching off the air
recirculation mode immediately should clear
interior window fogging. If interior window
fogging persists, make sure the air
conditioning (
�page 187) is activated, or
press buttonP.