Page 415 of 481
.
The jack ta")
414 Practical hintsFlat tire
1Wheel wrench�
On wheel to be changed, loosen but do
not yet remove the wheel bolts in direc-
tion of arrow (approximately one full
turn with wheel wrench1).
The jack take-up brackets are located di-
rectly behind the front wheel housings and
in front of the rear wheel housings.2Jack
3Take-up bracket
�
Place jack2 on firm ground.
�
Position jack2 under take-up
bracket3 so that it is always vertical
(plumb-line) as seen from the side,
even if the vehicle is parked on an
incline.
Warning!
G
The jack is designed exclusively for jacking
up the vehicle at the jack take-up brackets
built into either side of the vehicle. To help
avoid personal injury, use the jack only to lift
the vehicle during a wheel change. Never
get beneath the vehicle while it is supported
by the jack. Keep hands and feet away from
the area under the lifted vehicle. Always
firmly set parking brake and block wheels
before raising vehicle with jack.
Do not disengage parking brake while the
vehicle is raised. Be certain that the jack is
always vertical (plumb line) when in use, es-
pecially on hills. Always try to use the jack
o n l e v e l s u r f a c e . B e s u r e t h e j a c k a r m i s f u l l y
seated in the jack take-up bracket. Always
lower the vehicle onto sufficient capacity
jackstands before working under the
vehicle.
Warning!
G
Position the jack only on the jack take-up
brackets designed for this purpose.
If the jack is not properly positioned, the ve-
hicle may fall off of the jack.
Page 416 of 481
415 Practical hints
Flat tire
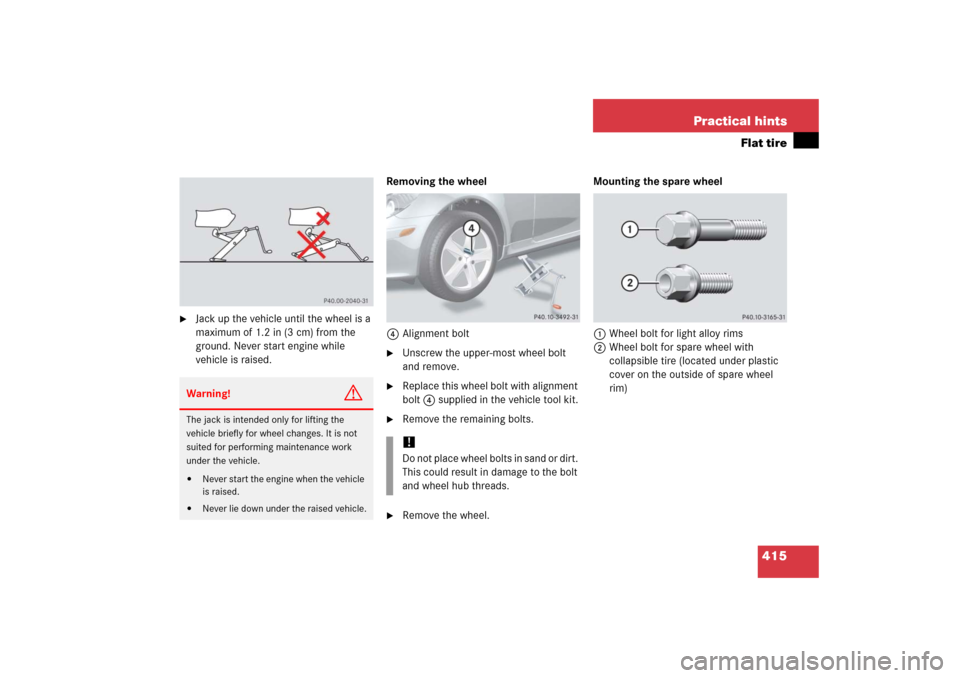
�
Jack up the vehicle until the wheel is a
maximum of 1.2 in (3 cm) from the
ground. Never start engine while
vehicle is raised.Removing the wheel
4Alignment bolt
�
Unscrew the upper-most wheel bolt
and remove.
�
Replace this wheel bolt with alignment
bolt4 supplied in the vehicle tool kit.
�
Remove the remaining bolts.
�
Remove the wheel.Mounting the spare wheel
1Wheel bolt for light alloy rims
2Wheel bolt for spare wheel with
collapsible tire (located under plastic
cover on the outside of spare wheel
rim)
Warning!
G
The jack is intended only for lifting the
vehicle briefly for wheel changes. It is not
suited for performing maintenance work
under the vehicle.�
Never start the engine when the vehicle
is raised.
�
Never lie down under the raised vehicle.
!Do not place wheel bolts in sand or dirt.
This could result in damage to the bolt
and wheel hub threads.
Page 417 of 481
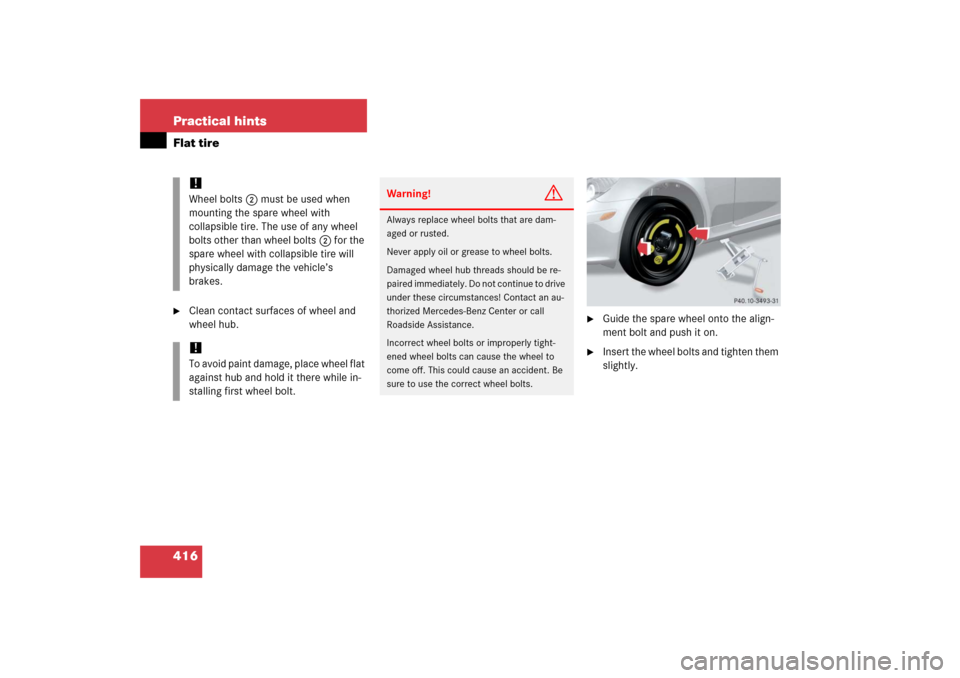
416 Practical hintsFlat tire�
Clean contact surfaces of wheel and
wheel hub.
�
Guide the spare wheel onto the align-
ment bolt and push it on.
�
Insert the wheel bolts and tighten them
slightly.
!Wheel bolts2 must be used when
mounting the spare wheel with
collapsible tire. The use of any wheel
bolts other than wheel bolts2 for the
spare wheel with collapsible tire will
physically damage the vehicle’s
brakes. !To avoid paint damage, place wheel flat
against hub and hold it there while in-
stalling first wheel bolt.
Warning!
G
Always replace wheel bolts that are dam-
aged or rusted.
Never apply oil or grease to wheel bolts.
Damaged wheel hub threads should be re-
paired immediately. Do not continue to drive
under these circumstances! Contact an au-
thorized Mercedes-Benz Center or call
Roadside Assistance.
Incorrect wheel bolts or improperly tight-
ened wheel bolts can cause the wheel to
come off. This could cause an accident. Be
sure to use the correct wheel bolts.
Page 418 of 481
417 Practical hints
Flat tire
�
Unscrew the alignment bolt, install last
wheel bolt and tighten slightly.
�
Inflate the collapsible tire
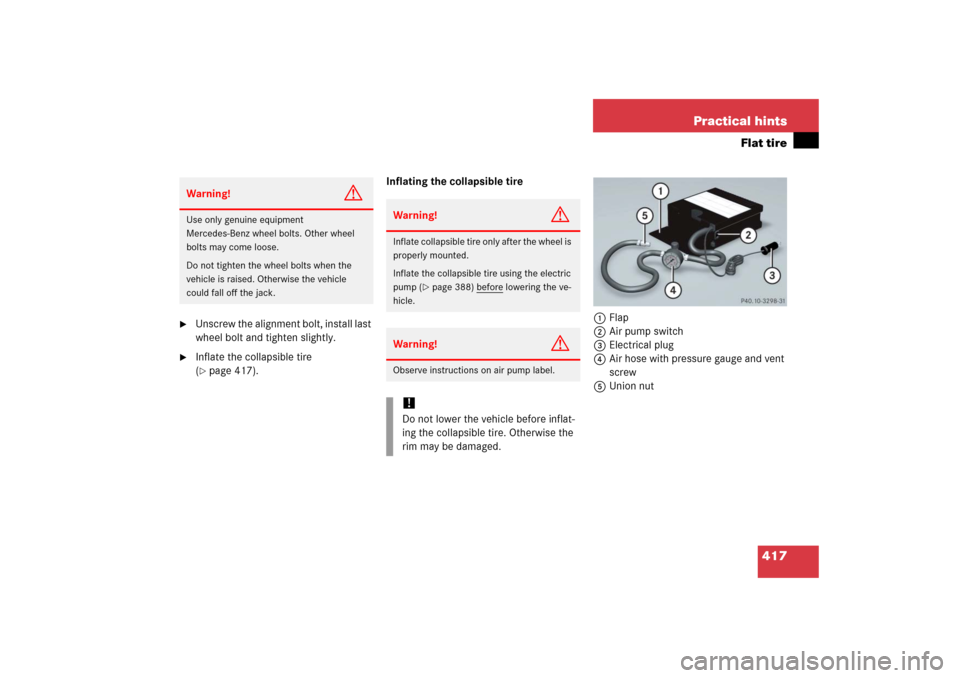
(�page 417).Inflating the collapsible tire
1Flap
2Air pump switch
3Electrical plug
4Air hose with pressure gauge and vent
screw
5Union nut
Warning!
G
Use only genuine equipment
Mercedes-Benz wheel bolts. Other wheel
bolts may come loose.
Do not tighten the wheel bolts when the
vehicle is raised. Otherwise the vehicle
could fall off the jack.
Warning!
G
Inflate collapsible tire only after the wheel is
properly mounted.
Inflate the collapsible tire using the electric
pump (
�page 388) before
lowering the ve-
hicle.
Warning!
G
Observe instructions on air pump label.!Do not lower the vehicle before inflat-
ing the collapsible tire. Otherwise the
rim may be damaged.
Page 420 of 481

419 Practical hints
Flat tire
�
Detach the electric air pump.
�
Reinstall collapsible tire valve cap.
�
Store electrical plug3 and air
hose4 behind flap 1 and place the
electric air pump back in the trunk.
�
Lower the vehicle (
�page 419).Lowering the vehicle
�
Lower vehicle by turning the crank
counterclockwise until vehicle is rest-
ing fully on its own weight.
�
Remove the jack.
1-5 Wheel bolts
�
Tighten the five wheel bolts evenly in
the direction of the arrow, following the
diagonal sequence illustrated
(1to5), until all bolts are tight.
Observe a tightening torque of
80 lb-ft (110 Nm).
Warning!
G
Follow recommended tire inflation
pressures.
Do not underinflate tires. Underinflated tires
wear excessively and / or unevenly,
adversely affect handling and fuel economy,
and are more likely to fail from being over-
heated.
Do not overinflate tires. Overinflated tires
can adversely affect handling and ride
comfort, wear unevenly, increase stopping
distance, and result in sudden deflation
(blowout) because they are more likely to
become punctured or damaged by road
debris, potholes etc.
Warning!
G
Inflate the collapsible tire using the electric
pump (
�page 417) before
lowering the ve-
hicle.
��
Page 463 of 481

The Research Octane Number for gaso-
line as determined by")
462 Technical termsRoll bar
Occupant protection system which
consists of tubular steel sheathed in
plastic.
RON
(R
esearch O
ctane N
umber)
The Research Octane Number for gaso-
line as determined by a standardized
method. It is an indication of a gaso-
line’s ability to resist undesired detona-
tion (knocking). The average of both
the ->MON (Motor Octane Number)
and RON (Research Octane Number) is
posted at the pump, also known as
ANTI-KNOCK INDEX.
Shift lock*
When the vehicle with automatic trans-
mission is parked, this lock prevents
the gear selector lever from being inad-
vertently moved out of positionP with-
out the SmartKey turned and the brake
pedal depressed.Sidewall
(
�page 345)
SRS
(Supplemental R
estraint S
ystem)
Seat belts, emergency tensioning
device and air bags. Though indepen-
dent systems, they are closely inter-
faced to provide effective occupant
protection.
Tele Aid system
(T
elematic A
larm I
dentification on
D
emand)
The Tele Aid system consists of three
types of response: automatic and man-
ual emergency, Roadside Assistance
and information. Tele Aid is initially ac-
tivated by completing a subscriber
agreement and placing an acquain-
tance call.
The Tele Aid system is operational pro-
vided that the vehicle’s battery is
charged, properly connected, not dam-
aged and cellular and GPS coverage is
available.Tightening torque
Force times lever arm (e.g. a lug
wrench) with which threaded fasteners
such as wheel bolts are tightened.
TIN
(T
ire I
dentification N
umber)
(
�page 346)
Tire load rating
(�page 346)
Tire ply composition and material used
(�page 346)
Tire speed rating
(�page 346)
Traction
(�page 346)
Tread
(�page 346)
Treadwear indicators
(�page 346)
Uniform Tire Quality Grading Standards
(�page 346)
Page 474 of 481

Night security illumination (Control
system) 145
Normal occupant weight 345
O
Occupant distribution 345
O")
473 Index
N
NAV* menu 132
Navigation system see NAV*
Neck-level heating see AIRSCARF* (Seats)
Night security illumination (Control
system) 145
Normal occupant weight 345
O
Occupant distribution 345
Occupant safety 64
Children 66, 75
Infant and child restraint systems 72,
75
Seat belts 47, 68, 71
Oil see Engine oil
One-touch gearshifting* 164
Operating safety 16, 203
Operating vehicle outside the USA and
Canada 13
Operator’s Manual 10
Ornamental moldings see Vehicle care
Outside temperature indicator 121, 129
Outside temperature/speed 138
Overhead control panel 30
Overspeed range 121, 460P
Paintwork see Vehicle care
Panic alarm 80
Parcel net (Storage compartment) 267
Parking 296
And locking 59
Parking aid see Parking position*
Parking brake 52, 59
Parking lamps 110, 401
Parking position* 108
Activation (Control system) 148
Exterior rear view mirrors 175
Parts service 434
Passenger air bag see Air bags
Passenger compartment 301
Passenger front air bag off indicator
lamp 367
Passenger safety see Occupant safety
Phone book see Telephone*
Plastic parts, cleaning 359
Poly-V-belt drive 437, 460
Potential problems associated with under-
inflated and overinflated tires 332
Power outlet 271
Power seat* see Seats
Power train 461Power washer see Vehicle care
Power windows 246
Operating rear side windows 248
Operating with retractable hardtop
switch 248
Summer opening/convenience
closing* 249
Synchronizing 251
Practical hints
Fuses 430
Lamps in instrument cluster 362
Spare wheel bolts 392
Towing vehicle 426
Vehicle jack 389
What to do if... 362
Premium unleaded gasoline 452
Problems
While driving 58
With vehicle 17
Product information 9
Production options weight 345
Program mode selector switch* 461
Automatic transmission* 163
PSI 345
Page 477 of 481
 236
Technical data
Air conditioning refrigerant 451
Brake fluid 451
Coolants 453
Electric")
476 IndexT
Tachometer 121
Tail lamps 401
Tar stains see Vehicle care
TDMA or CDMA network phones
(Telephone*) 236
Technical data
Air conditioning refrigerant 451
Brake fluid 451
Coolants 453
Electrical system 446
Engine 438
Engine oil 451
Fuel additives 453
Fuel requirements 452
Fuels, coolants, lubricants, etc. 449
Headlamp cleaning system* 456
Main dimensions 447
Parts service 434
Premium unleaded gasoline 452
Rims and tires 439
Weights 448
Windshield washer system 456Tele Aid system 273, 462
Call priority 279
Initiating an emergency call 276
Remote door unlock 280
Requirements 273
Roadside Assistance 277
Stolen Vehicle Recovery
services 280
System self-check 274
Telephone* 272
Compartment 266
GSM network phones 229
Operation 151, 203
Tightening torque 462
Wheel bolts 419
Time and date synchronization with head
unit* (Control system) 139
TIN 346
Tire and Loading Information 321
Tire and loading terminology 344
Tire care and maintenance 318
Tire Identification Number see TINTire inflation pressure 410
Air pressure 344
Checking 327, 329
Tire inflation pressure see the placard on
the fuel filler flap
Tire inspection 318
Tire load rating 346
Tire ply composition and material
used 346
Tire speed rating 336, 346
Tire terminology 344
TIREFIT kit* (Vehicle tool kit) 388, 389
TIREFIT*
Instructions for use 408
Tires 317, 439
Cleaning 319
Collapsible (Spare wheel) 458
Direction of rotation 320
Driving instructions 297
Flat tire 408
Important guidelines 317
Inflating with air pump 417
MOExtended system* 333
Mounting wheel 415