Page 130 of 481

129 Controls in detail
Control system
Displaying digital speedometer or
outside temperature�
Press buttonjork repeatedly
until you see the digital speedometer.
The current vehicle speed is shown in
the multifunction display.
AUDIO menu
The functions in the
AUDIO
menu operate
the audio equipment which you currently
have turned on.
If no audio equipment is currently switched
on, the message
AUDIO off
is shown in the
multifunction display.
The following functions are available:
Warning!
G
�
Driving when your engine is overheated
can cause some fluids which may have
leaked into the engine compartment to
catch fire. You could be seriously
burned.
�
Steam from an overheated engine can
cause serious burns and can occur just
by opening the hood. Stay away from
the engine if you see or hear steam com-
ing from it.
Turn off the engine, get out of the car and do
not stand near the vehicle until the engine
has cooled down.
iYou can select either the display of the
digital speedometer or the outside
temperature indicator (
�page 138).
Function
Page
Selecting radio station
130
Selecting satellite radio
station* (USA only)
130
Operating the CD player
131
Page 132 of 481
131 Controls in detail
Control system
Operating the CD player�
Switch on the radio and select the
CD player (
�page 222).
Vehicles with COMAND*:
Refer to the separate operating instruc-
tions.
�
Press buttonèorÿ repeatedly
until the settings for the CD currently
being played are shown in the multi-
function display.
1Current CD
(CD0
for single CD drive in head unit,
CD1
through
CD6
for CD in
CD changer*)
2Current track
�
Press buttonjork repeatedly
until the desired track is selected.
iFor more information on satellite radio
operation, see “Introduction to satellite
radio* (USA only)” (
�page 214).
Vehicles with COMAND*:
Refer to separate operating
instructions.
iTo select a CD from the magazine,
press a number on the audio system or
the COMAND* system key pad located
in the center dashboard.
Page 140 of 481

139 Controls in detail
Control system
Time/Date submenu
Access the
Time/Date
submenu via the
Settings...
menu. Use the
Time/Date
submenu to change the instrument cluster
display settings.
The following functions are available:Time and date synchronization with
head unit*
This function can only be seen on vehicles
with COMAND* and navigation module*.
�
Move the selection marker with
buttonæorç to the
Time/Date
submenu.
�
Press buttonjork repeatedly
until you see
Synchronization with
head unit
in the multifunction display.
The selection marker is on the current
setting.
�
Press buttonæorç to select
the desired setting.Setting the time (hours)
This function can be seen in vehicles with
audio system, or in vehicles with
COMAND* and navigation module*, if the
time and date synchronization with head
unit* feature was set to
Off
(�page 139).
Function
Page
Time synchronization with head
unit*
139
Setting the time (hours)
139
Setting the time (minutes)
140
Setting the date (month)
141
Setting the date (day)
141
Setting the date (year)
142
iVehicles with COMAND*:
For information on setting the time in
COMAND, refer to the separate
COMAND operating instructions.
Page 141 of 481

140 Controls in detailControl system�
Move the selection marker with
buttonæorç to the
Time/Date
submenu.
�
Press buttonjork repeatedly
until you see
Clock, hours
in the mul-
tifunction display.
The selection marker is on the hours.
�
Press buttonæorç to set the
correct hours displayed in the multi-
function display.
�
Press reset buttonJto confirm the
set hours.Setting the time (minutes)
This function can be seen in vehicles with
audio system, or in vehicles with
COMAND* and navigation module*, if the
time and date synchronization with head
unit* feature was set to
Off
(�page 139).
�
Move the selection marker with
buttonæorç to the
Time/Date
submenu.
�
Press buttonjork repeatedly
until you see
Clock, minutes
in the
multifunction display.
The selection marker is on the minutes.
�
Press buttonæorç to set the
correct minutes displayed in the multi-
function display.
�
Press reset buttonJto confirm the
set minutes.
iVehicles with COMAND*:
For information on setting the time in
COMAND, refer to the separate
COMAND operating instructions.
Page 142 of 481
141 Controls in detail
Control system
Setting the date (month)
This function can be seen in vehicles with
audio system, or in vehicles with
COMAND* and navigation module*, if the
time and date synchronization with head
unit* feature was set to
Off
(�page 139).
�
Move the selection marker with
buttonæorç to the
Time/Date
submenu.
�
Press buttonjork repeatedly
until you see
Set date month
in the
multifunction display.
The selection marker is on the month.
�
Press buttonæorç to set the
month.Setting the date (day)
This function can be seen in vehicles with
audio system, or in vehicles with
COMAND* and navigation module*, if the
time and date synchronization with head
unit* feature was set to
Off
(�page 139).
iVehicles with COMAND*:
For information on setting the time in
COMAND, refer to the separate
COMAND operating instructions.
iVehicles with COMAND*:
For information on setting the time in
COMAND, refer to the separate
COMAND operating instructions.
Page 143 of 481
142 Controls in detailControl system�
Move the selection marker with
buttonæorç to the
Time/Date
submenu.
�
Press buttonjork repeatedly
until you see
Set date day
in the mul-
tifunction display.
The selection marker is on the day.
�
Press buttonæorç to set the
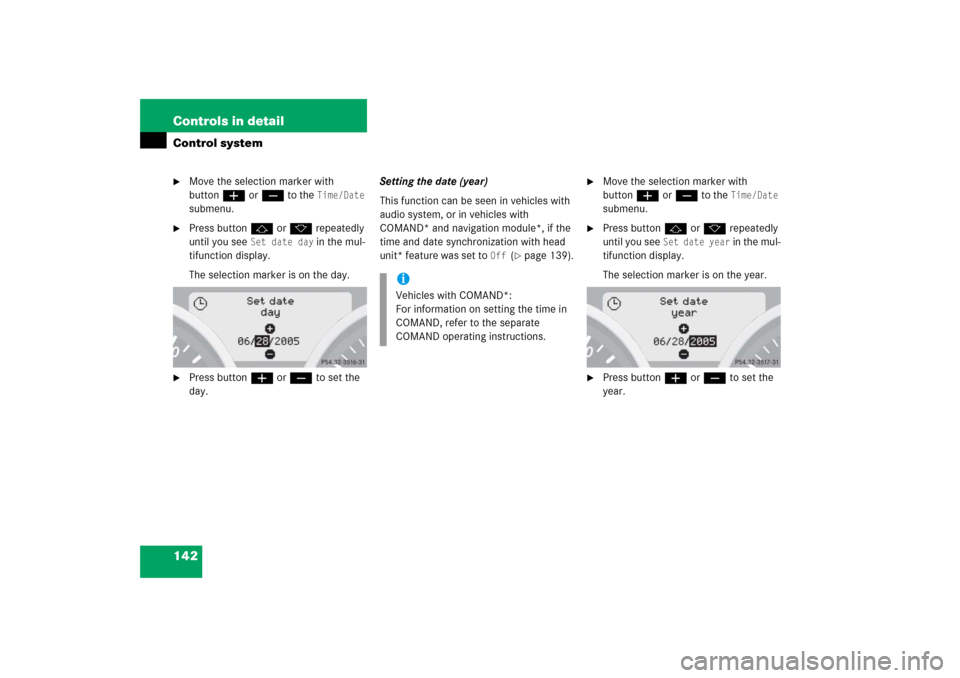
day.Setting the date (year)
This function can be seen in vehicles with
audio system, or in vehicles with
COMAND* and navigation module*, if the
time and date synchronization with head
unit* feature was set to
Off
(�page 139).
�
Move the selection marker with
buttonæorç to the
Time/Date
submenu.
�
Press buttonjork repeatedly
until you see
Set date year
in the mul-
tifunction display.
The selection marker is on the year.
�
Press buttonæorç to set the
year.
iVehicles with COMAND*:
For information on setting the time in
COMAND, refer to the separate
COMAND operating instructions.
Page 152 of 481
�
Press buttonèorÿ repeatedly
until you see the first function of the
trip computer menu.
�
Press buttonjork repeatedly
u")
151 Controls in detail
Control system
Calling up range (distance to empty)�
Press buttonèorÿ repeatedly
until you see the first function of the
trip computer menu.
�
Press buttonjork repeatedly
until you see
Range:
in the multifunc-
tion display.
In the multifunction display you will see
the calculated range based on the cur-
rent fuel tank level.
TEL menu*
You can use the functions in the
TEL
menu
to operate your telephone, provided it is
connected to a hands-free system and
switched on.
�
Switch on the telephone and Audio or
COMAND*.
See separate operating instructions.
�
Press buttonèorÿ repeatedly
until you see the
TEL
menu in the
multifunction display.
Warning!
G
A driver’s attention to the road must always
be his/her primary focus when driving. For
your safety and the safety of others, we rec-
ommend that you pull over to a safe location
and stop before placing or taking a tele-
phone call. If you choose to use the tele-
phone while driving, please use the
hands-free device and only use the tele-
phone when weather, road, and traffic con-
ditions permit.
Some jurisdictions prohibit the driver from
using a cellular telephone while driving a ve-
hicle.
Bear in mind that at a speed of just 30 mph
(approximately 50 km/h), your vehicle is
covering a distance of 44 feet
(approximately 14 m) every second.
Never operate radio transmitters equipped
with a built-in or attached antenna (i.e. with-
out being connected to an external antenna)
from inside the vehicle while the engine is
running. Doing so could lead to a malfunc-
tion of the vehicle’s electronic system, pos-
sibly resulting in an accident and/or
personal injury.
Page 153 of 481

152 Controls in detailControl systemWhich messages will appear in the multi-
function display depends on whether your
telephone is switched on or off:�
If the telephone is switched off, the
message in the multifunction display is: PHONE off
.
�
If the telephone is switched on:
The telephone will then search for a
network. During this time the multi-
function display is empty.
As soon as the telephone has found a
network,
Ready
is indicated in the mul-
tifunction display.
This standby message indicates that your
telephone is ready for use and you can op-
erate it using the control system.Answering a call
When your telephone is ready to receive
calls, you can answer a call at any time. In
the multifunction display you will see the
message:
Audio system
COMAND*�
Press buttons.
You have answered the call.
The duration of the call appears in the
multifunction display.Rejecting a call
If you do not wish to receive the call, you
can choose to reject it.
�
Press buttont.
You have rejected the call.
The caller receives a busy signal.
Ending a call
�
Press buttont.
You have ended the call.
The standby message appears in the
multifunction display.


This function can be seen in vehicles with
audio system, or in vehicles with
COMAND* and navigation module*, if the
time and date sync")