Page 225 of 481

224 Controls in detailAudio system�
Briefly press button2 for the empty
magazine slot that you would like to
use.
The light-emitting diode in the maga-
zine slot button flashes in green. INSERT CD
appears in the display along
with the slot number.
The flashing light indicates that the CD
changer is ready to receive a CD.
�
Insert an audio CD into CD loading
slot1 within 5 seconds, label side up.
The CD is pulled in and played.
�
Close the glove box.
Loading several CDs
�
Open the glove box.
�
Press button2 of an empty magazine
slot for more than 2 seconds.
The light-emitting diodes in all the mag-
azine slot buttons light up several
times in green, and
ALL LOAD
appears
in the display.
�
Wait until the light-emitting diode for
the first magazine slot flashes in green.
The flashing light indicates that the CD
changer is ready to receive a CD.
�
Insert an audio CD into CD loading
slot1 within 5 seconds, label side up.
The CD is pulled in and the light-emit-
ting diode in the magazine slot button
lights up in red. The magazine slot is
loaded.
The light-emitting diode in the next
available magazine slot button flashes
in green. The CD changer is ready to re-
ceive the next CD.
�
Repeat the previous step until all six
magazine slots are loaded.
Once all magazine slots are loaded, the
CD in the sixth magazine slot is played.
�
Close the glove box.iIf, for example, you only want to load
magazine slots 1 - 4 instead of all six,
simply do not insert a fifth CD into the
CD loading slot. The CD changer will
first try to load a CD but will then can-
cel the procedure, after which the radio
will play the fourth CD.
��
Page 226 of 481

225 Controls in detail
Audio system
Ejecting CDs
Ejecting single CDs�
Open the glove box.
�
Briefly press desired magazine slot but-
ton.
The light-emitting diode in the maga-
zine slot button flashes in red. The cor-
responding CD is ejected.
EJECTING CD
appears in the display along with the
magazine slot number.
�
Remove CD from CD loading slot within
15 seconds.
If after removing a single CD no other
CDs remain loaded in the magazine, MAG. EMPTY
appears in the display.
�
Close the glove box.Ejecting all loaded CDs
�
Open the glove box.
�
Press the button of a loaded magazine
slot for more than 2 seconds.
The light-emitting diodes in all maga-
zine slot buttons light up several times
in red, and
ALL EJECT
appears in the
display.
The CD changer ejects the CDs one af-
ter another.
The light-emitting diode for the maga-
zine slot being emptied flashes in red.
�
Take corresponding CD from CD load-
ing slot within 15 seconds.
The ejection procedure is finished once
you have removed all CDs from the CD
loading slot or if the CD changer can-
cels the procedure.
With all CDs removed from the maga-
zine,
MAG. EMPTY
appears in the
display.
iThe CD playback is interrupted while
one or more CDs are being ejected.
iIf you do not take the CD from the CD
loading slot within 15 seconds, the CD
changer will automatically pull the CD
back in. The system will then play the
CD.
If you are listening to a CD while eject-
ing another CD from the changer:
The Audio system stops playing the CD
while another CD is being ejected.
Once the CD has been ejected, the
Audio system will continue playing
where it left off.
��
Page 227 of 481

226 Controls in detailAudio system�
Close the glove box.Playing CDs
Single CD player in the audio unit
�
Pressi button.CD0
will appear in the upper left-hand
corner of the display.
The CD will resume playback at the point
where it was switched off.
CD changer*
�
Press Q button.CD and the selected magazine slot
number appear in the upper left-hand
corner of the display.
If you have not removed a CD since the last
time the CD audio source was activated,
the last CD listened to will begin to play at
the point where it was switched off.
After the last track on a CD has finished,
the next CD is automatically played.Playing tracks
You have the following options:
�
Audio system with CD changer*:
selecting CDs
�
Direct track entry
�
Track skip forward/reverse
�
Fast forward/reverse
�
Scan
�
Random tracks
�
Repeat track
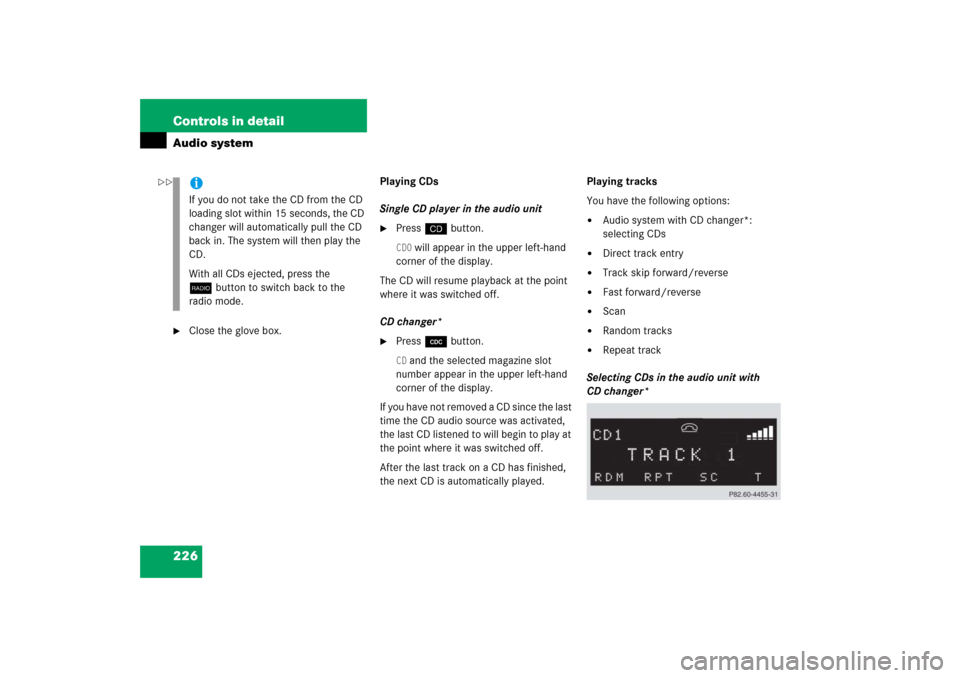
Selecting CDs in the audio unit with
CD changer*
iIf you do not take the CD from the CD
loading slot within 15 seconds, the CD
changer will automatically pull the CD
back in. The system will then play the
CD.
With all CDs ejected, press the
bbutton to switch back to the
radio mode.
��
Page 228 of 481

227 Controls in detail
Audio system
�
You can select from among the
inserted CDs with buttons
Rto6.
R = CD player in the audio unit
1to6 = CDs in the
CD changer*
The magazine slot number of the
selected CD appears next to
CD in the
display, and the number of the
currently played track appears next
to
TRACK
.Direct track entry
You can make a direct selection from
among the tracks on a CD.
�
Press * button.
�
Enter track number using buttons 1
to R.
The number of the track being played
appears next to
TRACK
in the display.
You can only enter available track
numbers.Skipping tracks forward/backward
�
Skipping tracks forward�
PressHbutton briefly.
The next track will be played.
�
Skipping tracks backward�
PressGbutton briefly.
If the track has been playing for
more than 10 seconds, the unit
skips back to the beginning of the
track currently playing. If less than
10 seconds have been played, the
unit skips back to the beginning of
the previous track.
Pressing theGorHbutton
repeatedly will result in multiple tracks
being skipped.
iIf there is no CD in the selected
magazine slot,
NO CD
appears in the
display with the corresponding slot
number.
Page 230 of 481
229 Controls in detail
Audio system
Pause function
The CD changer mode is interrupted by an
incoming call on the telephone*
(�page 235).
�
Switching on pause function�
PressFbutton.
The CD changer mode is
interrupted and
PAUSE
appears in
the display.
�
Switching off pause function�
PressFbutton.
The CD changer mode is active
again.Track and time display
�
Press
T soft key.
The number of the track being played
and the elapsed playing time appear in
the display.
�
Press
T soft key again.
The total number of tracks and the total
playing time of the CD appear in the
display.
�
Press
T soft key.
The standard CD playback menu
appears in the display.
GSM network phones
Using your Mercedes-Benz specified
mobile telephone*, a number of functions
and operating steps can be performed and
displayed in the audio system display.
Page 267 of 481

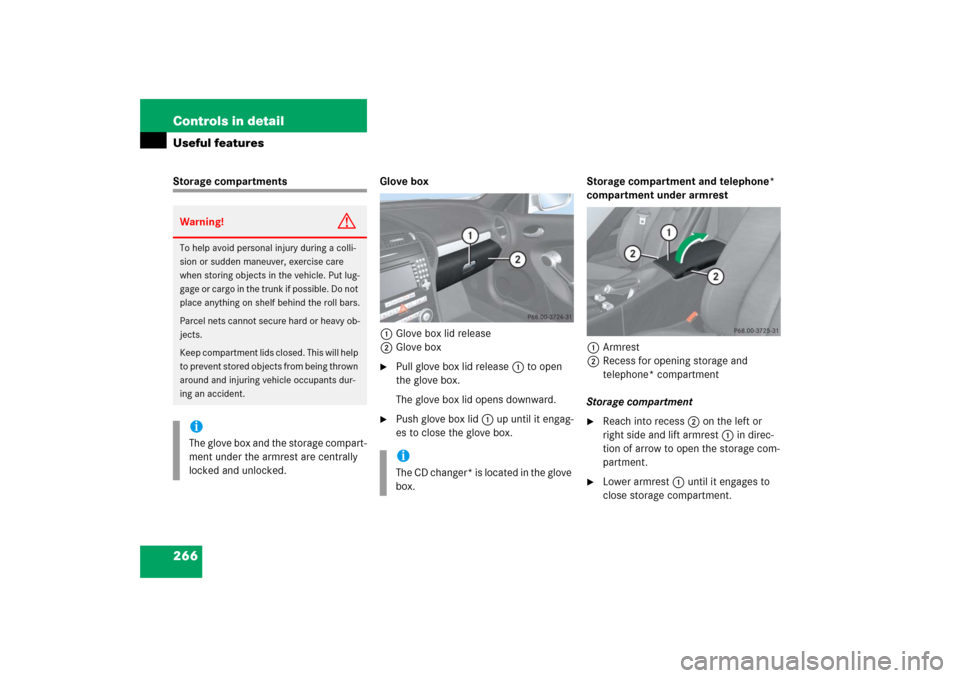
266 Controls in detailUseful featuresStorage compartments Glove box
1Glove box lid release
2Glove box
�
Pull glove box lid release1 to open
the glove box.
The glove box lid opens downward.
�
Push glove box lid1 up until it engag-
es to close the glove box.Storage compartment and telephone*
compartment under armrest
1Armrest
2Recess for opening storage and
telephone* compartment
Storage compartment
�
Reach into recess2 on the left or
right side and lift armrest1 in direc-
tion of arrow to open the storage com-
partment.
�
Lower armrest1 until it engages to
close storage compartment.
Warning!
G
To help avoid personal injury during a colli-
sion or sudden maneuver, exercise care
when storing objects in the vehicle. Put lug-
g a g e o r c a r g o i n t h e t r u n k i f p o s s i b l e . D o n o t
place anything on shelf behind the roll bars.
Parcel nets cannot secure hard or heavy ob-
jects.
Keep compartment lids closed. This will help
to prevent stored objects from being thrown
around and injuring vehicle occupants dur-
ing an accident.iThe glove box and the storage compart-
ment under the armrest are centrally
locked and unlocked.
iThe CD changer* is located in the glove
box.
Page 459 of 481

458 Technical termsCAN system
(C
ontroller A
rea N
etwork)
Data bus network serving to control ve-
hicle functions such as door locking or
windshield wiping.
Cockpit
All instruments, switches, buttons and
indicator/warning lamps in the passen-
ger compartment needed for vehicle
operation and monitoring.
Cold tire inflation pressure
(
�page 344)
Collapsible tire
An especially compact spare tire that
must be inflated with a provided air
pump before using. It should only be
used to bring the vehicle to the nearest
service station.COMAND*
(Co
ckpit Man
agement and
D
ata System)
Information and operating center for
vehicle sound and communications
systems, including the radio,
CD changer and navigation system, as
well as other optional equipment (e.g.
telephone).
Control system
The control system is used to call up
vehicle information and to change
component settings. Information and
messages appear in the multifunction
display. The driver uses the buttons on
the multifunction steering wheel to
navigate through the system and to ad-
just settings.
Cruise control
Driving convenience system for auto-
matically maintaining the vehicle speed
set by the driver.Curb weight
(
�page 344)
DOT
(Department o
f Transportation)
(
�page 344)
Engine number
The number set by the manufacturer
and placed on the cylinder block to
uniquely identify each engine pro-
duced.
Engine oil viscosity
Measurement for the inner friction (vis-
cosity) of the oil at different tempera-
tures. The higher the temperature an
oil can tolerate without becoming thin,
or the lower the temperature it can tol-
erate without becoming viscous, the
better the viscosity.
ESP®(Electronic S
tability Pr
ogram)
Improves vehicle handling and direc-
tional stability.
Page 466 of 481

465 Index
A
ABS 82, 457
Display message 370
Indicator lamp 362
Accessory weight 344
Accident 58
Adjusting (Getting started) 38
Air bags 65
BabySmart
TM
77, 457
Children 66
Front 70
Head-thorax 71, 459
Kneebag 70
Passenger front air bag off indicator
lamp 78
Safety guidelines 68
Air conditioning
Automatic climate control* 200
Climate control 187
Air conditioning refrigerant 451
Air pressure see Tire inflation pressure
AIRSCARF neck level heating*
(Seats) 105, 457
Alarm system see Anti-theft systems
Alignment bolt (Vehicle tool kit) 388,
415, 457Anticorrosion/antifreeze 454
Antilock brake system see ABS
Anti-theft systems 87
Alarm system 87
Immobilizer 87
Tow-away alarm 88
Ashtray 269
Aspect ratio 344
AUDIO menu (Control system) 129
Audio system 203
Audio and telephone*, operation 203
CD changer* 223
CD operation 219
Introduction to satellite radio*
(USA only) 214
MP3 220
Operating and display elements 204
Auto-dimming* for rear view mirrors 174
Automatic climate control*
Air conditioning 200
Automatic mode, basic setting 194
Control panel 192
Deactivating 194
Overview 190Automatic locking
Control system 147
When driving 101
Automatic shift program* 163
Automatic transmission* 157
Automatic transmission fluid
(ATF) 313
Driving 53
Emergency operation
(Limp Home Mode) 172
Fluid level 313
Gear ranges 160
Gear selector lever 157
Gear selector lever (Unlocking
manually) 396
Gear shifting malfunctions 172
Gearshift pattern 51
Kickdown 162
Manual shifting 164
One-touch gearshifting 164
Program mode selector switch 163