Page 26 of 481

25 At a glance
Instrument cluster
Item
Page
1
Multifunction display
with:Main odometer
128
Trip odometer
122
Automatic transmission*:
Gear range indicator
51,
158
Automatic transmission*:
Program mode
163,
169
Outside temperature
indicator (or actual speed
when selected)
138
2
Tachometer with:?
Engine malfunction
indicator lamp,
USA only
364
±
Engine malfunction
indicator lamp,
Canada only
364
Item
Page
<
Seat belt telltale
71,
366
A
High beam
headlamp indicator
lamp
55,
114
3
Fuel gauge with:4
Fuel reserve warning
lamp
365
The arrow indicates that the
fuel filler flap is on the rear
right-hand side.
304
4
Clock
122
5
Speedometer with:1
Supplemental
Restraint System
(SRS) indicator lamp
64,
366
-
Antilock Brake
System (ABS)
indicator lamp
82,
362
Item
Page
L
Left turn signal
indicator lamp
K
Right turn signal
indicator lamp
55
v
Electronic Stability
Program (ESP
®)
warning lamp
84,
365
;
Brake warning lamp,
USA only
59,
363
3
Brake warning lamp,
Canada only
363
6
Reset button
120
7
Knobs for instrument
cluster illumination
120
Page 102 of 481
101 Controls in detail
Locking and unlocking
Automatic central locking
The doors and the trunk automatically lock
when the ignition is switched on and the
wheels are turning at vehicle speeds of
approximately 9 mph (15 km/h).
You can open a locked door from the in-
side. Open door only when conditions are
safe to do so.
You can deactivate the automatic locking
using the control system, see “Setting
automatic locking” (
�page 147).
iIf the vehicle has previously been cen-
trally locked with the SmartKey, open-
ing the trunk from the inside will trigger
the anti-theft alarm system.
To cancel the alarm, do one of the fol-
lowing:�
Press buttonŒor‹ on the
SmartKey.
�
Insert the SmartKey in the starter
switch.
iThe doors unlock automatically after an
accident if the force of the impact ex-
ceeds a preset threshold.
To prevent the vehicle door locks from
locking, deactivate the automatic cen-
tral locking when the vehicle�
is pushed or towed
�
is on a test stand
Page 121 of 481
.
The multifunction display in the instrument
clu")
120 Controls in detailInstrument clusterA full view illustration of the instrument
cluster can be found in the “At a glance”
section (
�page 24).
The multifunction display in the instrument
cluster is activated when you
�
open a door
�
switch on exterior lighting
�
switch on ignition (
�page 36)
�
press reset buttonJ (
�page 24)
For information on changing the instru-
ment cluster settings, e.g. the language,
see “Instrument cluster submenu”
(
�page 137).
Instrument cluster illumination
Adjusting
The knobs for adjusting the instrument
cluster illumination are on the left side of
the instrument cluster (
�page 24).
1Brightening illumination (knob+)
2Dimming illumination (knob-)
3Reset buttonJ Brightening illumination
�
Press knob+ briefly.
The instrument cluster illumination
brightens.
Dimming illumination
�
Press knob- briefly.
The instrument cluster illumination
dims.
iOpening a door or pressing the reset
buttonJwithout switching on the ig-
nition or the exterior lighting activates
the multifunction display illumination
only for 30 seconds.
iThe instrument cluster illumination
automatically adjusts to the ambient
light.
You can only adjust the brightness of
the instrument cluster illumination
when it is dark outside.iWith the exterior lighting switched on,
the brightness of the switches in the
center console will be adjusted when
using knob+or-.
Page 123 of 481
122 Controls in detailInstrument clusterTrip odometer�
Make sure you are viewing the stan-
dard display menu (
�page 128).
�
Press and hold reset buttonJuntil
the trip odometer is reset.
Clock
Vehicles with COMAND*:
The clock in the instrument cluster can be
synchronized with the time set in
COMAND using the time synchronization
with head unit feature (
�page 139), or set
independently from COMAND using the
control system (
�page 139) with the time
synchronization with head unit feature set
to
Off
.
For setting the time in COMAND, see sep-
arate COMAND operating instructions.
For setting the time with audio system,
(
�page 139).
Page 131 of 481
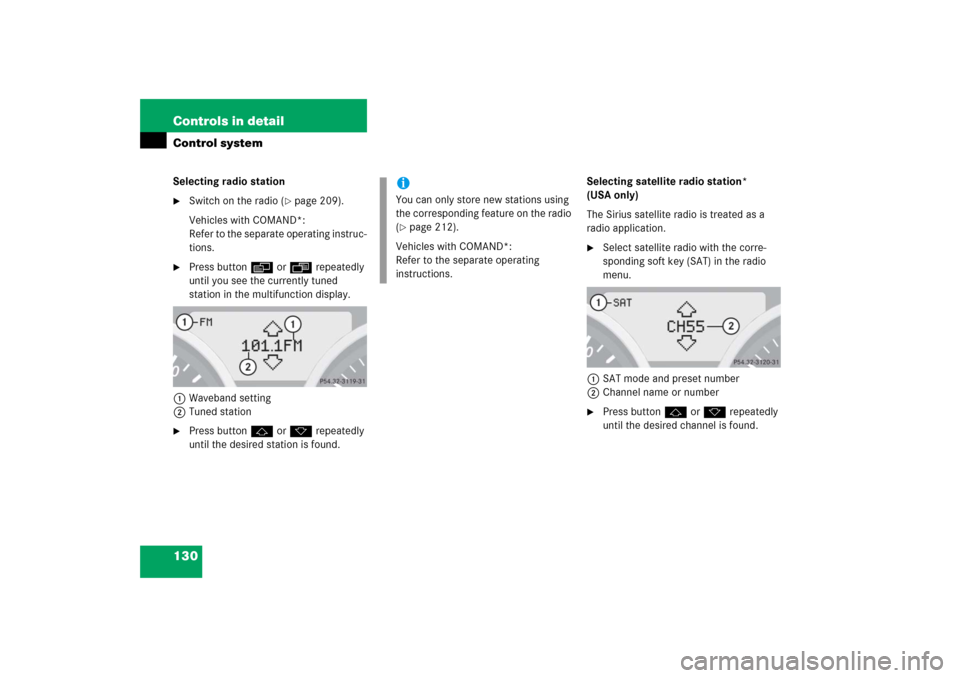
130 Controls in detailControl systemSelecting radio station�
Switch on the radio (
�page 209).
Vehicles with COMAND*:
Refer to the separate operating instruc-
tions.
�
Press buttonèorÿ repeatedly
until you see the currently tuned
station in the multifunction display.
1Waveband setting
2Tuned station
�
Press buttonjork repeatedly
until the desired station is found.Selecting satellite radio station*
(USA only)
The Sirius satellite radio is treated as a
radio application.
�
Select satellite radio with the corre-
sponding soft key (SAT) in the radio
menu.
1SAT mode and preset number
2Channel name or number
�
Press buttonjork repeatedly
until the desired channel is found.
iYou can only store new stations using
the corresponding feature on the radio
(�page 212).
Vehicles with COMAND*:
Refer to the separate operating
instructions.
Page 135 of 481

134 Controls in detailControl systemSettings menu
In the
Settings...
menu are two func-
tions:
�
The function
To reset: Press reset
button for 3 seconds
for resetting all
settings to factory standard.
�
A collection of submenus for perform-
ing individual settings for your vehicle.
�
Press buttonèorÿ repeatedly
until the
Settings...
menu appears in
the multifunction display.The following settings and submenus are
available in the
Settings...
menu:Resetting all settings
You can reset all the functions of all sub-
menus to the factory settings.
�
Press the reset buttonJon the instru-
ment cluster (
�page 24) for approxi-
mately 3 seconds.
The request to press the reset
buttonJonce more to confirm ap-
pears in the multifunction display.
�
Press the reset buttonJagain.
The functions of all submenus will be
reset to the factory settings.
The message
Reset to factory
settings
appears in the multifunction
display.
Function
Page
Resetting all settings
134
Submenus in the Settings menu
135
Instrument cluster submenu
137
Time/date submenu
137
Lighting submenu
143
Vehicle submenu
147
Convenience submenu
147
Page 136 of 481

135 Controls in detail
Control system
Submenus in the Settings menu�
Press buttonj.
In the multifunction display you see the
collection of the submenus.
�
Press buttonç.
The selection marker moves to the next
submenu.The submenus are arranged by hierarchy.
Scroll up with buttonæ, and scroll
down with buttonç.
With the selection marker on the desired
submenu, use thejbutton to access
the individual functions within that sub-
menu. Once within the submenu, you can
use the jbutton to move to the next
function or the kbutton to move to the
previous function within that submenu.
The settings themselves are made with
buttonæorç.
iFor safety reasons, the following func-
tion cannot be reset while driving:�
the function
Lamp circuit head-
lamp mode in the
Lighting
sub-
menu
The following message appears in the
multifunction display:
Lighting Cannot be completely re-
set to factory settings while driv-
ing
.
iYour individual settings will not be re-
set unless you confirm the action by
pressing the reset buttonJagain.
After 5 seconds the
Settings...
menu
reappears in the multifunction display.
Page 141 of 481

140 Controls in detailControl system�
Move the selection marker with
buttonæorç to the
Time/Date
submenu.
�
Press buttonjork repeatedly
until you see
Clock, hours
in the mul-
tifunction display.
The selection marker is on the hours.
�
Press buttonæorç to set the
correct hours displayed in the multi-
function display.
�
Press reset buttonJto confirm the
set hours.Setting the time (minutes)
This function can be seen in vehicles with
audio system, or in vehicles with
COMAND* and navigation module*, if the
time and date synchronization with head
unit* feature was set to
Off
(�page 139).
�
Move the selection marker with
buttonæorç to the
Time/Date
submenu.
�
Press buttonjork repeatedly
until you see
Clock, minutes
in the
multifunction display.
The selection marker is on the minutes.
�
Press buttonæorç to set the
correct minutes displayed in the multi-
function display.
�
Press reset buttonJto confirm the
set minutes.
iVehicles with COMAND*:
For information on setting the time in
COMAND, refer to the separate
COMAND operating instructions.