Page 118 of 481

117 Controls in detail
Lighting
Hazard warning flasher
The hazard warning flasher can be
switched on at all times, even with the
SmartKey removed from the starter
switch.
The hazard warning flasher switches on au-
tomatically when an air bag deploys.
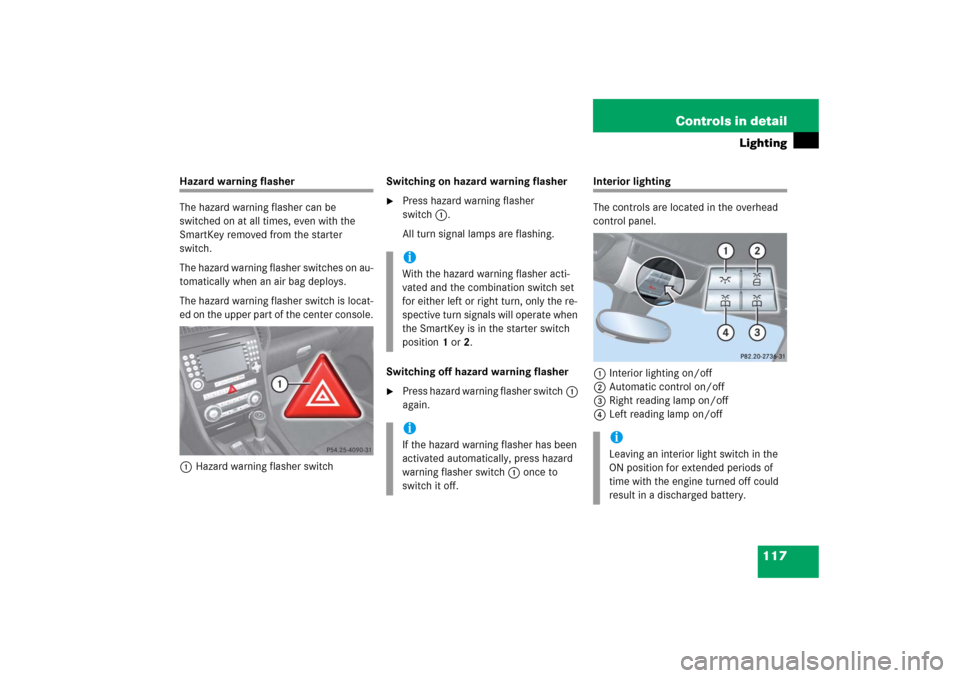
The hazard warning flasher switch is locat-
ed on the upper part of the center console.
1Hazard warning flasher switchSwitching on hazard warning flasher
�
Press hazard warning flasher
switch1.
All turn signal lamps are flashing.
Switching off hazard warning flasher
�
Press hazard warning flasher switch1
again.
Interior lighting
The controls are located in the overhead
control panel.
1Interior lighting on/off
2Automatic control on/off
3Right reading lamp on/off
4Left reading lamp on/off
iWith the hazard warning flasher acti-
vated and the combination switch set
for either left or right turn, only the re-
spective turn signals will operate when
the SmartKey is in the starter switch
position1or2.iIf the hazard warning flasher has been
activated automatically, press hazard
warning flasher switch1 once to
switch it off.
iLeaving an interior light switch in the
ON position for extended periods of
time with the engine turned off could
result in a discharged battery.
Page 119 of 481

118 Controls in detailLightingAutomatic control
Activating�
Press automatic control switch2 until
it is flush to the other switches.
The interior lighting switches on in
darkness, when you�
unlock the vehicle
�
remove the SmartKey from the
starter switch
�
open a door
The interior lighting switches off automati-
cally following a preset time delay.
For more information, see “Interior lighting
delayed shut-off” (
�page 146).Deactivating
�
Press automatic control switch2 until
it engages at a deeper position than the
other switches.
The interior lighting remains switched
off in darkness, even when you�
unlock the vehicle
�
remove the SmartKey from the
starter switch
�
open a doorManual control
Interior lighting
�
Press interior lighting switch1.
The interior lighting switches on.
�
Press interior lighting switch1 again.
The interior lighting switches off.
iIf the door remains open, the interior
lighting switches off automatically after
approximately 5 minutes when the
SmartKey is in starter switch position0
or removed.
iWhen you open the trunk, the trunk
lighting switches on automatically.
If the trunk lid remains open, the trunk
lighting switches off automatically after
approximately 10 minutes.
iThe footwell lighting* is switched on
and off simultaneously with the manual
control.
Page 123 of 481
122 Controls in detailInstrument clusterTrip odometer�
Make sure you are viewing the stan-
dard display menu (
�page 128).
�
Press and hold reset buttonJuntil
the trip odometer is reset.
Clock
Vehicles with COMAND*:
The clock in the instrument cluster can be
synchronized with the time set in
COMAND using the time synchronization
with head unit feature (
�page 139), or set
independently from COMAND using the
control system (
�page 139) with the time
synchronization with head unit feature set
to
Off
.
For setting the time in COMAND, see sep-
arate COMAND operating instructions.
For setting the time with audio system,
(
�page 139).
Page 128 of 481

127 Controls in detail
Control system
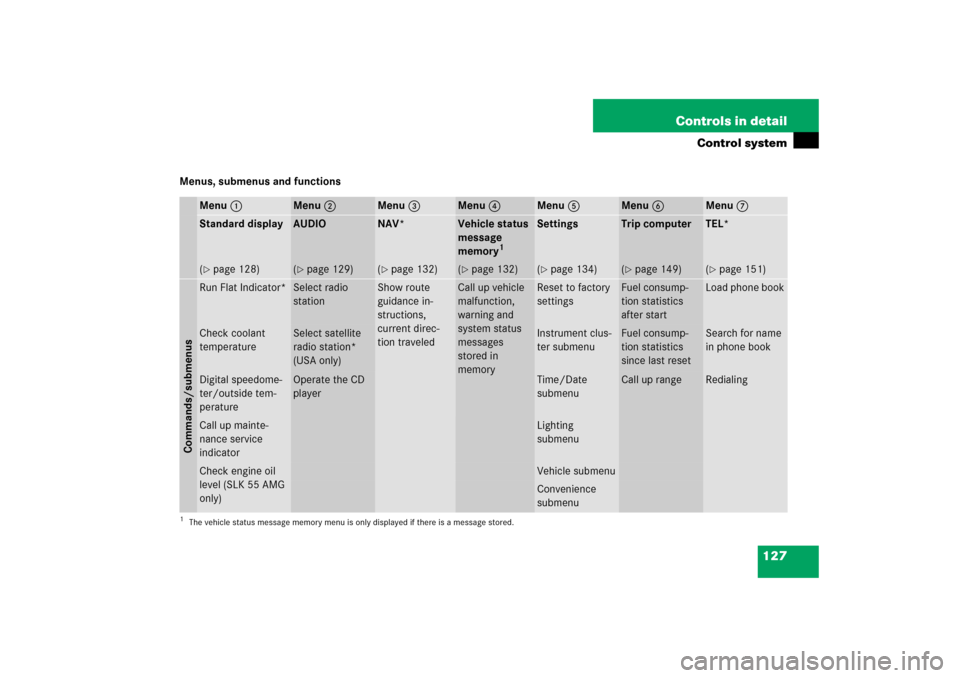
Menus, submenus and functions
Menu1
Menu2
Menu3
Menu4
Menu5
Menu6
Menu7
Standard display
AUDIO
NAV*
Vehicle status
message
memory
1
Settings
Trip computer
TEL*
(�page 128)
(�page 129)
(�page 132)
(�page 132)
(�page 134)
(�page 149)
(�page 151)
Commands/submenusRun Flat Indicator*
Select radio
station
Show route
guidance in-
structions,
current direc-
tion traveled
Call up vehicle
malfunction,
warning and
system status
messages
stored in
memory
Reset to factory
settings
Fuel consump-
tion statistics
after start
Load phone book
Check coolant
temperature
Select satellite
radio station*
(USA only)
Instrument clus-
ter submenu
Fuel consump-
tion statistics
since last reset
Search for name
in phone book
Digital speedome-
ter/outside tem-
perature
Operate the CD
player
Time/Date
submenu
Call up range
Redialing
Call up mainte-
nance service
indicator
Lighting
submenu
Check engine oil
level (SLK 55 AMG
only)
Vehicle submenuConvenience
submenu
1The vehicle status message memory menu is only displayed if there is a message stored.
Page 135 of 481

134 Controls in detailControl systemSettings menu
In the
Settings...
menu are two func-
tions:
�
The function
To reset: Press reset
button for 3 seconds
for resetting all
settings to factory standard.
�
A collection of submenus for perform-
ing individual settings for your vehicle.
�
Press buttonèorÿ repeatedly
until the
Settings...
menu appears in
the multifunction display.The following settings and submenus are
available in the
Settings...
menu:Resetting all settings
You can reset all the functions of all sub-
menus to the factory settings.
�
Press the reset buttonJon the instru-
ment cluster (
�page 24) for approxi-
mately 3 seconds.
The request to press the reset
buttonJonce more to confirm ap-
pears in the multifunction display.
�
Press the reset buttonJagain.
The functions of all submenus will be
reset to the factory settings.
The message
Reset to factory
settings
appears in the multifunction
display.
Function
Page
Resetting all settings
134
Submenus in the Settings menu
135
Instrument cluster submenu
137
Time/date submenu
137
Lighting submenu
143
Vehicle submenu
147
Convenience submenu
147
Page 137 of 481
136 Controls in detailControl systemThe table below shows what settings can
be changed within the various submenus.Detailed instructions on making individual
settings can be found on the following
pages.Instrument cluster
Time/Date
Lighting
Vehicle
Convenience*
(�page 137)
(�page 139)
(�page 143)
(�page 147)
(�page 147)
Selecting digital speed-
ometer display mode
Time synchronization
with head unit*
Daytime running lamp
mode (USA only)
Setting automatic locking
Activating
easy-entry/exit feature*
Selecting language
Setting the time (hours)
Locator lighting
Setting parking position
for exterior rear view
mirror*
Selecting display (speed
display or outside
temperature) for status
indicator
Setting the time
(minutes)
Night security
illumination
Setting the date (month)
Interior lighting delayed
shut-off
Setting the date (day)Setting the date (year)
Page 140 of 481

139 Controls in detail
Control system
Time/Date submenu
Access the
Time/Date
submenu via the
Settings...
menu. Use the
Time/Date
submenu to change the instrument cluster
display settings.
The following functions are available:Time and date synchronization with
head unit*
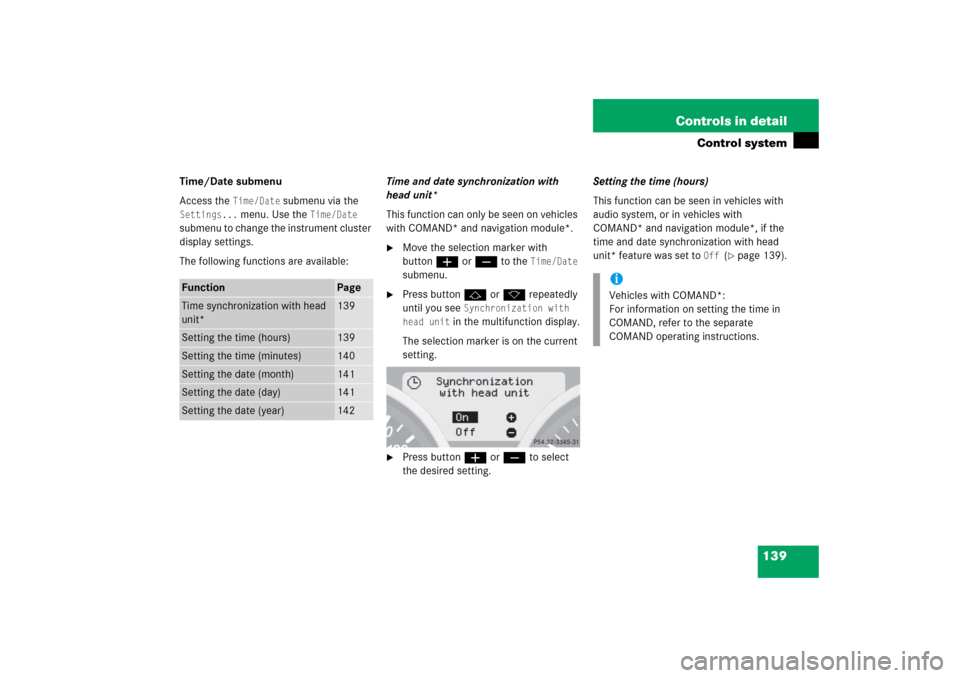
This function can only be seen on vehicles
with COMAND* and navigation module*.
�
Move the selection marker with
buttonæorç to the
Time/Date
submenu.
�
Press buttonjork repeatedly
until you see
Synchronization with
head unit
in the multifunction display.
The selection marker is on the current
setting.
�
Press buttonæorç to select
the desired setting.Setting the time (hours)
This function can be seen in vehicles with
audio system, or in vehicles with
COMAND* and navigation module*, if the
time and date synchronization with head
unit* feature was set to
Off
(�page 139).
Function
Page
Time synchronization with head
unit*
139
Setting the time (hours)
139
Setting the time (minutes)
140
Setting the date (month)
141
Setting the date (day)
141
Setting the date (year)
142
iVehicles with COMAND*:
For information on setting the time in
COMAND, refer to the separate
COMAND operating instructions.
Page 141 of 481

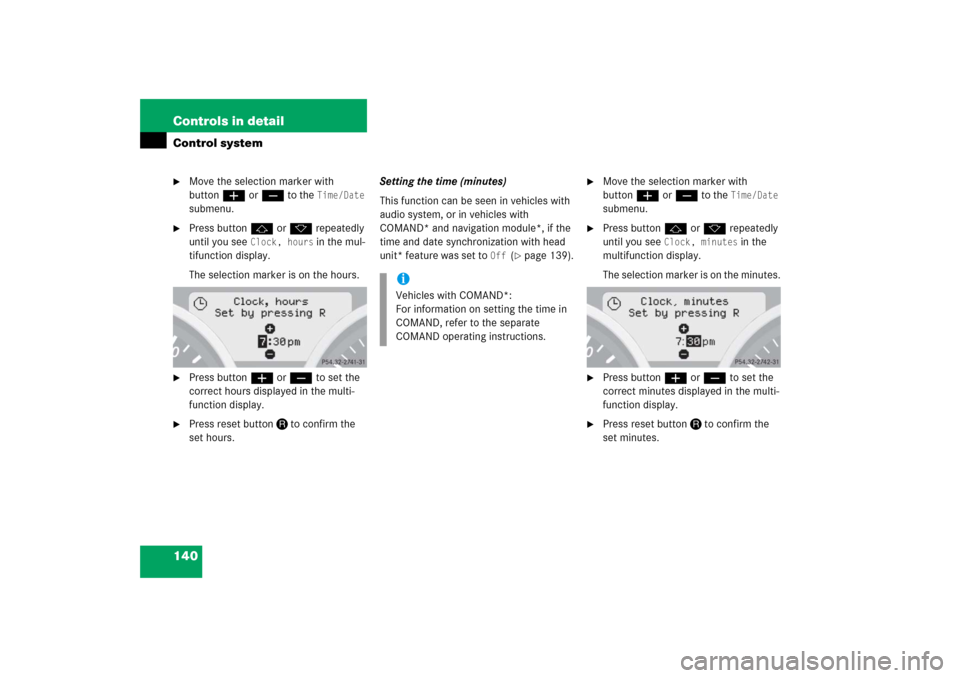
140 Controls in detailControl system�
Move the selection marker with
buttonæorç to the
Time/Date
submenu.
�
Press buttonjork repeatedly
until you see
Clock, hours
in the mul-
tifunction display.
The selection marker is on the hours.
�
Press buttonæorç to set the
correct hours displayed in the multi-
function display.
�
Press reset buttonJto confirm the
set hours.Setting the time (minutes)
This function can be seen in vehicles with
audio system, or in vehicles with
COMAND* and navigation module*, if the
time and date synchronization with head
unit* feature was set to
Off
(�page 139).
�
Move the selection marker with
buttonæorç to the
Time/Date
submenu.
�
Press buttonjork repeatedly
until you see
Clock, minutes
in the
multifunction display.
The selection marker is on the minutes.
�
Press buttonæorç to set the
correct minutes displayed in the multi-
function display.
�
Press reset buttonJto confirm the
set minutes.
iVehicles with COMAND*:
For information on setting the time in
COMAND, refer to the separate
COMAND operating instructions.