Page 32 of 481
31 At a glance
Door control panel
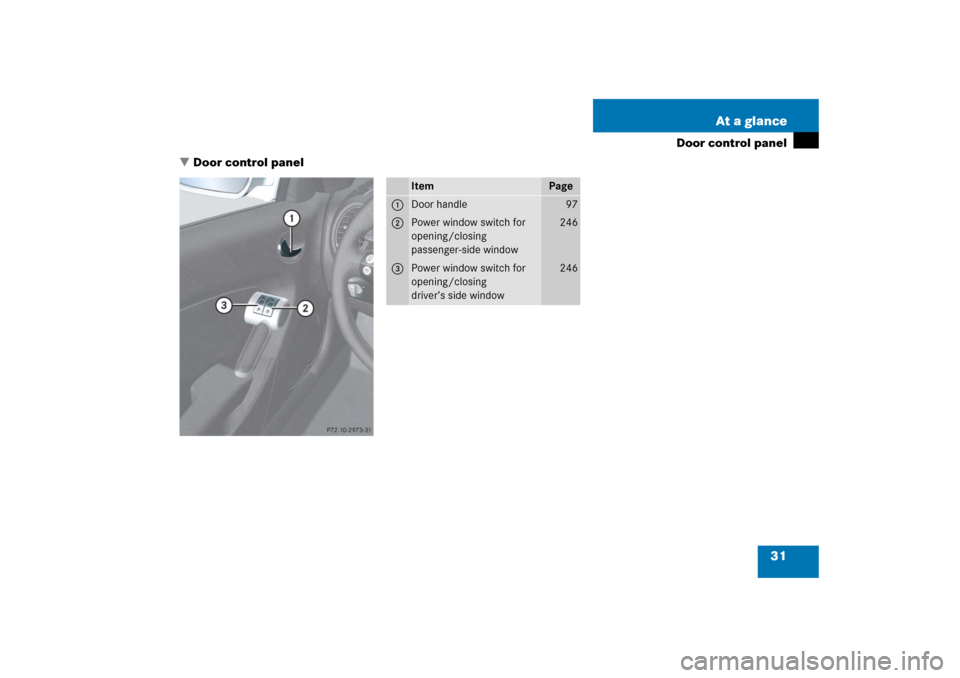
�Door control panel
Item
Page
1
Door handle
97
2
Power window switch for
opening/closing
passenger-side window
246
3
Power window switch for
opening/closing
driver’s side window
246
Page 35 of 481
34 Getting startedThe “Getting started” section provides an
overview of the vehicle’s most basic func-
tions. First-time Mercedes-Benz owners
should pay special attention to the infor-
mation given here.
If you are already familiar with the basic
functions described here, the “Controls in
detail” section (
�page 91) will provide you
with further information. The correspond-
ing page references are located at the end
of each segment.
Unlocking
Unlocking with the SmartKeySmartKey with remote control1‹Lock button
2ŠUnlock button for trunk lid
3ŒUnlock button
4ÂPanic button (
�page 80)
�
Press unlock buttonΠon the
SmartKey.
All turn signal lamps flash once. The
locking knobs in the doors move up.
The anti-theft alarm system is dis-
armed.
�
Get in the vehicle and insert the
SmartKey in the starter switch.
Page 36 of 481
35 Getting started
Unlocking
For more information, see “Locking and
unlocking” (
�page 92).
iOpening a door causes the windows on
that side of the car to open slightly.
They will return to the up position when
the door is closed.
!The side windows will not open or close
if the battery is discharged or the win-
dows are covered with ice. As a result,
you may no longer be able to properly
close the door. Do not attempt to force
the door shut. Doing so may damage
the door or the side window. Correct
the condition that prevents the
windows from operating before
attempting to close the door.
iWithout the antenna on the left rear
side of the vehicle installed, the
SmartKey signaling range is consider-
ably reduced. Hold the SmartKey in
close proximity towards the antenna
base when locking or unlocking the
vehicle.
Page 37 of 481

36 Getting startedUnlockingStarter switch positions SmartKey
Starter switch0For removing the SmartKey
The steering is locked when the
SmartKey is removed from the starter
switch.
1Power supply for some electrical con-
sumers, such as seat adjustment.2Ignition (power supply for all electrical
consumers) and driving position.
All lamps (except high beam headlamp
indicator lamp and turn signal indicator
lamps unless activated) in the instru-
ment cluster come on. If a lamp in the
instrument cluster fails to come on
when the ignition is switched on, have
it checked and replaced if necessary.
If a lamp in the instrument cluster re-
mains on after starting the engine or
comes on while driving, refer to see
“Lamps in instrument cluster”
(
�page 362).
3Starting position.
Warning!
G
When leaving the vehicle, always remove the
SmartKey from the starter switch, take it
with you, and lock the vehicle. Do not leave
children unattended in the vehicle, or with
access to an unlocked vehicle. Unsuper-
vised use of vehicle equipment may cause
an accident and/or serious personal injury.
Page 38 of 481
.
iWhen you switch on ignition, the indi-
cator and warning lamps (except high
beam headlamp indicator lamp and
tu")
37 Getting started
Unlocking
For information on starting the engine, see
(�page 50).
iWhen you switch on ignition, the indi-
cator and warning lamps (except high
beam headlamp indicator lamp and
turn signal indicator lamps unless acti-
vated) in the instrument cluster come
on. The indicator and warning lamps
(except high beam headlamp indicator
lamp and turn signal indicator lamps if
activated) will go out when the engine
is running. This indicates that the re-
spective systems are operational.iVehicles with automatic transmission*:
The SmartKey can only be removed
from the starter switch with the gear
selector lever in positionP.
!If the SmartKey cannot be turned in the
starter switch, the vehicle battery may
not be sufficiently charged.�
Check the vehicle battery and
charge it if necessary (
�page 421).
�
Get a jump start (
�page 424).
To prevent accelerated vehicle battery
discharge or a completely discharged
vehicle battery, always remove the
SmartKey from the starter switch when
the engine is not in operation.
Page 39 of 481
.Warning!
G
All")
38 Getting startedAdjustingSeats
The seats can be adjusted either manually
or electrically, depending on the vehicle’s
equipment.
For more information, see “Seats”
(�page 104).Warning!
G
All seat, head restraint, steering wheel, and
rear view mirror adjustments, as well as fas-
tening of seat belts, must be done before
the vehicle is put into motion.
Warning!
G
Do not adjust the driver seat while driving.
Adjusting the seat while driving could cause
the driver to lose control of the vehicle.
Never ride in a moving vehicle with the seat
back in an excessively reclined position as
this can be dangerous. You could slide un-
der the seat belt in a collision. If you slide
under it, the belt would apply force at the ab-
domen or neck. That could cause serious or
fatal injuries. The seat back and seat belts
provide the best restraint when the wearer
is in a nearly upright position and belts are
properly positioned on the body. Your seat
must be adjusted so that you can correctly
fasten your seat belt (
�page 47).
Never place hands under the seat or near
moving parts while the seat is being
adjusted.
Warning!
G
When leaving the vehicle, always remove the
SmartKey from the starter switch, take it
with you, and lock the vehicle.
Even with the SmartKey removed from the
starter switch, the power seats* can be op-
erated when the respective door is open.
Therefore, do not leave children unattended
in the vehicle, or with access to an unlocked
vehicle. Unsupervised use of vehicle equip-
ment may cause an accident and/or serious
personal injury.
Page 41 of 481

40 Getting startedAdjustingSeat height�
Pull or push handle2 up or down and
adjust the seat height until your legs
are slightly supported.
Backrest tilt
�
Pull handle3 and adjust the backrest
until your arms are slightly angled
when holding the steering wheel.
�
Release handle3 when the desired
backrest tilt is reached.
When you hear an audible click, the
backrest is again fixed into place.
For more information, see “Seats”
(
�page 104).Power seat* adjustment
The seat adjustment switches are located
on the outer side of each seat.
1Seat fore and aft adjustment
2Seat height
3Backrest tilt
4Seat cushion tilt
�
Switch on the ignition (
�page 36).
or
�
Open the respective door.Seat fore and aft adjustment
�
Press the horizontal switch forward or
backward in direction of arrow1.
Adjust seat to a comfortable seating
position that still allows you to reach
the accelerator / brake pedal safely.
The position should be as far rearward
as possible, consistent with ability to
properly operate controls.
Seat height
�
Press the horizontal switch up or down
in direction of arrow2 and adjust the
seat height until your legs are slightly
supported.iThe memory function* (
�page 107)
lets you store the settings for power
seats*, steering wheel adjustment
(electrical)*, and exterior rear view
mirrors.
Page 44 of 481
.
1Adjusting steering column")
43 Getting started
Adjusting
Steering wheel adjustment, electrical*
The lever for the electrical steering wheel
adjustment is located on the steering col-
umn (lower left).
1Adjusting steering column, in or out
2Adjusting steering column, up or down�
Switch on the ignition (
�page 36).
or
�
Open the driver’s door.Adjusting steering column in or out
�
Move the lever in direction of
arrows1 until a comfortable steering
wheel position is reached with your
arms slightly bent at the elbow.
Adjusting steering column up or down
�
Move the lever in direction of
arrows2.
Make sure your legs can move freely
and all the displays (including malfunc-
tion and indicator lamps) on the instru-
ment cluster are clearly visible.Easy-entry/exit feature*
This feature allows for easier entry into and
exit from the vehicle.
The easy-entry/exit feature can be activat-
ed or deactivated in the
Convenience
submenu of the control system
(
�page 147).
iThe memory function* (
�page 107)
lets you store the settings for the steer-
ing wheel together with the settings for
the exterior rear view mirrors and the
driver’s seat position.